Table of Contents
Advertisement
Available languages
Available languages
Quick Links
Advertisement
Table of Contents

Related Manuals for Comelit G115K


Summary of Contents for Comelit G115K
- Page 1 KIT G115K...
-
Page 2: Importanti Informazioni Di Sicurezza
Importanti informazioni di sicurezza ATTENZIONE 1. Leggere attentamente queste istruzioni prima di installare e utilizzare il prodotto. 2. Non tagliare il cavo di alimentazione per estenderlo; il dispositivo (trasformatore) non funzionerà con un cavo più lungo. Non collegare l’apparecchio prima di aver completato il cablaggio. Installazione in sicurezza 1. - Page 3 Introduzione alle icone 1 Microfono 4 Pulsante destro/Impostazi- 7 Pulsante di chiamata interna 2 Tasto MENU one del tono della campana 8 Pulsante di sblocco 3 Tasto sinistro/Regola il 5 Pulsante Mute 9 Pulsante di sblocco volume della suoneria 6 LED indicatore Mute 10 Pulsante Interfono/Monitor Dipende dall’altezza dell’utente...
-
Page 4: Installazione
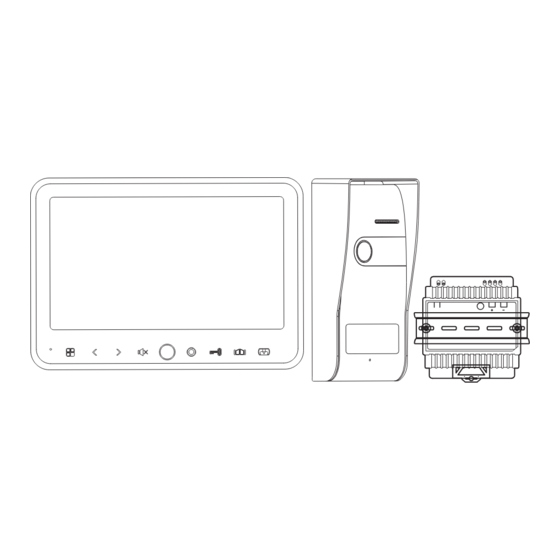
Funzioni principali del posto esterno Tettuccio parapioggia Speaker Telecamera LED infrarossi Pulsante di chiamata Microfono Resistenza fotosensibile Sblocco impostazioni Installazione Quando si installa il posto esterno, assicurarsi che sia collocato in un luogo asciutto. È importante che il posto esterno e i componenti elettronici non si bagnino. - Page 5 Funzioni principali dell’alimentatore AC IN 100~240V~50/60Hz DC OUT 15V/2A Installazione...
- Page 6 Cablaggio Monitor Posto Esterno DC 15V Serratura (non inclusa) 2 fili 2 fili 2 fili Serratura (non inclusa) 2 fili Alim. G116V DC 15V G116A Monitor aggiuntivo Red Black Red Black Monitor aggiuntivo Lock Lock Black Posto Esterno...
- Page 7 Impostazioni Durante la modalità standby, premere prima il pulsante e poi il pulsante per visualizzare il menu principale. Premere il pulsante per spostarsi a un’altra impostazione. Il relativo sottomenu sarà evidenziato. Premere i pulsanti per regolare l’ipostazione al valore desiderato. Cancella foto Regolazione della luminosità...
- Page 8 Operazioni 1. Chiamata: Quando un visitatore preme il pulsante di chiamata del pannello esterno, il monitor emette un suono. Premere il pulsante per rispondere e parlare con la persona all’esterno, 2. Autoaccensione: In stato di standby, premere il pulsante e sullo schermo viene visualizzata l’immagine ripresa dal posto esterno.
-
Page 9: Specifiche Tecniche
Specifiche tecniche Monitor Dimensioni schermo 7” Configurazione del colore R.G.B.delta Systema Video PAL/NTSC Pixel effettivi 800X3(RGB)X480 Consumo di corrente 310~ 330mA Temperatura di funzionamento -10°C ~ +50°C Umidità di funzionamento 85%(Max) Tensione di alimentazione DC 15V 1A Posto esterno Tipo di sensore 1/3”... -
Page 10: Operation Safety
lmportant Safety lnformation WARNING 1. Please read these instructions carefully before installing and using the product. 2. Do not cut the power supply cable to extend it; the device (transformer) will not work with a longer cable. Do not plug in the device until all the wiring has been finished. lnstallation Safety 1. -
Page 11: Icon Introduction
Icon Introduction 1 Microphone 4 Right Button/ 7 Internal call button 2 MENU Button Setting the bell tone 8 Unlock button 3 Left Button/ 5 Mute Button 9 Unlock button Adjust the ring volume 6 Mute indicator LED 10 Intercom/Monitor Button Depend on user’s height 1. - Page 12 The key function of outdoor-camera Rain cover Speaker Camera lens Infrared LED Call Button Microphone Photosensitive resistor Unlock setting lnstallation When install the camera, ensure that it is located in dry place. It is important that the camera or the electronics do not get wet.
- Page 13 The key function of power supply AC IN 100~240V~50/60Hz DC OUT 15V/2A lnstallation...
-
Page 14: Cable Connections
Cable connections Indoor-monitor Outdoor-camera DC 15V Lock (excluded) 2 wire 2 wire 2 wire Lock (excluded) 2 wire Power G116V DC 15V G116A Indoor-monitor Extension Red Black Red Black Indoor-monitor Extension Lock Lock Black Outdoor-camera... -
Page 15: Function Settings
Function settings During standby mode, press the button firstly, then Press button, will pop up the main menu. Press button to move another setting. And the relevant submenu will be in highlight. Press button to adjust it DELETE photo BRIGHTNESS adjustment It will delete all the photo in the memory. -
Page 16: Operation
Operation 1. lntercom: When a visitor press the call button of outdoor panel, The monitor will give a sound. Press the button, to answer and talk to the person outside, 2. Monitor: Under the standby status, Press the button, The screen firstly displays the picture of the outdoor panell. -
Page 17: Specifications
Specifications Indoor-monitor Screen size 7"(Diagonal) inch Color Configuration R.G.B.delta Video System PAL/NTSC Effective Pixels 800X3(RGB)X480 Consumption Current 310~ 330mA Operation Temperature -10°C ~ +50°C Operation Humidity 85%(Max) Supply Voltage DC 15V 1A Outdoor-camera Imaging Sensor Type 1/3” View Angle about 100° Minimum Illumination 0Lux Night vision distance...