Table of Contents
Advertisement
Available languages
Available languages
Quick Links
Advertisement
Table of Contents

Related Manuals for Comelit 7 Plus


Summary of Contents for Comelit 7 Plus
- Page 1 Kit Vidéo 7 Plus art. G115KFR0 & G115KFR1...
-
Page 2: Informations De Sécurité Importantes
Informations de sécurité importantes ATTENTION 1. Lisez attentivement ces instructions avant d’installer et d’utiliser le produit. 2. Ne pas couper le câble d’alimentation pour le rallonger ; le dispositif (transformateur) ne fonctionnera pas avec un câble plus long. Ne pas brancher l’appareil avant d’avoir terminé le câblage. Installation sécurisée 1. -
Page 3: Présentation Des Icônes
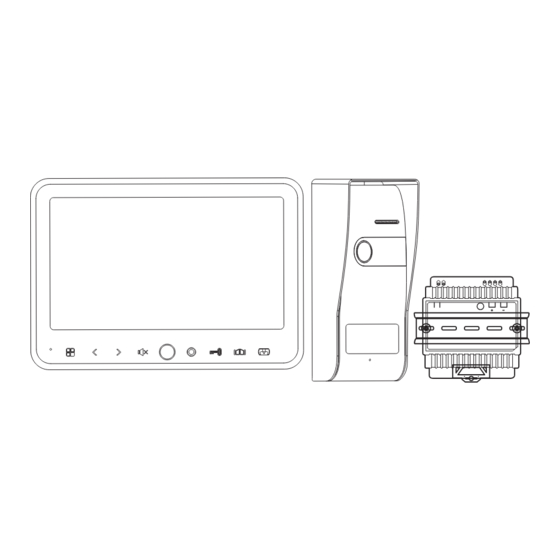
Présentation des icônes 1 Microphone 4 Bouton droit/Réglage de la 7 Bouton d’appel interne 2 Bouton MENU tonalité de la sonnerie 8 Bouton de déverrouillage 3 Bouton gauche/Réglage 5 Bouton de sourdine 9 Bouton de déverrouillage du volume de la sonnerie 6 Indicateur LED de sourdine 10 Bouton Interphone/Moniteur Dépend de la hauteur de... -
Page 4: Installation
Fonctions principales de la platine extérieure Visière anti-pluie Haut-parleur Caméra LED infrarouge Bouton d’appel Microphone Résistance photosensible Déverrouillage des réglages Installation Lors de l’installation de la platine extérieure, veillez à ce qu’elle soit placée dans un endroit sec. Il est important que la platine et les composants électroniques ne soient pas mouillés. - Page 5 Principales fonctions de l’alimentation AC IN 100~240V~50/60Hz DC OUT 15V/2A Installation...
- Page 6 Câblage Moniteur Platine extérieure DC 15V Serrure (non incluse) 2 fils 2 fils 2 fils Serrure (non incluse) 2 fils Alim. G116VFR1 DC 15V G116AFR1 Moniteur additionnel Rouge Noir Rouge Noir Moniteur additionnel Serrure Rouge Serrure Noir Platine extérieure...
- Page 7 Paramètres En mode veille, appuyez d’abord sur la touche et ensuite le bouton pour afficher le menu principal. Appuyez sur le bouton pour passer à un autre réglage. Le sous-menu correspondant est mis en surbrillance. Appuyez sur le bouton pour ajuster le réglage à la valeur souhaitée. Supprimer les photos Réglage de la luminosité...
-
Page 8: Note Importante
Opérations 1. Appel : Lorsqu’un visiteur appuie sur le bouton d’appel de la platine extérieure, le moniteur émet un son. Appuyer sur le bouton pour répondre et parler à la personne qui se trouve à l’extérieur. 2. Auto-allumage : En mode veille, appuyer sur la touche et la visualisation de la platine extérieure s’affiche à... -
Page 9: Caractéristiques Techniques
Caractéristiques techniques Moniteur Taille de l’écran 7” R.G.B.delta Configuration des couleurs Système vidéo PAL/NTSC Pixels 800X3(RGB)X480 Consommation 310~ 330mA Température de fonctionnement -10°C ~ +50°C Humidité de fonctionnement 85%(Max) Tension d’alimentation DC 15V 1A Platine extérieure Type de capteur 1/3” Angle de vision Environ 100°... -
Page 10: Packing List
lmportant Safety lnformation WARNING 1. Please read these instructions carefully before installing and using the product. 2. Do not cut the power supply cable to extend it; the device (transformer) will not work with a longer cable. Do not plug in the device until all the wiring has been finished. lnstallation Safety 1. -
Page 11: Icon Introduction
Icon Introduction 1 Microphone 4 Right Button/ 7 Internal call button 2 MENU Button Setting the bell tone 8 Unlock button 3 Left Button/ 5 Mute Button 9 Unlock button Adjust the ring volume 6 Mute indicator LED 10 Intercom/Monitor Button Depend on user’s height 1. - Page 12 The key function of outdoor-camera Rain cover Speaker Camera lens Infrared LED Call Button Microphone Photosensitive resistor Unlock setting lnstallation When install the camera, ensure that it is located in dry place. It is important that the camera or the electronics do not get wet.
- Page 13 The key function of power supply AC IN 100~240V~50/60Hz DC OUT 15V/2A lnstallation...
-
Page 14: Cable Connections
Cable connections Indoor-monitor Outdoor-camera DC 15V Lock (excluded) 2 wire 2 wire 2 wire Lock (excluded) 2 wire Power G116VFR1 DC 15V G116AFR1 Indoor-monitor Extension Red Black Red Black Indoor-monitor Extension Lock Lock Black Outdoor-camera... -
Page 15: Function Settings
Function settings During standby mode, press the button firstly, then Press button, will pop up the main menu. Press button to move another setting. And the relevant submenu will be in highlight. Press button to adjust it DELETE photo BRIGHTNESS adjustment It will delete all the photo in the memory. -
Page 16: Operation
Operation 1. lntercom: When a visitor press the call button of outdoor panel, The monitor will give a sound. Press the button, to answer and talk to the person outside, 2. Monitor: Under the standby status, Press the button, The screen firstly displays the picture of the outdoor panell. -
Page 17: Specifications
Specifications Indoor-monitor Screen size 7"(Diagonal) inch Color Configuration R.G.B.delta Video System PAL/NTSC Effective Pixels 800X3(RGB)X480 Consumption Current 310~ 330mA Operation Temperature -10°C ~ +50°C Operation Humidity 85%(Max) Supply Voltage DC 15V 1A Outdoor-camera Imaging Sensor Type 1/3” View Angle about 100° Minimum Illumination 0Lux Night vision distance...