Table of Contents
Advertisement
Quick Links
Advertisement
Table of Contents

Related Manuals for Ricoh IS420


Summary of Contents for Ricoh IS420
- Page 1 Ricoh Image Scanner IS420/430 User's Manual MC-Service...
- Page 2 G406-8610 Printed in Japan...
- Page 3 Note to users in the United States of America This equipment has been tested and found to comply with the limits for a Class B digital device, pursuant to Part 15 of the FCC Rules. These limits are designed to provide reasonable protection against harmful interference in a residential installation.
- Page 4 In accordance with IEC 417, this machine uses the following symbol for the main switch: means Push ON Push OFF - ii -...
- Page 5 Precautions Read all of these instructions and keep them for later reference. Follow all warnings and instructions marked on the device. Unplug this device from the wall outlet before cleaning. Do not use liquid cleaners or aerosol cleaners. Do not use this device near water. Do not place this device on an unstable cart, stand, or table.
- Page 6 B. If liquid has been spilled into the product. C. If the device has been exposed to rain or water. D. If the device does not operate normally when the operating instructions are fol- lowed. Adjust only those controls that are covered by the operating instructions since improper adjustment of other controls may result in damage and will often required extensive work by a qualified techinician to restore the product to nor- mal operation.
-
Page 7: Table Of Contents
Contents 1. Part names ..................2 Front view ........................2 Rear view ........................3 2. Installation ..................4 Checking the parts ..................... 4 Location ........................5 Connecting the SCSI cable ..................6 Setting the SCSI ID ....................7 Connecting the power cord ..................7 Turning the power on .................... - Page 8 Appendix ....................22 Functions ........................22 Prescan ........................23 Scan ......................... 23 Scanning composition ....................24 Binary scanning / Threshold ..................25 Halftone scanning ....................26 Multi-value scanning ....................27 Area extraction ......................28 Section area (Multi area settings) ................29 Auto photo/letter .......................
- Page 9 Image Scanner User's Manual User's Manual (English) - 1 - MC-Service Page 1 97.5.8, 5:35 PM 03_IS430-BODY PageMaker 5.0J...
-
Page 10: Part Names
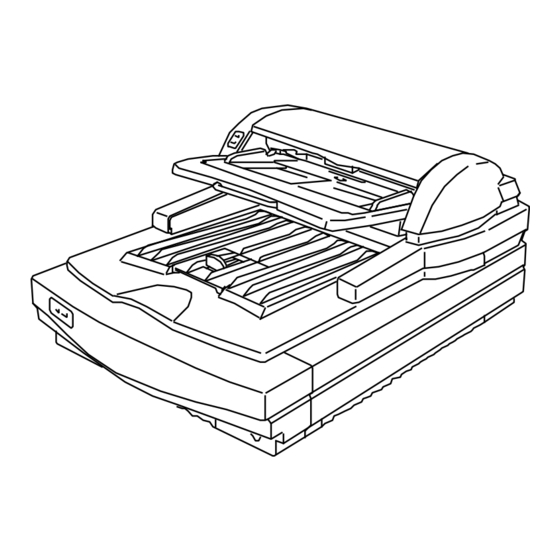
Image Scanner User's Manual 1. Part names ¡ Front view Closing the document feeder Document feeder indicators Document table Exit table Scanner indicators Power switch Opening the document feeder White sheet Document set origin Contact glass - 2 - Page 2 97.5.8, 5:35 PM 03_IS430-BODY PageMaker 5.0J... -
Page 11: Rear View
Image Scanner User's Manual ¡ Rear view SCSI connectors Rotary switch DIP switches Reset switch Power cord socket - 3 - MC-Service Page 3 97.5.8, 5:35 PM 03_IS430-BODY PageMaker 5.0J... -
Page 12: Installation
Image Scanner User's Manual 2. Installation ¡ Checking the parts Make sure that you have all the parts shown below in your packing box. Parts list Name Q'ty Scanner Power cord Terminator SCSI cable User's manual (English) User's manual (German) User's manual (French) Registration card Scanner... -
Page 13: Location
Image Scanner User's Manual ¡ Location Place the scanner in a location meeting the following environmental requirements. Operating environment more than 130mm E Temperature: 10‘ 32˚C E Humidity: 20‘ 80 RH E Space Right: more than 20 mm Left: more than 20 mm Behind: more than 130 mm Front:... -
Page 14: Connecting The Scsi Cable
Image Scanner User's Manual ¡ Connecting the SCSI cable Caution: Connect the cable before turning the power on. The use of interface cables other than shielded cables or specified equivalents will invali- date the certification of this scanner and may cause interference levels which exceed the limits established for this equipment. -
Page 15: Setting The Scsi Id
Image Scanner User's Manual ¡ Setting the SCSI ID Caution: No two devices on the SCSI-chain can have the same ID number. The setting will not take effect until the machine is reset. Do not set the SCSI ID to 8 or 9. The SCSI ID must be set between 0 and 7, even though 8 and 9 are present on the rotary switch. -
Page 16: Turning The Power On
Image Scanner User's Manual ¡ Turning the power on Original position Caution: Confirm that the DIP switches on the rear of the scanner are in the original position as shown right. If the settings « have been changed, correct the settings, otherwise the scanner may not work correctly. -
Page 17: Indicators
Image Scanner User's Manual 3. Indicators . Setting the document The condition of the scanner is indicated by a combination of the lit indicators on the scanner and the document feeder. (green) (amber) (amber) (green) : On : Blinking : Off Scanner Document feeder Meaning... -
Page 18: Placing Originals
Image Scanner User's Manual 4. Placing originals You can scan your originals two ways. You can place them one at a time directly on the contact glass (book mode) or you can place all of them on the document feeder (document feeder mode). Placing originals on the contact glass is the only way to scan books, magazines and the like. -
Page 19: Placing An Original On The Contact Glass
Image Scanner User's Manual ¡ Placing an original on the contact glass Original condition Originals that meet the following specifications can be scanned. E Weight: Less than 10 kg per document (Letter or A4) E Thickness: Less than 10 mm (If document feeder is open, more than 10 mm is possible.) E Written material: Pencil, toner, ink, ball point pen, anything that does not stick to the contact glass. -
Page 20: Placing Originals On The Document Table
Image Scanner User's Manual ¡ Placing originals on the document table Original condition Originals that meet the following specifications can be handled by the document feeder. Caution: When an original needs to be scanned that does not meet the following specifications, place the original on the contact glass and scan in book mode, otherwise your original may be damaged. - Page 21 Image Scanner User's Manual Procedures 1. When scanning large size originals, extend the document table. Note: If the extention of the document table is pushed down strongly, it will come off to prevent it from damaging. If it comes off, put it back .
-
Page 22: Cleaning
Image Scanner User's Manual 5.Cleaning If the contact glass or the white sheet is dirty, it will adversely affect the quality of the scanned image. If the roller of the document feeder is dirty, it can cause paper jams, misfeeds, or soil the originals. - Page 23 Image Scanner User's Manual If feed errors such as jams and/or double feeds occur, open the document feeder cover and clean the feed roller by wiping it with a damp cloth. Caution: Clean the roller after scanning an original written with material that doesn't stick well to the sheet, such as pencil lead.
-
Page 24: Troubleshooting
Image Scanner User's Manual 6. Troubleshooting If an error occurs, the type of error is indicated by a combination of lit indicators, as mentioned on page 9. Follow the appropriate directions below. If the error is not solved by the measures given below, contact your service representative for assistance. -
Page 25: Lamp Error
Image Scanner User's Manual ¡ Lamp error Scanner Document feeder Green Amber Green Amber Blinking Blinking This indicates that the CCD does not sense light from the lamp. The lamp may be burned out or the connector may be disconnected. Corrective action Remove the lamp connector and then rein- stall it correctly refering to page 36. -
Page 26: Paper Jam
Image Scanner User's Manual ¡ Paper jam Scanner Document feeder Green Amber Green Amber Blinking This indicates that an original is jammed in the document feeder. Corrective action 1. Open the document feeder cover. If you can't see the document, see steps 4 to 6. -
Page 27: Paper Misfeed
Image Scanner User's Manual ¡ Paper misfeed Scanner Document feeder Green Amber Green Amber This indicates that the document feeder fails to feed the originals. Corrective action 1. Open the document feeder cover. 2. Pull out the original. 3. Place the original again refering to "Original condition"... -
Page 28: System Error
Image Scanner User's Manual ¡ System error Scanner Document feeder Green Amber Green Amber Blinking Blinking Blinking Blinking Corrective action Initialize the scanner by switching the scanner off and on again or press the reset switch. If the error is not solved, please contact your service representative. ¡... -
Page 29: Specifications
Image Scanner User's Manual 7. Specifications Type : Desktop type Scanning method : Flat bed & Sheet feed Scanning area : Main direction 304 mm max. Sub direction 432 mm max. Resolution : Main direction 400 dpi Sub direction 400 dpi Grayscale : 4, 6 or 8 bits / pixel Max. -
Page 30: Appendix
Image Scanner User's Manual Appendix Functions Note: The scanner is controlled by software. Some software does not support all of this scanner's functions. Unsupported functions are not available. The names given to functions in this manual may be different from the names used by the software. -
Page 31: Prescan
Image Scanner User's Manual ¡ Prescan Function: Scanning the whole available area at a low resolution (60, 75, or 100DPI*). Usage: Use "Prescan" when you want to obtain a quick, low-resolution scanned image. You can then adjust the scan area so that subsequent scans apply to exactly the part of the original you want to scan. -
Page 32: Scanning Composition
Image Scanner User's Manual ¡ Scanning composition Function: You can scan using one of three compositions; binary, halftone, or multi-value. Binary scanning records only black and white from the original. Halftone scan- ning records gray shades on the original using a pattern of black and white dots to represent these shades. -
Page 33: Binary Scanning / Threshold
Image Scanner User's Manual ¡ Binary scanning / Threshold Function: A binary composition scanning converts every pixel on the image to either black or white. If the image contains a gray area, the threshold value determines whether the scanner records it as black or white. If the threshold value is high, the scanner records more pixels as black. -
Page 34: Halftone Scanning
Image Scanner User's Manual ¡ Halftone scanning Function: Halftone creates the illusion of gray scales by simulating shades of gray from pat- terns of black and white dots. Usage: Use halftone scanning when scaning an image with gray shadings such as a photo- graph, to be printed or displayed on a monochrome device, such as a laser printer. -
Page 35: Multi-Value Scanning
Image Scanner User's Manual ¡ Multi-value scanning Function: Multi-value scanning can record 4, 6, or 8 bits of information for each dot on the image. The 4-bit multi-value data represents 16 different shades of gray, the 6-bit data rep- resents 64 shades of gray, 8-bit data represents 256 different shades of gray. Note that the multi-value scanning uses more memory and disk space. -
Page 36: Area Extraction
Image Scanner User's Manual ¡ Area extraction Function: To extract a rectangular area from the whole scannable area. Usage: For example, if you want to extract a photograph from a page, define a rectangle over the photograph, as shown below. The position of the area is decided by setting the X and Y co-ordinates of the left- upper corner of the rectangle. -
Page 37: Section Area (Multi Area Settings)
Image Scanner User's Manual Section area (Multi area settings) ¡ Function: Within the scannable area, you can set rectangular areas and define scanning modes such as binary scanning, halftone scanning, or binary filter etc. for each area. Six areas can be set for one scan. These areas can be piled on top of one another and the last defined area is valid. -
Page 38: Auto Photo/Letter
Image Scanner User's Manual ¡ Auto photo/letter Function: This mode detects photo (halftone) areas and letter (binary) areas of the original so that the binary areas are scanned in the binary mode, and the halftone areas are scanned in the halftone mode. Note: This function is available only when the optional image processing unit is installed in the scanner. -
Page 39: Resolution
Image Scanner User's Manual ¡ Resolution Function: To set vertical and horizontal resolution independently at 60, 75, and 100 to 800 dots per inch. The higher the resolution, the finer the detail. However, a high resolution image requires much more memory space and processing time than a low resolution im- age. -
Page 40: Brightness
Image Scanner User's Manual ¡ Brightness Function: To adjust the brightness value between 1 and 255. A high brightness setting results in a lighter overall image. A low brightness setting results in a darker overall image. Usage: When scanning a dark image, the darker area may appear as deep black although it has gray shades. -
Page 41: Gamma Correction
Image Scanner User's Manual ¡ Gamma correction Function: To select following gamma correction settings: Normal: Emphasizes contrast slightly to improve a scanned image. Sharp: Emphasizes contrast to sharpen an image. Smooth: Weakens contrast to soften an image. Linear: Outputs an image as scanned. User defined: Your own gamma correction curve is loaded into the scanner. -
Page 42: Binary Filter
Image Scanner User's Manual ¡ Binary filter Function: You can use 4 binary filters; noise elimination, smoothing, thickening black lines and edge extraction in binary scanning. Noise elimination: Eliminates independent black or white dots. Smoothing: Flattens uneven dots. Thickening black lines: Thickens thin lines. Edge extraction: Extracts outlines of the image. -
Page 43: Parameter Download
Image Scanner User's Manual ¡ Parameter download To download a gamma curve and a dither pattern to the scanner. You can modify the scanned image with your gamma curve and binalize it with your dither pattern. Refer to your software manual for how to download these parameters to the scanner. ¡... -
Page 44: Options
Image Scanner User's Manual Options ¡ Red lamp unit You can use the optional red lamp unit to skip the OCR red images. Replace the lamp unit with the optional red lamp unit as follows. Warning: Never change the lamp unit with the scanner plugged in. The lamp becomes very hot. -
Page 45: Data Compression Unit
Image Scanner User's Manual ¡ Data compression unit Using an optional data compression unit, it is possible to compress the scanned image data by methods known as MH, MR, and MMR. This saves memory capacity. ¡ Video interface unit The optional video interface unit provides a video interface connector. ¡...