Oki MC560 User Manual
Hide thumbs
Also See for MC560:
- Quick setup (2 pages) ,
- Handy reference (165 pages) ,
- Service & troubleshooting manual (91 pages)
Table of Contents
Advertisement
Quick Links
Advertisement
Table of Contents

Related Manuals for Oki MC560


Summary of Contents for Oki MC560
- Page 1 MC560 User’s Guide...
-
Page 2: Preface
The most up-to-date drivers and manuals are available from: http://www.okiprintingsolutions.com Copyright © 2008 Oki Europe Ltd. All rights reserved. Oki, Oki Printing Solutions and Microline are registered trademarks of Oki Electric Industry Company, Ltd. Energy Star is a trademark of the United States Environmental Protection Agency. -
Page 3: Emergency First Aid
Oki Data Corporation, 4-11-22 Shibaura, Minato-ku, Tokyo 108-8551, Japan MPORTER TO THE AUTHORISED REPRESENTATIVE Oki Europe Limited (trading as Oki Printing Solutions) Blays House Wick Road Egham Surrey, TW20 0HJ United Kingdom For all sales, support and general enquiries contact your local distributor. -
Page 4: Table Of Contents
ONTENTS Preface ...........2 Emergency first aid . - Page 5 Oki contact details........
-
Page 6: Notes, Cautions And Warnings
OTES CAUTIONS AND WARNINGS NOTE A note provides additional information to supplement the main text. CAUTION! A caution provides additional information which, if ignored, may result in equipment malfunction or damage. WARNING! A warning provides additional information which, if ignored, may result in a risk of personal injury. -
Page 7: Introduction
> “Ask Oki” – a user-friendly function that gives a direct link from your printer driver screen (but not always illustrated in this guide) to a dedicated web site specific to the exact model you are using. This is where you’ll find all the advice, assistance and support you could need to help you get the best possible results from your Oki printer - Windows only. - Page 8 > Multiple Pages Sending - With the Auto Document Feeder (ADF), the MFP allows a stack of up to 50 page document(s) to be continuously scanned. > Faxing - An intuitive control panel, makes direct faxing fast and easy. > Advanced fax transmission and reception, including delayed transmissions, sending to multiple locations and polling.
-
Page 9: About This Guide
BOUT THIS GUIDE NOTE Images used in this manual may include optional features that your MFP does not have installed. This guide is part of a suite of online and printed documentation provided to help you become familiar with your product and to make the best use of its many powerful features. The documentation is summarised below for reference and is found on the manuals DVD unless indicated otherwise: >... -
Page 10: On-Line Usage
LINE USAGE This guide is intended to be read on screen using an Adobe Reader. Use the navigation and viewing tools provided in Adobe Reader. You can access specific information in two ways: > In the list of bookmarks down the left hand side of your screen, click on the topic of interest to jump to the required topic. -
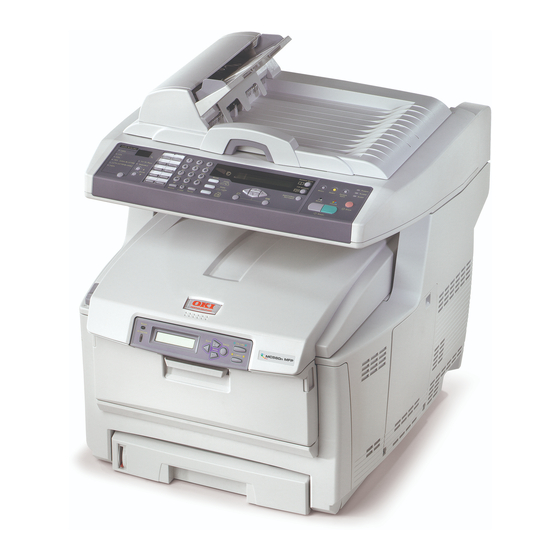
Page 11: Mfp Overview
OVERVIEW RONT VIEW 1. Output stacker, face down. 6. Multi purpose feeder (shown closed). Standard printed copy delivery point. Used for feeding heavier paper stocks, Holds up to 250 sheets at 80g/m². envelopes and other special media. Also for manual feeding of single sheets when 2. -
Page 12: Rear View
EAR VIEW This view shows the connection panel and the rear output stacker. 13. ON/OFF Power switch. 17. Network Connector. 14. USB interface. 18. Line connection. Socket for connecting the fax 15. AC power socket. machine to the telephone line. 16. -
Page 13: The Control Panel
HE CONTROL PANEL OPY AND DIALLING AREA 1. Zoom Used to increase or decrease scaling in 1% increments up to 400% and down to -25%. A further choice of scaling can be made from preset percentages. 2. One-touch keypad Provides one-touch dialling of your most often used or favourite fax numbers. -
Page 14: Start And Other Keys
TART AND OTHER KEYS 14. Menu Select to access the menu to set up the MFP. 15. Reset Select to change the scanner to the factory default settings. 16. Power save Press once to go to “sleep” mode (continuous press is invalid). 17. -
Page 15: Getting Started
ETTING STARTED CAUTION! Make sure the scanner is in the UNLOCKED position before operating. Open the document cover. Move scan lock lever to UNLOCKED position. NSTALLING DRIVERS AND UTILITIES WAIN AND PRINTER DRIVERS CAUTION! To ensure the scan function works properly, install the TWAIN driver FIRST then the printer driver, before connecting to the computer. -
Page 16: Mfp Network Setup Tool
The MFP network setup utility can be found on the Networking/Utilities DVD in the Utilities folder. Follow the on-screen instructions to complete the setup tool installation. The MFP network setup tool can discover MC560 devices over network connections. To search and install, select File > Search All Devices... -
Page 17: Paper Recommendations
Transparencies should be of the type designed for use in copiers and laser printers. We strongly recommend Oki transparencies (Order No. 01074101). In particular, avoid office transparencies designed for use by hand with marker pens. These will melt in the fuser and cause damage. -
Page 18: Multi Purpose Tray
ULTI PURPOSE TRAY The multi purpose tray can handle the same media sizes as the cassette trays but in weights of 75g/m² to 203g/m². For very heavy paper stock, use the face up (rear) paper stacker. This ensures that the paper path through the MFP is almost straight. The multi purpose tray can feed paper widths as small as 105mm and lengths up to 1200mm (banner printing). -
Page 19: Loading Paper
OADING PAPER ASSETTE TRAY Remove the paper tray from the MFP. Fan the paper to be loaded at the edges (1) and in the middle (2) to ensure that all sheets are properly separated, then tap the edges of the stack on a flat surface to make it flush again (3). - Page 20 Adjust the rear stopper (1) and paper guides (2) to the size of paper being used. To prevent paper jams: > Do not leave space between the paper and the guides and rear stopper. > Do not overfill the paper tray. Capacity depends on the type of paper stock. >...
-
Page 21: Multi Purpose Tray
ULTI PURPOSE TRAY Open the multi purpose tray and press gently down on the paper platform (1) to ensure it is latched down. Load the paper and adjust the paper guides (2) to the size of paper being used. > When printing on headed paper load the paper into the multi purpose tray with pre-printed side up and top edge into the MFP. -
Page 22: Configuring Your Machine
..ONFIGURING YOUR MACHINE INIMUM CONFIGURATION REQUIREMENTS To make the best of this MFP, the following configuration is required: To send faxes: A PSTN telephone line connection. To send e-mails: > TCP/IP network. > A SMTP and an optional POP3 server. To file document(s) via intranet >... - Page 23 Explanation: DHCP Enable: Choose Yes to obtain IP/subnet/gateway addresses automatically from DHCP server. After changing setting from Disable to Enable, switch scanner module power OFF then IP Address: The Internet Protocol (IP) address assigned to your machine by your network administrator.
- Page 24 NOTE 1. DHCP server: With DHCP (Dynamic Host Configuration Protocol), a host can automatically be given a unique IP address each time it connects to a network-making IP address management an easier task for network administrators. If the DHCP server is available from your network, you do not need to enter TCP/IP, subnet mask, gateway, and DNS information.
-
Page 25: Internet Communication Features
To upload files, select Tools > Upload 802.1x Files. Select the file type you wish to upload from the list. A pop-up window displays. Navigate to the file you wish to upload and press Open. NOTE After uploading the files, you must reboot the machine. NTERNET COMMUNICATION FEATURES Scan to e-mail The MFP allows you to deliver your scanned document to e-mail addresses on the... -
Page 26: Configuration
ONFIGURATION There are a number of configuration options available which allow you to change the scanner, fax and printer settings to suit your own needs. There are three methods of configuring your MFP: From the MFP's web page. From the MFP’s Management Utility (please refer to the user's manual of the Network Setup Tool on the DVD-ROM supplied). -
Page 27: From The Management Utility
..FROM THE MANAGEMENT UTILITY If you have not already done so, install the MFP Network Setup Tool as described in “MFP network setup tool” on page NOTE The Administrative Settings are blocked by a password. It is recommended that the system administrator creates a new one since the machine is shipped without a specific password. - Page 28 Information ITEM DESCRIPTION OR CHOICE Model Displays the model name. Device name Displays the device name. Scanner MAC Displays the scanner MAC address. address Printer Serial No. Displays serial number. F/W version Displays firmware versions: 1. Printer CU version 2. Printer PU version 3.
- Page 29 Network settings NOTE Access to this menu is password restricted. ITEM DESCRIPTION OR CHOICE IP Address The IP address of the MFP. Subnet Mask The IP address of your subnet mask. Gateway IP The IP address of your gateway. DNS Server The IP address of your DNS server.
- Page 30 Fax settings ITEM DESCRIPTION OR CHOICE Phone Book Add speed dial! Add group dial! Delete speed dial! Delete group dial! Delete All! Append phone #: OFF/On Reports: Activity Report Select to print activity report. Transmission Report Select to print transmission report. Transmission Report Enable / Error Only / Disable.
- Page 31 Report print ITEM DESCRIPTION OR CHOICE Menu Map Select to print menu map. Printer Demo Page Select to print a sample page. MFP Usage report Select to print usage information. Supplies Status Report Select to print information on the consumables remaining. Management NOTE 1.
- Page 32 ITEM DESCRIPTION OR CHOICE Stand-by Timer 20, 40, 60, 120, 180 seconds. Select the country in which the MFP is situated. Country Code Choice: Japan/International/Denmark/Austria/ Italian/Latin America/Great Britain/Germany/ Belgium/Greece/Mexico/Ireland/Hungary/Holland/ Australia/China/Norway/Czech Republic/France/ New Zealand/Russia/Sweden/Poland/Portugal/ Singapore/Taiwan. Language Default set to English. Scan to Log Report Select to print all the “Scan to”...
-
Page 33: Specifying The Administrative Settings
PECIFYING THE ADMINISTRATIVE SETTINGS NOTE The settings can only be done through the web page or the Network Setup Tool. It cannot be set up on the Control Panel. The Administrative settings are blocked by a password. Since the machine is shipped without a specific password, it is recommended that the administrator create a new password to ensure security. -
Page 34: Contents Of Each Printer Menu
ONTENTS OF EACH PRINTER MENU The printer control panel offers some additional menu options. NOTE The scanner retrieves the latest information from the printer, ensuring both menu sets are always synchronised. Press Enter (1) on the printer control panel. Use the + and - keys (2) to navigate, Enter (1) to select, and Back (3) to cancel the selection or exit the menu item. - Page 35 Shutdown menu This menu only appears if the hard disk drive is installed. NOTE This item should always be selected before switching the printer off, to ensure that no hard disk data is lost. ITEM ACTION DESCRIPTION Shutdown Start Execute Performs controlled shutdown of the MFP, ensuring that all files on the internal hard disk are closed before power is turned off.
- Page 36 Print menu ITEM CHOICE DESCRIPTION Copies 1-999 Enter the number of copies of a document to be printed from 1 to 999. Duplex ON/OFF Turns the duplex (2-sided) printing function on or off if this feature is installed. Paper Feed TRAY1 Selects the default tray for paper feed, TRAY 2...
- Page 37 ITEM CHOICE DESCRIPTION Mono-Print Speed AUTO SPEED If the first page of a print job is black and white, the MFP runs at 32ppm (pages per minute). When a colour page is detected the MFP slows down to 20ppm for the rest of that job.
- Page 38 Media menu ITEM CHOICE DESCRIPTION Tray1 Papersize Selects the size of paper loaded in Tray 1 A5 / A6 / B5 (upper tray if both trays installed). For LEGAL14 CUSTOM setting see X-DIMENSION and Y- LEGAL13.5 DIMENSION later in this table. LEGAL13 LETTER EXECUTIVE...
- Page 39 ITEM CHOICE DESCRIPTION MPT Papersize A4 / A5 / A6 / B5 Selects the size of paper to be fed from the LEGAL14 multi purpose tray. For CUSTOM setting LEGAL13.5 see X-DIMENSION and Y-DIMENSION later LEGAL13 in this table. LETTER EXECUTIVE CUSTOM COM-9 ENVELOPE...
- Page 40 Colour menu ITEM CHOICE DESCRIPTION Density Control AUTO If set to AUTO, image density will be automatically MANUAL adjusted at power on, when a new image drum or toner cartridge is installed, and at intervals of 100, 300 and 500 drum counts. If a 500 drum count interval occurs during a print job it will occur at the end of that job, and will take up to 55 seconds.
- Page 41 System configuration menu ITEM CHOICE DESCRIPTION Pow Save Time Adjusts the idling time before the printer automatically switches into power saving mode. In this mode power consumption is reduced to a low level required to just keep the printer operating and ready to receive data.
- Page 42 PCL emulation ITEM CHOICE DESCRIPTION Font Source RESIDENT / Specifies the location of the PCL default RESIDENT 2 font. Normally this will be INTERNAL unless additional fonts are installed in the expansion ROM slot or additional fonts have been downloaded to RAM as permanent fonts.
- Page 43 PPR emulation ITEM CHOICE DESCRIPTION Character Pitch 10 CPI; 12 CPI; 17 Specifies character pitch in IBM PPR CPI; 20 CPI; emulation. PROPORTIONAL Font Condense 12CPI - 20CPI; Specifies 12CPI pitch for Condense 12CPI - 12CPI Mode. Character Set SET 1; SET 2 Specifies a character set.
- Page 44 FX emulation ITEM CHOICE DESCRIPTION Character Pitch 10 CPI; 12 CPI; 17 Specifies character pitch in this CPI; 20 CPI; emulation. PROPORTIONAL Character Set SET 1 / SET 2 Specifies a character set. Symbol Set IBM 437 Specifies a symbol set. Letter 0 Style DISABLE Specifies the style that replaces 9BH...
- Page 45 Maintenance menu ITEM CHOICE DESCRIPTION Menu Reset EXECUTE Resets menus to default settings. Save Menu EXECUTE Saves current menu settings as default values. At confirmation prompt, press ENTER to confirm save, or CANCEL to cancel. Power Save ENABLE DISABLE Enables or disables automatic power save mode.
- Page 46 Job log menu NOTE Access to this menu is password restricted. ITEM CHOICE DESCRIPTION Enter Password nnnn Input a password to enter the Print Statistics menu. The default password is “0000” (four zeros). Note: Job Log Menu category is not shown when Print Statistics function is not supported.
-
Page 47: Explanation Of Filing Protocols
XPLANATION OF FILING PROTOCOLS FTP stands for “File Transfer Protocol.” It is a common method of transferring files via the Internet from one computer to another. FTP use RFC 959[FTP] as their protocol. Therefore, ensure you have a legal FTP account with the privilege of writing under the directory to save the files and password before using FTP to save documents. - Page 48 Setting IIS anonymous access: Start Internet service manager in “Control Panel”. Select Default Web site and right click C:\Inetpub\wwwroot\X cabinet. Select Properties. In the X cabinet dialogue box, select the Directory security tab, and click Edit for "Anonymous Access and Authentication Control”. Make sure “Anonymous Access” is selected in the “Authentication Methods”...
- Page 49 Setting IIS privileged access: As in “Setting IIS anonymous access”, start “Internet service manager” and select Default Web site. Right click C:\Inetpub\wwwroot\X cabinet, and select Properties. Select the Directory tab on the Properties page. Ensure the privileges for “Read”, “Write” and “Directory Browsing” are selected. NOTE If the file management system on your server is NTFS, in order to allow IIS to use an anonymous account to access the files in the directory of...
-
Page 50: Setting The Fax Facility
ETTING THE FAX FACILITY NITIAL SET UP The following parameters must be set before using the fax function on your MFP: > Date and time > Country code > Station ID and number There are other parameters that can be adjusted to suit your personal preferences later if required, refer to fax set up table for details (see “Fax settings”... - Page 51 Press OK, enter the name of the fax recipient using the alpha/numeric keypad, and press OK. Using the DOWN arrow key, navigate to the number field then press OK. Enter the new destination fax number and press OK. NOTE 1. The maximum length of name is 32 characters. The maximum length of number is 32 digits.
- Page 52 Deleting a speed dial entry from the phone book To delete a speed dial number from the phone book: Press the Menu button on the control panel. Using the UP arrow key, navigate to Fax Settings and press OK. Press OK to select Phone Book. Using the DOWN arrow key, navigate to Delete Speed Dial! then press OK.
- Page 53 Appending the phone number after transmission You can set your machine to prompt you to append any new fax numbers to the phone book after transmission: Press the Menu button on the control panel. Using the UP arrow key, navigate to Fax Settings and press OK. Press OK to select Phone Book.
- Page 54 Manual receive Upon receiving an incoming call, the MFP will ring until you press the Start button to receive the fax. To enable the manual receive option: Press the Menu button to prompt the menu settings screen. Using the UP arrow key, navigate to Fax Settings and press OK. Using the UP arrow key, navigate to Setup Fax and press OK.
-
Page 55: Operation
PERATION With its intuitive control panel, this Multi Function Product (MFP) is designed to be easy to use. After the machine has been configured, operating is quite straight forward. NOTE If PIN restriction has been enabled for any or all of the MFP functions, you will first have to enter your PIN. -
Page 56: Placing Document(S) On The Glass
Adjust the Paper Guides (1) to centre the document in the ADF. LACING DOCUMENT ON THE GLASS Open the document cover. Place your document with the text face DOWN on the glass and align it to the upper- left corner. Close the document cover. -
Page 57: Sending Document(S) Via E-Mail
ENDING DOCUMENT VIA E MAIL ASIC OPERATION Using the local address book Place your document(s) with text face UP in the ADF or face DOWN on the glass (as described above). Press Send Mode (1) on the control panel. The e-mail screen will appear. In the “To”... -
Page 58: Advanced Operation
Use the UP and DOWN arrows (3) to select an e-mail address and press the OK button (4). Press Return (5) to return to the e-mail main screen. Repeat step 6 to add further “To” addresses, if necessary. Enter the subject of your e-mail. If not entered, “Default Subj.” will be displayed. Enter or select CC and BCC address(es), if necessary. - Page 59 Refer to the following table to modify the scanner settings. MENU ITEM DESCRIPTION Attachment The file name of the scanned document. Up to 64 characters can be entered in this field. From Enter your “From” address. If an e-mail can not be sent, notification is returned to this address.
-
Page 60: Sending Document(S) To A File Server
ENDING DOCUMENT TO A FILE SERVER Before sending your document to a file server, profiles should be set up first to speed up the process. A profile contains a list of filing parameters such as your filing protocol, directory, file name and other scanning parameters. Add a new profile by either entering the machine's web page or installing and starting the Network Setup Tool on the DVD-ROM supplied. -
Page 61: Copying
OPYING ASIC OPERATION Place your document(s) with text face UP in the ADF or face DOWN on the glass. If required, press the Copy Mode button (1) on the control panel to prompt the Copy screen. NOTE Factory default setting is Copy mode. Press Mono (2) to copy your document(s) in black and white, or Colour (3) to copy your document(s) in colour. - Page 62 Below is the menu for the “Additional Settings” when all printer options are installed (if there are any changes in the option condition, the settings will return to the these factory default settings). FUNCTION DEFAULT SETTING Density Quality Speed Collate Duplex (optional) N-up 1in1...
- Page 63 Edge Erase > 0/6/13/19/25 (mm) Margin Shift > Right 0/6/13/19/25 (mm) > Bottom 0/6/13/19/25 (mm) Paper Supply > Legal > Letter > > Input Tray > Auto > Tray 1 > Tray 2 (Optional) > Changing scaling The machine is preset to 100% scaling. If you wish to reduce or enlarge your original, you can apply this feature to enlarge up to 400% or reduce down to 25%.
- Page 64 Improving copy quality The machine is preset to “Speed”. If required, you can change to “Text” or “Photo” to improve the copy quality. To change copy quality: Press the Copy Mode button on the control panel to prompt the Copy screen. Press the Additional Settings button.
-
Page 65: Faxing
AXING ASIC OPERATION Searching the phone book To search the contents of the phone book: Press the Fax Mode button (1) on the control panel to prompt the Fax screen. Press the Address Book button (2). Using the UP/DOWN arrow keys (3) navigate through the resulting list, and press OK to select an entry. -
Page 66: Advanced Operation
Receiving a Fax Your MFP is set to receive faxes automatically, if you wish to change this to manual receive refer to “Manual receive” on page 54 for details. NOTE If the MFP is sending a fax, then any incoming faxes will be rejected. During other functional operations, for example copying, filing, e-mailing, etc., then any incoming faxes will be stored and printed out when the MFP is available. - Page 67 Changing fax quality The machine is preset to “Fine”. If required, you can select “ExtraFine” or “Photo” to improve the fax quality or you can reduce the fax quality by selecting “Standard”. To change fax quality: Press the Fax Mode button on the control panel to prompt the fax screen. Press the Additional Settings button and press OK.
- Page 68 Delayed send The delayed send function allows you to fax documents at a specific date and time. To set the fax to delay send: Place your document(s) with text face UP in the ADF or face DOWN on the glass. Press the Fax Mode button on the control panel to prompt the Fax screen.
- Page 69 Overseas mode To avoid transmission problems when faxing overseas, set the fax to overseas mode: Place your document(s) with text face UP in the ADF or face DOWN on the glass. Press the Fax Mode button on the control panel to prompt the Fax screen. Press the Additional Settings button.
-
Page 70: Cancel Fax Jobs
ANCEL FAX JOBS If you no longer require a stored fax job, you can cancel and remove it from your MFP’s memory. NOTE Requires an Administrator password to perform this function. Press the Menu button on the control panel to prompt the menu settings screen. Using the UP arrow key, navigate to Fax Settings and press OK. -
Page 71: Scanning
TWAIN link is used. A dialogue box with a list of scanning sources appears. Select “MC560”. You need to select the source only once, unless you want to choose another scanner. Place the document face DOWN on the document glass or face UP in the ADF. -
Page 72: Alook At The User Interface
LOOK AT THE USER INTERFACE 1. Scan Method Choice: ADF/Multi-page, Flatbed. 2. Image type Choice: Black & White, 8-Bit Grey, 24-Bit Color, Half tone. 3. Resolution Choice: 50, 72, 100, 144, 150, 200, 300, 600, 1200, 2400, 4800 (dpi). 4. Brightness Adjust the brightness level from -100 to +100. -
Page 73: Using The Basic Features
SING THE BASIC FEATURES Scan method Choice: > Flatbed: Select this setting if you need to scan photo, or newspaper clippings. > ADF/Multipage: Select this setting if you need to scan multi-page document from the automatic document feeder (ADF). Image type Choose B&W if your original contains only B&W text, pencil or ink sketch. - Page 74 Enlarging previewed image (zoom) Enlarge your previewed image to the maximum of the preview window. NOTE This function only enlarges your preview image. This does not enlarge the actual image. Inverting and selecting your image Invert The invert command reverses the brightness and the color in the image. For color images, each pixel will be changed into its complementary color when inverted.
- Page 75 Using the advanced features Click the Switch button (1) to select the Advanced Settings bar (2 to 7). Advanced settings include Highlight/Shadow, Hue/Saturation/Lightness, Curve, Color Balance, Color Drop-out. Highlight/shadow levels Highlight refers to the lightest point in a scanned image while shadow refers to the darkest point.
- Page 76 When the value of highlight and shadow change, the image changes as shown below. 1. Highlight: 255/Shadow: 0(Normal); 2. Highlight: 210/Shadow:10; 3. Highlight: 200/Shadow:0; 4. Highlight: 255/Shadow: 50 Adjusting the curve Adjusts the midtones of the image without dramatically altering their lightest and darkest areas.
- Page 77 Lightness Increase the lightness by moving the triangle to the right or to the left to decrease the lightness. Using colour balance The Colour Balance control allows you to set optimal image colour quality. You can either move the relevant pointer toward a colour (in the above example 63% green has been selected) or, if known, enter the figure in the box at the top.
-
Page 78: Other Tools
THER TOOLS Measuring Unit: Indicates the measuring system in use. By clicking the button, you can change the measuring unit. Choice: Inch, cm, Pixel. Paper Size Choice: Card 4" x 2.5", Photo 5" x 3.5", Photo 3.5" x 5", Photo 4" x 6", Photo 6"... -
Page 79: Maintenance
AINTENANCE ONSUMABLE LIFE EXPECTANCY NOTE When the LCD display indicates TONER LOW, or if print appears faded, first open the top cover and try tapping the cartridge a few times to evenly distribute the toner powder. This will enable you to obtain the best “yield” from your toner cartridge. -
Page 80: Consumable Order Details
For the protection of your product, and in order to ensure that you benefit from its full functionality, this model has been designed to operate only with genuine Oki Printing Solutions toner cartridges. These can be identified by the Oki Printing Solutions trademark. -
Page 81: Replacing Consumable Items
EPLACING CONSUMABLE ITEMS ONER CARTRIDGE REPLACEMENT CAUTION! To avoid toner wastage and possible toner sensor errors, do not change the toner cartridge(s) until “TONER EMPTY” is displayed. The toner used in this machine is a very fine dry powder. It is contained in four cartridges: one each for cyan, magenta, yellow and black. - Page 82 Note the positions of the four cartridges. 1. Cyan cartridge 2. Magenta cartridge 3. Yellow cartridge 4. Black cartridge Pull the coloured toner release lever (1) on the cartridge to be replaced fully towards the front of the MFP. Lift the right-hand end of the cartridge and then draw the cartridge to the right to release the left-hand end as shown, and withdraw the toner cartridge out of the MFP.
- Page 83 Gently shake the new cartridge from end to end several times to loosen and distribute the toner evenly inside the cartridge. Remove the wrapping material and peel off the adhesive tape from the underside of the cartridge. Holding the cartridge by its top centre with the coloured lever to the right, lower it into the printer over the image drum unit from which the old cartridge was removed.
-
Page 84: Image Drum Replacement
Gently lower the scanner. MAGE DRUM REPLACEMENT CAUTION! Static sensitive devices, handle with care. The MFP contains four image drums: cyan, magenta, yellow and black. Gently raise the scanner. Press the cover release (a) and open the MFP’s top cover (b) fully. WARNING! If the MFP has been powered on, the fuser will be hot. - Page 85 Note the positions of the four cartridges. 1. Cyan cartridge 2. Magenta cartridge 3. Yellow cartridge 4. Black cartridge Holding it by its top centre, lift the image drum, complete with its toner cartridge, up and out of the MFP. Put the cartridge down gently onto a piece of paper to prevent toner from marking your furniture and to avoid damaging the green drum surface.
- Page 86 image drum cartridge. Place the cartridge on a piece of paper to avoid marking your furniture. Take the new image drum cartridge out of its packaging and place it on the piece of paper where the old cartridge was placed. Keep it the same way round as the old unit.
-
Page 87: Transfer Belt Replacement
Gently lower the scanner. NOTE If you need to return or transport this product for any reason, please make sure you remove the image drum unit beforehand and place in the bag provided. This is to avoid toner spillage. RANSFER BELT REPLACEMENT The belt unit is located under the four image drums. - Page 88 Note the positions of the four cartridges. It is essential that they go back in the same order 1. Cyan cartridge 2. Magenta cartridge 3. Yellow cartridge 4. Black cartridge Lift each of the image drum units out of the MFP and place them in a safe place away from direct sources of heat and light.
-
Page 89: Fuser Replacement
Turn the two fasteners 90° to the left. This will release the belt from the MFP chassis. Pull the lifting bar (6) upwards so that belt tilts up towards the front, and withdraw the belt unit from the MFP. Lower the new belt unit into place, with the lifting bar at the front and the drive gear towards the rear of the MFP. - Page 90 Press the cover release (a) and open the MFP’s top cover (b) fully. Identify the fuser handle (1) on the top of the fuser unit. Pull the two fuser retaining levers (2) towards the front of the printer so that they are fully upright.
-
Page 91: Cleaning
Push the two retaining levers (2) towards the rear of the MFP to lock the fuser in place. Close the top cover and press down firmly at both sides so that the cover latches closed. Gently lower the scanner. LEANING .. -
Page 92: The Document Glass
Wipe the feed roller (1) by moving the swab from side to side. Rotate the roller forward with your finger and repeat step 3 until the roller is clean. Be careful not to snag or damage the springs near the pad (2). Wipe the pad (2) from top to bottom, being careful not to hook the springs. - Page 93 Press the cover release (a) and open the MFP’s top cover (b) fully. Gently wipe the LED head surface with a soft, lint-free cloth. CAUTION! Do not use methyl alcohol or other solvents on the LED head as damage to the lens surface will occur. Close the top cover and press down firmly at both sides so that the cover latches closed.
-
Page 94: Installing Upgrades
NSTALLING UPGRADES This section explains how to install optional equipment into your MFP. This includes: > duplex (two-sided printing) unit > additional RAM memory > 40GB hard disk drive > additional paper tray > storage cabinet RDER CODES OPTION ORDER CODE Duplex unit 43347502 RAM memory:... -
Page 95: Memory Upgrade
EMORY UPGRADE This section explains how to install additional RAM memory into your MFP as a memory upgrade. The model comes equipped with 256MB of main memory.This can be upgraded with an additional memory board containing either 256MB or 512MB, giving a total memory capacity of either 512MB or 768MB maximum. - Page 96 Close the access panel, pressing firmly at top to latch it closed. Reconnect the AC power cable and switch the MFP on. When the MFP is ready, print a menu map (refer to “Information menu” on page 34). Examine the first page of the menu map. Near the top of the page, between the two horizontal lines, you will see the current MFP configuration.
-
Page 97: Hard Disk Drive
ARD DISK DRIVE The optional 40GB internal hard disk drive (HDD) enables collating of printed pages and can be used to store overlays and macros, fonts, and secure or proof documents waiting to be printed. Switch the MFP off and disconnect the AC power cable. Pull open the access panel on the side of the machine. -
Page 98: Additional Paper Tray
All that remains is to configure the Windows printer driver so that it knows the hard disk unit has been fitted, and the additional features can be made available immediately. “Adjusting windows printer drivers” on page 99. DDITIONAL PAPER TRAY Switch the MFP off and disconnect the AC power cable. -
Page 99: Adjusting Windows Printer Drivers
DJUSTING WINDOWS PRINTER DRIVERS Once your new upgrade has been installed, you may need to update the Windows printer driver so that the additional features are available to your Windows applications. Remember that if your MFP is shared between users on different computers, the driver must be adjusted on each user’s machine. -
Page 100: Troubleshooting
ROUBLESHOOTING LEARING PAPER JAMS Provided that you follow the recommendations in this guide on use of print media, and you keep the media in good condition prior to use, your MFP should give years of reliable service. However, paper jams occasionally do occur, and this section explains how to clear them quickly and simply. - Page 101 Press the cover release (a) and open the MFP’s top cover (b) fully. WARNING! If the MFP has been powered on, the fuser will be hot. This area is clearly labelled. Do not touch. Note the positions of the four cartridges. 1.
- Page 102 Repeat this removal procedure for each of the remaining image drum units. Look into the MFP to check whether any sheets of paper are visible on any part of the belt unit. To remove a sheet with its leading edge at the front of the belt (1), carefully lift the sheet from the belt and pull it forwards into the internal drum cavity and withdraw the sheet.
- Page 103 through the drum cavity area. Then allow the pressure release lever to rise again. NOTE If the sheet is well advanced into the fuser (only a short length is still visible), do not attempt to pull it back. Follow the next step to remove it from the rear of the MFP.
- Page 104 If the sheet is low down in this area and difficult to remove, it is probably still gripped by the fuser. In this case raise the top cover, reach around and press down on the fuser pressure release lever (7). If you are not using the rear exit tray, close it once paper has been removed from this area.
- Page 105 Pull out the paper tray and ensure that all paper is stacked properly, is undamaged, and that the paper guides are properly positioned against the edges of the paper stack. When satisfied, replace the tray. Close the top cover and press down firmly at both sides so that the cover latches closed.
-
Page 106: Fax Problem Checklist
AX PROBLEM CHECKLIST If a problem occurs, read through the list of problems and solutions before calling for service. The MFP will not dial a telephone number. Check the power cable and wall outlet. Make sure that the telephone line (not external telephone or handset) is connected to the LINE socket on the back of the machine. - Page 107 MFP is set for delayed transmission but it did not send. Check the display to make sure that the MFP is set to the correct time and date (see “Initial set up” on page 50). MFP will not poll a remote machine. Call the person at the remote machine and make sure that they have loaded documents and that their machine is set to polling transmission mode.
-
Page 108: Lcd Message List
MESSAGE LIST NOTE 1. <%color%> = Y, M, C or K. 2. <%tray%> = Tray 1, Tray 2 or MP Tray. 3. <%job_cancel%> = Log buffer full, job rejected invalid ID or job rejected. 4. mmm = the setup of “paper supply”. 5. - Page 109 STATUS MESSAGE MEANING / ACTION / CODE Normal Cancelling job Indicates a job being cancelled due to no print permit: (User denied) 1. A job received from a user who is denied printing. 2. A colour job received from a user who is denied colour printing.
- Page 110 STATUS MESSAGE MEANING / ACTION / CODE Warning <%color%> drum life Notifies the life of the drum. This is a warning only. This warning appears when the cover is opened and closed just after the drum life error occurred. Warning <%tray%>...
- Page 111 STATUS MESSAGE MEANING / ACTION / CODE Warning Disk use failed <%FE_ERR%> A disk error has occurred. %FS_ERR%: 0 - General error 1- Volume not found 3 - File not found 4 - No free file descriptors 5 - Invalid number of bytes 6 - File already exists 7 - Illegal name 8 - Can not del root...
-
Page 112: Error Messages
RROR MESSAGES STATUS MESSAGE MEANING / ACTION / CODE Error Load %MEDIA_SIZE% in MP tray Manual paper feed is required. Manually insert the paper shown (online) and press on-line switch by %MEDIA_SIZE%. Error %TRAY% Paper feeding is recommended because the print of back sides (online) Duplex request (odd number pages) is finished... - Page 113 Error 410: Y Error 411: M Error 412: C Error 413: K Error Replace toner OKI regional mismatch: Incorrect toner cartridge fitted (incorrect %ERRCODE%:%COLOR% toner signature ID; correct distribution regional channel group). Replace with genuine toner cartridge.
- Page 114 STATUS MESSAGE MEANING / ACTION / CODE Error Replace toner OEM channel mismatch: Incompatible toner cartridge fitted %ERRCODE%: incompatible (incorrect signature ID; incorrect %COLOR% toner distribution channel group). Replace with genuine toner cartridge. Error 614: Y Error 615: M Error 616: C Error 617: K Error Replace toner...
- Page 115 STATUS MESSAGE MEANING / ACTION / CODE Error Open front cover Inappropriate size paper was fed from a tray. Check the paper in the %ERRCODE%: paper size error tray or check for multi feed (See “Clearing paper jams” Open and close the cover to perform recovery printing, and continue.
- Page 116 STATUS MESSAGE MEANING / ACTION / CODE Error Replace image drum The image drum has reached the end of its life (alarm). %ERRCODE%:%COLOR% drum life Error 350: Y Error 351: M Error 352: C Error 353: K Warning status takes effect at cover open/close.
- Page 117 STATUS MESSAGE MEANING / ACTION / CODE Error Close cover Close the cover. %ERRCODE%: cover open Error 310: Top cover Error 311: Front cover If the code still appears, contact your dealer. Error Close cover Close the duplex cover. %ERRCODE%: duplex cover open If the code still appears, contact your dealer.
- Page 118 STATUS MESSAGE MEANING / ACTION / CODE Error Shutting down Your machine is in the process of shutting down. Error Shutdown Shutdown complete. 365.5 Error Please pow OFF Shutdown complete. Shutdown comp Switch off machine. Fatal %FATAL1% Reboot machine. %FATAL2% If a fatal code appears, contact your dealer.
-
Page 119: Error Messages During Networking
RROR MESSAGES DURING ETWORKING MESSAGE ACTION Connection failed Ping the IP address of the MFP from another PC in DOS prompt. For example, type “Ping Check network settings 10.1.20.144" in DOS prompt. If the MFP does not respond, then perform the following steps. Address is invalid Check that the RJ-45 connector is firmly Check network settings... - Page 120 MESSAGE ACTION Mailbox unavailable Requested mail action not taken. Check “To” address. Check “To” address Processing error Requested action aborted. Contact your network administrator for further help. Contact network administrator Insufficient system storage Contact your network administrator for further help. Contact network administrator Temporary authentication failure Contact your network administrator for further...
-
Page 121: Error Messages During Filing
RROR MESSAGES DURING ILING MESSAGE ACTION Fail to connect FTP server Make sure the FTP server is not shut down and port number is correct. If the error is still there, Contact server administrator contact your FTP server administrator. Unpredicted error Contact your server administrator for help. - Page 122 MESSAGE ACTION HTTP Unauthorized This HTTP server needs authorization. Make sure your account has correct authorization. Make sure your account has authorization HTTP Forbidden This action is forbidden in this server. This is not unauthorized but forbidden. This action is forbidden Unpredicted error.
-
Page 123: Specifications
PECIFICATIONS MC560 N31174B ITEM SPECIFICATION General Dimensions 500 x 600 x 670mm (W x D x H) Weight 37Kg approximately Power source Input: 220 to 240VAC, 50 to 60Hz Power consumption Max. operating: 1200W Normal operating: 490W Stand-by: 110W Power save mode: <27W... - Page 124 ITEM SPECIFICATION Document size 114 x 140 to 216 x 355mm Document weight/thickness 60 to 105 g/m² Paper feed Face up Capacity 50 sheets of Xerox4024 DP 9.07Kg paper ADF life 240,000 scans or more, or 5 years Recommended daily scans Up to 1000 pages a day Recommended pad 50,000 scans...
- Page 125 ITEM SPECIFICATION Network Specification Connectivity Ethernet 10BaseT/100BaseTX auto-negotiation with RJ-45 connector Communications protocol TCP/IP, SMTP, HTTP, MIME, FTP, CIFS, DHCP, DNS, LDAP Supported browsers Microsoft IE 4.1 or higher Netscape Navigator 4.0 or higher Configuration requirement IP address Subnet mask Gateway SMTP server/POP3 server FTP server...
- Page 126 ITEM SPECIFICATION E-mail Specification Communication protocol SMTP, MIME, POP3 File formats: B&W PDF, TIFF, MTIFF Grey/Colour PDF, TIFF, MTIFF, JPEG Default file format Separation limit 1MB, 3 MB, 5MB, 10 MB, 30MB, No limit Resolution 75, 100, 150, 200, 300, 400, 600 dpi Default resolution: B&W 200 dpi...
- Page 127 ITEM SPECIFICATION Filing Specification Communication protocol FTP, HTTP, CIFS File formats: B&W PDF, TIFF, MTIFF Grey/colour PDF, TIFF, MTIFF, JPEG Default file format Resolution 75, 100, 150, 200, 300, 400, 600 dpi Default resolution: B&W 200 dpi Grey/Colour 150 dpi Max.
-
Page 128: Index
NDEX Pre-Installation Information ......22 Belt Loading Paper ....... 19 DHCP Enable ....23 how to replace Cassette tray ....87 ....19 DNS server ....... 23 life expectancy Multi purpose tray ....79 .... 21 Gateway IP ....... 23 life remaining .... -
Page 129: Oki Contact Details
Tel:(64) 9 477 0500 4-11-22 Shibaura, Minato-ku, Tokyo Fax:(64) 9 477 0549 108-8551, Japan http://www.comworth.co.nz Tel:(81) 3 5445 6158 Oki Data(S) P Ltd. Malaysia Rep Fax:(81) 3 5445 6189 Office http://www.okidata.co.jp Suite 21.03, 21st Floor Menara IGB, Oki Data (Singapore) Pte. Ltd. - Page 130 Oki Europe Limited Blays House Wick Road Egham Surrey TW20 0HJ United Kingdom Tel: +44 (0) 208 219 2190 Fax: +44 (0) 208 219 2199 www.okiprintingsolutions.com 07099101 iss.1...