Table of Contents
Advertisement
Advertisement
Table of Contents

Related Manuals for Roland S-1


Summary of Contents for Roland S-1
- Page 1 Owner’s Manual...
-
Page 2: Table Of Contents
Table of contents Table of contents Saving a pattern ..............47 S-1 Owner’s Manual ..............3 Copying, initializing and reloading a pattern ....48 Panel descriptions ..............4 Top panel ................. 4 Other useful functions ............49 Rear panel ................7 Playing arpeggios .............. -
Page 3: S-1 Owner's Manual
S-1 Owner’s Manual S-1 Owner’s Manual © 2023 Roland Corporation... -
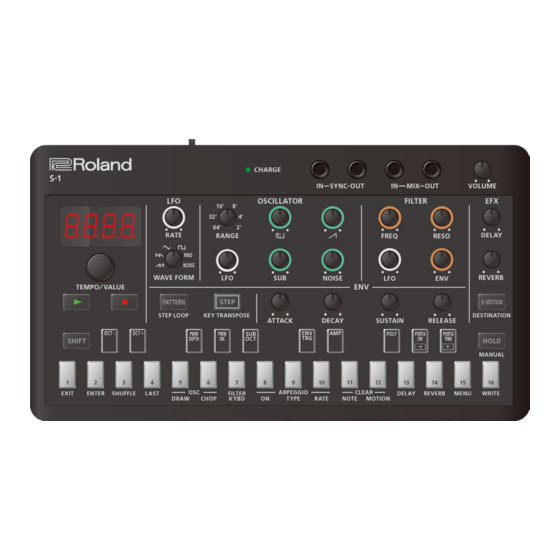
Page 4: Panel Descriptions
SYNC OUT jack This is the audio input jack. MIX IN jack The sound from connected devices is mixed with the sound of the S-1 and output from the MIX OUT jack. This is the audio output jack. MIX OUT jack Connect a pair of headphones here. - Page 5 Panel descriptions 5–35°C However, in order to take full advantage of the lithium-ion battery’s performance, we recommend that you charge it in a temperature range of 10–30°C. * Use cables with monaural mini phone type plugs to connect to/from the SYNC IN/OUT jacks. Do not use cables with stereo mini phone type plugs, as these cables do not work.
- Page 6 Panel descriptions Section Controller Explanation Turns the D-MOTION function on/off, which controls the tones according to the angle at which this unit is tilted. For details, refer to “Controlling the parameters by tilting this unit (D- MOTION)(P.55)”. [D-MOTION] (DESTINATION) button * When using the D-MOTION function, firmly grip both sides of this unit and be careful that the connected cables are not excessively bent.
-
Page 7: Rear Panel
Panel descriptions Rear panel A. [POWER] switch Turns the power on/off. B. USB port (USB Type-C ® Use a commercially available USB 2.0 cable (Type-A to C, or Type-C to C) to connect this port to your computer. This is used to transfer USB MIDI and USB audio data. * Do not use a USB cable that is designed only for charging a device. -
Page 8: Playing With The Keyboard Pads
Playing with the keyboard pads Playing with the keyboard pads You can use the keyboard pads to play notes on this unit right after turning it on. Switching the octave Hold down the [SHIFT] button and press the [OCT-] [OCT+] pads. Setting range: -4 to +4 octaves By holding down the [SHIFT] button and pressing the [OCT-] pad and the [OCT+] pad, you can reset the octave setting (to zero). -
Page 9: Selecting And Playing A Pattern
Setting the tempo Selecting a pattern What’s a pattern? On the S-1, the performance data (sequence) in the sequencer as well as the tones (sounds) used in performance are handled together as a single set of data. This is called a “pattern”. - Page 10 Selecting and playing a pattern When the [PATTERN] button is lit Turn the [TEMPO/VALUE] knob to select a pattern. You can also use the [1]–[16] pads to select the number.
-
Page 11: Setting The Tempo
Selecting and playing a pattern Setting the tempo Turn the [TEMPO/VALUE] knob to set the tempo. Hold down the [SHIFT] button and turn the [TEMPO/VALUE] knob to fine-tune the value. The value can be adjusted (fine-tuned) in steps of 0.1. -
Page 12: Creating Sounds
Creating sounds The S-1 features a number of functions you can use to create sounds. The tones you create are saved to each pattern. The performance data and tones from the factory settings (presets) are saved in patterns 1-01 through 1-16. - Page 13 Creating sounds Waveform Waveform characteristics Harmonic structure For asymmetrical square waves, the harmonic composition Asymmetrical square wave changes greatly depending on the ratio of the upper and lower widths. These waveforms characteristically drop the nth harmonic series is dropped when the upper width is 1/n that of the entirety.
- Page 14 Creating sounds Chopping a waveform and emphasizing its harmonics (OSC CHOP) Ø Chopping a waveform and emphasizing its harmonics (OSC CHOP)(P.31) [LFO] knob This knob adjusts the modulation intensity, when you use the modulator signal from the LFO section to control the fundamental frequency (pitch) of the OSC.
-
Page 15: Filter Section
Creating sounds FILTER section The FILTER section is used for reducing or emphasizing harmonic components in the original sound that’s mixed in the OSC section, and to alter the tone. This lets you pass the lower frequencies through while cutting the higher frequencies (LPF: Low-Pass Filter). [FREQ] knob This knob sets the cutoff point (cutoff frequency) for the filter. - Page 16 Creating sounds Cutoff point (cutoff frequency)
- Page 17 Creating sounds Resonance...
-
Page 18: Amp Section
Creating sounds AMP section This section controls the volume of the sound, letting you change the attack and decay of the sound by controlling the output signal from the standard envelope generator. Switching between AMP control sources Use these steps to select whether to control the AMP by using the envelope generator signal (“Env”) or by using the gate signal (“GAtE”). -
Page 19: Env Section
Creating sounds ENV section This section creates control signals to make time-based changes to the sound. These signals are generated when you play the keyboard pads. The signals control the FILTER and AMP sections to change the sound and volume of each note you play over time. [ATTACK] knob (A) This knob sets the time (attack time) it takes for the control signal to reach its peak level after you press a keyboard pad. - Page 20 Creating sounds ADSR settings and envelope waveforms When the [ATTACK] knob, [DECAY] knob, [SUSTAIN] knob and [RELEASE] knob are all set to “0”, an extremely short pulse wave is generated, producing a click noise. Selecting the signal used to control the envelope (ENV TRG: envelope trigger) Follow these steps to select which signal is used for controlling the envelope generator.
- Page 21 Creating sounds Value Explanation GATE When in POLY mode, if you’ve selected a mode besides “PoLy”, the envelope goes to its attack phase each time you play a keyboard pad (completely taking your finger off a pad and then playing the next pad). If you want to make tonal or time-based changes to each note, you must play in a non-legato style.
-
Page 22: Lfo Section
Creating sounds LFO section The modulator consists of the LFO (low-frequency oscillator), RANDOM and NOISE, and produces signals for controlling the OSC and FILTER sections. Aside from this, the LFO can also output a sine wave, so that you can control OSC or FILTER when receiving MIDI modulation or pitch bend messages. - Page 23 Creating sounds LFO Mode (MENU – LFO. N ) This selects how quickly the LFO changes when LFO Sync is “OFF”. This is disabled when LFO Sync is “ON”. Value Explanation Normal mode. norN This produces the regular LFO cycle. Fast mode.
-
Page 24: Controller Section
Creating sounds Controller section Setting the sound triggering mode (POLY) This shows how to set the way that the sound source is triggered when one or more notes are played (input) using the keyboard pads or the sequencer. Hold down the [SHIFT] button and press the [POLY] pad. Turn the [TEMPO/VALUE] knob to edit the value. - Page 25 Creating sounds This also changes the FILTER KYBD (filter keyboard follow) value in the FILTER section. Hold down the [SHIFT] button and press the [STEP] button. Turn the [TEMPO/VALUE] knob to edit the value (-60–60). At this time, you can also hold down the [SHIFT] button and press a keyboard pad to make this setting within a range of -12 to +12.
-
Page 26: Efx Section
EFX section You can use effects to add spatial depth or a more expansive feel to the sound. The S-1 features three kinds of built-in effects, including delay, reverb and chorus. [DELAY] knob This adds an echoing effect by delaying the sound and repeating the delay. - Page 27 Creating sounds [REVERB] knob This effect produces reverberation, like being in a hall or room. Turn the [REVERB] knob to adjust the volume of the reverb (r0–r255). Adjust the reverb length (time) by turning the [REVERB] knob while holding down the [SHIFT] button. Configuring the reverb (REVERB) Hold down the [SHIFT] button and press pad [14] (REVERB).
- Page 28 Creating sounds Value Explanation A standard chorus effect. A chorus with faster modulation. An effect with quick modulation that’s like a rotary speaker (fast). A chorus effect with more relaxed modulation.
-
Page 29: Creating Original Waveforms For The Oscillator (Osc Draw)
Creating sounds Creating original waveforms for the oscillator (OSC DRAW) You can use a square wave oscillator to generate original waveforms. * Pulse width modulation (PWM) is not applied. Hold down the [SHIFT] button and press pad [5] (OSC DRAW). Use the [TEMPO/VALUE] knob to select a parameter, and then press pad [2] (ENTER). - Page 30 Creating sounds Parameter Value Explanation 1.0–32.0 You can synchronize the waveform you created with the ForN parameter to a single wavelength while increasing the playback speed (pitch) to generate sound. With a 1.0 value, the waveform you created is as long as a single wavelength. The larger the value, the more that the waveform gradually begins repeating from both sides within a single wavelength, while the playback speed (pitch) of the waveform you created increases.
-
Page 31: Chopping A Waveform And Emphasizing Its Harmonics
Creating sounds Chopping a waveform and emphasizing its harmonics (OSC CHOP) You can chop the waveforms that are generated by the oscillator, and emphasize their harmonics (overtones). Hold down the [SHIFT] button and press pad [6] (OSC CHOP). Use the [TEMPO/VALUE] knob to select a parameter, and then press pad [2] (ENTER). Turn the [TEMPO/VALUE] knob to edit the value. -
Page 32: Editing The Notes, Performance Data And Motions
A system for using a sound generator to play notes (pitches and note lengths) at a certain timing based on a specified set of performance data (a “sequence”) is called a “sequencer”. With the S-1 sequencer, you can handle the following performance data in units of playing time called “steps”. ●... - Page 33 These motions can be used when you create a pattern. On the S-1, you can record and play back the changes you make to a maximum of eight parameters and to the pitch bend for each pattern.
-
Page 34: Inputting With The Step Pads
Editing the notes, performance data and motions ● When the parameter changes that are recorded to a motion play back, the changes in value may differ slightly from what you actually input, due to computational error. Inputting with the step pads Press the [ó] (REC) button to make it go dark, and press the [STEP] button to make it light up. - Page 35 Editing the notes, performance data and motions While holding down the step pad, use the [TEMPO/VALUE] knob to edit the setting. Inputting a tie To input a tie that extends to the next step, press the [HOLD] button while holding down the step pad of the step whose length you wish to change.
-
Page 36: Editing With The Keyboard Pads (Chord)
Editing the notes, performance data and motions Editing with the keyboard pads (chord) Press the [STEP] button to make it go dark, and press the [ó] (REC) button to make it light up. The button toggles between lit and unlit each time you press it. The step number appears on the display. - Page 37 Editing the notes, performance data and motions When the unit is waiting for you to execute or cancel, you can delete only the parameter for a specific knob from a motion by turning that knob. (This is executed when you turn the knob.) To execute, press pad [2] (ENTER).
-
Page 38: Editing A Step
Editing the notes, performance data and motions Editing a step Press the [STEP] and [ó] (REC) buttons to make them light up. The buttons toggle between lit and unlit each time you press them. The step number appears on the display. Press a step pad to select the step to edit. - Page 39 Editing the notes, performance data and motions When you long-press a step pad that contains a tie, the note number inputted to that step is shown in the display. You can’t input a tie if a note already exists in the next step. Deleting all notes at once within a specified step Hold down the [SHIFT] button and press pad [11] (CLEAR NOTE).
-
Page 40: Inputting Your Performance In Real Time
Editing the notes, performance data and motions Inputting your performance in real time Press the [ó] (REC) button to make it light up. The display now shows the steps (record standby mode). Press the [ø] (PLAY) button to make it light up. The display indicates “rEc”, and recording begins. -
Page 41: Editing A Step While Checking What You Played
Editing the notes, performance data and motions Editing a step while checking what you played Press the [STEP] and [ó] (REC) buttons to make them light up. The buttons toggle between lit and unlit each time you press them. The step number appears on the display. Press the [ø] (PLAY) button to make it light up. - Page 42 Editing the notes, performance data and motions When you long-press a step pad that contains a tie, the note number inputted to that step is shown in the display. You can’t input a tie if a note already exists in the next step. Deleting all notes at once within a specified step Hold down the [SHIFT] button and press pad [11] (CLEAR NOTE).
-
Page 43: Deleting A Group Of Notes
Deleting a group of notes Deleting a group of notes Here’s how to delete a group of notes. Hold down the [SHIFT] button and press pad [11] (CLEAR NOTE). “CLr. n ” blinks, and the unit waits for you to execute or cancel. There are two kinds of steps that are targeted for deletion, as explained in “Delete all notes”... -
Page 44: Inputting/Deleting A Motion
These motions can be used when you create a pattern. On the S-1, you can record and play back the changes you make to a maximum of eight parameters and to the pitch bend for each pattern. -
Page 45: Useful Sequencer Functions
Useful sequencer functions Useful sequencer functions Copying step (COPY) Press the [ó] (REC) button to make it light. The step number is shown in the display. Use the [TEMPO/VALUE] knob to select the copy source step. Hold down the [STEP] button and press pad [15] (MENU). Use the [TEMPO/VALUE] knob to select “COPY”. - Page 46 Useful sequencer functions Changing the step length (P. S CL) Hold down the [STEP] button and press pad [15] (MENU). Use the [TEMPO/VALUE] knob to select “P. S CL”. Press pad [2] (ENTER). Specify the step length (1_8: eighth notes–1_32: thirty-second notes, 4t: quarter-note triplets–16t: sixteenth-note triplets).
-
Page 47: Saving A Pattern
Saving a pattern Saving a pattern Hold down the [SHIFT] button and press pad [16] (WRITE). Use the [TEMPO/VALUE] knob to select what to save. Data to save Explanation Saves the currently selected pattern. Saves all patterns. Press pad [2] (ENTER). “donE”... -
Page 48: Copying, Initializing And Reloading A Pattern
Copying, initializing and reloading a pattern Copying, initializing and reloading a pattern Copying the patterns Copies the current pattern to a specified pattern. Hold down the [SHIFT] button and press pad [15] (MENU). Use the [TEMPO/VALUE] knob to select “COPY”, and press pad [2] (ENTER). Use the [TEMPO/VALUE] knob to select the copy destination number. -
Page 49: Other Useful Functions
On the S-1, you can automatically arpeggiate the chords you play on the keyboard pad. This is the arpeggiator function. The arpeggiator on the S-1 works when you press multiple keyboard pads at the same time. When you press a single note using a non-legato technique (by pressing the next keyboard pad only after you’ve released the previous pad), the arpeggio plays... - Page 50 Other useful functions Selecting the type of phrase played by the arpeggiator Hold down the [SHIFT] button and press pad [9] (ARPEGGIO TYPE). Use the [TEMPO/VALUE] knob to select the arpeggio type. TYPE Explanation Down doľn Up&Down UP. d ľ Up 2oct UP.
- Page 51 Other useful functions Hold down the [SHIFT] button and press pad [10] (ARPEGGIO RATE). Use the [TEMPO/VALUE] knob to select the arpeggio note length. RATE Explanation Quarter note Eighth note Sixteenth note 1_16 Thirty-second note 1_32 Eighth-note triplet Sixteenth-note triplet Thirty-second-note triplet If the timing you use when playing each note of the chord is considerably off, the arpeggio might not start playing right away.
-
Page 52: Using The Manual Function
Other useful functions Using the manual function What’s the manual function? The manual function applies the position of all of the knobs to the tone. This is useful in situations like when you want to create a tone from scratch. When you want to create a sound from scratch, we recommend that you either select an empty pattern from 2-01 onward, or follow the steps in “Initializing a... -
Page 53: Looping Specific Steps (Step Loop)
Other useful functions Looping specific steps (step loop) You can make a selected step or steps play back in a loop during pattern playback. You can make more than one step play back in a loop at the same time. Press the [ø] (PLAY) button to start playback (the button lights up). -
Page 54: Transposing (Key Transpose)
Other useful functions Transposing (key transpose) You can transpose the pitches played by the keyboard pads and the sequencer. Hold down the [SHIFT] button and press the [STEP] (KEY TRANSPOSE) button. Turn the [TEMPO/VALUE] knob to edit the value. Parameter Value Key transpose -60–+60... -
Page 55: Controlling The Parameters By Tilting This Unit (D-Motion)
Controlling the parameters by tilting this unit (D-MOTION) The S-1 features D-MOTION, which lets you control the tones according to the angle at which this unit is tilted. You can add various effects by tilting this unit while you play. - Page 56 Other useful functions OFF: No parameters are changed. roLL (Roll) Nod (Modulation): A cyclical change is applied to the pitch or filter according to how the unit is tilted, just like when MIDI modulation data is received. (The effect is the same for both positive and negative directions.) Adjust the effect speed with the LFO [RATE] knob(P.5), and the depth with...
-
Page 57: Adding A Rising Or Falling Sound To Your Performance (Riser)
Other useful functions Adding a rising or falling sound to your performance (Riser) What’s a “Riser”? A Riser is a rising sound that’s added to a song as the song builds in excitement and reaches its climax. In contrast, a “Downer” is a falling sound. -
Page 58: Using The Metronome
Other useful functions Using the metronome Configuring the metronome Here’s how to change how the metronome plays and its volume. Hold down the [SHIFT] button and press pad [15] (MENU). Use the [TEMPO/VALUE] knob to select the parameters below, and then press pad [2] (ENTER). Parameter Value Explanation... -
Page 59: Setting The Probability For The Entire Pattern (Master Probability)
Other useful functions Setting the probability for the entire pattern (master probability) This shows how to set the probability for the notes in the entire pattern to play (the master probability). The master probability value is added or subtracted from the probabilities that each step plays. Because of this, you can use the master probability to lower the chance that the step sounds even more, for steps on which you’ve already individually lowered the probability. -
Page 60: Using Global Delay/Reverb
Other useful functions Using global delay/reverb What’s global delay/reverb? On this unit, you can select whether to control delay and reverb by using the pattern parameters or by using the system parameters. “Global delay/reverb” refers to using the system parameters to control the delay and reverb. The global delay/reverb parameters are saved in the system parameters. -
Page 61: Connecting To A Computer Or Mobile Device
Connecting to a computer or mobile device Connecting to a computer or mobile device You can transmit and receive audio and MIDI data by connecting a USB cable from your computer or mobile device (smartphone or tablet) to this unit. You don’t need to install a device driver on your computer or mobile device to do this, since this unit supports USB Audio Device Class 2.0 specs. -
Page 62: Restoring The Factory Settings (Factory Reset)
“FACt” is indicated, and the [D-MOTION] button blinks. To cancel the factory reset, turn off the power. Press the [D-MOTION] button. This executes the factory reset. Once “dOnE” is displayed and all buttons are blinking, turn the power of the S-1 off and then on again. -
Page 63: Backing Up And Restoring Data
Drag the “S-1” icon to the Trash icon in the Dock. Turn the S-1 off. Restoring Execute steps 1–3 in “Backup”, and then open the “S-1” drive on your computer. The drive on this unit takes 1–2 minutes to get ready. The keyboard pads light up to show the progress. -
Page 64: Using The Functions
Using the functions Using the functions Hold down the [SHIFT] button and press a keyboard pad. This lets you configure and execute a variety of function parameters. List of functions Controller Explanation [OCT-] pad Switches between octaves for the keyboard pads. By holding down the [SHIFT] button and pressing the [OCT-] pad and the [OCT+] pad, you can reset the [OCT+] pad octave to zero. - Page 65 Motions are used to record your operations (such as when turning the knobs) into the sequencer and play them back. On the S-1, you can record eight types of knob motions (or MIDI control change messages corresponding to the parameters) and MIDI pitch bend data for each pattern.
- Page 66 Using the functions Controller Explanation Hi. C t (High Cut): Cuts the frequencies above the frequency that you set (630–12.5 kHz, FLAT). No frequencies are cut when this is set to “FLAt ”. Controls the reverb. tyPE: This selects the reverb type. ●...
-
Page 67: Using The Menus
Using the menus Using the menus Hold down the [SHIFT] button and press step pad [15] (MENU). Use the [TEMPO/VALUE] knob to select the item, and then press pad [2] (ENTER). Menu list Item Value Explanation Sets the pattern’s volume. 0–127 (Volume) (*1) Sets the depth of the effect (vibrato or growl) applied to the OSC or FILTER from the LFO... - Page 68 Using the menus Item Value Explanation Sets whether the LFO is reset when a note-on message is received or played. LFO. K OFF, On (LFO Key Trigger) (*1) Selects the chorus type. OFF, 1–4 1: A standard chorus effect. 2: A chorus with faster modulation. (Chorus) (*1) 3: Adds an effect similar to a rotary speaker (fast).
- Page 69 Using the menus Item Value Explanation Sets the keyboard velocity. vELo 1–127 (Key Velocity) Sets the master tuning. tUnE 433. 0 –448. 0 (Tune) Default value: 440.0 Hz Configures the volume of the signal output to USB. OFF, 1–127 USb. d OFF: Uses the VOLUME knob’s setting.
-
Page 70: Knob Assignments
Knob assignments Knob assignments Characters shown in quotes indicate the first character that’s displayed. “(#number)” indicates the MIDI controller number. Operate while holding down the Section Knob Normal operations [SHIFT] button [RATE] knob LFO MODE (#79) LFO RATE (“r” [when LFO SYNC: OFF], #3) [WAVE FORM] LFO WAVE FORM (#12) LFO SYNC (“S”, #106) (Ver.1.02) -
Page 71: Main Specifications
Weight (including batteries) 11 oz Accessories Leaflet “Read Me First” USB Type-C to USB A cable * This document explains the specifications of the product at the time that the document was issued. For the latest information, refer to the Roland website. -
Page 72: Signal Flow
Signal flow Signal flow... -
Page 73: Midi Implementation Chart
MIDI implementation chart MIDI implementation chart AIRA Compact Model: S-1 Date: Apr. 18, 2023 Version 1.02 Function Transmitted Recognized Remarks Basic Default 3 (Synth), 16 (Program 3 (Synth), 16 (Program Memorized Channel Change) Change) Changed 1–16 1–16 Mode Default Mode 3... - Page 74 MIDI implementation chart Control Change Explanation Expression Pedal LFO WAVE FORM (LFO [WAVE FORM] knob) OSC LFO (OSCILLATOR [LFO] knob) OSC RANGE (OSCILLATOR [RANGE] knob) OSC PULSE WIDTH ([SHIFT] button + [PWM DEPTH] pad) ([SHIFT] +OSCILLATOR [ ] knob) OSC PWM SOURCE ([SHIFT] button + [PWM SRC] pad) LFO MODULATION DEPTH ([SHIFT] button + pad [15] (MENU): LFO Modulation Depth) OSC BEND SENS ([SHIFT] button + pad [15] (MENU): Oscillator Bend Sens) LEVEL (OSCILLATOR [...
- Page 75 MIDI implementation chart Owner’s Manual ©2023 Roland Corporation...