Table of Contents
Advertisement
Advertisement
Table of Contents

Related Manuals for Roland 5100011346 -01


Summary of Contents for Roland 5100011346 -01
- Page 3 All rights reserved. No part of this publication may be reproduced in any form without the written permission of ROLAND CORPORATION. Roland is registered trademarks or trademarks of Roland Corporation in the United States and/or other countries. Copyright © 2010 ROLAND CORPORATION...
-
Page 4: Using The Unit Safely
(except when this manual provides specific instructions directing you to do so). Refer all servicing to your retailer, the nearest Roland Service Center, or an authorized Roland distributor, as listed on the separate sheet titled “Information.” ● Never install the unit in any of the following locations. - Page 5 AC adaptor (if one is being used) from the power outlet. And request servicing by your retailer, the nearest Roland Service Center, or an authorized Roland distributor, as listed on the separate sheet titled “Information”...
- Page 6 USING THE UNIT SAFELY 103b ● At regular intervals, you should unplug the AC adaptor and clean it by using a dry cloth to wipe all dust and other accumulations away from its prongs. Also, disconnect the power plug from the power outlet whenever the unit is to remain unused for an extended period of time.
-
Page 7: Important Notes
Roland assumes no liability concerning such loss of data. Additional Precautions ● Please be aware that the contents of memory can be irretrievably lost as a result of a malfunction, or the improper operation of the unit. - Page 8 MMP (Moore Microprocessor Portfolio) refers to a patent portfolio concerned with microprocessor architecture, which was developed by Technology Properties Limited (TPL). Roland has licensed this technology from the TPL Group. MatrixQuest™ 2007 TEPCO UQUEST, LTD. All rights reserved. The SD-50‘s USB functionality uses Matrix-Quest middleware technology from TEPCOUQUEST, LTD.
-
Page 9: Table Of Contents
Contents USING THE UNIT SAFELY...4 IMPORTANT NOTES...7 Check the Contents of the Package ...12 Getting Ready Names of Things and What They Do...14 Front Panel... 14 Rear Panel... 16 Side Panel ... 18 Bottom Panel ... 19 Turning the Power On/Off ...20 Before You Turn the Power On... - Page 10 Contents Operation Using the SD-50 as a MIDI Sound Module ...44 About the Sound Generator... 44 Explanation of Terms ... 45 Polyphony... 45 Selecting a Tone For Each Part ... 46 Selecting From the Tone List ... 46 Selecting by Category or Group ... 47 Viewing a Tone’s Program Change and Bank Select Numbers ...
- Page 11 System Settings...72 Basic Procedure for System Settings ... 72 System Setting List ... 73 Utility Functions ...74 Basic Procedure... 74 Backing Up User Data (BACKUP)... 75 Restoring Backed-Up Data to The SD-50 (RESTORE) ... 75 Formatting USB Memory (USB MEM FORMAT) ... 76 Returning to the Factory Settings (FACTORY RESET) ...
-
Page 12: Check The Contents Of The Package
Check the Contents of the Package When you open the package, check that all items are present. If anything is missing, please contact your dealer. ❏ SD-50 (main unit) ❏ SD-50 Owner’s Manual (the document you’re reading) This explains how to use the SD-50, and includes cautions and other notes. Keep it at hand for reference. ❏... -
Page 13: Getting Ready
Getting Ready... -
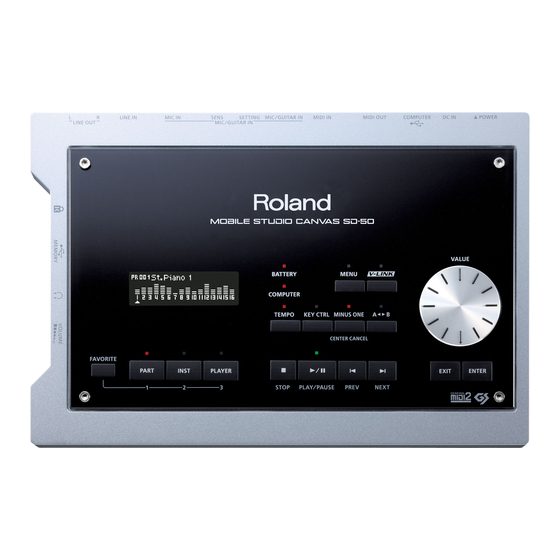
Page 14: Names Of Things And What They Do
Names of Things and What They Do Front Panel fig.panel-front_e.eps Display Useful information relevant to the procedure at hand is shown here. * The explanations in this manual include illustrations that depict what should typically be shown by the display. Note, however, that your unit may incorporate a newer, enhanced version of the system (e.g., includes newer sounds), so what you actually see in the display may not... - Page 15 [TEMPO] button This button changes the tempo of the song (p. 68). [KEY CTRL] button This button changes the key of the song (p. 68). [MINUS ONE] (CENTER CANCEL) button This button lets you mute a part in a song or reduce the volume of the melody (e.g., vocal), so that you can play that part or melody yourself (p.
-
Page 16: Rear Panel
Names of Things and What They Do Rear Panel ig.XLR_e.eps [POWER] switch This switch turns the power on/off (p. 22). Setting Explanation When connected to a computer and using bus power, this setting turns the power on. Turns the power off. DC IN/ When using an AC adaptor or batteries (sold BATTERY... -
Page 17: Ground Terminal
When the unit is grounded, a slight hum may occur, depending on the particulars of your installation. If you are unsure of the connection method, contact the nearest Roland Service Center, or an authorized Roland distributor, as listed on the separate sheet titled “Information.” Unsuitable places for connection •... -
Page 18: Side Panel
Names of Things and What They Do Side Panel fig.panel-side_e.eps Security Slot ( http://www.kensington.com/ USB MEMORY connector Connect USB memory (sold separately) here (p. 64). * Carefully insert the USB memory all the way in—until it is firmly in place. PHONES jack Connect headphones here. -
Page 19: Bottom Panel
Bottom Panel fig.battery-0_e.eps Battery compartment Install six commercially available AA nickel-metal hydride batteries or alkaline batteries in the battery compartment. This allows the unit to be used even when the AC adaptor is not connected. Batteries that can be used Please use nickel-metal hydride batteries or alkaline batteries. -
Page 20: Turning The Power On/Off
Turning the Power On/Off Before You Turn the Power On Using the AC Adaptor Connect the included AC adaptor and power cord. Connect the AC adaptor to the DC In connector on the rear panel. fig-connect-AC-Adaptor_e.eps Indicator AC adaptor * Place the AC adaptor so the side with the indicator (see illustration) faces upwards and the side with textual information faces downwards. -
Page 21: Using Bus Power
Making sure that each battery is oriented in the correct polarity (+/–), insert the batteries into the battery compartment. fig.Battery-2.eps Securely close the battery compartment lid. Battery remaining indication When the batteries run low, the BATTERY indicator will light. If you continue use, the BATTERY indicator will blink. Please stop using the unit, and replace the batteries. fig.battery-3_e.eps * If you continue playing even when the indicator is blinking, the display will indicate “Battery Low!”... -
Page 22: Turning The Power On/Off
Turning the Power On/Off Turning the Power On/Off Turning the Power On Once the connections have been completed (p. 20), turn on power to your various devices in the order specified. By turning on devices in the wrong order, you risk causing malfunction and/or damage to speakers and other devices. -
Page 23: Installing The Driver
Installing the Driver A driver is software that transfers data between the SD-50 and the application software on your computer when the SD-50 is connected to your computer. The procedure for installation and checking will depend on your system. Perform the following three steps to install and check the driver. -
Page 24: Windows 7/Windows Vista Users
Installing the Driver Windows 7/Windows Vista Users Steps to be performed on the SD-50 sound module itself are marked by a connect the SD-50 to your computer until you are told to do so. * The example screen shots included here are taken from Windows 7. With the SD-50 disconnected, start up Windows. - Page 25 A user account control confirmation screen will appear. Click [Yes] if you’re using Windows 7, or click [Continue] if you’re using Windows Vista. fig.win7uac_e.eps The screen will indicate “SD-50 Driver will be installed on your computer.” Click [Next]. If any other message appears, proceed as directed by the message. To begin the installation, click [Next] once again.
-
Page 26: Input/Output Device Settings
Installing the Driver Operation of the SD-50 The driver will be installed automatically. * It can take several minutes for the driver installation to complete. When the installation is completed, the “SD-50 Driver Setup” dialog box will indicate “Installation has been completed.”... - Page 27 Settings when using the SD-50 in Windows Media Player Here’s how to specify the SD-50 as the system default playback device so that it can be used with Windows Media Player. * In “Verifying That You Hear Sound” (p. 38), you’ll use Windows Media Player to play back sample data. Be sure to make the settings described below.
-
Page 28: Windows Xp Users
Installing the Driver Windows XP Users Steps to be performed on the SD-50 sound module itself are marked by a connect the SD-50 to your computer until you are told to do so. With the SD-50 disconnected, start up Windows. Disconnect all USB cables from your computer, with the exception of those for a USB keyboard and USB mouse (if used). - Page 29 Operation of the SD-50 connect the SD-50 to your computer. fig.xpdrv4-e.eps_27 If any other message appears, proceed as directed by the message. Operation of the SD-50 The indication “Found New Hardware” will appear in the lower right corner of your screen. * It may take several minutes for the “Found New Hardware Wizard”...
- Page 30 Installing the Driver If the “Hardware Installation” dialog box appears, click [Continue Anyway] to continue the installation. fig.xpdrv7-e.eps If you are unable to proceed, click [OK] in the dialog box to terminate the installation. Then change the setting as described in “Driver Signing Option Settings (Windows XP)” (p. 99), and perform the installation once again. The screen will indicate “Completing the Found New Hardware Wizard.”...
-
Page 31: Input/Output Device Settings
Input/Output Device Settings In order to use the SD-50 with your software, you must select the SD-50 as the audio input/output device. For details on how to make this setting, refer to the documentation for the software you’re using. * If you’re unable to select the SD-50 as the audio input/output device in your software, it may be that a problem has occurred. - Page 32 Installing the Driver Settings when using the SD-50 in Windows Media Player Here’s how to specify the SD-50 as the system default playback device so that it can be used with Windows Media Player. * In “Verifying That You Hear Sound” (p. 38), you’ll use Windows Media Player to play back sample data. Be sure to make the settings described below.
-
Page 33: Mac Os X Users
Mac OS X Users Steps to be performed on the SD-50 sound module itself are marked by a connect the SD-50 to your computer until you are told to do so. * If the “Authenticate” or “Installer requires that you type your password” dialog box appears during the installation, enter an administrator password and click [OK]. -
Page 34: Input/Output Device Settings
Installing the Driver In the next screen, click [Continue Installation]. When installation is completed, click [Restart] to restart your computer. * It may take some time for your computer to restart. Operation of the SD-50 Operation of the SD-50 your computer. Operation of the SD-50 Input/Output Device Settings In order to use the SD-50 with your software, you’ll need to select the SD-50 as the audio input/output device (p. - Page 35 Using the SD-50 with iTunes Here’s how to specify the SD-50 as the sound output device so that it can be used with iTunes. In “Verifying That You Hear Sound” (p. 38), you’ll use iTunes to play back sample data. Be sure to make the settings described below.
- Page 36 Installing the Driver Click [Add Device] three times. fig.osxadddevice-e.eps Three [New Device] items will appear. Specify the device name for each [New Device]. Select the [New Device] you added, and click [Show Info]. Enter the name in the [Device Name] field. For each [New Device], enter the following names. fig.osxnewdevice-e.eps New Device First [New Device]...
- Page 37 Check to make sure that MIDI transmission and reception takes place normally. Click “Test Setup.” Turn down the SD-50’s volume. The following step will cause a fairly loud sound to be produced from the SD-50. Click the SD-50’s downward arrow. If the SD-50 produces sound, the settings are correct.
-
Page 38: Verifying That You Hear Sound
Installing the Driver Verifying That You Hear Sound Now let’s play back some sample data to verify that the connections and settings are correct. * To prevent malfunction and/or damage to speakers or other devices, always turn down the volume, and turn off the power on all devices before making any connections. -
Page 39: Playing Back The Sample Data
Playing Back the Sample Data Here we will play back sample data using the standard functionality provided by your operating system. The sample data “TTears(.mp3)” is in the included DVD-ROM. * Copyright law prohibits you from using the song data included with this product for any purpose other than personal enjoyment unless you have obtained permission from the copyright holder. -
Page 40: Using Playlist Editor
Using Playlist Editor You can create playlists for playing SMFs or audio files on the SD-50 using the Playlist Editor. When using the SD-50 to play backing tracks (accompaniment), it’s convenient to create a playlist that specifies the desired order for the songs. For details on using this, refer to the PDF manual that is installed together with Playlist Editor. -
Page 41: Creating A Playlist
Creating a Playlist Start up Playlist Editor and create a playlist. PlaylistEditor.eps_35 * For details on how to create a playlist, refer to “PlaylistEditorManual.E.pdf” from the “Playlist Editor” help. * You’ll need to use the included “Playlist Editor” to create playlists. They cannot be created on the SD-50 itself. * You can play songs individually without creating a playlist. - Page 42 MEMO...
-
Page 43: Operation
Operation... -
Page 44: Using The Sd-50 As A Midi Sound Module
“The Solo sounds and how to play them” (p. 106). Number of sounds Explanation This sound set complies with the “GS” sound generator format promoted by Roland Corporation. * If GS mode is selected, the following settings will be unavailable. 226 sounds +9 drum sets •... -
Page 45: Explanation Of Terms
Explanation of Terms Tone On the SD-50, a “tone” is the unit of sound (e.g., piano, organ, guitar) that you can select. For the available tones, refer to PDF “Tone List.” Drum set A “drum set” is a group of percussion instrument sounds. Since percussion instruments are not usually used to play a melody, it’s not necessary that you be able to play different pitches of the instrument from the keyboard. -
Page 46: Selecting A Tone For Each Part
Using the SD-50 as a MIDI Sound Module Selecting a Tone For Each Part Selecting From the Tone List Here’s how to select a tone from a list. Refer to PDF “Tone List” for information on the available tones. Press the [PART] button a number of times to access the MIDI part screen. page_part_meter.eps Turn the [VALUE] dial to select the part whose tone you want to change. -
Page 47: Selecting By Category Or Group
Selecting by Category or Group Here’s how to select a tone by category such as piano or organ, or from a group such as PRESET, GM2, or Solo. Press the [PART] button a number of times to access the MIDI part screen. page_part_meter.eps Turn the [VALUE] dial to select the part whose tone you want to change. -
Page 48: Viewing A Tone's Program Change And Bank Select Numbers
Using the SD-50 as a MIDI Sound Module Viewing a Tone’s Program Change and Bank Select Numbers Here’s how to check the program change and bank select numbers of the currently selected tone. Press the [INST] button a number of times to access the tone information screen. page_tone_info.eps... -
Page 49: Adjusting The Settings Of Each Part
Adjusting the Settings of Each Part For each part, you can adjust its volume and other settings, and apply effects to the sound. Muting/Soloing a Part You can “mute” a specific part so that it will not produce sound. Conversely, you can “solo” a specific part so that it will play while all of the other parts are muted. Press the [PART] button a number of times to access the MIDI part screen. -
Page 50: Adjusting Each Part's Volume
Using the SD-50 as a MIDI Sound Module Adjusting Each Part’s Volume Here’s how to adjust the volume of a specific part. Press the [PART] button a number of times to access the MIDI part screen. page_part_meter.eps Turn the [VALUE] dial to select the part whose volume you want to adjust, and then press the [ENTER] button twice. -
Page 51: Adjusting The Pan And Effect Depth
Adjusting the Pan and Effect Depth You can specify the pan (stereo position) of each part, and adjust the depth of the reverb and chorus effects for each part. Press the [PART] button a number of times to access the Part Edit screen. page_part_edit-1.eps Turn the [VALUE] dial to select the effect whose settings you want to adjust, and then press the [ENTER] button. -
Page 52: Adjusting The Effect Settings
Using the SD-50 as a MIDI Sound Module Adjusting the Effect Settings Here’s how to adjust the effect settings and other settings of the studio set. Press the [PART] button a number of times to access the Studio Set Edit screen. page_studio_edit.eps Turn the [VALUE] dial to select the item you want to edit, and then press the [ENTER] button. - Page 53 Using the SD-50 as a MIDI Sound Module Turn the [VALUE] dial to adjust the setting. The effect settings you adjust will be saved in internal memory if you save the studio set (p. 52).
-
Page 54: Saving A Studio Set
Using the SD-50 as a MIDI Sound Module Saving a Studio Set You can save the studio set you’ve edited. This means that the sounds you’ve selected for the SD-50’s parts, as well as other settings, will be saved in internal memory. You can save three different studio sets in internal memory. Edit the studio set as desired. -
Page 55: Using The Sd-50 As An Audio Interface
Using the SD-50 as an Audio Interface By connecting the SD-50 to your computer, you can use it as an audio interface. This also allows you to connect a microphone or guitar, and record your vocal or instrumental performance into the computer. -
Page 56: Listening To Playback From Your Computer
Using the SD-50 as an Audio Interface Listening to Playback from Your Computer Use a USB cable to connect the SD-50 to your computer. Play back an audio file (e.g., WAV or MP3) on your computer. The playback of your computer will be heard from the SD-50. Recording Your Microphone or Guitar If you connect a microphone or guitar to the SD-50, you’ll be able to record a vocal or guitar performance into the computer. -
Page 57: Recording
Adjust the input level Press the [PART] button a number of times to access the audio part screen. The level meters will appear. page_audio_meter-mic.eps Turn the [SENS] knob to adjust the input volume. In order to record with the best audio quality, use the [SENS] knob to increase the level as far as possible without allowing an overload to occur;... -
Page 58: Recording Sound From The Line Input
Using the SD-50 as an Audio Interface Recording Sound From the Line Input You can connect your portable audio player or other audio device to the SD-50’s line input, and record the sound into the computer from that device. Getting Ready to Record Connect your audio device Use a USB cable to connect the SD-50 to your computer. -
Page 59: Input/Output And Effect Settings
Input/Output and Effect Settings Here you can apply an effect to the external audio input via a microphone or guitar, and specify how the audio is to be output. Press the [PART] button a number of times to access the Audio Setting screen. page_audio_setting-1.eps Turn the [VALUE] dial to select the item you want to edit, and then press the [ENTER] button. -
Page 60: Using The Sd-50 As A Midi Interface
Using the SD-50 as a MIDI Interface You can connect a MIDI keyboard to the SD-50 and use it as a MIDI interface for your computer. This lets you create song data by playing your MIDI keyboard. For details on how to make the necessary settings, refer to the user’s guide for the software you’re using. -
Page 61: Using The Sd-50 As An Smf/Audio Player
* Carefully insert the USB Memory all the way in—until it is firmly in place. * Please use USB memory sold by Roland. Operation cannot be guaranteed if you use other products. * If you’re using new USB memory, you must first format it using the SD-50 (p. 74). - Page 62 Using the SD-50 as an SMF/Audio Player What is SMF? SMF (Standard MIDI File) is a data format that was created in order to standardize music data across manufacturers. Many collections of SMF music data are available in a wide range of musical styles for listening enjoyment, instrument practice, or karaoke.
-
Page 63: Listening To The Demo Songs
Listening to the Demo Songs Here’s how to listen to the demo songs that are built into the SD-50. Switch on the SD-50’s power (p. 22). Press the [PLAYER] button twice; the playlist screen will appear. The button’s indicator will light. fig.screen_play_list.eps Turn the [VALUE] dial to move the cursor to “Demo Songs.”... -
Page 64: Playing Back
Using the SD-50 as an SMF/Audio Player Playing Back Selecting a Song Connect USB memory containing playlists and songs to the SD-50. Press the [PLAYER] button a number of times to access the playlist screen. The button’s indicator will light. fig.screen_play_list.eps * If a is shown at the left of the playlist name, you cannot edit that playlist’s settings or change the settings of the... -
Page 65: Playing A Song
Press the [ENTER] button. The play screen will appear. page_song_player-opening.eps Playing a Song From the play screen, press the [ Playback operation buttons Operation Press the [ ] button Press the [ ] button Press the [ ] button Press the [ ] button Press the [ ] button... - Page 66 Using the SD-50 as an SMF/Audio Player Adjusting the volume of the song In the play screen, turn the [VALUE] dial. The screen will appear as follows, you can change the volume. You can also adjust the song volume from the audio part screen (p. 59). page_song_playe-volumer.eps Chain Play / Repeat All settings You can use Chain Play for the songs in the playlist, or play all songs repeatedly.
- Page 67 A-B Repeat This lets you repeatedly play back a specific region within a song. This is a convenient way to listen repeatedly to a passage of interest. Play back the song. During playback, press the [ Start point (A) has now been specified. The [ ] button’s indicator will blink.
-
Page 68: Changing The Tempo
Using the SD-50 as an SMF/Audio Player Changing the Tempo Play back a song. * If you change the tempo while the song is stopped, the song’s playback tempo will not be changed. Press the [TEMPO] button. The tempo screen will appear. page_tempo.eps Turn the [VALUE] dial. -
Page 69: Using Minus-One And Center Cancel (Minus One/Center Cancel)
Using Minus-One and Center Cancel (MINUS ONE/CENTER CANCEL) When playing back a song, you can use these functions to mute the specified part(s) so that you can perform it yourself, or minimize the melodic portion so that you can perform it. If you’ve connected a microphone or guitar, you can use the SD-50 to play back an accompaniment while you perform on vocals or guitar. -
Page 70: Selecting Favorite Songs (Favorite)
Using the SD-50 as an SMF/Audio Player Selecting Favorite Songs (FAVORITE) You can register up to three songs as “favorites,” so they can later be instantly recalled at the press of a button. Registering a Favorite Song Access the song list (p. 64). fig.page_song_list.eps Press the [FAVORITE] button for a number of seconds until the REGIST SONG screen appears. -
Page 71: Adjusting The Input/Output Volume
Adjusting the Input/Output Volume Here’s how to adjust the playback level for an SMF or audio file, or adjust the input level for a microphone or guitar. Press the [PART] button a number of times to access the audio part screen. page_audio_meter.eps Turn the [VALUE] dial to select the item that you want to edit, and then press the [ENTER] button. -
Page 72: System Settings
System Settings Here you can make “system” settings that apply to the overall operation of the SD-50, such as the tuning and the brightness of the display. Basic Procedure for System Settings Press the [MENU] button. The menu screen will appear. menu-1.eps Turn the [VALUE] dial to select the parameter that you want to edit, and then press the [ENTER] button. -
Page 73: System Setting List
System Setting List Indication LCD Contrast GM TYPE Master Tune Output Gain Minus One Battery Mastering Auto Power Off Time Auto Save Mode Range Explanation Adjusts the brightness of the display. 1–10 Higher settings make the display brighter. Switches the GM sound type. •... -
Page 74: Utility Functions
For details on the settings that can be saved as user data, refer to p. 105. * Please use USB memory sold by Roland. Operation cannot be guaranteed if any other product is used. * “BACKUP,” “RESTORE” and “USB MEM FORMAT” are not available while the SD-50 is connected via USB to a computer. -
Page 75: Backing Up User Data (Backup)
Backing Up User Data (BACKUP) Here’s how to save user data to USB memory. This operation is called “backup.” Connect your USB memory device to the SD-50. In the utility screen, select “User Backup.” page_util-back.eps Press the [ENTER] button. The following screen will appear. back-up-dialog.eps To cancel without executing, press the [EXIT] button. -
Page 76: Formatting Usb Memory (Usb Mem Format)
Utility Functions Press the [ENTER] button. The following screen will appear. Restore-dialog.eps To cancel without restoring, press the [EXIT] button. To execute the restore operation, press the [ENTER] button. When the restore is completed, the following screen will appear. page_power_off.eps Turn the SD-50’s power off, then on again. -
Page 77: Returning To The Factory Settings (Factory Reset)
Returning to the Factory Settings (FACTORY RESET) Here’s how you can return all settings in the SD-50 to their factory-set condition. This operation is called “factory reset.” If the SD-50 contains important data you’ve created, be aware that all of your data will be lost when the factory reset operation is executed. -
Page 78: Viewing Information About The Sd-50 (Information)
Utility Functions Viewing Information About the SD-50 (INFORMATION) Here’s how to view the version of the SD-50’s system software, and the remaining battery power. In the utility screen, select “INFORMATION.” page_util-infor.eps Press the [ENTER] button. The following screen will appear. page_system_info.eps Press the [EXIT] button to return to the previous screen. -
Page 79: Appendix
Appendix... -
Page 80: Controlling Daw Software
Controlling DAW Software When the SD-50 is connected to your computer, you can use the SD-50 to control your DAW software. For example, you can press the SD-50’s [ fig.connect-MIDI-Cont_e.eps SD-50 The MIDI messages transmitted from the SD-50 are compatible with Mackie Logic Control. As described in the owner’s manual of your DAW software, set your DAW software so that it can be controlled by the following MIDI messages. -
Page 81: About V-Link
About V-LINK What is V-LINK? V-LINK ( compatible devices are connected via MIDI, you’ll be able to easily enjoy a variety of visual effects that are linked to the expressive elements of your performance. For example, if you use the SD-50 with the EDIROL P-10, you’ll be able to do the following. •... - Page 82 About V-LINK Turning V-LINK On/Off Press the [V-LINK] button. The button will light, and the following screen will appear. fig.screen_vlink.eps V-LINK will turn on. When the V-LINK button is on, the video can be controlled in tandem with operations of the SD-50. Press the [V-LINK] button once again.
-
Page 83: Driver Settings
Driver Settings The settings window of the SD-50 driver allows you to make settings such as the audio input/output buffer size. Decreasing the buffer size will decrease the latency and improve the realtime response. However, depending on the processing power of your computer and the complexity of your song data, this may make clicks and pops during recording or playback more likely. - Page 84 Driver Settings About the Items in the Settings Dialog Box fig.driver-e.eps Setting Audio Buffer Size ASIO Buffer Size Use Smaller ASIO Buffer Size Use ASIO Direct Monitor Light Load Show “README” Driver version Description This lets you adjust the buffer size for the audio input/output. (The default setting is the sixth position from the left.) * If you change the buffer size, you must restart the application that’s using the SD-50, or if you’re using an application that has an audio device test function, you must...
- Page 85 MAC OS X Users Use a USB cable to connect the SD-50 to your computer, then switch on the SD-50’s power. In “System Preferences,” click “SD-50.” The Driver Settings screen will appear. About the Items in the Settings Dialog Box fig.Driverset-mac-e.eps Setting Audio Buffer Size...
-
Page 86: Reinstalling The Driver
Reinstalling the Driver If a problem occurred while installing the driver, use the following procedure to reinstall it. Uninstall the SD-50 driver as described in “Removing the driver.” Install the driver once again as described in “Installing the Driver” (p. 23). Removing the Driver Your computer may fail to correctly recognize the SD-50 if the driver could not be installed according to the specified procedure. - Page 87 Mac OS X Users Start up your computer with all USB cables disconnected. Make sure that all USB cables other than those for a USB keyboard and USB mouse (if used) are disconnected. Insert the included DVD-ROM into the DVD-ROM drive of your computer. Double-click one of the following icons on the DVD-ROM to start up the uninstaller.
-
Page 88: Troubleshooting
If you experience a problem, read this chapter first. It contains information that may help you solve the problem. If the information here does not help you solve the problem, try accessing the Roland website. If you are still unable to solve the problem, please contact a service location listed at the end of this manual. -
Page 89: Problems With Effects
Even though you set a tone’s pan all the way to one channel, sound is still heard from the opposite channel The SD-50’s built-in effects are stereo. This means that if you’ve applied an internal effect, the effect sound will still be heard from the opposite channel even if a tone is panned all the way to one side. - Page 90 Troubleshooting • Could there be system exclusive data at the locations where the playback lags? Try changing the location of the system exclusive data. Since system exclusive messages involve a large amount of data, they can place a significant processing load on the sequencer or sound module.
- Page 91 Problems with USB Memory USB memory is not recognized Files are not displayed • It may be that the USB memory has not been formatted correctly. If the USB memory was formatted by a device other than the SD-50, use the SD-50 to format it (p. 76). Can’t back up to USB memory Check the following points.
-
Page 92: Problems When Installing The Driver
Troubleshooting Problems that Can Occur when Connected to a Computer For help with Windows or Mac OS X operation, refer to the documentation for your computer or operating system. Problems when Installing the Driver Can’t start up the installer Is the DVD-ROM inserted correctly in your DVD- ROM drive? Make sure that the DVD-ROM is correctly inserted in the DVD- ROM drive. - Page 93 Could other software be running, perhaps in the background (such as anti-virus software)? The installation may not occur correctly if other software is running. Be sure to close all other software before you perform the installation. Installation is not successfully completed After you connect the SD-50, it may take several minutes before it is recognized by your computer This is not a malfunction.
-
Page 94: Problems With Settings
Troubleshooting Problems with Settings Can’t select/use the SD-50 within software or in system settings Could the SD-50 be in use by other software? Close all software you currently have running. Next, switch off the SD-50’s power, then turn it back on again. If this does not solve the problem, reinstall the driver. -
Page 95: Problems With Playback Or Recording
Problems with Playback or Recording Can’t play or record Was the driver installed correctly? Driver installation may have failed. Reinstall the driver. ➝ “Reinstalling the Driver” (p. 86) Did you make input/output device settings for your software? Refer to the owner’s manual of your software and to the following pages, and select the SD-50 as the input/output device. - Page 96 Troubleshooting No sound from your computer’s speakers If you connect the SD-50 to your computer, sound will not be heard from your computer’s speakers This is not a malfunction. Connect your headphones or audio playback system (external monitors) to the SD-50. Sound played by your computer is inaudible or too soft Can you hear sound by connecting headphones?
- Page 97 Check the power management settings You may be able to eliminate clicks and pops by changing your system’s power management settings. ➝ “Power Management Settings” (p. 100) Try updating the driver of your display adaptor (Windows) You may be able to eliminate clicks and pops by updating the driver for the display adaptor installed in your computer.
- Page 98 Troubleshooting Try adjusting “Hardware Acceleration” in the advanced display properties (Windows XP) In some cases, adjusting your graphics acceleration settings may solve problems with noise during audio playback. ➝ “Hardware Acceleration Settings (Windows XP)” (p. 99) Noise or distortion occurs elsewhere than in the playback from your computer Is a guitar connected? If the noise decreases when you lower your guitar’s volume, it...
- Page 99 Settings for Your Computer that Can Prevent Problems This section explains how to make settings on your computer to avoid the problems described in “Problems that Can Occur when Connected to a Computer” (p. 92). Driver Signing Option Settings (Windows XP) Driver installation may not be possible due to your settings for “Driver Signing Options.”...
-
Page 100: Power Management Settings
Troubleshooting Power Management Settings If you experience problems such as interrupted notes or dropouts in the sound, you may be able to solve the problem by changing your computer’s power management settings. Windows 7 users Open the “Control Panel,” click [System and Security], and then click [Power Options]. -
Page 101: Windows Vista Users
System “Performance” Settings (Windows) You may be able to solve the problem by changing the “Performance” setting of the system as described below. Windows 7 users Open the “Control Panel,” click [System and Security], and click [System]. If you’re using an icon display, double-click the [System] icon. At the left, click [Advanced system settings]. -
Page 102: System Volume Settings
Troubleshooting System Volume Settings Windows 7 users Open the “Control Panel,” and switch “View by:” to “Category.” Click [Hardware and Sound], and then click [Adjust system volume]. The volume mixer will appear. From the pulldown menu of the “Device” item, choose the SD-50’s [OUT], and adjust the volume. - Page 103 Voice communication Software Settings (Windows 7) If you’re using voice communication software, the volume of the audio device might be adjusted automatically according to the status of your conversation. In this case, proceed as follows to disable automatic volume adjustment. Open the “Control Panel,”...
-
Page 104: Error Messages
Please execute a Factory Reset. If this does not resolve the problem, contact your dealer or a nearby Roland service center. Reduce the amount of MIDI messages that are being transmitted. Check that there is no problem with the MIDI cable connected to the SD-50’s MIDI IN, and that the MIDI... -
Page 105: Settings Saved As User Data
Settings Saved as User Data The following settings are saved when you back up user data (p. 75). System settings (p. 75) Setting LCD Contrast Master Tune Output Gain Battery Mastering PowerSave Power Off Input/output volume settings (p. 71) Setting Mic/Line Input MP3/Audio Player SMF Player... -
Page 106: Solo Tone
Solo Tone Solo Tone The Solo sounds and how to play them The Solo sounds allow you to reproduce the natural tonal changes (changes in dynamics) that are distinctive of each instrument as you range from delicate soft notes to strongly played powerful notes—not merely changes in the volume. * Dynamics can be controlled by Note-on Velocity, Modulation controller (CC01), and Expression (CC11). - Page 107 Features of the Solo sounds Sound Features • If you play two or more notes simultaneously, a chord will sound, simulating the double-stop playing technique of a violin. When all notes turn off, the instrument will return to mono mode. Violin * Vibrato will not automatically be applied below the lowest note that a violin can sound (note number 55).
-
Page 108: Midi Implementation Chart
MIDI Implementation Chart Model SD-50 Function... Basic Default Channel Changed Default Mode Messages Altered Note Number True Voice Velocity Note ON Note OFF Aftertouch Key’s Channel’s Pitch Bend Control Change Program Change : True Number System Exclusive : Song Postion System : Song Select Common... -
Page 109: Specifications
Specifications SD-50: 128 Voices Sound Module with Audio Interface Sound Generator Section Parts 16 parts Maximum Polyphony 128 voices Wave Memory 128 M bytes (16-bit linear equivalent) Internal Sounds Preset Sounds: 1,125 Tones Rhythm Sets: 32 * 3 Solo tones and GM2/GS compatible sounds are included. User Memory Studio Sets: 3 Effects... -
Page 110: Power Supply
Specifications Power Supply DC 9 V (AC Adaptor) Battery (AA x 6, ALKALIN or Ni-MH) USB Bus power available Expected battery life under continuous use Nickel-metal hydride: 4 hours Alkaline: 3 hours * These figures will vary depending on the actual conditions of use. -
Page 111: Index
Index ... 67 A-B Repeat ... 15 A-B Repeat Button ... 12, 20 AC Adaptor ... 19 Alkaline batteries ... 59 Audio Input Att ... 26, 31 Audio Input/Output Device ... 91 Backup ... 48 Bank Select ... 19 Battery Compartment ... - Page 112 Index ... 45 Mastering ... 52 MEDIUM HALL ... 52 MEDIUM ROOM ... 14 [MENU] Button ... 59 Mic Echo Level ... 17 MIC IN Jack ... 59 Mic Input SW ... 16 MIC/GUITAR IN Connector ... 89 MIDI ... 16 MIDI Connectors (OUT, IN) ...
- Page 113 MEMO...
- Page 114 MEMO...
- Page 115 MEMO...
-
Page 116: Declaration Of Conformity
For the USA DECLARATION OF CONFORMITY Compliance Information Statement Model Name : SD-50 Type of Equipment : Sound Module with Audio Interface Responsible Party : Cakewalk, Inc. Address : 268 Summer Street Boston, MA 02210 Telephone : (617) 423-9004 fig.15_WEEE_Small.eps For EU Countries... - Page 117 fig.16_ChineseRoHS.eps For China fig.17_Proposition65.eps For C.A. US ( Proposition 65 ) WARNING This product contains chemicals known to cause cancer, birth defects and other reproductive harm, including lead.
- Page 118 fig.05.eps IMPORTANT: THE WIRES IN THIS MAINS LEAD ARE COLOURED IN ACCORDANCE WITH THE FOLLOWING CODE. BLUE: BROWN: As the colours of the wires in the mains lead of this apparatus may not correspond with the coloured markings identifying the terminals in your plug, proceed as follows: The wire which is coloured BLUE must be connected to the terminal which is marked with the letter N or coloured BLACK.