Table of Contents
Advertisement
Quick Links
Download this manual
See also:
Service Notes
Owner's Manual
Thank you, and congratulations on your choice of the Roland D2 Groovebox.
Before using this unit, carefully read the sections entitled: "USING THE UNIT SAFELY" (pp.
2–3) and "IMPORTANT NOTES" (p. 4). These sections provide important information
concerning the proper operation of the unit. Additionally, in order to feel assured that you have
gained a good grasp of every feature provided by your new unit, Owner's manual should be read
in its entirety. The manual should be saved and kept on hand as a convenient reference.
by playing some sounds!
2
1. Press the [
2. Press the [VINYL] button.
3. Move your finger in a circle on the D-FIELD.
Copyright © 2001 ROLAND CORPORATION
All rights reserved. No part of this publication may be reproduced in any form without the
written permission of ROLAND CORPORATION.
Let's start off
] button to start the pattern.
3
1
Advertisement
Table of Contents

Related Manuals for Roland Groovebox D2


Summary of Contents for Roland Groovebox D2
- Page 1 Owner’s Manual Thank you, and congratulations on your choice of the Roland D2 Groovebox. Before using this unit, carefully read the sections entitled: “USING THE UNIT SAFELY” (pp. 2–3) and “IMPORTANT NOTES” (p. 4). These sections provide important information concerning the proper operation of the unit. Additionally, in order to feel assured that you have gained a good grasp of every feature provided by your new unit, Owner’s manual should be read...
- Page 2 Refer damage, malfunction, or electric shock. all servicing to your retailer, the nearest Roland ......................Service Center, or an authorized Roland • Do not excessively twist or bend the power cord, distributor, as listed on the "Information"...
- Page 3 ......................103b your retailer, the nearest Roland Service Center, or • Whenever the unit is to remain unused for an an authorized Roland distributor, as listed on the extended period of time, disconnect the AC "Information"...
-
Page 4: Important Notes
MIDI device (e.g., a power to all units. This will help prevent malfunctions sequencer) once it has been lost. Roland Corporation and/or damage to speakers or other devices. assumes no liability concerning such loss of data. -
Page 5: Table Of Contents
Panel Descriptions/ Making Connections ..........10 Top panel ..............................10 Rear panel ..............................11 Turning On/Off the Power........................11 Chapter 1. An Overview of the D2 ............12 How the D2 is structured ........................12 The sequencer section........................12 The sound generator section ....................... 12 About the D-FIELD........................ - Page 6 Contents Making the sound change over time (ASSIGN 2: ENVELOPE)..........34 Applying cyclic change to the sound (ASSIGN 2: LFO)............36 Changing the pitch or vibrato depth (ASSIGN 2: BENDER)..........36 Changing the rhythmic feel of a pattern (ASSIGN 2: QUANTIZE) ........37 Changing the reverb depth (ASSIGN 2: REVERB)..............
- Page 7 MIDI reception settings........................ 77 Advanced Operation Using MIDI......................78 About MIDI............................ 78 Using the D2 together with an external MIDI device .............. 79 Synchronization with an External MIDI Device............... 80 Saving data on an external sequencer (Bulk Dump)..............81 Troubleshooting..................82 Error Message List................83...
-
Page 8: Features Of The D2
New type of step recording The D2 features a new feel in step recording. Use the 32 indicators on the panel to specify the input point, and use the REC FUNCTION section and the D-FIELD controller to instantly edit that point. It’s easier than ever before to create original patterns from scratch. -
Page 9: How To Read This Manual
MIDI devices. Read this chapter as necessary. Appendices Consult this chapter when the D2 does not function as you expect, or if an error message is displayed. This chapter also contains information such as parameter lists and the MIDI implementation. -
Page 10: Panel Descriptions/ Making Connections
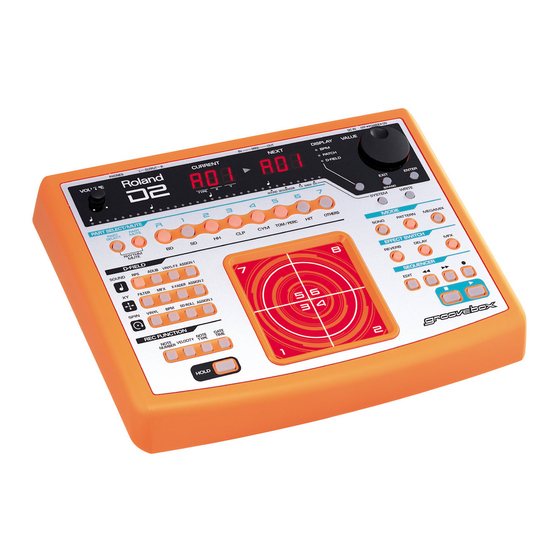
Panel Descriptions/ Making Connections Top panel 1. VOLUME knob 7. D-FIELD This knob adjusts the volume of the entire D2. You can produce a variety of effects by touching this area with your finger (p. 21). 2. Beat scan indicators 8. -
Page 11: Rear Panel
Sound will still be output from the 3. MIDI connectors (IN, OUT) OUTPUT jacks even while headphones are connected. These connectors are used when you want to use the D2 6. Security Slot ( to play external sound generating devices, or use an external sequencer to play the D2’s sound generator;... -
Page 12: Chapter 1. An Overview Of The D2
D2’s D-FIELD and sequencer. Performance FIELD. data from an external MIDI device can also play the sound generator. The sound generator of the D2 is able to produce up to 64 notes simultaneously, more than enough for playing SOUND multiple parts at once. -
Page 13: How Characters And Numerals Are Displayed
After you modify settings or record a performance, you must perform the Save procedure if you wish to keep the results. If The display of the D2 indicates characters and numbers as you turn off the power without doing this, your settings or follows. -
Page 14: Restoring The Factory Settings (Factory Reset)
The display will indicate “Factry,” and the Factory Reset operation will be executed. * If you decide not to execute the operation, press [EXIT]. Once the Factory Reset is complete, the D2 will be in the same state as it is normally after being powered-up. -
Page 15: Chapter 2. Playing Patterns
A pattern consists of 1 to 32 measures of play that include patches and rhythm sets of up to 8 parts. Advance to the Return to the The D2 is a sequencer that plays back patterns and adds previous measure. next measure. Use in recording. -
Page 16: Changing The Bpm (Tempo)
Chapter 2. Playing Patterns Muting a part or rhythm tone Playing Back at the Tempo Set for the Pattern In order to play back patterns at the BPM (standard tempo) The part button indicators show the mute status of each set up for the respective patterns, select a pattern while no part (rhythm instrument) as follows: pattern is being played back, then start playback.This secures... - Page 17 Chapter 2. Playing Patterns Muting individual rhythm sounds Applying the mute status to the next pattern as well (Mute Remain) The instruments used within part R can be muted (silenced) individually. A certain category of instrument, such as bass This operation is used to maintain the muting mode for drum (BD) or snare drum (SD) can be muted as a group.
-
Page 18: Selecting A Sound (Patch/Rhythm Set)
Here’s how the sound you modified by using D-FIELD filter (p. 33), envelope (p. 34), and LFO (p. 36) operations can be The D2’s Patterns are composed of up to eight Parts, and saved as a patch. different Patches (Part1 - 7: Patches, Part R = Rhythm set) can be selected for each Part. -
Page 19: Modifying The Settings Of Each Part (Part Edit)
Chapter 2. Playing Patterns Modifying the settings of each part (Part Edit) You can modify the settings of each part to change the way in which the pattern is sounded. First specify the part whose settings you wish to modify. 1. -
Page 20: Saving A Pattern
Setup Parameters When you have made the settings for setup parameter, save the pattern as a user pattern. On the D2, the following parameters are saved for each pattern. These parameters are collectively referred to as the “Setup parameters.” If you edit another pattern, switch to Song mode, or turn off the power without saving the pattern you recorded or edited, - Standard Tempo (p. -
Page 21: Chapter 3. About The D-Field
Chapter 3. About the D-FIELD What is the D-FIELD? The D-FIELD is a controller that lets you produce various effects by touching the surface of the controller with your finger. The effect can be controlled by the location of your touch, or by how you move your finger. Broadly speaking, there are three ways to use the D-FIELD. -
Page 22: Basic Use Of The D-Field
Chapter 3. About the D-FIELD Basic use of the D-FIELD Memorizing the location from which you released your finger (Hold) Selecting a function If you press [HOLD] to make it light, you can take your finger off of the D-FIELD and the effect will continue as if 1. -
Page 23: Sound Mode
Chapter 3. About the D-FIELD Assigning phrases to the D-FIELD SOUND mode You may find it convenient to assign your favorite or Playing back a phrase frequently used phrases as one RPS set. (RPS: Realtime Phrase Sequence) 1. Select the pattern that contains the phrase you want Phrases assigned to each of the eight areas of the D-FIELD to assign. -
Page 24: Improvising Along With A Chord Progression (Adlib)
Chapter 3. About the D-FIELD Improvising along with a chord progression (ADLIB) After pressing one of the areas in the lower half of the D-FIELD, move your finger in the left/right direction to play an ad-lib performance. While sound is being produced, you can move your finger upward to apply modulation. fig.Adlib Display Explanation... -
Page 25: Applying Special Turntable-Type Effects (Vinyl-Fx: Vinyl Effects)
Chapter 3. About the D-FIELD Applying special turntable-type effects (VINYL-FX: Vinyl Effects) You can apply various special effects by pressing each of the eight areas of the D-FIELD. fig.Pad Function Explanation POWER OFF The tempo will slow down and the pitch will fall, just as when a turntable is powered-off during playback. -
Page 26: Playing Arpeggios (Assign 1: Arpeggiator 1)
Chapter 3. About the D-FIELD Playing arpeggios (ASSIGN 1: ARPEGGIATOR 1) fig.AP1— You can specify ahead of time how the arpeggio will be sounded; then change the root note by varying the left/right location at which you press the D-FIELD, and change the chord by moving up/down. Display Explanation Setting... -
Page 27: Playing Arpeggios (Assign 1: Arpeggiator 2)
Chapter 3. About the D-FIELD Playing arpeggios (ASSIGN 1: ARPEGGIATOR 2) fig.AP2— Arpeggios can be played using the root note and chord that you specify ahead of time. By varying the location at which you press the D-FIELD, you can change how the arpeggio is sounded. Display Explanation Setting... - Page 28 Chapter 3. About the D-FIELD Arpeggio settings Arpeggio Styles When you wish to make arpeggiator settings, you will first select an Arpeggio Style. When you select a style, optimal values will be set for the four parameters “Motif,” “Beat Pattern,” “Shuffle Rate,” and “Accent Rate.” You can adjust parameters such as Accent Rage and Octave Range to modify the pattern to your taste.
-
Page 29: Table Of Style/Motif/Beat Pattern
Chapter 3. About the D-FIELD Beat pattern It will affect the accent location and note length, causing the beat (rhythm) to change. * The values which can be set will depend on the currently selected arpeggio style. For details on the possible values for each style, refer to “Table of STYLE/MOTIF/BEAT PATTERN”... -
Page 30: Recalling A Pattern (Assign 1: Pattern Call)
Chapter 3. About the D-FIELD Recalling a pattern (ASSIGN 1: PATTERN CALL) fig.PCL— The eight areas of the D-FIELD can be used as buttons that select patterns. You can prepare the desired patterns ahead of time, and then use this method to switch patterns quickly. The patterns assigned to the eight areas of the D-FIELD are collectively managed as a “pattern set.”... -
Page 31: Auditioning The Sound Of A Patch (Assign 1: Patch Preview)
Chapter 3. About the D-FIELD Auditioning the sound of a patch (ASSIGN 1: PATCH PREVIEW) fig.PRV— You can press each of the eight D-FIELD areas to hear the sound of each part. Pressing D-FIELD 8 will sound the rhythm part. * The note number (pitch) that is played can be modified by holding down REC FUNCTION (p. -
Page 32: Playing Rhythm Instruments / Scales (Assign 1: Keyboard Pad)
Chapter 3. About the D-FIELD Playing rhythm instruments / scales (ASSIGN 1: KEYBOARD PAD) fig.PAD— By pressing the eight areas of the D-FIELD you can play any eight notes of the current part. In the case of part R alone, you can specify different note numbers than the other parts. This allows you to assign various instruments of the rhythm set for part R, and assign a scale for the other parts. -
Page 33: Xy Mode
Chapter 3. About the D-FIELD XY mode Changing the brightness of the sound/Adding character to the sound (FILTER) You can vary the brightness of the current part by the location of your touch. Left/right movement will vary the cutoff frequency. Upward movement will apply more emphasis to the region surrounding the cutoff frequency (resonance), producing a distinctive tone. -
Page 34: Changing The Volume Of The Parts (X-Fader)
Chapter 3. About the D-FIELD Changing the volume of the parts (X-FADER) The volume or pan of two parts can be controlled simultaneously. Display Explanation Setting TYPE Specify whether you will control volume or pan. LEV (LEVEL), PAN Select the part that will be affected when you move your P-r, P-1–P-7 finger to left or right. - Page 35 Chapter 3. About the D-FIELD Making detailed settings 1. Hold down [ASSIGN 2] and press [EDIT]. 2. Press [ENTER] to select the desired parameter. 3. Turn [VALUE] to change the setting. Display Parameter Explanation Setting PITCH ENVELOPE DEPTH Adjust the range of pitch change. Negative (-) settings will invert -12–12 the shape of the envelope, causing the pitch to change in the op- posite direction.
-
Page 36: Applying Cyclic Change To The Sound (Assign 2: Lfo)
Chapter 3. About the D-FIELD Applying cyclic change to the sound (ASSIGN 2: LFO) fig.LFO— The LFO (Low Frequency Oscillator) applies cyclic change to the sound. By cyclically changing the pitch, cutoff frequency, or volume, you can create effects such as vibrato, wah, tremolo, or auto-pan. * There will be no effect for part R. -
Page 37: Changing The Rhythmic Feel Of A Pattern (Assign 2: Quantize)
Chapter 3. About the D-FIELD Changing the rhythmic feel of a pattern (ASSIGN 2: QUANTIZE) fig.QTE— You can change the rhythm feel of the performance data of a pattern. By modifying the timing and velocity (volume) of the notes in the pattern, you can produce a rhythm feel that is different than that of the original pattern. fig.Quantize You can modify the note timing by the location at which you press the D-FIELD. - Page 38 Chapter 3. About the D-FIELD 34: REGGE-PS-H.AC rushing/high dynamics 35: REGGE-PS-L.SW rushing/light swing Quantization will correct only note messages; other messages 36: REGGE-PS-H.SW rushing/strong swing are not corrected. This means that if messages that modify the sound in real time (such as pitch bend) have been 8 Beat Pops type recorded in the pattern, some Quantize settings may cause 37: POPS-NM-L.AC...
-
Page 39: Changing The Reverb Depth (Assign 2: Reverb)
Chapter 3. About the D-FIELD Changing the reverb depth (ASSIGN 2: REVERB) fig.REV— * There will be no effect if [REVERB] is dark. Press [REVERB] to make it lit. Display Explanation Setting TYPE Select the type of reverb. ROOM1, ROOM2, STAGE1, STAGE2, HALL1, HALL2 Select the parameter that will be affected Refer to the explanation of reverb (p. -
Page 40: Spin Mode
Chapter 3. About the D-FIELD SPIN mode You can produce a variety of effects by moving your finger in a circle on the D-FIELD. Changing the sound as on a turntable (VINYL) In the same way as by spinning a turntable manually, you can change the tempo or pitch, play a pattern backward, or produce scratch effects. -
Page 41: Sounding A Snare Roll (Sd Roll)
Chapter 3. About the D-FIELD Sounding a snare roll (SD ROLL) You can sound a snare drum roll. The speed at which you rotate your finger will affect the speed of the roll. You can also change the volume by varying the size of the circle in which you move your finger. Display Explanation Setting... -
Page 42: Chapter 4. Applying Effects To The Sound (Effects)
Chapter 4. Applying Effects to the Sound (Effects) Reverb Reverb is an effect which adds reverberation and ambiance to the sound, creating an impression of spatial depth. It simulates the sound of music played in a concert hall. This section describes the settings for using the reverb function. Turning reverb on/off Reverb is turned on by pressing [REVERB] and confirming that its indicator has lighted. -
Page 43: Delay (Add Echoes To The Sound)
Chapter 4. Applying Effects to the Sound (Effects) Delay (Add echoes to the sound) Delay is an effect which adds echoes to the sound. It is effective when applied to solo phrases or to densely rhythmic phrases. Described here is how to set the Delay effect. Turning delay on/off Delay is turned on by pressing [DELAY] and confirming that its indicator has lighted. -
Page 44: Multi-Effects (Mfx)
Chapter 4. Applying Effects to the Sound (Effects) Multi-Effects (MFX) Multi-effects provides 25 different Effect Types, each of Available Settings which let you apply a different effect. Described here is how to enter the MFX-related settings. MFX TYPE Description 4BAND EQ modify the tone Turning the multi-effects on/off SPECTRUM... - Page 45 Chapter 4. Applying Effects to the Sound (Effects) * Parameters with an “X” or “Y” following the value will be selected when using D-FIELD to control the multi-effects (p. 33). “X” can be controlled by moving your finger to left and right, and “Y” by moving your finger up and down. 1.
- Page 46 Chapter 4. Applying Effects to the Sound (Effects) 3. Enhancer (Add Sparkle to the Sound) fig.MFXENH By controlling the overtones of the high frequency range, this effect adds sparkle to the sound, giving it more definition. Use this effect when you want to make a specific sound stand out from the rest of the ensemble, or to give it greater definition. Screen Parameter Explanation...
- Page 47 Chapter 4. Applying Effects to the Sound (Effects) 5. Distortion (Distort the Sound Severely) fig.MFXDST This effect produces a more severe distortion than the Overdrive effect. It also contains an amp simulator, and produces the natural sound of a guitar amp. Screen Parameter Explanation...
- Page 48 Chapter 4. Applying Effects to the Sound (Effects) 7. Noise Generator (Add Various Types of Noise) fig.MFXNSE In addition to a Lo-Fi effect, this effect also generates various types of noise such as hum, pink noise, and disk noise. Screen Parameter Explanation Value...
- Page 49 Chapter 4. Applying Effects to the Sound (Effects) 9. Phonograph (Simulates an Old Record) This effect mutes the tone and adds disc noise to simulate the sound of music played on an old record player. Screen Parameter Explanation Value DISC TYPE Determines the type of disc noise.
- Page 50 Chapter 4. Applying Effects to the Sound (Effects) 12. Slicer (Apply Successive Cuts to the Sound) fig.MFXSLI By applying successive cuts to the sound, this effect turns a conventional sound into a sound that appears to be played as a backing phrase.
- Page 51 Chapter 4. Applying Effects to the Sound (Effects) 14. Phaser (Modulate the Sound) By adding a phase-shifted sound to the original sound, this effect modulates the sound to add depth and a sense of rotation. Screen Parameter Explanation Value MANUAL Specifies the center frequency at which the sound will be modulated.
- Page 52 Chapter 4. Applying Effects to the Sound (Effects) 16. Space-D (Add Transparent Depth) This is a type of chorus, but unlike a conventional chorus, it does not create a sense of modulation. Screen Parameter Explanation Value PRE DELAY Specifies the time from the original sound until the chorus sound is 0.0–100 (Pre Delay Time) heard.
- Page 53 Chapter 4. Applying Effects to the Sound (Effects) 18. Flanger (Add Metallic Resonance to the Sound) fig.MFXFLN This creates a sharp and mechanical sound. It can add a metallic resonance to the sound, or produce an effect that sounds like an jet airplane taking off and landing.
- Page 54 Chapter 4. Applying Effects to the Sound (Effects) 19. Step Flanger (Add Metallic Resonance to the Sound While Changing the Pitch in Steps) This is a flanger that changes the pitch of the sound in steps. The frequency of pitch change can also be synchronized to the BPM. Screen Parameter Explanation...
- Page 55 Chapter 4. Applying Effects to the Sound (Effects) Screen Parameter Explanation Value OUTPUT LEVEL Specifies the output volume from the Short Delay effect. 0–127 * 1: 16 (16th note), 8T (8th note triplets), 16. (dotted 16th note), 8 (8th note), 4T (quarter note triplets), 8. (dotted 8th note), 4 (quarter note), 2T (half note triplets), 4.
- Page 56 Chapter 4. Applying Effects to the Sound (Effects) 22. Feedback Pitch Shifter (Skew the Pitch) fig.MFXFPS This effect shifts the pitch of the original sound and layers it with the original sound. It can be used to play unison lines at an interval of an octave or fifth, or to layer a slightly pitch-shifted with the original sound to create a chorus effect.
- Page 57 Chapter 4. Applying Effects to the Sound (Effects) Screen Parameter Explanation Value BALANCE Specifies the volume balance be- 0–100 (%) (Effect Balance) tween the original sound and the reverberation.With a setting of “0,” no reverb sound will be out- put. OUTPUT LEVEL Specifies the output volume from 0–127...
-
Page 58: Chapter 5. Replacing Phrases To Create A Different Pattern (Megamix)
Chapter 5. Replacing phrases to create a different pattern (MEGAMIX) MEGAMIX is a function which lets you play back a pattern The part button of the current part will remain lit, and while you exchange the musical data of one part with the the part button of the selected part will go dark. -
Page 59: Saving The Pattern You Rearranged
Chapter 5. Replacing phrases to create a different pattern (MEGAMIX) Saving the pattern you rearranged Tips when using MEGAMIX to create a pattern When you have used MEGAMIX to create a pattern that you If the patterns that you combine using MEGAMIX have like, you can save it as a User Pattern. -
Page 60: Chapter 6. Creating An Original Pattern
“Saving a pattern” (p. 20) Recording as you perform (Realtime Recording) 6. Press [ Here’s how you can record your performance on the D2’s D- FIELD controller or an external MIDI keyboard. ] will light, and the D2 will be in REC STANDBY mode. -
Page 61: Filter
Chapter 6. Creating an Original Pattern The display during realtime recording Erasing unwanted data while recording (Realtime Erase) The CURRENT display will indicate the measure and beat being recorded. The NEXT display will indicate the number Instances of a particular kind of data that occur within data of measures in the entire pattern. -
Page 62: Inputting Notes One By One (Step Recording)
“—”. 5. Press [ When you press and hold [HOLD], the CURRENT display ] will light, and the D2 will be in REC STANDBY will indicate the location (tick) in 1/96th of a beat. mode. (Example) 7th tick of beat 3, note pitch E5 6. - Page 63 Chapter 6. Creating an Original Pattern Inputting notes Using the D-FIELD to enter notes During step recording, you can press the eight areas of the D- Changing the location at which to input notes FIELD to record efficiently. Turn [VALUE] to move to the next (previous) grid line. fig.Pad Hold down [HOLD] and turn [VALUE] to move in steps of a tick.
- Page 64 Chapter 6. Creating an Original Pattern Modifying a note that you input Adjusting the location of a previously (Note Edit) input note You can modify the pitch, strength, and length of an already- You can move the location of a previously input note (Move entered note.
-
Page 65: Editing A Pattern (Pattern Edit)
Chapter 6. Creating an Original Pattern Editing a pattern Basic procedure for pattern editing (Pattern Edit) 1. Press [PATTERN] to enter Pattern mode. The process of editing the performance data of a pattern in 2. Turn [VALUE] to select the pattern that you wish to measure units is called Pattern Editing. -
Page 66: Copying A Pattern (Pattern Copy)
Chapter 6. Creating an Original Pattern Copying a pattern (Pattern Copy) fig.PTNCPY This operation copies a pattern to a different pattern. Display Parameter Explanation Setting SOURCE Select the data that you wish to copy. ALL: all performance data, PHRASE: only note data, * Press the part button [R] or [1]–[7] of the part whose data SETUP: only setup parame- you wish to erase, getting its indicator to light. -
Page 67: Erasing Unwanted Data (Erase)
Chapter 6. Creating an Original Pattern Erasing unwanted data (Erase) Inserting blank measures (Insert Measure) fig.PTNERS fig.PTNINS This operation erases part (or all) of the data in a pattern. This operation inserts blank measures between the specified Display Explanation Setting measure of the pattern and the next measure. -
Page 68: Changing The Strength Of The Notes (Change Velocity)
Chapter 6. Creating an Original Pattern Changing the strength of the Thinning out unnecessary data notes (Change Velocity) (Data Thin) fig.PTNCVL fig.PTNDTH This operation changes the velocity (strength) of the notes Since data such as Pitch Bend and Control Change typically recorded in the pattern. -
Page 69: Chapter 7. Playing And Creating Songs
Chapter 7. Playing and Creating Songs Playing a song <Step and pattern number display during playback> A song consists of two or more patterns connected in the 1. Press [ENTER] during song playback. desired order of playback. The CURRENT display will indicate the currently When you play back a song, the patterns will be selected playing step, and the NEXT display will show its pattern automatically in the specified order, so you do not need to... -
Page 70: Creating A Song (Song Recording)
3. Press [ fig.7-01 ] will light, and the D2 will be in SONG REC mode. 4. Turn [VALUE] to select the pattern that will play back for this step. 1. Press [SONG] to select Song mode. -
Page 71: Inserting A Step (Step Insert)
3. Press [EDIT]. to insert a step. The display will indicate “SnG CLr.” 3. Press [ ] will light, and the D2 will enter SONG REC mode. 4. Use [ ] to display the step at which you 4. Press [ENTER]. -
Page 72: Copying A Song (Song Copy)
Chapter 7. Playing and Creating Songs Copying a song (Song Copy) Saving a song This operation copies the song data to a different song. When you have created a song that you like, you should save that song as a user song. If you wish to save the song with the changes you made, use 1. -
Page 73: Chapter 8. System Settings And Midi Applications
Making system settings (System) Here you can make settings that affect the operation of the entire D2, such as tuning and the synchronization method. * It is not possible to enter these set-up screens while a pattern or song is being played back. -
Page 74: Sequencer Settings
Chapter 8. System Settings and MIDI Applications Sequencer settings Indication Parameter Explanation Values SYNC MODE Specifies how the internal sequencer will op- INT: erate and how MIDI Clock messages will be The internal sequencer will syn- transmitted and received. chronize to the internal tempo clock. Any MIDI Clock messages received from an external device will be ig- nored. - Page 75 The phrase will play back immedi- precise alignment, depending on the timing ately, at the timing at which you at which you press the D-FIELD. On the D2 pressed D-FIELD. you can specify the playback timing of the 16, 8, 4:...
-
Page 76: Midi Transmission Settings
Specifies the types of MIDI message that will be transmitted. At the factory set- MODE1, (transmit tings, this is set to “MODE1.” When using a MIDI connection to a D2, MC-307, MODE2 mode) MC-505, or JX-305, setting this to MODE2 will reduce the amount of data trans- mitted and received, in comparison to MODE1. -
Page 77: Midi Reception Settings
This setting is necessary only if data is being transmitted 17–32 (device ID separately to two or more D2 units. Otherwise, you should number) not change this setting. At the factory settings, the device ID number is set to “17.”... -
Page 78: Advanced Operation Using Midi
It is not possible to change the channel settings of each instruments. Without MIDI, it would not be possible to use part. an external keyboard to play the D2, or to use the D2 to record and play back a performance played on an external Rhythm part Ch. -
Page 79: Using The D2 Together With An External Midi Device
MIDI OUT MIDI Sound Module AUTO CHANNEL = ON With this setting, the part selected on the D2 will be the recording part (regardless of which channel is used for 1. Set the MIDI channel of the external sound module to transmission by the external MIDI keyboard). -
Page 80: Synchronization With An External Midi Device
D2. (Or, set MIDI For details on the setting, refer to the owner’s manual for channels 1 to 7 and 10, corresponding to those used on the D2, your MIDI sequencer. not to be used for data transmission.) Otherwise, the D2 Start synchronized playback. -
Page 81: Saving Data On An External Sequencer (Bulk Dump)
Data for the currently selected pattern or for all data in fig.8-8.j memory can be transmitted from the D2 to another D2, or to an external MIDI sequencer (such as the Roland MC-80) for saving. Transmitting this data is called bulk dump, and receiving this data is called bulk load. -
Page 82: Troubleshooting
If checking these points does not resolve the problem, please contact your dealer or a nearby Roland service center. * Roland can take no responsibility for the recovery of any lost data, or for any damages incurred as a result of such loss. -
Page 83: Error Message List
Error Message List If the D2 is operated incorrectly or if an operation could not be executed correctly, an error message will be displayed. Take the appropriate action for the error message that is displayed. Display Meaning Action There is a problem with the internal Please contact your dealer or a nearby Roland service center. -
Page 84: Preset Patch List
Preset Patch List Preset A Preset B Preset C (CC#0 = 81, CC#32 = 0) (CC#0 = 81, CC#32 = 1) (CC#0 = 81, CC#32 = 2) Name Name Name Name Name Lead TB 1 Dist Lead 3 Strong Brass NU-NRG Str X-Org/Nz Dist TB 1... - Page 85 Preset Patch List Preset D Preset E (CC#0 = 81, CC#32 = 3) (CC#0 = 84, CC#32 = 0) Name Name Name Name Name Timpani Kalimba MutePandeiro SOLO Saw Digi Steel Steel Drum Bagpipes Open Surdo Stereo Saw OctoLimba Digi Bell PnoBendM7-m7 Brazil Perc Fright Saw...
-
Page 86: Preset Rhythm Set List
Preset Rhythm Set List * The Rhythm Group column shows the button that can be pressed to mute that rhythm tone. P: A 01–26 (CC#0 = 81, CC#32 = 0), P: B 01–04 (CC#0 = 84, CC#32 = 0), User: 01–20 (CC#0 = 85, CC#32 = 0) Rhythm Group P: A01 TR-909 P: A02 TR-808... - Page 87 Preset Rhythm Set List Rhythm Group P: A06 Techno 2 P: A07 Techno 3 P: A08 Hardcore P: A09 Ambient P: A10 House 1 Note No. TR808 Kick 5 Plastic BD 3 TR909 Kick 5 TR909 Kick 5 TR808 Kick 5 TR707 Kick 1 Plastic BD 4 Gabba Kick...
- Page 88 Preset Rhythm Set List Rhythm Group P: A11 House 2 P: A12 Jungle P: A13 Drum’n’Bass1 P: A14 Drum’n’Bass2 P: A15 Hip-Hop 1 Note No. Wet Kick TR909 Kick 3 Roll Kick TR909 Kick 3 Lo-Fi Kick 1 Plastic BD 2 Lo-Fi Kick 2 Analog Kick Lo-Fi Kick 2...
- Page 89 Preset Rhythm Set List Rhythm Group P: A16 Hip-Hop 2 P: A17 Funk P: A18 Electro P: A19 Jazz P: A20 Brush Note No. TR707 Kick 1 TR707 Kick 2 TR808 Kick 1 Lo-Fi Kick 1 Video Kick Optic Kick West Kick TR808 Kick 5 Hip Kick...
- Page 90 Preset Rhythm Set List Rhythm Group P: A21 Disco P: A22 Ragga P: A23 Rock P: A24 Industrial P: A25 Ethnic Note No. TR707 Kick 2 Analog Kick Optic Kick TR909 Dst BD Open Surdo TR808 Kick 3 TR707 Kick 2 TR909 Kick 4 Lo-Fi Kick 2 Mute Surdo...
- Page 91 Preset Rhythm Set List Rhythm Group P: A26 Reverse P: B01 Trance P: B02 House 3 P: B03 2step P: B04 R&B Note No. Ele Kick Plastic BD 4 TR909 Kick 3 TR909 Dst BD TR606 Dst BD Turbo Kick Gabba Kick Plastic BD 2 Break Kick...
-
Page 92: Preset Pattern List
Hans-Joerg Scheffler A57 NU-NRG 3 Roland Corporation A08 EuroTrance 8 Hans-Joerg Scheffler A58 NU-NRG 4 Roland Corporation A09 EuroTrance 9 Roland Europe S.p.A. A59 NU-NRG 5 Hans-Joerg Scheffler A10 EuroTrance 10 B.U.S A60 EuroBeat 1 Roland Europe S.p.A. A11 Progressive 1 B.U.S... - Page 93 B14 R&B 1 presto product are sound recordings protected by copyright. B15 R&B 2 presto Roland hereby grants to purchasers of this product the B16 R&B 3 Roland Corporation U.S. permission to utilize the sound recordings contained in B17 R&B 4 Roland Corporation U.S.
-
Page 94: Rps Pattern List
RPS Pattern List Pattern Name Pattern Name Pattern Name Pattern Name B58 Trance Drums 1 C16 Drums Fill 26 C74 Synth Riff 12 D32 Synth Lead 13 B59 Trance Drums 2 C17 Drums Fill 27 C75 Synth Riff 13 D33 Piano 1 B60 Trance Drums 3 C18 Drums Fill 28 C76 Synth Riff 14... -
Page 95: Rps Set List
RPS Set List D-FIELD No. Pattern Name D-FIELD No. Pattern Name D-FIELD No. Pattern Name D-FIELD No. Pattern Name 1. Euro Trance 9. Ambient 17. Filter Disco 25. Drum'n'Bass Trance Drums 1 Techno Drums 4 House Drums 4 DnB Drums C24 Trance Bass 1 C32 Techno Bass 4 C40 House Bass 4... -
Page 96: Profiles Of Pattern Composers
In addition, Little Thing.” he created internal patterns and preset sounds for the Roland MC-505 and 307. Listeners are captivated by his Bjoern Bojahr four-dimensional sound unbound by stereotypical ideas. Bjoern Bojahr is a germany based young sound designer Naoki “GigBag”... -
Page 97: Waveform List
Waveform List Group A Name Name Name Name Name Name TB Dst Saw Funky Bass Balaphone Emergency Thrill TR808 Conga TB Dst Sqr 1 Poly Bass Kalimba Buzzer PCM Press HiBongo Open TB Dst Sqr 2 MG Bass Steel Gtr Insect Air Gun LoBongo Open... -
Page 98: Midi Implementation
MIDI Implementation Model: D2 (groovebox) Expression (Controller number 11) Date: Mar. 12, 2001 status 2nd byte 3rd byte Version: 1.00 * Expression messages are used to adjust the volume of each part. Symbol Description Range Hold 1 (Controller number 64) MIDI Channel 0H–6H,9H (ch.1–ch.7,ch.10) -
Page 99: Program Change
This is the ID number (manufacturer ID) that specifies the * When this message is received, the following controllers will be set to their reset values. manufacturer whose exclusive message this is. Roland’s manufacturer ID is 41H.ID numbers 7EH and 7FH are defined in an expansion of the... -
Page 100: Control Change
* This message is not received if the Rx.System Exclusive Switch parameter is OFF. status 2nd byte 3rd byte The only GS exclusive messages received by the D2 are Scale Tune settings. mm,ll=Bank number: 00 00H - 7F 7FH (bank.1 - bank.16384) Data Set 1... - Page 101 Remarks Exclusive status ID number (Roland) * For the functions of other controller numbers, refer to “Table of Transmitted Data” (p. 76). device ID (dev: 10H–1FH) model ID (D2 Quick) Program Change command ID (DT1) address (Status/Channel) status 2nd byte...
- Page 102 = ID number: This is the ID number (manufacturer ID) that specifies the manufacturer whose exclusive message this is. Roland’s manufacturer ID is 41H.ID numbers 7EH and 7FH are defined in an expansion of the 4.3.1 Messages automatically generated by the system MIDI standard as Universal Non-realtime messages (7EH) and Universal Realtime Messages (7FH).
- Page 103 * Addresses for which the Description field is listed as “Reserved” have no meaning for 16 00 | Part Info Part 7 19 00 | Part Info Part R the D2. They will be ignored. +——————————————————————————————————————————————————————————————————————————————+ 1-2-1.Part Info Common 1. D2 (Model ID=00H 0BH) Outline +——————————————————————————————————————————————————————————————————————————————+...
-
Page 104: Gate Reverb
MIDI Implementation CTRL2 Drive 0 - 127 CTRL2 Time R 0 - 103 0.1 - 190 CTRL3 AMP Type 0 - 3 SMALL,BUILTIN,2STACK,3STACK CTRL3 HF Damp 0 - 17 *1,BYPASS CTRL4 Output Pan 0 - 127 L64 - 63R CTRL4 Feedback 0 - 98 0 - +98... - Page 105 MIDI Implementation 1-3.Patch 00 3F | 000a aaaa | Random Pitch Depth 0 — 30 00 40 | 0000 aaaa | Pitch Key Follow 0 — 15 00 41 | 000a aaaa | Pitch Envelope Depth 0 — 24 (—12 — +12)| +——————————————————————————————————————————————————————————————————————————————+ 00 42 | 0aaa aaaa | Pitch Envelope Velocity Sens 0 —...
- Page 106 MIDI Implementation 1-4-2.Rhythm Note 3. Quick SysEx (Model ID=3AH) +——————————————————————————————————————————————————————————————————————————————+ +——————————————————————————————————————————————————————————————————————————————+ | Offset | Start Address | Size | Description Data (Value) address | Description |—————————————+————————————————————————————————————————————————————————————————| |—————————————+————————————————————————————————————————————————————————————————| 00 00 | 0000 000a | Tone Switch 0 — 1 (OFF,ON) 30 00 | Quick SysEx Part1 3—1 00 01 | 0000 0000 | Wave Group Type 31 00 |...
- Page 107 Equal temperament Roland exclusive messages (RQ1, DT1) are transmitted with a checksum at the end of the This temperament divides the octave into 12 equal steps, and is the temperament most data (before F7) to check that the data was received correctly. The value of the checksum is frequently used today, especially in western music.
-
Page 108: Midi Implementation Chart
MIDI Implementation groovebox (Sound Generator Section) Date : Mar. 8, 2001 MIDI Implementation Chart Model D2 Version : 1.00 Transmitted Recognized Function... Remarks Basic Default 1–7, 10 Channel Changed 1–7, 10 Default Mode 3 Mode Messages Mode 3, 4 (M = 1) - Page 109 MIDI Implementation goovebox (Sequencer Section) Date : Mar. 8, 2001 MIDI Implementation Chart Model D2 Version : 1.00 Transmitted Recognized Function... Remarks Basic Default 1–7, 10 1–7, 10 There is no basic Channel Changed channel. Default Mode 3 Mode Messages...
-
Page 110: Specifications
Specifications D2 (GROOVEBOX) Controller D-FIELD Controller Sound generator: Maximum Polyphony 64 voices Connectors Parts 16 (Main: 8 + RPS: 8) Headphones Jack (Stereo miniature phone type) Patches Output Jacks (L, R) (RCA phono type) Preset MIDI Connectors (IN/OUT) User DC IN Jack... -
Page 111: Index
Index Numerics FILTER ..............21, 33 Flanger ..............53–54 4 Band EQ ............... 45 Gate Reverb ..............57 AC adaptor jack ............. 11 GATE TIME .............. 62–63 ADLIB ..............21–22, 24 grid line ................62 Advanced Operation Using MIDI ......78 ARPEGGIATOR ARPEGGIATOR 1 ........... - Page 112 Index PATTERN ............... 15 SONG ................69 pattern ................60 Song Edit ................. 71 PATTERN CALL ............30 Song Clear ..............71 Pattern Edit ..............65 Song Copy ..............72 Change Gate Time ........... 68 Song mode ..............69 Change Velocity ............68 Song Recording ..............
- Page 113 MEMO...
- Page 114 MEMO...
- Page 115 For EU Countries This product complies with the requirements of European Directive 89/336/EEC. For the USA FEDERAL COMMUNICATIONS COMMISSION RADIO FREQUENCY INTERFERENCE STATEMENT This equipment has been tested and found to comply with the limits for a Class B digital device, pursuant to Part 15 of the FCC Rules.
- Page 116 Information When you need repair service, call your nearest Roland Service Center or authorized Roland distributor in your country as shown below. ISRAEL CRISTOFORI MUSIC PTE PANAMA ITALY AFRICA AFRICA SUPRO MUNDIAL, S.A. Roland Italy S. p. A. Halilit P. Greenspoon &...