Table of Contents
Advertisement
Quick Links
Advertisement
Table of Contents

Related Manuals for Hyundai HCP3000


Summary of Contents for Hyundai HCP3000
- Page 1 APPROVED BY DEKRA 09/06/17 Laurent Asty ORIGINAL INSTRUCTIONS TABLE SAW HCP3000 WARNING: Please read the manual carefully before using the unit! HYUNDAI 32, rue Aristide Bergès - ZI 31270 Cugnaux – France Licensed by Hyundai Corporation, Korea...
-
Page 2: Security Warnings
1. SECURITY WARNINGS WARNING! When using electric tools basic safety precautions should always be followed to reduce the risk of fire, electric shock and personal injury. Read all these instructions before attempting to operate this product and save these instructions. Keep work area clear ... - Page 3 Inspect tool cords periodically and if damaged have them repaired by an authorized service facility. Inspect extension cords periodically and replace if damaged. Keep handles dry, clean and free from oil and grease. 15. Disconnect tools When not in use, before servicing and when changing accessories such as blades, bits and cutters, disconnect tools from the power supply.
- Page 4 Operation with gloves forbidden! Gloves may be only used at maintenance work and changing the saw blade Do not touch the rotatory blade by hands. Do not use the machine in raining. Do not connect with household power supply. Wear suitable work clothes! Do not wear loose clothing or jewelry as they might be caught and cause severe accidents! Wear a hair net if you have long hair Keep other people, particularly children, away from work area.
- Page 5 Keep this side up. Risk of cutting and injuries from the rotating blade! Residual risks Even if you use this product in compliance with all safety requirements, the potential risks of injury and damage remain. The following hazards may arise from the structure and design of this product: ...
-
Page 6: Your Product
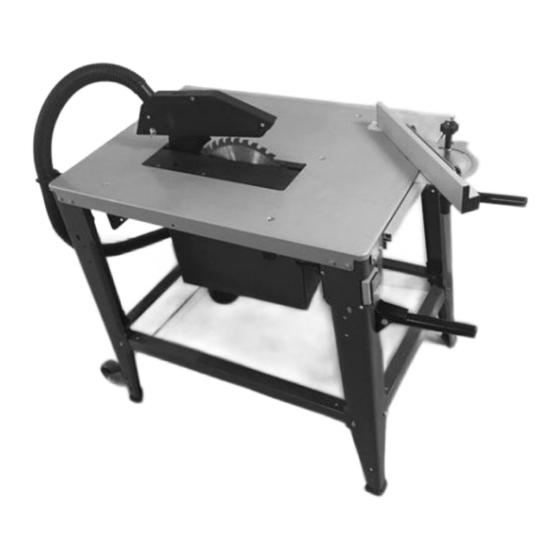
2. YOUR PRODUCT a. Description 6. Hose handle 1. Null voltage switch 7. Hose 2. Transport handle 8. Blade 3. Plug 9. Blade cover protection 4. Hand wheel 10. Guide rail 5. Wheels 11. Rip fence and mitre saw adjustment The tool is also provided with one extension table, 4 bars extensions, a set of screws and bolts, blade wrench and a push stick. - Page 7 b. Technical specifications Voltage 400V 3~ 50 Hz Rated input power P1 3000W S6 40% No load speed 2800/min Protection rating IP20 Blade dimensions Ø315 x Ø30 x 40T Table size without 800x550mm extension Table height 800mm Blade tilting range Cutting depth at 82mm Cutting depth at...
- Page 8 3. ASSEMBLY INFORMATION: Following the model, the table and/or some parts are potentially already assembled. Please check your delivery first before. Follow the below steps if the tool is not fully assembled. We recommend the user to have a help for an experienced person for the mounting of this table, specifically for untrained persons.
- Page 9 Install the 4 bar to the feet. The bolts must not be tightened too much. Then connect the together with screw and bolts. f) Install the extension table, the extension table can be installed in two ways: Side 1: Unscrew the screws of the side of the table. Install the 2 support bar on each side of the low bar of the table and screw them with screws and washers.
- Page 10 Side 2: screw the 2 support bar on the low bar of the table. Install the extension table and screw it on the table and then screw the support bar with the extension table. Install the support of foot on the feet. Take four M4x12 hex head bolts, four M6 washers and four M6 nuts and mount axle and part pulley to part 4 and part 5 (see pic.
- Page 11 Install the transport handle on the two foot by using the M8x45 hex head bolts and M8 female screws. l) Use M6x25 cross groove bolts and M6 nuts, to install the blade protection on the blade. m) Install the rip fence on the guide rail of the table. Check the installation; the device should move freely in the guide rail.
- Page 12 Connect the hose to the blade protection (1). Fix the hose to its holder (2). 2. CIRCULAR SAW BLADE REPLACEMENT PIC.24 PIC.25...
-
Page 13: Power Supply
PIC.26 Loosen the bolts and dismount part 20 (see pic.24). Loosen the bolts and dismount part 19 (see pic.25). Using the special tools 29 and 30, loosen the bolt fixing the circular saw blade (see pic. 26). Reversed order assembly. 4. -
Page 14: Operation
5. OPERATION NOTICE! Operating only with started dust collector! Never start the machine when the workpiece is pressed to the saw blade! Before starting the machine check if the saw blade is tightened. Check the running direction of the saw blade (arrow). ... - Page 15 Adjustment of the blade tilt For tilted cuts you have to open the lock screws, which are under the table. The tilt can now be adjusted and read on the scale. Then the lock screws have to be fixed again. Adjustment of the fence Angular adjustment: At first you have to open the lock screw.
-
Page 16: Maintenance And Storage
6. MAINTENANCE AND STORAGE a. Maintenance WARNING! Before carrying out maintenance or adjustments, the machine must be unplugged from power. The machine does not require intense maintenance. Please follow the below points to maintain your tool in a good work condition. ... -
Page 17: Troubleshooting
8. TROUBLESHOOTING PROBLEM CAUSE SOLUTION Motor cord or wall cord is not plugged in. Plug in motor cord or wall cord. Circuit fuse is blown. Replace circuit fuse. Saw does not start. Circuit breaker is tripped. Reset circuit breaker. Cord or switch is damaged. Have the cord or switch replace. -
Page 18: Exploded View
10. EXPLODED VIEW... - Page 19 Description Description guard screw M6x20 nut M12 washer M6 Plate nut M6 plate 65Mn plate positioning screw M5x20 square plate bolt M12x35 bolt M10x35 (left) sliding plate washer M10 bolt M6x16 plate washer M6 inner saw blade flange nut M6 motor 2.2KW, 400V, 50HZ circlip for shaft...
- Page 20 protective supporting2 housing knob mitre gauge left connecting handle plate guard horizontal supporting bolt deputy working table right wrench 1 connecting plate working table wrench 2...
-
Page 21: Ec Declaration Of Conformity
ZI, 32 RUE ARISTIDE BERGES – 312070 CUGNAUX – FRANCE Declares that the machinery as designated below: TABLE SAW Model: HCP3000 Serial number: Complies with the provisions of the Directive « machinery » 2006/42/EC and national laws transposing it: Also complies with the following European directives:...