Table of Contents

Related Manuals for Neilsen CT1282


Summary of Contents for Neilsen CT1282
- Page 1 10 GALLON SANDBLASTER CT1282 ORIGINAL INSTRUCTIONS SAVE THESE INSTRUCTIONS AND PRECAUTIONS. READ ALL PRECAUTONS AND INSTRUCTIONS BEFORE USE. Cannon Tools Limited Address: 20 Station Road, Rowley Regis, West Midlands, B65 0JU.U.K.
- Page 2 In case of alteration of the machine, not agreed upon by us, this declaration will lose its validity. 10 GALLON SANDBLASTER Product description: CT1282 Model: Internal production control plus supervised pressure equipment checks according to Directive 2014/68/EU CANNON TOOLS LTD 20 Station Road, Rowley Regis, West Midlands, B65 0JU.U.K.
-
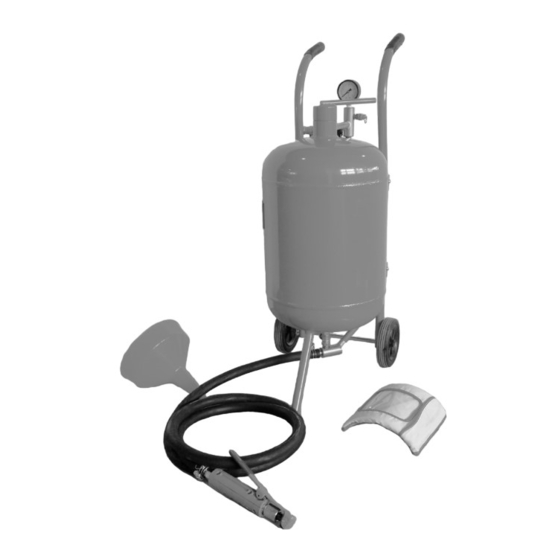
Page 3: What Is Supplied
INTRODUCTION Thank you for purchasing this Pressurised Sandblaster. Before you try to use this product, read this manual and follow the instructions carefully. In doing so you will ensure your safety and the safety of others around you. You can also look forward to a purchase that gives you long and satisfactory service. -
Page 4: General Safety Rules
GENERAL SAFETY RULES Warning: Compressed air can be dangerous. This machine is supposed to be operated by pre-training.Ensure that you are thoroughly familiar with all precautions relating to the use of compressors and compressed air supply.Only professionals could use this equipment. 1. - Page 5 15. Always check to make sure that the trigger is not on before connecting blaster to air supply. 16. Store idle tools out of the reach of children and untrained persons. Tools may be dangerous in the hands of untrained users. 17.
- Page 6 AIR SUPPLY Sandblasting operations are extremely demanding on some compressors and can cause a compressor overload or overheated condition. We recommend using a compressor that is 5 HP and above with a minimum of a 12 CFM rating. Refer to your compressor Owner's Manual and make sure that your compressor can handle the load of sandblasting.
-
Page 7: Assemble The Frame
ASSEMBLY FIT HANDLE BARS TO THE TANK Lay the tank on a flat level surface Fig 1 (such as a workbench or table top), with the handlebar mounting brackets facing up, as shown in Fig 1. 2. Align the holes in the handlebar with the handlebar mounting brackets of the tank. - Page 8 ATTACH FRONT LEG Roll the tank over so that handlebars are now facing down. 2. Align the holes of the front foot with the holes in the foot mount on the front side of the tank, see Fig 4. 3. Insert a split pin through the holes and bend it so the front foot cannot slide off the foot mount.
-
Page 9: Operation
OPERATION WARNING: ALWAYS WEAR YOUR HOOD, DUST MASK AND HEAVY DUTY CANVAS GLOVES WHEN OPERATING THE SANDBLASTER. WARNING: BEFORE OPERATING YOUR SANDBLASTER, INSPECT EACH CONNECTION, DOUBLE CHECKING TO MAKE SURE THAT ALL ARE TIGHT AND PROPERLY SEALED. WARNING: THIS SANDBLASTER IS NOT INTENDED FOR USE WITH SILICA BASED ABRASIVES. -
Page 10: Abrasive Flow Adjustment
LOADING THE ABRASIVE • To prevent clogging, ensure that the abrasive you use is dry. • While you may re-use abrasive, remember that abrasive grit/ material does wear out. After use, abrasive becomes smoother and rounder, thus reducing its effectiveness. NOTE: Re-using abrasive may also cause clogging due to fine debris contained in the mixture from prior use. -
Page 11: To Start Blasting
TO START BLASTING NOTE: Start with all valves in the closed position. Following the instructions below will help prevent clogging in the delivery hose, outlet manifold and the safety trigger. Connect compressor to the inlet connector. Start compressor and open the air supply valve, see Fig 8. -
Page 12: To Stop Blasting
TO STOP BLASTING While continuing to press and hold Fig 12 the Trigger, turn the abrasive control valve to the closed position, see Fig 12. 2. When you notice only air (no abrasive) is coming out of the safety trigger, you can stop the air flow by releasing the trigger. -
Page 13: Maintenance
MAINTENANCE WARNING: DISCONNECT THE SANDBLASTER FROM THE AIR SUPPLY BEFORE CHANGING ACCESSORIES, ATTEMPTING TO MOVE THE SANDBLASTER OR PERFORM ANY MAINTENANCE. 1. Keep your sandblaster clean, and protect it from damage. 2. When initially pressurising, check for leaks at the top of the tank and at all hoses and fittings. -
Page 14: Replacing The Nozzle
CLEANING/REPLACING Press the release catch and Fig 17 unscrew the condensation chamber, see Fig 17. Unscrew the filter as shown in Fig 18 Fig 18 and wipe clean 3. Refit the condensation chamber. 4. Check the safety valve every working hour, clean it up if any clog happen, and always ensure the valve works fine. - Page 15 SPECIFICATIONS Mode CT1282 Sand Grade Type Above 80 grit Abrasive Material Aluminium Oxide, Bank Sand, Beach Sand, Glass Beads Tank Capacity 10 Gallon Operating Pressure 5 - 8 Bar Flow Rate Required 6 - 18.8 CFM @ 8 Bar Nozzle Sizes 2, 2.5, 3 , 3.5 mm...
- Page 16 DISPOSAL At the end of the machine's working life, or when it can no longer be repaired, ensure that it is disposed of according to national regulations. Contact your local authority for details of collection schemes in your area. In all circumstances: Do not dispose of this tool with domestic waste.
-
Page 17: Exploded Diagram And Parts List
EXPLODED DIAGRAM & PARTS LIST... - Page 18 CANNON TOOLS LTD Add: 20 station road, Rowley Regis, west midlands,B65 0JU.U.K. Made in China...