Table of Contents
Advertisement
Quick Links
KA01020P/00/EN/17.22-00
71566247
2022-04-05
Products
Brief Operating Instructions
Deltapilot S FMB70
Hydrostatic level measurement
These Brief Operating Instructions are not a substitute for the
Operating Instructions pertaining to the device.
Detailed information about the device can be found in the
Operating Instructions and the additional documentation.
Available for all device versions via
• Internet:
www.endress.com/deviceviewer
• Smartphone/tablet: Endress+Hauser Operations app
Solutions
Services
Advertisement
Table of Contents

Related Manuals for Endress+Hauser FMB70


Summary of Contents for Endress+Hauser FMB70
- Page 1 These Brief Operating Instructions are not a substitute for the Operating Instructions pertaining to the device. Detailed information about the device can be found in the Operating Instructions and the additional documentation. Available for all device versions via • Internet: www.endress.com/deviceviewer • Smartphone/tablet: Endress+Hauser Operations app...
-
Page 2: Associated Documentation
Associated documentation Deltapilot S FMB70 Associated documentation Order code: XXXXX-XXXXXX Ser. no.: XXXXXXXXXXXX Ext. ord. cd.: XXX.XXXX.XX Serial number www.endress.com/deviceviewer Endress+Hauser Operations App A0023555 About this document Document function The Brief Operating Instructions contain all the essential information from incoming acceptance to initial commissioning. - Page 3 Deltapilot S FMB70 About this document Symbols used 2.2.1 Safety symbols DANGER This symbol alerts you to a dangerous situation. Failure to avoid this situation will result in serious or fatal injury. WARNING This symbol alerts you to a dangerous situation. Failure to avoid this situation can result in serious or fatal injury.
-
Page 4: Registered Trademarks
The manufacturer is not liable for damage caused by improper or non-intended use. Verification for borderline cases: ‣ For special fluids and fluids for cleaning, Endress+Hauser is glad to provide assistance in verifying the corrosion resistance of fluid-wetted materials, but does not accept any warranty or liability. -
Page 5: Workplace Safety
It fulfills general safety requirements and legal requirements. It also conforms to the EC directives listed in the device-specific EC declaration of conformity. Endress+Hauser confirms this fact by applying the CE mark. Functional safety SIL3 (optional) The Functional Safety Manual must be strictly observed for devices that are used in functional safety applications. -
Page 6: Incoming Acceptance And Product Identification
• Is the documentation available? • If required (see nameplate): Are the safety instructions (XA) present? If one of these conditions is not fulfilled, please contact your Endress+Hauser sales office. Product identification The device can be identified in the following ways: •... -
Page 7: Mounting Requirements
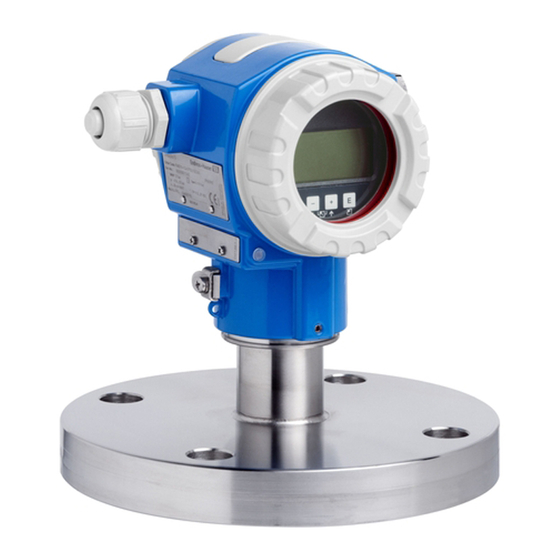
• To ensure optimum readability of the local display, it is possible to rotate the housing by up to 380°. • The local display can be rotated in 90° stages. • Endress+Hauser offers a mounting bracket for installation on pipes or walls. 5.2.1 Installation instructions... - Page 8 Mounting Deltapilot S FMB70 A0031804 • Keep the pressure compensation and GORE-TEX® filter (1) free from contamination and water. • Do not clean or touch process membranes with hard or pointed objects. • The device must be installed as follows in order to comply with the cleanability...
- Page 9 Deltapilot S FMB70 Mounting Level measurement • Always install the device below the lowest measuring point. • Do not install the device at the following positions: • In the filling curtain • In the tank outlet • In the suction area of a pump •...
-
Page 10: Electrical Connection
Electrical connection Deltapilot S FMB70 5.2.3 Closing the housing covers NOTICE Devices with EPDM cover seal - leaking transmitter! Mineral-, animal- or plant-based lubricants cause the EPDM cover seal to swell and the transmitter to leak as a result. ‣... - Page 11 Deltapilot S FMB70 Electrical connection • Guide the cable through the gland. Preferably use a twisted, shielded two-wire cable. • Connect the device as indicated in the diagram. • Screw down the housing cover. • Switch on the supply voltage.
- Page 12 Electrical connection Deltapilot S FMB70 6.1.1 Connection of devices with Harting plug Han7D – + – Han7D – A0019990 Electrical connection for devices with Harting plug Han7D View of the plug-in connection on the device Brown Green/yellow Blue 6.1.2 Connection of devices with M12 plug (p.
-
Page 13: Special Connection Instructions
Deltapilot S FMB70 Electrical connection Special connection instructions 6.2.1 Supply voltage WARNING Supply voltage might be connected! Risk of electric shock and/or explosion! ‣ When using the measuring device in hazardous areas, installation must also comply with the applicable national standards and regulations and the Safety Instructions or Installation or Control Drawings. - Page 14 Electrical connection Deltapilot S FMB70 6.2.3 Cable specification • Endress+Hauser recommends using twisted, shielded two-wire cables. • Cable diameter: 5 to 9 mm (0.2 to 0.35 in) 6.2.4 Load R Lmax R Lmax [ ] W [ ] W 1500...
-
Page 15: Operation Options
Deltapilot S FMB70 Operation options 6.2.5 Shielding/potential equalization • You achieve optimum shielding against disturbances if the shielding is connected on both sides (in the cabinet and on the device). If potential equalization currents are expected in the plant, only ground shielding on one side, preferably at the transmitter (e.g. possibility of hydrogen diffusion). - Page 16 Operation options Deltapilot S FMB70 A0020031 3 Operating keys, inside DIP switch for locking/unlocking parameters relevant to the measured value DIP switch for switching damping on/off Green LED to indicate value is accepted Operating keys Slot for optional display Slot for optional HistoROM®/M-DAT...
-
Page 17: Device Configuration
Deltapilot S FMB70 Commissioning Meaning Copy the configuration data from the optional HistoROM®/M-DAT module to the device. Copy the configuration data from the device to the optional HistoROM®/M- DAT module. • DIP switch 1: to lock/unlock parameters relevant to the measured value. - Page 18 Commissioning Deltapilot S FMB70 • Position adjustment (zero point correction) • Assignment of the lower and upper pressure value to the lower or upper level value • Device reset • The and keys only have a function in the following cases (for other settings, no function is assigned to the keys.):...
- Page 19 Deltapilot S FMB70 Commissioning Setting the upper range value Make sure the desired pressure for the upper range value is present at the device. In doing so, pay attention to the nominal pressure limits of the sensor. Press the key for at least 3 s.
- Page 20 *71566247* 71566247 www.addresses.endress.com...