Advertisement
Quick Links
Owner's Manual
Interactive
Flat-Panel
Wall Mount
Models: DWM5070HD, DWM7090HD
Este manual está disponible en español en la página de Tripp Lite: tripplite.com
Ce manuel est disponible en français sur le site Web de Tripp Lite : tripplite.com
Русскоязычная версия настоящего руководства представлена на веб-сайте компании
Dieses Handbuch ist in deutscher Sprache auf der Tripp Lite-Website verfügbar: tripplite.com
WARRANTY REGISTRATION
Register your product today and be
automatically entered to win an ISOBAR
surge protector in our monthly drawing!
tripplite.com/warranty
CAUTION: DO NOT EXCEED MAXIMUM LISTED WEIGHT CAPACITY. SERIOUS INJURY OR
PROPERTY DAMAGE MAY OCCUR!
200x200 / 300x200 / 300x300
400x200 / 400x300 / 400x400
600x400 / 700x400 / 800x400
800x500 / 800x600
Tripp Lite по адресу: tripplite.com
1111 W. 35th Street, Chicago, IL 60609 USA • tripplite.com/support
Copyright © 2021 Tripp Lite. All rights reserved.
70"
90"
88-132 lb.
88-132 lb.
MAX
MAX
(40-60 kg)
(40-60 kg)
DWM5070HD
DWM7090HD
DWM5070HD
DWM5070HD
®
1
132-198 lb.
132-198 lb.
(60-90 kg)
(60-90 kg)
RATED
RATED
RATED
RATED
DWM7090HD
DWM7090HD
Advertisement

Related Manuals for Tripp Lite DWM5070HD


Summary of Contents for Tripp Lite DWM5070HD
- Page 1 DWM7090HD Este manual está disponible en español en la página de Tripp Lite: tripplite.com Ce manuel est disponible en français sur le site Web de Tripp Lite : tripplite.com Русскоязычная версия настоящего руководства представлена на веб-сайте компании Tripp Lite по адресу: tripplite.com Dieses Handbuch ist in deutscher Sprache auf der Tripp Lite-Website verfügbar: tripplite.com...
-
Page 2: Safety Instructions
PRODUCT REGISTRATION Visit tripplite.com/warranty today to register your new Tripp Lite product. You’ll be automatically entered into a drawing for a chance to win a FREE Tripp Lite product!* * No purchase necessary. Void where prohibited. Some restrictions apply. See website for details. -
Page 3: Component Checklist
Component Checklist IMPORTANT: Ensure you have received all parts according to the component checklist prior to installing. If any parts are missing or faulty, visit tripplite.com/support for service. (x1) (x1) (x1) (x2) (x2) (x1) Package M M5x14 M6x14 M6x30 M8x30 M8x50 Washer Small Spacer... - Page 4 Assembly Attach Mount Assembly Brackets to Wall 1a. Mount on Wood Stud Wall 55mm 55mm (2.2") (2.2") 4.5mm 4.5mm ( 3/16") ( 3/16") Find and mark the exact location of mounting holes Drill pilot holes Screw the brackets onto the wall WARNING •...
- Page 5 Assembly Attach Mount Assembly Brackets to Wall 1b. Mount on Solid Brick and Concrete Block 60mm 60mm (2.4") (2.4") 10mm 10mm ( 3/8") ( 3/8") Find and mark the exact location of mounting holes Drill pilot holes Screw the brackets onto the wall WARNING •...
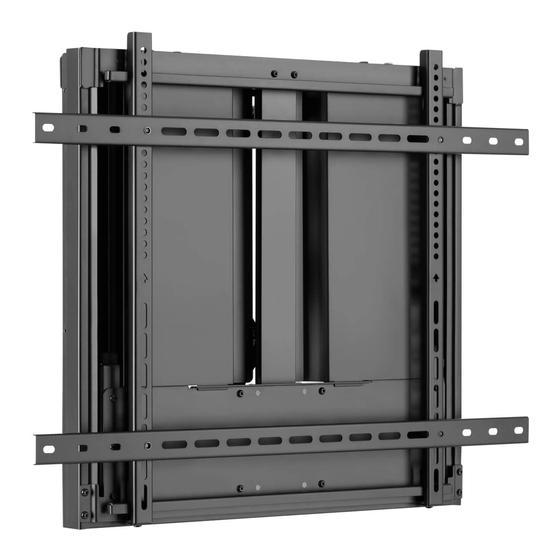
- Page 6 Assembly Install Adapter Brackets 2a. For Flat-Back Screens Note: Choose appropriate screws, washers and spacers (if necessary) according to the type of screen. • Position the adapter brackets as close as possible to the center of the display. • Firmly secure the adapter brackets onto the display using the screws and any other necessary hardware components included with the unit.
- Page 7 Assembly Install Adapter Brackets 2b-1. For Recessed Back Screen or to Access A/V Inputs Note: The horizontal brackets are used ONLY with interactive smart whiteboards that have 600x400/700x400/800x400/800x500/ 800x600 VESA patterns. Note: Choose appropriate screws, washers and spacers (if necessary) according to the type of screen. •...
- Page 8 Assembly Install Adapter Brackets 2b-2 For Recessed Back Screen or to Access A/V Inputs Adjust Balance Bolts The mount arrives with a default balance setting. Adjust to the number found on the scale that matches the weight of the whiteboard. To properly balance the unit, use a drill with a nut-driver to adjust...
- Page 9 Assembly Hang Mount Assembly...
- Page 10 Assembly Hang Display On Mount Assembly Using an assistant or mechanical lifting equipment, hook the display with attached adapter brackets over the top of the mounted wall-plate. Tighten the two bolts on the bottom of the adapter brackets to secure the unit.
- Page 11 Assembly Adjustment To ensure a perfect balance, use a drill with a nut-driver to make fine adjustments. 15.75 in. (400 mm) Maintenance • Check that the bracket is secure and safe to use at regular intervals (at least every three months). •...
- Page 12 1111 W. 35th Street, Chicago, IL 60609 USA • tripplite.com/support 21-06-124 933D81_RevA...