Table of Contents
Advertisement
Quick Links
We advise you to read this manual carefully, which contains all the instructions for
maintaining the appliance's aesthetic and functional qualities.
For further information on the product: www.smeg.com.au
Contents
4
4
5
5
5
5
6
6
7
7
7
8
8
9
10
10
11
11
13
14
14
15
16
17
21
21
21
22
23
23
24
25
25
26
28
3
Advertisement
Table of Contents

Related Manuals for Smeg C9CMXA1


Summary of Contents for Smeg C9CMXA1
-
Page 1: Table Of Contents
5.1 Clearances above and around domestic appliances 5.2 Electrical connection 5.3 Positioning We advise you to read this manual carefully, which contains all the instructions for maintaining the appliance's aesthetic and functional qualities. For further information on the product: www.smeg.com.au... -
Page 2: Instructions
Instructions 1 Instructions out installation and assistance interventions according to the 1.1 General safety instructions standards in force. • Do not modify this appliance. Risk of personal injury • Do not insert pointed metal • During use the appliance and its objects (cutlery or utensils) into the accessible parts become very hot. -
Page 3: Identification Plate
Instructions • Do not use steam jets for cleaning 1.3 Manufacturer liability the appliance. The manufacturer declines all liability for damage to persons or property caused by: • Do not obstruct ventilation • Use of the appliance other than the one openings and heat dispersal slots. -
Page 4: This User Manual
Instructions 1.7 How to read the user manual • Consign the appliance to the appropriate selective collection centres This user manual uses the following reading for electrical and electronic equipment conventions: waste, or deliver it back to the retailer Instructions when purchasing an equivalent product, on a one for one basis. -
Page 5: Description
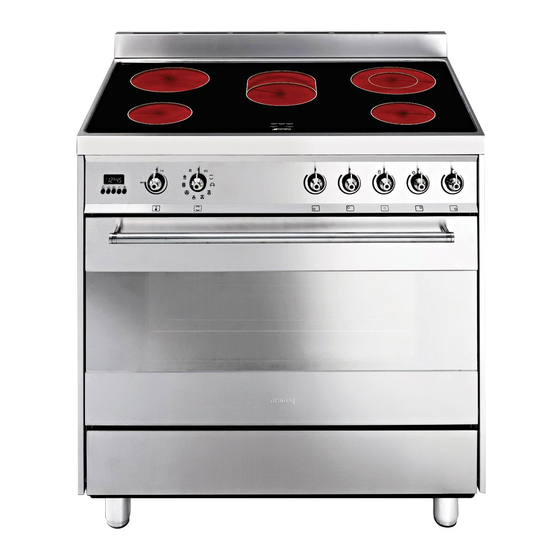
Description 2 Description 2.1 General description 1 Cooking hob 5 Door 2 Control panel 6 Fan 3 Oven light 7 Storage compartment 4 Seal Rack/tray support frame shelf 2.2 Cooking hob Outer diameter Max. consumed power Inner diameter Max. consumed power Zone (mm) (W) *... -
Page 6: Control Panel
Description 2.3 Control panel 2.4 Other parts 1 Programmer clock Useful for displaying the current time, setting Oven shelves programmed cooking operations and The oven features shelves for positioning programming the minute minder timer. trays and racks at different heights. The insertion heights are indicated from the 2 Temperature knob bottom upwards (see 2.1 General... -
Page 7: Available Accessories
Description 2.5 Available accessories Rotisserie rod Some models are not provided with all accessories. Scraper Useful for cooking chicken and all foods which require uniform cooking over their entire surface. Rotisserie support Useful for cleaning the Teppanyaki plate. Do not use on other surfaces. Rack To be used to support the rotisserie rod. -
Page 8: Use
3 Use Improper use Danger of burns 3.1 Instructions High temperature inside the oven • Oils and fats could catch fire if during use overheated. Be very careful. Danger of burns • Never place metal objects, such as dishes or cutlery, on the induction hob •... -
Page 9: First Use
3.2 First use Improper use 1. Remove any protective film from the Risk of damage to surfaces outside or inside of the appliance, including accessories. • Do not cover the bottom of the oven 2. Remove any labels (apart from the cavity with aluminium or tin foil sheets. - Page 10 Rotisserie rod Clean the trays before using them 1. Prepare the rotisserie rod with the food for the first time to remove any using the clip forks provided. residues left by the manufacturing process. Tray rack The tray can be used two different ways: •...
-
Page 11: Preliminary Operations
3.4 Preliminary operations In order to remove any moisture that could have accumulated during the manufacturing process and for the electronic circuits and control keypad to work properly: 1. Remove the protective films from the external surfaces of the appliance and accessories. -
Page 12: Using The Hob
3.5 Using the hob Advice on energy-saving All the appliance's control and monitoring • The diameter of the base of the pan must devices are located together on the front correspond to the diameter of the panel. The circle next to each knob cooking zone. -
Page 13: Using The Oven
3.7 Using the oven Grill The heat coming from the grill Switching on the oven element gives perfect grilling results To switch the oven on: above all for thin and medium 1. Select the cooking function using the thickness meat and in combination function knob. -
Page 14: Cooking Advice
• Use a meat thermometer when roasting Fan-assisted circular meat, or simply press on the roast with a The combination of the fan and the spoon. If it is hard, it is ready; if not, it circular element (incorporated in the needs another few minutes cooking. -
Page 15: Programmer Clock
• To check whether the dessert is cooked • Reduce any opening of the door to a right through: at the end of the cooking minimum to avoid heat dispersal. time, put a toothpick into the highest point • Keep the inside of the appliance clean of the dessert. - Page 16 3. Wait approx. 5 seconds without pressing Setting the time any key in order for the function to If the time is not set, the oven will activate. The current time and the not switch on. symbols will appear on the display.
- Page 17 Programmed cooking Minute minder timer Programmed cooking is the The minute minder timer does not function which allows a cooking stop the cooking operation but rather informs the user when the set operation to be started at a set time has run out. time and then ended after a specific length of time set by the The minute minder timer can be activated at...
- Page 18 Cooking information table Runner posi- Weight Temperature Food Function tion from the Time (minutes) (Kg) (°C) bottom Lasagne 3 - 4 Static 220 - 230 45 - 50 Pasta bake 3 - 4 Static 220 - 230 45 - 50 Roast veal Turbo 180 - 190...
-
Page 19: Cleaning And Maintenance
Cleaning and maintenance 4 Cleaning and maintenance Dirt which may have fallen on the hob while cleaning lettuce or potatoes can 4.1 Instructions scratch the hob when moving pans. Consequently, remove any dirt from the Improper use cooking surface immediately. Risk of damage to surfaces Pour the product onto a damp cloth and wipe the surface, rinse thoroughly and dry... -
Page 20: Removing The Door
Cleaning and maintenance Shiny surfaces can form due to the bases 2. Grasp the door on both sides with both of pans, especially aluminium ones, rubbing hands, lift it forming an angle of around on the surface, and due to the use of 30°... -
Page 21: Cleaning The Door Glazing
Cleaning and maintenance 4.4 Cleaning the door glazing Removing racks/trays support frames The glass in the door should always be kept Removing the rack/tray support frames thoroughly clean. Use absorbent kitchen enables the sides to be cleaned more roll. In case of stubborn dirt, wash with a easily. -
Page 22: Extraordinary Maintenance
Cleaning and maintenance 4.6 Extraordinary maintenance Removing the seal To permit thorough cleaning of the oven, the Live parts door seal can be removed. There are Danger of electrocution hooks on all four sides to attach it to the edge of the oven. Pull the edges of the seal •... -
Page 23: Installation
Installation 5 Installation 5.1 Clearances above and around domestic appliances This appliance must be installed by an highest part of the hob shall be protected authorised person in accordance with this for the full width and depth of the instruction manual, AS/NZS 5601.1 – cooking surface area in accordance Gas installations (installation and pipe with Clause 5.12.1.2. -
Page 24: Electrical Connection
Installation 5.2 Electrical connection 3. Additional requirements for Freestanding and Elevated Cooking Power voltage Appliaces – (Measurements D & E) Danger of electrocution Where D, the distance from the periphery of the nearest burner to a • Have the electrical connection horizontal combustible surface is less performed by authorised technical than 200 mm, then E shall be 10 mm or... - Page 25 Installation The appliance can work in the following Fixed connection modes: Fit the power line with an omnipolar circuit • 220-240 V 1N~ breaker in compliance with installation regulations. The circuit breaker should be located near the appliance and in an easily reachable position.
-
Page 26: Positioning
Installation 5.3 Positioning If a hood is installed above the hob, refer to the hood instruction manual to ensure the Heavy appliance correct clearance is left. Danger of crush injuries Depending on the type of installation, this appliance belongs to classes: •... - Page 27 Installation Positioning and levelling Heavy appliance Risk of damages to the appliance • Insert the front feet first and then the rear ones. After making the electrical and/or gas connections, screw the four adjustable feet supplied with the appliance. C - Class 2 subclass 1 (Built-in appliance) The appliance must be installed by a qualified technician and...
- Page 28 Installation Wall fixing Assembling the skirt 1. Attach the chain to the cooker The skirt provided is an integral 2. Stretch out the chain attached to the part of the product; it must be cooker horizontally so that the other end fastened to the appliance prior to touches the wall.