Table of Contents
Advertisement
TRANSLATION OF THE ORIGINAL INSTRUCTIONS
We advise you to read this manual carefully, which contains all the instructions for
maintaining the appliance's aesthetic and functional qualities.
For further information on the product: www.smeg.com
Contents
70
70
75
75
75
75
75
76
77
77
78
79
79
80
82
82
83
83
86
92
100
102
105
109
112
113
113
113
115
117
121
124
124
131
134
69
Advertisement
Table of Contents

Related Manuals for Smeg Portofino CPF9IPWH


Summary of Contents for Smeg Portofino CPF9IPWH
-
Page 1: Table Of Contents
5.2 Electrical connection 5.3 Instructions for the installer TRANSLATION OF THE ORIGINAL INSTRUCTIONS We advise you to read this manual carefully, which contains all the instructions for maintaining the appliance’s aesthetic and functional qualities. For further information on the product: www.smeg.com... -
Page 2: Instructions
Instructions 1 Instructions • Keep children under the age of eight at a safe distance unless 1.1 General safety instructions they are constantly supervised. Risk of personal injury • Keep children under the age of 8 away from the appliance when it •... - Page 3 Instructions • The cooking process must always • Do not use aerosols in the vicinity be monitored. A short cooking of this appliance whilst it is in use. process must be continuously • Switch off the appliance monitored. immediately after use. •...
- Page 4 Instructions Risk of damaging the appliance • Do not spray any spray products near the oven. • Do not use abrasive or corrosive • Do not use plastic cookware or detergents (e.g. scouring containers when cooking food. powders, stain removers and metallic sponges) on glass parts.
- Page 5 Instructions • If any liquid does boil over or spill, Installation remove the excess from the hob. • This appliance must not be • Take care not to spill acid installed in a boat or caravan. substances such as lemon juice or •...
- Page 6 Instructions • Use cables withstanding a • If cracks or fissures form, or if the temperature of at least 90°C. glass ceramic cooking surface breaks, turn off the appliance • The tightening torque of the immediately. Disconnect the screws of the terminal supply power supply and call Technical wires must be 1.5 - 2 Nm.
-
Page 7: Appliance Purpose
Instructions 1.2 Appliance purpose 1.4 This user manual This user manual is an integral part of the • This appliance is intended for appliance and must therefore be kept in its cooking food in the home entirety and within the user’s reach for the environment. -
Page 8: How To Read The User Manual
Instructions 1.7 How to read the user manual • Deliver the appliance to the appropriate recycling centre for electrical and This user manual uses the following reading electronic equipment waste, or return it to conventions: the retailer when purchasing an Instructions equivalent product, on a one for one basis. -
Page 9: Description
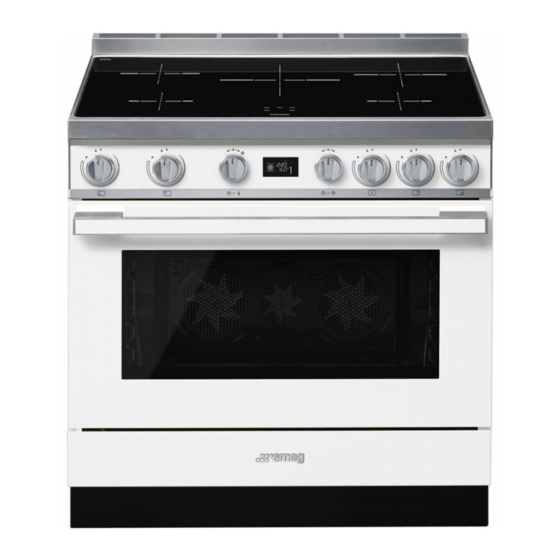
Description 2 Description 2.1 General Description 1 Hob 5 Door 2 Control panel 6 Fan 3 Oven light 7 Storage compartment 4 Seal Rack/tray support frames... -
Page 10: Hob
Description 2.2 Hob Power draw Outer diameter Max. power draw Zone with Booster function (mm) (W)* (W)* 1400 2200 1850 3000 2300 3700 2600 3700 Power levels are approximate and can vary according to the pan used or the settings made. •... -
Page 11: Control Panel
Description 2.3 Control panel 1 Hob cooking zone knobs 2.4 Other parts Useful for controlling the cooking zones of Cooling fan the induction hob. The fan cools the oven and comes into Turn the knobs clockwise to adjust the operation during cooking. operating power of the hot plate from a The fan causes a steady outflow of air that minimum of 1 to a maximum of 9. -
Page 12: Available Accessories
Description 2.5 Available accessories Interior lighting The appliance’s interior lighting comes on: Tray rack • When the door is opened. • When any function is selected, apart from the functions (multifunction models), and the functions (pyrolytic models). • When the temperature knob is briefly turned to the right (manual activation and To be placed over the top of the oven tray;... - Page 13 Description Rack Some models are not provided with all accessories. The accessories intended to come into contact with food are made of materials that comply with the provisions of current legislation. Useful for supporting containers with food during cooking. Supplied and optional accessories can be requested to Authorised Rotisserie Assistance Centres.
-
Page 14: Use
3 Use Improper use Risk of damage to surfaces 3.1 Instructions High temperatures during use • Do not cover the bottom of the oven cavity with aluminium or tin foil sheets. Danger of burns • If you wish to use greaseproof paper, place it so that it will not interfere with the •... -
Page 15: First Use
3.2 First use Improper use 1. Remove any protective film from the Danger of burns outside or inside of the appliance, including accessories. • Do not touch or clean the hob surface 2. Remove any labels (apart from the during operation or when the residual technical data plate) from the heat indicator lights are still on. - Page 16 Racks and trays Rotisserie (on some models only) Racks and trays have to be inserted into the 1. Insert the 4 supplied bushings in the 4 side guides until they come to a complete corner holes of the deep tray and stop.
- Page 17 3. Prepare the rotisserie rod with the food 5. Place the tray on the first runner (see using the clip forks provided. The clip “General Description”). forks can be tightened using the 6. Insert the tip of the rod in the rotisserie fastening screws.
-
Page 18: Using The Hob
3.4 Using the hob 7. To activate the rotisserie, turn the function knob to select the On first connection to the electrical mains, an automatic check will be function and use the carried out that will switch on all temperature knob to set a cooking indicator lights for a few seconds. - Page 19 Suitable cookware: Use only cookware with a • Enamelled steel cookware with thick perfectly flat bottom which is bases. suitable for induction hot plates. • Cast iron cookware with an enamelled Using cookware with an irregular base. bottom could jeopardise the •...
- Page 20 Limiting the cooking duration Advice on energy-saving • The diameter of the base of the pan must The hob has an automatic device which limits the duration of use. correspond to the diameter of the cooking zone. If the cooking zone settings are not changed, the maximum duration of operation for each zone depends on the power level selected.
- Page 21 Power levels Residual heat The power in the cooking zone can be Improper use adjusted to various levels. The table shows Danger of burns the levels suitable for various types of cooking. • Supervise children carefully as they Power level Suitable for: cannot easily see the residual heat indicator.
- Page 22 Heating accelerator Keep warm Each cooking zone is equipped The Keep warm function allows with a heating accelerator that you to keep cooked food warm. allows the maximum power to be delivered for a time that is To activate the Keep Warm function: proportional to the selected •...
- Page 23 Power control Controls lock The hob is fitted with a power control The controls lock is a device that module that optimises/limits consumption. If protects the appliance from the overall set power level exceeds the accidental or inappropriate use. maximum limit permitted, the electronic circuit board will automatically manage the 1.
-
Page 24: Using The Oven
3.5 Using the oven Operating modes Stand-by: When no function is selected, the Display display shows the current time Eco-logic indicator light ON: When a function is activated, the Pyrolytic function indicator light display shows the parameters set such as (pyrolytic models only) temperature, duration and temperature reached. - Page 25 Each time the temperature knob is pressed Setting the time during a function, the parameters will be When using the appliance for the first time, cycled through in the following order. or after a power failure, the symbol will flash on the display. To be able Temperature to start any cooking function, the current time must be set.
- Page 26 Cooking functions Preheating stage Cooking itself is preceded by a preheating stage, which allows the appliance to heat to the cooking temperature more quickly. The temperature level indicator flashes to indicate that this stage is in progress. 1. Press and turn the function knob to select the required cooking function.
- Page 27 Functions list Grill The heat coming from the grill element gives perfect grilling results This function is particularly suitable above all for thin and medium for cooking on a single shelf with thickness meat and, in combination low energy consumption. with the rotisserie (where fitted), Ideal for cooking meat, fish and gives the food an even browning at...
- Page 28 Minute minder Fan + lower element The combination of the fan with just This function only activates the the lower heating element allows buzzer, without stopping cooking. cooking to be completed more rapidly. This system is The minute minder can be recommended for sterilising or for activated both during cooking and finishing off the cooking of foods...
- Page 29 4. To deactivate the buzzer, press or turn 2. Turn the temperature knob right or left to one of the two knobs. set the cooking duration from 00:01 to 12:59. Keep the knob turned to 5. To select a further minute minder, turn produce a faster increase or decrease.
- Page 30 5. To deactivate the buzzer, press or turn Programmed cooking one of the two knobs or open the door. Programmed cooking is the function which allows cooking to To deactivate the buzzer and be stopped at an established time select a further timed cooking, turn depending on the time set by the the temperature knob to the right.
- Page 31 3. Press the temperature knob a fourth 5. At the end of cooking, time. The indicator light flashes. shown on the display and a buzzer Turn the knob right or left to set the sounds. cooking end time. 4. After a few seconds the indicator lights stop flashing.
-
Page 32: Cooking Advice
Modifying the data set during 3.6 Cooking advice programmed cooking General advice After modifying the cooking • Use a fan assisted function to achieve duration, the end of cooking time consistent cooking at several levels. must be re-set. • It is not possible to shorten cooking times by increasing the temperature (the food During operation, it is possible to modify could be overcooked on the outside and... - Page 33 Advice for cooking desserts/pastries and • To defrost meat, use the rack placed on biscuits the second level and a tray on the first level. In this way, the liquid from the • Use dark metal moulds: They help to defrosting food drains away from the absorb the heat better.
-
Page 34: Special Functions
3.7 Special functions Proving Defrost by time When using the proving function the temperature cannot be altered. 1. Place the food inside the oven. 2. Press and turn the function knob to For successful proving, a container select the defrost by time function of water should be placed in the 3. - Page 35 Sabbath After activating the Sabbath function the settings cannot be altered. Any action on the knobs will produce no effect; only the function knob remains active to allow the appliance to be turned off. 1. Press and turn the function knob to This function allows food to be select the Sabbath function cooked in accordance with the...
- Page 36 5. Turn the temperature knob to select the Defrost by weight weight (in grams) of the food to defrost. 6. Press the function knob to confirm the set parameters and start defrosting. 7. At the end, is displayed and a buzzer sounds. 8.
-
Page 37: Automatic Programs
3.8 Automatic programs 5. When preheating has finished, will flash. Introduce the food and then press the function knob to start cooking. 6. At the end, is displayed and a buzzer sounds. 7. To deactivate the buzzer, press or turn one of the two knobs or open the door. - Page 38 Automatic programs table MEAT (01 - 05) Weight Temperature Time Subcategory Level Function (°C) (minutes) 01 Roast beef (medium) 1300 02 Roast pork 03 Lamb (medium) 2000 04 Veal 1000 05 Whole roast chicken 1000 FISH (06 - 07) Weight Temperature Time Subcategory...
- Page 39 VEGETABLES (08 - 10) Weight Temperature Time Subcategory Level Function (°C) (minutes) 08 Mixed grilled 15 + 8 09 Roasted 1000 10 Roasted potatoes 1000 When grilling, it is recommended to cook foods on both sides, making reference to the times given in the table.
- Page 40 BREAD - PIZZA - PASTA (14-20) Weight Temperature Time Subcategory Level Function (°C) (minutes) 14 Leavened bread (loaf) 1000 15 Pan baked pizza 1000 16 Stone baked pizza 17 Pasta bake 2000 18 Lasagne 2000 19 Paella 20 Quiche 1000 The stone must be positioned on the base of the oven.
-
Page 41: Secondary Menu 109
3.9 Secondary menu Child lock mode The appliance has a drop-down secondary This mode allows the appliance to lock the menu allowing the user to: controls automatically after one minute of normal operation without any intervention • Activate or deactivate the Child lock. from the user. - Page 42 To release the lock temporarily during Showroom mode (for exhibitors only) cooking, hold the temperature knob down This mode allows the appliance to for 5 seconds. One minute after the last deactivate all heating elements, while setting the lock will become active again. keeping the control panel active.
- Page 43 Low Power (Eco-logic) mode Keep Warm mode This mode allows the appliance to limit the This mode allows the appliance to keep power used. cooked food warm (at low temperatures) for around an hour after cooking finishes Suitable for simultaneous use with further with a cooking cycle for which a duration home appliances.
-
Page 44: Using The Storage Compartment 112
3.10 Using the storage compartment Timed light (Eco-light) mode There is a storage compartment located at For greater energy savings, the light is the bottom of the cooker; this can be used automatically deactivated one minute from to store pans or metal objects required for the start of cooking. -
Page 45: Cleaning And Maintenance 113
Cleaning and maintenance 4 Cleaning and maintenance 4.2 Cleaning the glass ceramic hob To keep the surfaces in good condition, 4.1 Instructions they should be cleaned regularly after use. Let them cool first. Improper use Light coloured marks from pans with Risk of damage to surfaces aluminium bases can be easily cleaned off with a cloth moistened in vinegar. - Page 46 Cleaning and maintenance Shiny surfaces can form due to the bases Weekly cleaning of pans, especially aluminium ones, rubbing Clean and maintain the hob once a week on the surface, and due to the use of using an ordinary glass ceramic cleaning unsuitable detergents.
-
Page 47: Cleaning The Door
Cleaning and maintenance 4.3 Cleaning the door 2. Grasp the door on both sides with both hands, lift it forming an angle of around The glass in the door should always be kept 30° and remove it. thoroughly clean. Use absorbent kitchen roll. - Page 48 Cleaning and maintenance Removing the internal glass panes 3. Remove the intermediate glass pane by lifting it upwards. For easier cleaning the internal glass panes of the door can be removed. 1. Pull the rear part of the internal glass pane gently upwards, following the movement indicated by the arrows (1).
-
Page 49: Cleaning The Oven Cavity
Cleaning and maintenance 4.4 Cleaning the oven cavity Removing rack/tray support frames In order to keep your oven in the best Removing the rack/tray support frames possible condition, clean it regularly after enables the sides to be cleaned more letting it cool down. easily. - Page 50 Cleaning and maintenance Deactivating the door lock lever 1. Move the door lock lever to the right until it stops. manually Improper use Danger of burns • The following operations must always be performed with the appliance cold and switched off. •...
- Page 51 Cleaning and maintenance • For very stubborn encrustations spray an Pyrolytic cycle oven cleaning product onto the glass Pyrolytic cleaning is an automatic, (read the warnings on the product); high-temperature cleaning leave for 60 minutes, then rinse and dry procedure that causes dirt to the glass using kitchen roll or a microfibre dissolve.
- Page 52 Cleaning and maintenance Pyrolytic cycle 3. At the end of the pyrolytic cycle, the door remains locked as long as the temperature inside the oven cavity returns to safety levels. Wait for the oven to cool down and collect the residue deposited inside it using a damp microfibre cloth.
-
Page 53: Extraordinary Maintenance
Cleaning and maintenance Setting of programmed pyrolytic cycle 4.5 Extraordinary maintenance It is possible to program the pyrolytic cycle Replacing the internal light bulb start time like all other cooking functions. 1. After selecting the pyrolytic cycle Live parts duration, press the temperature knob. Danger of electrocution The display shows the current time and indicator light comes on. - Page 54 Cleaning and maintenance 4. Slide out and remove the light bulb. What to do if... The appliance is not working properly: • The switch is defective: check the fuse box to see whether the switch is in working order. • Loss of power: check that the appliance indicator lights are operational.
- Page 55 Cleaning and maintenance The display is completely off: After the (pyrolytic) automatic cleaning cycle it is not possible to select a function: • Check the mains power supply. • Verify whether the door lock has • Check whether an omnipolar switch deactivated.
-
Page 56: Installation
Installation 5 Installation Dimensions 5.1 Positioning Heavy appliance Crushing hazard • Position the appliance into the cabinet cut-out with the help of a second person. Pressure on the door Risk of damage to the appliance 900 mm • Never use the oven door to lever the 600 mm appliance into place when fitting. - Page 57 Installation Appliance dimensions Depending on the type of installation, this appliance belongs to classes: Position of gas and electrical connections. A - Class 1 General information (Free-standing appliance) This appliance may be installed next to walls, one of which must be higher than the worktop, at a minimum distance of 50 mm from the side of the appliance, as shown in figures A and C relative to the installation...
- Page 58 Installation Positioning and levelling Heavy appliance Risk of damage to the appliance • Insert the front feet first and then the rear ones. • After making the gas and electrical connections, screw on the four feet supplied with the appliance. C - Class 2 subclass 1 (Built-in appliance) The appliance must be installed by...
- Page 59 Installation 3. Assemble the fastening bracket. Fastening to the wall The anti-tip devices must be installed in order to prevent the appliance from tipping over. 1. Screw the wall fastening plate to the rear of the appliance. 4. Align the base of the hook on the fastening bracket with the base of the slot on the wall fastening plate.
- Page 60 Installation 5. Align the base of the fastening bracket 7. Move the bracket onto the wall and with the ground and tighten the screws mark the position of the holes to be to fix the measurements. drilled in the wall. 8.
- Page 61 Installation Fastening to the ground 2. Position the front plinth at the bottom of the appliance and line up the side If fastening to the ground, contact holes of the front plinth with the holes on the nearest Authorised Service the base of the appliance.
- Page 62 Installation Installing the side plinths 3. Insert the tabs on the side plinth into the slots on the rear part of the front plinth. After installing the front plinth, the side plinth can be fastened correctly to the appliance. 1. Use a screwdriver to remove the front screws underneath the storage compartment.
-
Page 63: Electrical Connection
Installation 5. Fasten the side plinth to the appliance 5.2 Electrical connection using the previously removed screw. Power voltage 6. Repeat the operations described Danger of electrocution above for the other side plinth section. • Have the electrical connection performed by authorised technical Assembling the upstand personnel. - Page 64 Installation The appliance can work in the following modes: The values indicated refer to the • 220-240 V 2~ cross-section of the internal conductor. The aforementioned power cables are sized taking into account the 3 x 10 mm² three-core cable. coincidence factor (in compliance with standard EN 60335-2-6).
- Page 65 Installation Accessing the terminal board 3. Proceed with installation of the power supply cable. To connect the power supply cable, you must access the terminal board on the rear casing: 1. Remove the screws fastening the plate to the rear casing. It is recommended to slacken off the cable clamp screw before installing the power supply cable.
-
Page 66: Instructions For The Installer
Installation 5.3 Instructions for the installer • The plug must be accessible after installation. Do not bend or trap the power cable. • The appliance must be installed according to the installation diagrams. • If the appliance does not work correctly after having carried out all the checks, contact your local Authorised Service Centre.