
Related Manuals for Schumacher Electric EV Series


Summary of Contents for Schumacher Electric EV Series
- Page 1 E115376 LEVEL 2 EV WALL CHARGER SEV1600HW, SEV1600P1450, SEV1600P650 INSTALLATION AND USER GUIDE 0099002387-2 - 1 -...
-
Page 2: Table Of Contents
CONTENTS IMPORTANT SAFETY INSTRUCTIONS ............2 GETTING STARTED....................3 FEATURES ......................... 4 IN THE BOX ......................5 TOOLS NEEDED FOR INSTALLATION ............6 INSTRUCTIONS PERTAINING TO A RISK OF ELECTRIC SHOCK ..7 INSTALLATION INSTRUCTIONS ..............8 OPERATING INSTRUCTIONS ................16 TROUBLESHOOTING ...................17 SPECIFICATIONS .................... -
Page 3: Getting Started
9. Do not operate charger if it has received a sharp blow, been dropped, or otherwise damaged in any way; take it to a qualified service person. 10. Do not disassemble charger; employ a qualified service person when service or repair is required. Incorrect reassembly may result in a risk of electric shock or fire. -
Page 4: Features
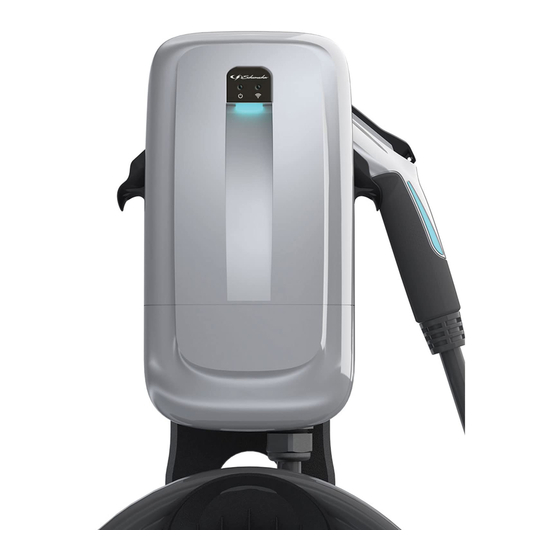
FEATURES Wi-Fi® LED Power LED Lockable, Ergonomic Charging Gun Charging Status LED Charging Gun LED Durable, raintight Housing Bluetooth® Switch 25-Foot Cable Flexible Cable Management Interchangeable Low Profile SAE-J1772 Dock Design Connector Tesla Adapter Also Available * *Tesla, Inc. is an independently owned and operated company. This product is not manufactured, approved, or endorsed by Tesla, Inc. -
Page 5: In The Box
IN THE BOX Please check to ensure all parts are included. If any parts are missing, please return to retailer or contact Schumacher Electric at 1-800-621-5485. 1. Charging station 2. Output cable with EV connector 3. Cord with NEMA 14-50 plug (model SEV1600P1450 only) 4. -
Page 6: Tools Needed For Installation
TOOLS NEEDED FOR INSTALLATION YOU WILL NEED THE FOLLOWING TO COMPLETE INSTALLATION OF THE SCHUMACHER EV2 WALL CHARGER. 1. Stud finder 2. Pencil 3. Tape 4. Level 5. Drill 6. Phillips head screwdriver - 6 -... -
Page 7: Instructions Pertaining To A Risk Of Electric Shock
INSTRUCTIONS PERTAINING TO A RISK OF ELECTRIC SHOCK For a permanently connected product: MODEL SEV1600HW ONLY GROUNDING INSTRUCTIONS This product must be connected to a grounded, metal, permanent wiring system, or an equipment-grounding conductor must be run with the circuit conductors and connected to the equipment grounding terminal or lead on the product. -
Page 8: Installation Instructions
INSTALLATION INSTRUCTIONS CAUTION: The Schumacher Level 2 EV Wall Charger must be installed by a licensed electrician. Any changes to the wall charger’s electrical settings (page 13) must be made by a licensed electrician. CHOOSING A LOCATION This device shall be mounted at a sufficient height from grade such that the height of the storage means for the coupling device is located between 600 mm (24 inches) and 1.2 m (4 feet) from grade. - Page 9 ASSEMBLING THE CHARGING STATION Lay the charging station on a flat surface and remove the lower front cover. Unscrew the single M4 screw at the bottom of the unit. Set the screw aside for reassembly. Then, slide the cover down and lift to disengage the tabs at the top of the front cover.
- Page 10 Turn off the power to circuit before installation. Do not restore power until installation is complete. Failure to do so could result in injury or death. When installing a hardwired circuit, Schumacher Electric recommends that the AC input uses a conduit into the rear opening of the charging station.
- Page 11 ATTACHING THE CORD AND PLUG TO THE CHARGING STATION (MODELS SEV1600P1450 AND SEV1600P650 ONLY) Ensure that you have an existing NEMA outlet that matches the model you are installing. Alternatively, a licensed electrician may install a NEMA outlet that corresponds with the specifications of your model.
- Page 12 2. Insert the wires into the appropriate connectors in the right terminal block as illustrated in the wiring diagram below. L1 - Red Wire L2 - Black Wire PE - Green and Yellow Wire CP - Blue Wire LED - Orange Wire 3.
- Page 13 3. Lift the charging station and then use the notch on the back of the unit to hang the unit from the screw affixed to the stud. 4. Align the charging station’s lower mounting hole with the lower pilot hole you drilled in step 1. Drive the 5.5 mm x 50 mm lag screw with the rubber washer through the lower mounting hole and into the pilot hole.
- Page 14 FINAL STEPS Dedicated Breaker Kilowatts Voltage Amperage Hardwired Plug 3.8kW 208V/240V 5.8kW 208V/240V 7.7kW 208V/240V 9.6kW 208V/240V 11.5kW 208V/240V 12.0kW 208V/240V 12.0kW 208V/240V For models SEV1600HW, SEV1600P1450, and SEV1600P650, the following steps must be completed by a licensed electrician. Before starting, the licensed electrician should consult all applicable codes for breaker and wire sizing requirements.
- Page 15 2. A licensed electrician should set the amperage of the unit according to the connected dedicated breaker associated with the hardwired connection or NEMA outlet. Using the table on the previous page, determine the voltage and amperage of the installation. Then, set the unit’s DIP switch following the diagram below that corresponds with the dedicated breaker’s voltage and amperage.
-
Page 16: Operating Instructions
OPERATING INSTRUCTIONS Check to make sure the wall charger’s Power LED is illuminated a steady, solid green color. 2. Remove charging gun from the wall charger’s dock. 3. Connect the charging gun to your vehicle’s charging port. Note: The charging gun is fitted with a universal SAE-J1772 connector that will fit most electric vehicles. -
Page 17: Troubleshooting
TROUBLESHOOTING LED Behavior Problem Solution Check the breaker and, for models SEV1600P1450 and SEV1600P650, Power LED off No AC power make sure the plug is fully inserted. Have a licensed electrician connect the charging station to AC power. Re-power the unit by turning the circuit breaker off and on again for model SEV1600HW. -
Page 18: Specifications
SPECIFICATIONS In/Out Voltage ..............208V/240V AC, 60Hz SEV1600HW Rated Current................. 50A SEV1600P1450 Rated Current................40A SEV1600P650 Rated Current................40A SEV1600HW Rated Output Power ............. 12.0kW SEV1600P1450 Rated Output Power ............9.6kW SEV1600P650 Rated Output Power ............9.6kW Configurable Current ............16/24/32/40/48/50A Configurable Power .......... - Page 19 DEFECTIVE GOODS IS LIMITED TO REPAIR OR REPLACEMENT AS DESCRIBED BELOW IN THIS WARRANTY STATEMENT. WHO MAY USE THIS WARRANTY? Schumacher Electric Corporation located at address 14200 FAA Blvd., Fort Worth, TX 76155 (“Schumacher” or “we”) extends this limited warranty only to the consumer who originally purchased the product from an authorized retailer in the United States, its territories, or Canada (“you”).
- Page 20 WHAT IS THE PERIOD OF COVERAGE? This limited warranty starts on the date of your purchase and lasts for three years (the “Warranty Period”). The Warranty Period is not extended if we repair or replace the product. We may change the availability of this limited warranty at our discretion, but any changes will not be retroactive.
- Page 21 The Schumacher logo is a registered trademark of Schumacher Electric Corporation. SCHUMACHER ELECTRIC CORPORATION 14200 FAA BLVD. FORT WORTH, TX 76155 1-800-621-5485 SCHUMACHERELECTRIC.COM - 21 -...