Table of Contents
Advertisement
Quick Links
Version 1.1 and later
Contents
. . . . . . . . . . . . . . . . . . . . . . . . . . . . . . . . . . . . . .
. . . . . . . . . . . . . . . . . . . . . . . . . . . . . . . . . . . . .
. . . . . . . . . . . . . . . . . . . . . . . . . . . . . . . . . . . . . . . . . . .
. . . . . . . . . . . . . . . . . . . . . . . . . . . . . . . . . . . . . . . . . . . . . .
. . . . . . . . . . . . . . . . . . . . . . . . . . . . . . . . .
. . . . . . . . . . . . . . . . . . . . . . . . . . . . . . . . . . . . . . . . . . .
. . . . . . . . . . . . . . . . . . . . . . . . . . . . . . . . . . . . . .
. . . . . . . . . . . . . . . . . . . . . . . . . . . . . . . .
. . . . . . . . . . . . . . . . . . . . . . . . . . . . . . . . 12
. . . . . . . . . . . . . . . . . . . . . . . . . . . . . . . . . . . . . . . 13
. . . . . . . . . . . . . . . . . . . . . . . . . . . . . . . . . . . . 13
. . . . . . . . . . . . . . . . . . . . . . . . . . . . . . . . . . . . . . . 14
. . . . . . . . . . . . . . . . . . . . . . . . . . . . . . . . . . 14
. . . . . . . . . . . . . . . . . . . . . . . . . . . . . . . . . . . . . . . . . . . . . . . 15
. . . . . . . . . . . . . . . . . . . . . . . . . . . . . . . . . . . . . . . 19
. . . . . . . . . . . . . . . . . . . . . . . . . . . . . . . . . . . . . . . . . . 20
. . . . . . . . . . . . . . . . . . . . . . . . . . . . . . . . . . . . . . . . 20
. . . . . . . . . . . . . . . . . . . . . . . . . . . . . . . . . 21
. . . . . . . . . . . . . . . . . . . . . . . . . . . . . . . . . . . . . . . . . 22
. . . . . . . . . . . . . . . . . . . . . . . . . . . . . . . . . . . . . . . . . 23
. . . . . . . . . . . . . . . . . . . . . . . . . . . . . . . . . . . . . 24
. . . . . . . . . . . . . . . . . . . . . . . . . . . . . . . . . . . . . . . 26
. . . . . . . . . . . . . . . . . . . . . . . . . . . . . . . . . . . . . 26
© 2021 Roland Corporation
. . . . . . . . . . . . . . . . . .
. . . . . . . . . . . . . . . . . . . . . . . . . . . . .
. . . . . . . . . . . . . . . . . . . . . . . . . . . 11
. . . . . . . . . . . . . . . . . . . . 11
. . . . . . . . . . . . . . . . . . . . . . . . 12
. . . . . . . . . . . . . . . . . . . . . . . . . . . . . . . 13
. . . . . . . . . . . . . . . . . . . . . . . . . . 13
. . . . . . . . . . . . . . . . . . . . . . . 26
. . . . . . . . . . . . . . . . . . . . . . . . . 27
. . . . . . . . . . . . . . . . . . . . . . . . . . . . . . . . . . . . . . . . . . . . . . . . 28
2
2
. . . . . . . . . . . . . . . . . . . . . . . . . . . . . . . . . . . . . . . . . . . . . . 29
3
4
4
7
. . . . . . . . . . . . . . . . . . . . . . . . . . . . . . . . . . . . . . . . . 31
7
8
8
9
. . . . . . . . . . . . . . . . . . . . . . . . . . . . . . . . . . . . . . . . . . 33
. . . . . . . . . . . . . . . . . . . . . . . . . . . . . . . . . . . . . . . . . . . . . . . . 34
. . . . . . . . . . . . . . . . . . . . . . . . . . . . . . . . . . . . . . . . . . . . . . . . . 34
. . . . . . . . . . . . . . . . . . . . . . . . . . . . . . . . . . . . . . . . . . . . . . 35
. . . . . . . . . . . . . . . . . . . . . . . . . . . . . . . . . . . . . . . . . . . . . . . . . 35
. . . . . . . . . . . . . . . . . . . . . . . . . . . . . . . . . . . . . . . . . . . . . . . . . . . . 36
. . . . . . . . . . . . . . . . . . . . . . . . . . . . . . . . . . . . . . . . . . . . 36
. . . . . . . . . . . . . . . . . . . . . . . . . . . . . . . . . . . . . . . . . . . 38
. . . . . . . . . . . . . . . . . . . . . . . . . . . . . . . . . . . . . . . . . . . . 39
. . . . . . . . . . . . . . . . . . . . . . . . . . . . . . . . . . . . . . . . . . 40
. . . . . . . . . . . . . . . . . . . . . . . . . . . . . . . . . . . . . . . . . . . 42
. . . . . . . . . . . . . . . . . . . . . . . . . . . . . . . . . . . . . . . . . . . . . . . . 42
. . . . . . . . . . . . . . . . . . . . . . . . . . . . . . . . . . . . . . . . . . . . . . . . . 44
. . . . . . . . . . . . . . . . . . . . . . . . . . . . . . . . . . . . . . . . . . . . . . . . . . 44
. . . . . . . . . . . . . . . . . . . . . . . . . . . . . . . . . . . . . . . . . . . . . . . . . . . . . 44
. . . . . . . . . . . . . . . . . . . . . . . . . . . . . . . . . . . . . . . . . . . . . . . . . . . . 45
. . . . . . . . . . . . . . . . . . . . . . . . . . . . . . . . . . . . . . . . . . . . . . . . 46
. . . . . . . . . . . . . . . . . . . . . . . . . . . . . . . . . . . . . . . . . . 46
. . . . . . . . . . . . . . . . . . . . . . . . . . . . . . . . . . . . . . . . . . . . . . 49
Reference Manual
. . . . . . . . . . . . . . . . . . . . . . . . 28
. . . . . . . . . . . . . . . . . . . . . 29
. . . . . . . . . . . . . . . . . . . . . . . . . . 29
. . . . . . . . . . . . . . . . . . . . . . . . . . . . . . . . . . . . 30
. . . . . . . . . . . . . . . . . . . . . . . . . . . . . . . . . . . . 32
. . . . . . . . . . . . . . . . . . . . . 32
. . . . . . . . . . . . . . . . . . . . . . . . . . . . . . . . . . . . . . . . 42
. . . . . . . . . . . . . . . . . . . . . . . . . . . . . . . . . 42
. . . . . . . . . . . . . . . . . . . . . . . . . . . . . . . . . . . . . . 45
. . . . . . . . . . . . . . . . . . . . . . . . . . . . . . . . . . . . . . . . 47
. . . . . . . . . . . . . . . . . . . . . . . . . . . . 47
. . . . . . . . . . . . . . . . . . . . . . . . . . . . . . . . . . . . . . . 48
. . . . . . . . . . . . . . . . . . . . . . . . . . . . . . . . . . . . . . 50
. . . . . . . . . . . . . . . . . . . . . . . . . . . . . . . . . . . . . 51
. . . . 31
. . . . . . . . . . 33
03
Advertisement
Table of Contents

Related Manuals for Roland P-20HD


Summary of Contents for Roland P-20HD
-
Page 1: Table Of Contents
. . . . . . . . . . . . . . . . . . . . . 32 How the P-20HD is Organized . -
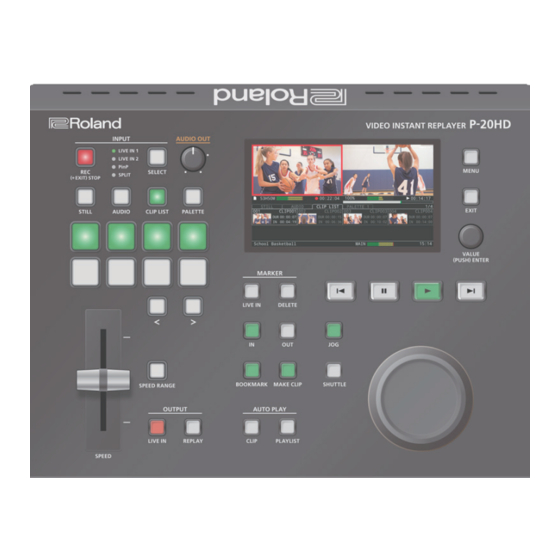
Page 2: Panel Descriptions
Sets the [JOG/SHUTTLE] dial to jog mode. (p. 14) Sets the [JOG/SHUTTLE] dial to shuttle mode. (p. [SHUTTLE] button Heat from inside the P-20HD is released from these vents. Cooling vents * Do not block the cooling vents. If the cooling vents are... -
Page 3: Rear Panel (Connecting Your Equipment)
Use these to connect an audio recorder, amplifier, speakers, or related equipment. separately) to this jack. Use this when you want to switch between video using your foot. * Use only the specified expression pedal (Roland EV-5, BOSS Audio FV-500L/FV-500H; sold separately). Connecting any other input jacks expression pedals may cause malfunctions and/or damage to this unit. -
Page 4: Getting Ready
Getting Ready Main Screen This is the main screen of the P-20HD. Name Explanation Displays the preview video for the recording content that is being input. You can also change the input video with the INPUT LIVE IN video preview area SELECT. - Page 5 Getting Ready Name Explanation Playback time display Shows the playback time. Displays the playback position within the recording time. Timeline display The full length of the timeline bar shows the recording time, and the length of the position bar (the gray area) shows the playback time.
- Page 6 Getting Ready Name Explanation When playing back a clip Playback time display Shows the playback time from the beginning of the clip. Timeline display The playback position is shown, with the clip length being the total length. The position bar is shown in light blue. Playback clip display For the clip area of the playback target, the playback position is displayed, with the clip area width being the clip length.
-
Page 7: Turning The Power On/Off
Turn off the power of the output devices first, and Formatting an SD Card then the source devices. Make sure that the SD card you want to use on the P-20HD is properly Turn off the [POWER] switch of the P-20HD. initialized using the P-20HD. -
Page 8: Operating The Menu
5 If the battery runs out, the message “Battery Error” is displayed. If you see this message, contact the nearest Roland Service Center. Follow the steps: press the [MENU] button 0 “System” 0 select “Date & Time Settings,” and press the [VALUE] knob. -
Page 9: How The P-20Hd Is Organized
Getting Ready How the P-20HD is Organized Project Clip List Palette 1–8 Page 1–64 Page 1–8 CLIP1 CLIP1 CLIP4 CLIP2 CLIP15 CLIP3 CLIP4 CLIP22 CLIP5 CLIP40 CLIP6 CLIP26 CLIP7 CLIP74 CLIP8 CLIP16 Max: 512 Max: 64 Recording Data CLIP1 CLIP2... - Page 10 Getting Ready Terms used Explanation On the P-20HD, a project is used for managing material (unprocessed content) and operation-related settings as a Project unit. This is the video data you’ve recorded. Recording data Even if video recording is stopped, you can simply start recording again to create a continuous block of data.
-
Page 11: Video Input/Output Settings
Setting the Video Input/Output Format On the P-20HD, the input/output format is determined according The P-20HD supports input and output of signals in the following to the system frame rate. Set the system frame rate to match the formats, regardless of the format in which the video was recorded. -
Page 12: Specifying The Input Format (Edid)
EDID data for a specific input format to be sent to the source device. NOTE If the display does not support the output format of the P-20HD, the What is EDID? video may not play properly. -
Page 13: Creating A Project
“clips” that contain specific time ranges of a recorded video, as well as “playlists” that feature multiple clips that are played back in series. After you turn the P-20HD on, you have the choice to create a new project or open an existing project. Creating a New Project Opening an Existing Project Here’s how to create a new project. -
Page 14: Video Operations
[SPEED] lever Recording and Playback Move the [SPEED] lever back and forth to change the playback speed. You can play back a previously recorded scene while the P-20HD is recording (chase play). Press the [INPUT SELECT] button to select the input. -
Page 15: Using Clips
Using Clips You can use effects such as mix or wipe that are applied when With the P-20HD, you can specify a certain time range of a recorded switching between videos. video and use it to create a clip. The clips you create can be used as Press the [MENU] button 0 “Transition”... - Page 16 Video Operations Specify the OUT point (the end of the time range). NOTE 5 You can’t perform this operation if the recording time has not The MARKER [OUT] button lights up one second after the video progresses from the IN point that you set. Make sure that the reached the time set for the clip and the [MAKE CLIP] button is MARKER [OUT] button is lit.
- Page 17 Video Operations Playing back a playlist MEMO When you want to record more material to a project Press the [CLIP LIST] button to display the CLIP LIST that already contains recorded video data, a marker is screen. automatically added to the recording start point regardless of the auto-marker settings.
- Page 18 Video Operations Editing a Clip’s Name Press the MARKER [OUT] button to set the OUT point. Clips can be renamed. * You can’t set the OUT point before the IN point. * You can’t set the OUT point less than one second after the IN On the CLIP LIST (PALETTE) screen, select the clip to point.
-
Page 19: Clip List Operations
Video Operations Clip List Operations Adding Transition Effects You can add transition effects between clips when playing back a playlist. Creating a Thumbnail Press the [MENU] button 0 select “Playlist,” select You can create thumbnails for many clips all at once that do not yet the clip list or palette you want to set, and press the have a thumbnail. -
Page 20: Pad Operations
Pad Operations Using the Palettes Selecting a Palette On the P-20HD, you can register the clips you have created in eight Hold down the [PALETTE] button and press pads different palettes and categorize the clips by player, scene and so on [1]–[8]. -
Page 21: Other Palette Operations
Pad Operations Changing the length of a clip Other Palette Operations This is explained in “Using Clips, ” “Editing a Clip, ” “Changing the length of a clip” (p. 21). Creating a Thumbnail Changing the thumbnail position You can create thumbnails for many clips all at once that do not yet have a thumbnail. -
Page 22: Using Still Images
Using Still Images For still image clips that are assigned to the pads, you can individually The P-20HD lets you load (import) still images created on your configure the playback-related settings. computer as materials and display those images by pressing the pads. -
Page 23: Using Audio Files
Audio files that you created on your computer can be loaded Press the [AUDIO] button (imported) into the P-20HD as materials. Turn the [VALUE] knob to move the cursor and The imported audio can then be played back by pressing the pads. -
Page 24: Adjusting The Video
Here’s how to adjust the output video so that it is appropriate for the Here’s how to adjust the video that is input from the INPUT 1 and 2 device that receives output from the P-20HD. connectors. Press the [MENU] button 0 “Video Input” 0 MEMO select “LIVE IN1”... - Page 25 Border Width Sets the border width for the split. * For details on the parameters, refer to “Menu List” (p. 36). The P-20HD features three internal output buses (Main, Preview and Replay). Press the [MENU] button to close the menu.
-
Page 26: Audio Operations
Audio Operations Adjusting the Volume Applying Effects to the Input Audio Here’s how to adjust the volume of the input and output audio. You can apply effects to the input audio to adjust the character of the sound. Press the [MENU] button 0 “Audio Input” 0 Press the [MENU] button 0 “Audio Input”... -
Page 27: Applying Effects To Output Audio
Audio Operations Equalizer (EQ) Applying Effects to Output Audio Adjusts the tonal character of the audio for each frequency band. Here’s how to modify the tonal character by applying effects to the audio output. Menu Explanation Press the [MENU] button 0 “Audio Output” 0 Turns the equalizer on/off. -
Page 28: Muting Only Specific Audio (Mute)
Switching Between Audio Output from (Mute function). Each Output Connector Muting input audio The P-20HD features two internal audio output buses (Main and Press the [MENU] button 0 “Audio Input” 0 Preview). select an item from “LIVE IN” to “REC” and press the You can set which audio output bus is assigned to each output [VALUE] knob. -
Page 29: Annotation
There is no need to calibrate if you’re using a tablet without an LCD screen. * If you want to use a USB flash drive with the P-20HD at the same time, use a USB hub to connect. From the [MENU] button 0 select “Annotation” 0 Connecting to a Pen Tablet “Calibration”... -
Page 30: Drawing On The Screen
The operations that can be redone are drawing, erasing and clear. Eraser Erases the area drawn with the pen. You can use the annotation buttons on the P-20HD for the following Clear operations. Clears all contents drawn on the screen. -
Page 31: Other Functions
Other Functions When saving a new file or saving with a different filename: Saving this Unit’s Settings to a SD Card/ Press the [MENU] button 0 “SD Card/USB USB Flash Drive Memory” 0 select “Save Settings As,” and press the [VALUE] knob. You can group together the unit’s settings into a single file (with a A confirmation dialog box appears. -
Page 32: Formatting An Sd Card
Turning Off the Power from the Menu In addition to using the [POWER] switch on the P-20HD to shut down the power, you can also power down this unit from the menu. This method is useful when you want to turn the power on/off from the primary side of the AC adaptor. -
Page 33: Returning To The Factory Settings (Factory Reset)
Other Functions Returning to the Factory Settings (Factory Reset) System Settings Here’s how you can return the settings of the P-20HD to their factory- These are the overall settings for the P-20HD, the date and time set state. settings and so on. -
Page 34: Menu List
Menu List When you press the [MENU] button, the menu is shown on this unit’s display and on the display connected to the OUTPUT PREVIEW connector. MEMO 5 If “[Enter]” is shown for the setting value, you can press the [VALUE] knob to proceed to a lower-level menu. -
Page 35: 2: Transition
Menu List Project Utility Menu Value Explanation (Bold: default) Open [Exec] Opens the project. Delete [ENTER] Deletes the project. 2: Transition LIVE IN0REPLAY, REPLAY0LIVE IN Menu Value Explanation (Bold: default) Time 0.0–1.0–5.0sec Sets the transition effect time. Mix, Wipe Type Sets the transition effect type. -
Page 36: 4: Pad
Menu List 4: Pad Menu Value Explanation (Bold: default) STILL [ENTER] Configures the settings for the still image clip. AUDIO [ENTER] Configures the settings for the audio clip. CLIP LIST [ENTER] Configures the settings for the clip list. PALETTE (*current palette [ENTER] Configures the settings for the current palette. - Page 37 What is EDID? SXGA (1280 x 1024) EDID EDID is data that is transmitted from the P-20HD to the source device when SXGA+ (1400 x 1050) the P-20HD is connected to a source device. EDID contains data such as the...
-
Page 38: 6: Video Output
Menu List SPLIT Menu Value Explanation (Bold: default) V-Center, H-Center, V-Stretch, Pattern Sets the split composite pattern. H-Stretch Center 0.0–50.0–100.0% Sets the split position. A-Ch (Left/Upper) LIVE IN 1, LIVE IN 2 Sets the channel for the left/upper split video. B-Ch(Right/Lower) LIVE IN 2 LIVE IN 1,... -
Page 39: 7: Audio Input
Menu List 7: Audio Input Menu Value Explanation (Bold: default) LIVE IN1 [ENTER] Configures the audio input for LIVE IN1. LIVE IN2 [ENTER] Configures the audio input for LIVE IN2. AUDIO IN [ENTER] Configures the audio input for AUDIO IN. LIVE IN Bus [ENTER] Configures the audio input for the LIVE IN bus. -
Page 40: 8: Audio Output
Menu List LIVE IN Bus Menu Value Explanation (Bold: default) Level -INF, -80.0–0.0–10.0dB Adjusts the input volume. Turns the mute function on/off. If this is set to “On, ” the input audio is Mute Off, On temporarily muted. Preview Send -INF, -80.0–0.0–10.0dB Adjusts the output volume sent through the OUTPUT PREVIEW connector. - Page 41 Menu List Main Bus Menu Value Explanation (Bold: default) Level -INF, -80.0–0.0–10.0dB Adjusts the output volume. Turns the mute function on/off. If this is set to “On, ” the output audio is Mute Off, On temporarily muted. Adjusts the delay time of the audio. Delay 0.0–95.0ms(0.0–*.*Frame) Effect...
-
Page 42: 9: Audio Rec Level
Menu List 9: Audio Rec Level Menu Value Explanation (Bold: default) Level -INF, -80.0–0.0–10.0dB Adjusts the output volume. Turns the mute function on/off. If this is set to “On, ” the output audio is Off, On Mute temporarily muted. 10: SD Card/USB Memory Menu Value Explanation... - Page 43 Value Explanation (Bold: default) Turns the Auto Off function on/off. If this is set to “On, ” the power to the P-20HD turns off automatically when all of the following applies for at least 240 minutes. Auto Off Off, On...
-
Page 44: Clip List
Menu List CLIP LIST Menu Value Explanation (Bold: default) Name Give the clip a name. In Position 00:00:00 Shows the IN point. Out Position 00:00:00 Shows the OUT point. Duration Shows the length of the clip. Update Thumbnail [Exec] Sets the thumbnail. Add to PALETTE [ENTER] Registers a clip to a palette. -
Page 45: Audio
Menu List AUDIO Menu Value Explanation (Bold: default) Import [Exec] Imports an audio clip. Name Sets the name of an audio clip. File xxxx.wav Shows the filename. Duration Shows the length of an audio clip. Level -INF.–0.0–10.0dB Sets the volume of an audio clip. Sets what happens when the audio clip plays back. -
Page 46: Appendix
Appendix Troubleshooting If you suspect a malfunction, please check the following points. If this does not resolve the problem, contact a nearby Roland Service Center. Problem Items to check Action Page Video-related problems Have you inserted an SD card? Make sure that the SD card is inserted correctly. -
Page 47: Error Message List
Message Explanation P-20HD is too hot! The internal temperature is too hot. Select [OK] and turn off the power of the P-20HD. Please turn off the power immediately. Fan Error! The cooling fan is not working. Select [OK] and turn off the power of the P-20HD. -
Page 48: Main Specifications
Appendix Main Specifications 9 Video Video Processing 4:2:2 (Y/Pb/Pr), 8-bit HDMI type A x 2 Input Connectors INPUT 1–2 * Multi-format Supported HDMI type A MAIN Output Connectors * Multi-format Supported PREVIEW HDMI type A 720/59.94p, 720/50p, 1080/59.94i, 1080/50i, 1080/59.94p, 1080/50p SVGA (800 ×... -
Page 49: Dimensions
Power cord (*1) future update. * 0 dBu = 0.775 Vrms * This document explains the specifications of the product at the time that the document was issued. For the latest information, refer to the Roland website. Dimensions Unit: mm 79.2 69.8... -
Page 50: Video Block Diagram
Appendix Video Block Diagram P-20HD Blockdiagram ver. 1.10 Video ANNOTATOR INPUT SELECT HDMI 1 LIVE IN 1 FRAME EDID SCALER OUTPUT SELECT SYNCHRONIZER EMULATOR LIVE IN 1 LIVE IN LIVE IN 2 LIVE IN TITLE HDMI 2 ANNOTATION LIVE IN 2... -
Page 51: Audio Block Diagram
REPLAY FRAME REPLAY ASSIGN DECODE SCALER REPLAY PREVIEW OUT SYNCHRONIZER TITLE MAIN REPLAY STILL IMAGE PREVIEW Appendix Audio Block Diagram LIVE IN REPLAY Built-in LCD MONITOR PREVIEW GUI Audio OUTPUT BUS INPUT BUS MAIN PREVIEW LIVE IN MAIN PREVIEW FOLLOW FOLLOW INPUT SELECT OUTPUT SELECT...