Table of Contents
Advertisement
Quick Links
What you can do with the P-20HD
Slow-motion replay
During video recording, you can select a scene and replay it in slow motion. This is ideal for live events and sports broadcasting.
Composite the video from multiple cameras, and capture and replay it
Two HDMI inputs are provided. You can composite the two video signals (PinP or SPLIT), and record and replay the result.
Extended recording to SD card
As storage media, this unit uses easily-available SD cards (commercially available), and the recording format is H.264, allowing extended
recording to an SD card.
All actions necessary for replay can be controlled using just the unit itself
In addition to buttons, jog shuttle dial, and lever, an LCD display is also provided, so that the unit itself supports all operations needed for
replay.
Title and caption compositing
A specified still image title can be shown superimposed on the video, or you can layer an individual still image on the live input video or the
replay video.
PDF Manual (download from the Web)
Details on operations and menu lists are provided in
"Reference Manual" (PDF).
Downloading
1.
Enter the following URL in your computer.
https://proav.roland.com/manuals/
2.
Choose "P-20HD."
Before using the unit, ensure that its system program is at the most recent version.
For information on available upgrades for the system program, see the Roland website (https://proav.roland.com/).
You can check the system program version by Pressing the [MENU] button 0 "SYSTEM"0 "VERSION."
Before using this unit, carefully read "USING THE UNIT SAFELY" and "IMPORTANT NOTES" (leaflet "USING THE UNIT SAFELY" and Startup Guide (p. 11)). After reading, keep
the document(s) where it will be available for immediate reference.
Checking the Included Items
Check that all of the included items are present. If any of the
included items are missing, contact your dealer.
* P-20HD unit
* AC adaptor
* Power cord
* Startup Guide (this document)
* Leaflet "USING THE UNIT SAFELY"
Startup Guide
© 2020 Roland Corporation
Advertisement
Table of Contents

Related Manuals for Roland P-20HD


Summary of Contents for Roland P-20HD
- Page 1 Before using the unit, ensure that its system program is at the most recent version. For information on available upgrades for the system program, see the Roland website (https://proav.roland.com/). You can check the system program version by Pressing the [MENU] button 0 “SYSTEM”0 “VERSION.”...
-
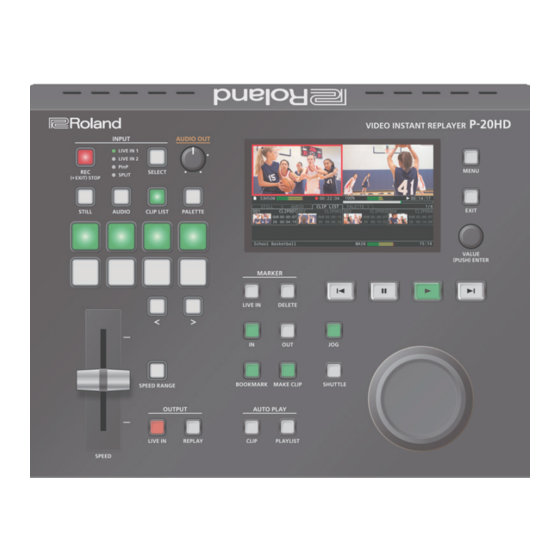
Page 2: Panel Descriptions
[JOG] button (p. 8) Sets the [JOG/SHUTTLE] dial to shuttle mode. [SHUTTLE] button Heat from inside the P-20HD is exhausted here. (p. 8) Cooling vent * Do not block the cooling vent. If the cooling vent is blocked, the internal temperature will rise, and the... -
Page 3: Rear Panel (Connecting Your Equipment)
P-20HD. an HDMI output connector. computer that is equipped * The menu of the P-20HD is shown on its with RS-232) and use it to * Use a CAT5e or higher LAN own built-in display and on the display cable for GbE support. -
Page 4: Getting Ready
Getting Ready About SD Cards Turning the Power On/Off You cannot use the features of the P-20HD without inserting an SD * After making connections correctly (p. 3), you must use the card, except for making menu settings. following procedure to turn the power on. Using an incorrect procedure might cause faulty operation or malfunction. -
Page 5: Main Screen
Getting Ready Main Screen This is the main screen of the P-20HD. Red border shown on the video that’s being output LIVE IN screen REPLAY screen Available Playback time counter recording (HH: MM: SS) time Audio level meter of the... -
Page 6: Creating A Project
Clip After powering-on the P-20HD, you will either create a new project or open a previously-created project before you start working. This is a unit of playback over a specified range of time. There are three kinds of clips: video, still images and audio. - Page 7 Getting Ready Project Clip List Palette1 - 8 Page1 - 64 Page1 - 8 CLIP1 CLIP1 CLIP4 CLIP2 CLIP15 CLIP3 CLIP4 CLIP22 CLIP5 CLIP40 CLIP6 CLIP26 CLIP7 CLIP74 CLIP8 CLIP16 Max: 512 Max: 64 Recording Data CLIP1 CLIP2 CLIP3 CLIP4 Audio Still Page1 - 2...
-
Page 8: Video Operations
Video Operations Recording and Playback You can play back a previously recorded video while the P-20HD is recording (chase play). Press the [INPUT SELECT] button to select the input. Changing the Playback Speed Note that the video of the selected input is shown in the upper left of the built-in display and of the OUTPUT PREVIEW. - Page 9 Video Operations Using Clips Clips that you create can be used as material for replay. You can specify a region within a video that is being recorded and turn it into a clip. By creating clips of highlight scenes from recorded video, you can play back specified video clips at whatever timing you like.
-
Page 10: Using Palettes
(Play list playback) Using Audio and Still Images Registering Clips in the Palette On the P-20HD, you can import audio files or still image files that you created on a computer, and use them as material. Press the [CLIP LIST] button. -
Page 11: Using The Unit Safely
• The nameplate is displayed on the bottom of unit. For a list of Roland service centers and official Roland dealers, product by downloading it from the following website: refer to the Roland website.