Table of Contents
Advertisement
Quick Links
2.4 GHZ WIRELESS COLOR
CAMERA/RECEIVER SYSTEM
SG6350
This product broadcasts over public airwaves and its
video and audio signals may be intercepted without
your consent.
FOR MORE INFORMATION
WWW.STRATEGICVISTA.COM
Before operating the system, please read this manual
thoroughly and retain it for future reference.
Advertisement
Table of Contents

Related Manuals for Lorex SG6350


Summary of Contents for Lorex SG6350
- Page 1 2.4 GHZ WIRELESS COLOR CAMERA/RECEIVER SYSTEM SG6350 This product broadcasts over public airwaves and its video and audio signals may be intercepted without your consent. FOR MORE INFORMATION WWW.STRATEGICVISTA.COM Before operating the system, please read this manual thoroughly and retain it for future reference.
- Page 2 CAUTION RISK OF ELECTRIC SHOCK. DO NOT OPEN CAUTION: TO REDUCE THE RISK OF ELECTRIC SHOCK, DO NOT REMOVE COVER (OR BACK). NO USER-SERVICEABLE PARTS INSIDE. REFER SERVICING TO QUALIFIED SERVICE PERSONNEL. Explanation of two Symbols The lightning flash with arrowhead symbol, within an equilateral triangle, is intended to alert the user to the presence of uninsulated "dangerous voltage“...
- Page 3 SAFETY INSTRUCTIONS IMPORTANT SAFEGUARDS All the safety and operating instructions should be read before the system is operated, and retained for future reference. 1. HEED WARNINGS - All warnings on the appliance and in the operating instructions should be adhered to. 2.
-
Page 4: Table Of Contents
TABLE OF CONTENTS PAGE INTRODUCTION & FEATURES……………………………………… SYSTEM INCLUDES………………………………………………….. CONTROLS AND FUNCTIONS Wireless Camera…..……..….……………………..……... Wireless Receiver...……......……….……...…… INSTALLATION OF WIRELESS CAMERA…………………………. INSTALLATION OF WIRELESS RECEIVER Operation with TV (Using RCA Cables)..……………….…..Operation with TV (Using Coaxial Cable) ....…..……..SYSTEM OPERATION Multiple Cameras / Auto Scanning………………………………… Auto/Manual Options / Selectable Settings………………………... -
Page 5: Introduction & Features
INTRODUCTION: Thank you for purchasing the 2.4 GHz Wireless Color Camera & Receiver System. This system turns your TV into a Video Security System, providing instant protection in your home or office. Avoiding the hassle of running wires, this system is easy to install and operate for immediate applications. -
Page 6: System Includes
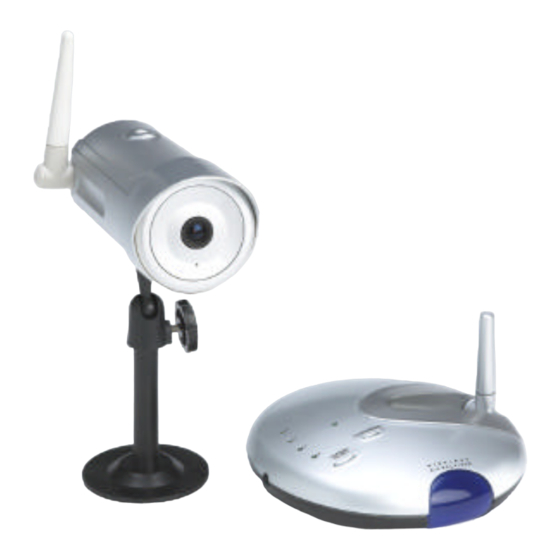
SYSTEM INCLUDES: 1 - 2.4 GHz Color Wireless Camera 1 - 2.4 GHz Wireless Receiver Also includes: 2 – 9V DC 500mA Adapters 2 – RCA Audio/Video Cables 1 – Coaxial Cable Owner’s Manual... -
Page 7: Controls And Functions
CONTROLS & FUNCTIONS WIRELESS CAMERA FRONT/ SIDE VIEW REAR VIEW 1. Microphone – Built-in condenser microphone provides listen-in audio capability from camera to TV 2. Lens – Color CMOS Image Sensor 3. Channel Selector Switch – Slide switch for channels 1-4 4. -
Page 8: Wireless Receiver
CONTROLS & FUNCTIONS WIRELESS RECEIVER TOP VIEW REAR VIEW BOTTOM VIEW 1. Auto/Manual Button – Used to activate/deactivate auto sequencing 2. Channel Selector Button – Used to manually switch channels from 1-4 3. LED Channel Indicators – Indicator light shows selected channel 4. -
Page 9: Installation Of Wireless Camera
INSTALLATION OF CAMERA CONNECTING CAMERA TO AN AC OUTLET/ BATTERY POWER STEP 1: To 9V Power adapter Electrical Outlet Ensure the Power Switch on the camera is turned OFF prior to NOTE proceeding with the following steps. 1. Attach the stand base to the wall or ceiling where you want to install the camera. -
Page 10: Operation With Tv (Using Coaxial Cable)
INSTALLATION OF RECEIVER CONNECTING THE RECEIVER TO A TV STEP 2: You have two options to connect the Receiver: A) Using RCA Cables (see below), or B) Coaxial Cables, please refer to page 7 of this manual. Television Back of Receiver Electrical Outlet Ensure the Power Switch on the Receiver is turned OFF before NOTE... - Page 11 INSTALLATION OF RECEIVER CONNECTING A RECEIVER TO A TV USING COAXIAL CABLES Television Back of Receiver Electrical Outlet Audio Video Coaxial Cable (75 ohm) Ensure the Power Switch on the Receiver is turned OFF prior to NOTE proceeding with the following steps. 1.
-
Page 12: System Operation
SYSTEM OPERATION CONNECTING MORE CAMERAS TO YOUR SYSTEM (MAX. OF 4) The receiver will automatically do a self diagnostic when it is powered up to determine how many cameras are connected. It will detect which channels are receiving a video signal. To purchase additional wireless cameras, please visit www.strategicvista.com When connecting additional cameras to this system, ensure the camera is set to a different channel. -
Page 13: Auto/Manual Options / Selectable Settings
SYSTEM OPERATION AUTO AND MANUAL VIEWING OPTIONS This system is preset to the Manual mode. In Auto mode, the LED light will turn ON. To manually view a specific camera location, set the system to Manual and press the Ch. Select key to view the desired camera location. Auto Mode is used when more than 1 camera is connected to the system. -
Page 14: Troubleshooting
TROUBLESHOOTING If the system does not function properly, check the following points before contacting the service center. Causes & Remedies Problems Camera Receiver/Transmitter No power - AC adapter not plugged in -AC adapter not plugged in (no picture/sound) - Power switch not turned - Power switch not turned on - TV or Monitor not turned on - Improper A/V or coaxial... -
Page 15: Technical Specifications
TECHNICAL SPECIFICATIONS WIRELESS CAMERA Image sensor Color CMOS Lens 3.6mm Scanning system 2:1 interlace Scanning frequency 15.734 KHz(H) 59.94Hz (V) Sync. system Internal Negative synchronization Resolution 380 Lines 2 Lux @ F2.0 Min. illuminations 1.0Vp-p/75 Ohm Video Output r=0.45 Gamma characteristics Electrical Auto Iris Auto Iris Shutter sensitivity :1/60-1/6,000... -
Page 16: Care & Maintenance
CARE AND MAINTENANCE: Please follow these instructions to ensure proper care and maintenance of this system Keep your monitor and camera dry. If it gets wet, wipe it dry immediately. Use and store your unit in normal temperature environment. Extreme temperatures can shorten the life of the electronic devices.