Sony PCM-D50 Operating Instructions Manual
Portable linear pcm recorder
Hide thumbs
Also See for PCM-D50:
- Service manual (78 pages) ,
- Specifications (2 pages) ,
- Operating instructions (2 pages)

Related Manuals for Sony PCM-D50


Summary of Contents for Sony PCM-D50
- Page 1 3-277-770-11(2) Linear PCM Recorder Operating Instructions PCM-D50 © 2007 Sony Corporation...
- Page 2 The model number is located at the rear and the serial number is located inside the battery compartment. Record the serial number in the space provided below. Refer to them whenever you call upon your Sony dealer regarding this product. Model No. PCM-D50 Serial No.
- Page 3 – Consult the dealer or an experienced radio/TV technician for help. If you have any questions about this product, you may call: Sony Customer Information Services Center 1-800-222-7669 or http://www.sony.com/ Declaration of Conformity Trade Name: SONY Model: PCM-D50 Responsible Party: Sony Electronics Inc.
-
Page 4: Important Safeguards
Use only a cart, stand, tripod, bracket, or table recommended by Sony. Power Source – This appliance should be operated only from the type of power source indicated on the marking label. - Page 5 This will prevent damage to the appliance due to lightning and powerline surges. Attachments – Do not use attachments not recommended by Sony, as they may cause hazards. Cleaning – Unplug the appliance from the wall outlet before cleaning or polishing it. Do not use liquid cleaners or aerosol cleaners.
-
Page 6: Table Of Contents
Table of Contents Overview What you can do with the PCM-D50 Identifying parts and controls Getting Started Checking the supplied accessories Step 1: Preparing a power source Step 2: Setting the clock Recording Preparation before recording Recording analog sound Monitoring the recording Recording a few seconds in advance, before starting to record (Pre-recording) Recording with an external microphone... - Page 7 Operations after Recording Playing back recorded audio data (tracks) Quickly locating the point you wish to start playback (Easy Search) Adjusting the playback speed (DPC (the Digital Pitch Control function)) Connecting external equipment for playback Playing back repeatedly Dividing a track Deleting tracks Storing tracks on a computer On folder and track file structure...
- Page 8 Table of Contents (continued) DELETE TRK (Deleting a track) DPC (Digital Pitch Control function) EASY SEARCH (Easy search function) REC MODE (Sampling frequency/quantifying bit number) LIMITER (Preventing distortion) LCF (Low Cut Filter function) SBM (Super Bit Mapping function) PRE REC (Pre-recording function) SYNC REC (Synchronized recording function) PLUG IN PWR (Plug in power function) Additional Information...
-
Page 9: What You Can Do With The Pcm-D50
What you can do with the PCM-D50 For recording practice sessions The built-in microphones of the PCM-D50 allow you to record musical performances easily without complicated microphone setup. The DPC (Digital Pitch Control) feature provides quick or slow playback of a musical performance, which is best suited for modeling your playing on the playback on the recorder. - Page 10 What you can do with the PCM-D50 (continued) For outdoor recording The highly-sensitivity built-in microphones enable easy and high-quality outdoor recording. You can also connect an external microphone to the stereo mini-plug of the PCM-D50. You can use an optional wind screen (AD- ...
- Page 11 As a high-quality music player The built-in high-sensitivity headphone amplifier achieves well-balanced and powerful output that covers both low and high frequency ranges. The PCM-D50 supports digital recording from an external device, allowing you to preserve your music library of DAT or MD media just as they are in the original digital recording.
-
Page 12: Identifying Parts And Controls
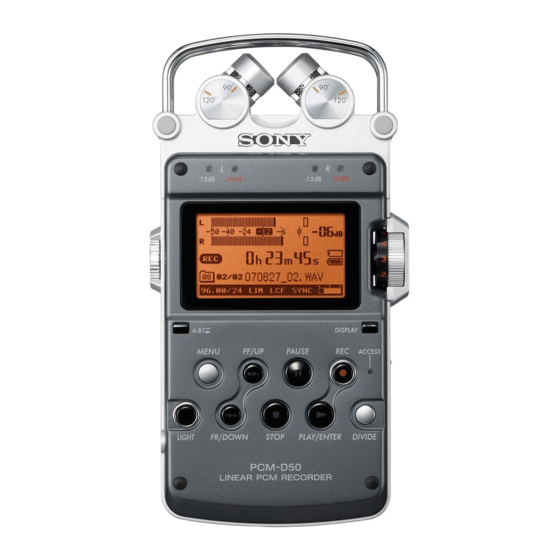
Identifying parts and controls Front Right side... - Page 13 Built-in microphones (page 21) Peak level lamps (L/R) (page 24) Displays left and right peak levels of an audio signal input with -12dB (green) and OVER (red) lamps. Display (page 15) Volume dial (page 26) Adjusts the playback volume by turning the dial to set the desired level (0 to 10) to the “•”...
- Page 14 Identifying parts and controls (continued) Left side LIMITER switch (pages 22, 43) LOW CUT FILTER switch (pages 22, 43) Hole for attaching the tripod (not supplied) INPUT switch (pages 23, 28, 29, 30) When set to “” (microphone), records an audio signal input from the built-in microphones or an external microphone that ...
- Page 15 Display Time information Each time the DISPLAY button is pressed, the time information changes as follows (Flashes when the recorder is paused): Elapsed recording/playback time Remaining recordable time of the current memory (During playback: Remaining time of the current track) Recorded date (During recording: Recording start date) ...
- Page 16 Identifying parts and controls (continued) Memory Stick indicator Displayed when the current memory is a “Memory Stick.” Folder number, track numbers Folders are classified into (a folder for recording and playback) and playback only) (page 38). Track numbers are displayed as “current track number/total number of tracks.”...
-
Page 17: Getting Started
Getting Started Checking the supplied accessories USB cable (page 36) AC power adapter (6V) (page 19) Four LR6 (size AA) alkaline batteries CD-ROM (“Sound Forge Audio Studio LE”) Operating Instructions (this book) Only for the US and Canadian models Only for the US, Canadian, and European models Step 1: Preparing a power source Use the supplied LR6 (size AA) alkaline... - Page 18 – Nickel metal hydride rechargeable battery: NH-AA-4BE – Quick battery charger for nickel metal hydride rechargeable batteries: BCG-34HE Battery life When using Sony LR6 (size AA) alkaline batteries (supplied)*: Linear PCM 96 kHz 44 kHz 24 bit 16 bit Playback Approx.
-
Page 19: Step 2: Setting The Clock
To operate with the AC power adapter (Only for the USA and Canada models) Connect the supplied AC power adapter to the DC IN 6V jack. to a wall outlet AC power adapter (supplied) to the DC IN 6V jack Notes on the AC power adapter Use only the supplied AC power adapter. - Page 20 Getting Started (continued) To reset the clock 1 While the recorder is stopped, press and hold the /MENU button until the menu is displayed. 2 Press the FF/ and FR/ buttons to select “CLOCK,” and then press the PLAY/ENTER button.
-
Page 21: Recording
Recording Preparation before recording When you position the recorder, place it so that the microphones point to the sound source. For accurate recording of left and right sources, place the recorder with its front side facing upward (see the illustration below). - Page 22 Recording (continued) When rotating both capsules of the microphones to 120˚ to face outside (Wide stereo position) The microphone on the right records sound from the right; the microphone on the left records sound from the left. You can obtain dynamic stereo sound recording.
-
Page 23: Recording Analog Sound
Recording analog sound This section explains how to record analog INPUT switch sound signals from the line output of an external device or by using the built-in or Volume dial external microphones. MENU button Recording using the built-in microphones jack This sub-section explains how to record sound sources in the built-in memory with... - Page 24 Recording (continued) Press the FF/ and FR/ buttons to select the desired folder, and press the PLAY/ENTER button. Folders 01 to 10 are for saving recorded tracks. You can record a maximum of 99 tracks in each folder Press the ...
- Page 25 To pause recording Press the PAUSE button. The on the display. Press the button again to restart recording. The recorder does not start recording again automatically. Be sure to press the PAUSE button again to restart recording. To stop recording Press the ...
-
Page 26: Monitoring The Recording
Recording (continued) Monitoring the recording Connect optional headphones or earphones to the (headphone) jack of the recorder to monitor the recording sound. The volume of monitored sound can be adjusted by turning the volume dial. The volume of monitored sound does not affect the recording volume. -
Page 27: Recording With An External Microphone
The recorder stands by for recording, and appears on the display. Sounds for the last 5 seconds are buffered in the memory. Number of seconds to be buffered in the memory Press the PLAY/ENTER (or PAUSE) button The standby for recording mode is released, and recording starts. -
Page 28: Recording From External Equipment (Line Input)
Recording (continued) Recording from external equipment (Line Input) You can connect an external device such as a CD player, MD player, or DAT player to the recorder and record its playback sound. Connect the audio output jacks of the external equipment to the LINE IN (OPT) jack of the recorder by using an optional audio cable. -
Page 29: Recording Digital Signals From External Equipment (Optical Input)
Notes During digital recording, the following features cannot be used: Setting the recording level/MIC ATT switch/LIMITER switch/Setting the recording mode/LCF setting/SBM setting/pre-recording When the remaining recordable time is less than 10 seconds, digital recording may be disabled. Recording digital signals from external equipment (Optical Input) Connect the audio output jacks of... -
Page 30: Synchronizing Recording With Playback (Digital Synchronized Recording)
Recording (continued) Synchronizing recording with playback (Digital Synchronized Recording) When an external digital device such as a CD/MD/DAT player is connected to the recorder, you can start recording synchronously with playback on the external device (Digital Synchronized Recording). Connect the audio output jacks of the external digital equipment to the LINE IN (OPT) jack of the recorder using an optional optical digital cable. -
Page 31: Operations After Recording
Operations after Recording DPC switch A-B button FF/ button PAUSE button/ indicator DIVIDE button PLAY/ENTER button/indicator STOP button FR/ button Playing back recorded audio data (tracks) To change the memory and folder used to play back, go to the menu display (page 40). Connect optional headphones or earphones to the ... - Page 32 Operations after Recording (continued) To change the memory drive The recorder supports the use of “Memory Stick” in addition to the built-in memory. You can switch the memory as follows. When you insert a “Memory Stick,” make sure that the recorder is not recording or playing a track.
-
Page 33: Quickly Locating The Point You Wish To Start Playback (Easy Search)
Playing back an MP3 file You can play an MP3 file on the recorder by copying it from your PC or other device onto the recorder. For details, see page 38. Quickly locating the point you wish to start playback (Easy Search) When “EASY SEARCH”... -
Page 34: Connecting External Equipment For Playback
LINE OUT (OPT) jack of the recorder using an optional Sony audio cable or optical digital cable. Connecting an analog device AV amplifier/player (analog type) -
Page 35: Dividing A Track
Dividing a track You can divide a recorded track. Note that tracks cannot be combined on the recorder after they have been divided. During playback, press the DIVIDE button. “DIVIDE?” is displayed. Press the DIVIDE button again. The track is divided into two at the point you pressed the button, and “DIVIDING...”... -
Page 36: Storing Tracks On A Computer
Operations after Recording (continued) Storing tracks on a computer Connect the recorder to a computer to save recorded tracks on the hard disk drive of the computer. Turn on the power of the recorder. Connect the USB connectors of a computer and the recorder using the supplied USB connecting cable. -
Page 37: On Folder And Track File Structure
Notes We do not ensure trouble-free operation of the system suspend, sleep, or hibernation function on all computers. The following systems are not supported: Operating systems other than those indicated on – “Operating Systems.” Personally constructed computers or operating –... -
Page 38: Playing Back Mp3 Files Copied From A Computer
Operations after Recording (continued) Files containing information such as the order of folders, playback order of audio files, recording date and time, etc. Do not delete or change these files. The name of a folder in which files are stored will be displayed on the recorder as the same folder name it had when it was copied on the computer. - Page 39 Disconnect the recorder from the computer, and then press the button briefly, press the FF/ and FR/ buttons to select the desired folder, and then press the PLAY/ ENTER button. Press the FF/ and FR/ buttons to select the file that you want to play.
-
Page 40: Menu Operations
Menu Operations /MENU button PLAY/ENTER button/indicator STOP button Using the menu display You can make various adjustments and settings using the menu display. Press the /MENU button for more than one second. The menu display appears. The currently selected item and option are highlighted and displayed in the center. -
Page 41: Menu Items
Menu items While the recorder is stopped, all the items in the following chart appear. During recording, recording standby, or recording pause, only “LIMITER,” and “LCF” appear. During playback or playback pause, only “DELETE TRK,” “DPC” and “EASY SEARCH” appear. During digital recording, you cannot operate the menu. - Page 42 Menu Operations (continued) Item Options (Default settings are underlined.) Sets the DPC (Digital Pitch Control) function. (Digital Pitch Control The function becomes enabled when you set the DPC switch to “ON.” function) Set the speed of the playback in a range from +100% to –75% by 10% for the + setting and by 5% for the –...
- Page 43 Item Options (Default settings are underlined.) LIMITER The recorder always reserves audio for the digital limiter, which is 20dB (Preventing distortion) lower than audio processed in the normal circuit. This compensates for clipping that happens during digital processing if audio is over-input. When the LIMITER switch is set to “ON,”...
- Page 44 Menu Operations (continued) Item Options (Default settings are underlined.) You can buffer sound for approximately 5 seconds in the memory when you PRE REC (Pre-recording function) press the When you press the start recording, recording actually starts 5 seconds prior to the point the button is pressed (pre-recording function).
-
Page 45: Using A "Memory Stick" (Not Supplied)
Using a “Memory Stick” (not supplied) ACCESS indicator Memory Stick slot “Memory Stick” Cover of Memory Stick slot You can record audio using a “Memory Stick” instead of the built-in memory of the recorder. “Memory Stick PRO-HG Duo” and “Memory Stick PRO Duo (High Speed)”... -
Page 46: Using The "Memory Stick" For Recording/Playback
GB are checked on the recorder, but this does not guarantee operations of all series or models of “Memory Stick.” Because the Sony “Memory Stick” is the only “Memory Stick” that has been operationally tested on the recorder, “Memory Stick”... -
Page 47: Maintenance
Maintenance On noise Noise may be heard when the recorder is placed near an AC power source, a fluorescent lamp, or a mobile phone during recording or playback. Noise may be recorded when an object, such as your finger, etc., rubs or scratches the recorder during recording. -
Page 48: Troubleshooting
Stick.” (Note that initializing will delete all data in the memory or in the “Memory Stick.”) Read through the symptoms and solutions on pages 48 to 51 and messages on pages 51 to 53 to check your recorder. If the problem persists, consult with qualified Sony personnel (see the warranty for contact information). Symptom... - Page 49 Symptom Cause/Solution You cannot erase a The write-protect switch on the inserted “Memory Stick” is set to “LOCK.” track. Release the lock. When you use a Windows computer, the track or the folder containing the track is set to “Read-only” on the computer. Display the track or the folder using Windows Explorer and remove the check for “Read-only”...
- Page 50 Troubleshooting (continued) Symptom Cause/Solution There are fewer menu Some menu items are not displayed during playback or recording (page items in the menu 41). display. A character in a folder The recorder cannot support or display some special characters and ...
-
Page 51: Error Messages
Symptom Cause/Solution “.WAV” files cannot be A file recorded in a frequency that the recorder does not support cannot be played back on the played back. recorder. The remaining memory Data may be damaged because the power source was removed during ... - Page 52 Troubleshooting (continued) Message Meaning/Solution ACCESS DENIED A “Memory Stick” with an access control function is inserted. Functions including recording and playback are limited, and you cannot use it with the recorder. Use a “Memory Stick” that the recorder supports. M.S. TYPE ERROR An incompatible “Memory Stick”...
- Page 53 A system error has occurred. Remove the batteries or the AC power adapter to turn off the recorder completely, and then turn on the recorder again. If this message appears again, consult with qualified Sony personnel (see the warranty for contact information).
-
Page 54: Specifications
Specifications Recording media Built-in flash memory 4 GB, “Memory Stick” (not supplied), Linear PCM Stereo recording Capacity Part of the memory capacity is allocated to data management. Actual usable capacity: Approx. 3.83 GB (4,116,611,072 bytes) Maximum recording time Refer to “Maximum recordable time” on page 57. - Page 55 MS-EX2G (2GB) MS-EX1G (1GB) “Memory Stick PRO Duo (High Speed)” MSX-M2GNU (2GB) MSX-M1GNU (1GB) ** For the “Memory Stick” compatibilities list, access the following web page: http://www.sony.net/Products/mssupport Stereo headphones MDR-V900HD MDR-V700DJ Audio connecting cable RK-G129/G129CS Optical digital cable POC-10B (optical mini plug ...
-
Page 56: File Specifications
File Specifications Once you record audio in the built-in memory or a “Memory Stick,” the 10 folders used for saving tracks are created automatically in each memory location. One “.WAV” file is created for each recording. For details about the folders and track file structure, refer to page 37. - Page 57 Maximum recordable time (Approximate) The total maximum recordable time (approximate) of all the folders is as follows. Built-in flash memory (4 GB) Sampling frequency/ Maximum quantifying bit number recordable time * 22.05 kHz 16 bit 12 hrs 55 min. 44.10 kHz 16 bit 6 hrs 25 min.
-
Page 58: Index
Index Symbols (headphone) jack ... 26, 31 (microphone) jack ... 27 /MENU ... 20, 23, 29, 30, 31, 32, 35, 40 A-B button ... 34 button ... 19, 32 button ... 19, 32 PAUSE button/indicator ... - Page 59 Peak level lamps ... 24 Peak meter ... 24 Placing the built-in microphones to face the sound source ... 21 Playing back ... 31 Adjusting the playback speed (DPC) ... 33 Easy Search ... 33 MP3 files... 38 Pause ... 32 Pre-recording ...
- Page 60 Printed in China...