Sony PCM-D100 Operating Instructions Manual
Linear pcm recorder
Hide thumbs
Also See for PCM-D100:
- Specifications (4 pages) ,
- Help manual (338 pages) ,
- Service manual (36 pages)

Related Manuals for Sony PCM-D100


Summary of Contents for Sony PCM-D100
- Page 1 Linear PCM Recorder Overview Getting Started Operating Instructions Recording Playback Editing Utilizing Your Computer Menu Operations Additional Information PCM-D100...
- Page 2 EU directives space provided below. Refer to these numbers This product has been manufactured by or on whenever you call upon your Sony dealer behalf of Sony Corporation, 1-7-1 Konan Minato-ku regarding this product. Tokyo, 108-0075 Japan. Inquiries related to product compliance based on European Union Model No.
- Page 3 Inrush current If you have any questions about this product, (1) The average half-cycle r.m.s. inrush current, on you may call: Sony Customer Information initial, switch-on: 0.5 A (230V) Service Center 1-800-222-7669 or (2) Hot switching inrush current, measured in http://www.sony.com/...
-
Page 4: Table Of Contents
................For recording practice sessions ................For outdoor recording ...................... As a high-quality music player ................... Audio file formats you can record or play on the PCM-D100 ....Getting Started Identifying parts and controls ..................... Checking the supplied items .................... - Page 5 Using a memory card (not supplied) ................Inserting a memory card ....................Switching the memory ....................Selecting a file ..........................Selecting a file from the folder list ................ Selecting a file by date from the calendar ............Using the remote control .......................
- Page 6 Table of Contents (continued) Recording analog sound ......................Recording using the built-in microphones ............Monitoring the recording ....................... Recording a few seconds in advance, before starting to record (Pre-Recording) ........................Recording using other devices ................... Recording with an external microphone ............
- Page 7 Adjusting the playback speed (DPC(Speed Control)) ....... Improving the playback sound quality (Upsampling) ......Connecting external equipment for playback ............Connecting an analog device ..................Connecting a digital device ..................Editing Organizing files ..........................Moving a file to a different folder ................
- Page 8 Table of Contents (continued) Protecting a file ..........................Registering a function to F1/F2 function keys ............Utilizing Your Computer Using the linear PCM recorder with your computer ..........Connecting the linear PCM recorder to your computer ........Structure of folders and files ....................
-
Page 9: Manuals
You can access the Help Guide page at the following address: For customers in Europe: http://rd1.sony.net/help/icd/pcmd100/ce/ For customers in the U.S.A. and Canada: http://rd1.sony.net/help/icd/pcmd100/uc/ You can also view the Help Guide on your smart phone or tablet. Sound Forge Audio Studio LE Help Guide ˎ... -
Page 10: What You Can Do With The Pcm-D100
What you can do with the PCM-D100 For recording practice sessions The built-in microphones of the PCM-D100 You can attach an optional tripod to the ˎ ˎ ˎ ˎ recorder. allow you to record musical performances easily without complicated microphone The Cross-Memory Recording feature allows ˎ... -
Page 11: For Outdoor Recording
The long battery life allows you to record for or copy digital files from your computer to ˎ ˎ approximately 8 hours with four LR6 (size play back on the PCM-D100 or transfer to an AA) alkaline batteries. external device for playback. Continued on the next page... -
Page 12: Audio File Formats You Can Record Or Play On The Pcm-D100
What you can do with the PCM-D100 (continued) Audio file formats you can The MP3 file format compresses sound data to record or play on the PCM-D100 reduce the file size. The linear PCM recorder can make a high- Although it only cuts sound in the range... -
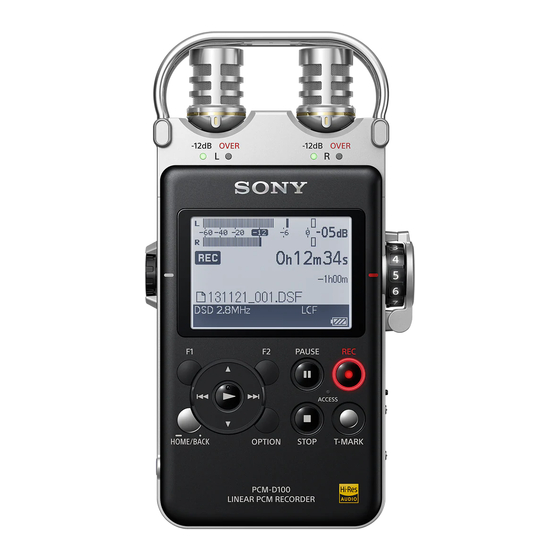
Page 13: Identifying Parts And Controls
Identifying parts and controls Front Right side Continued on the next page... - Page 14 Identifying parts and controls (continued) Built-in microphones (page 33) Peak level lamps (L/R) (page 37) Displays the left and right peak levels of an audio signal input with –12dB (green) and REC LEVEL dial guard OVER (red) lamps. ...
- Page 15 Left side Hole for attaching the tripod (not supplied) Battery cover lock lever INPUT switch (pages 36, 41, 43, 44) Set to “MIC” (microphone) to record an audio signal input from the built-in microphones or an external microphone connected to the MIC jack.
- Page 16 Identifying parts and controls (continued) Remote control (transmitter unit) PAUSE button STOP button (review/fast backward) /CH1 (channel 1) button PLAY/CH2 (channel 2) button REC (record) button (page 30) T-MARK (track mark) button Adds a track mark at the current position of the selected file.
- Page 17 Display window Notes Display windows in this manual may differ from ˎ ˎ Display during recording what are actually displayed on your linear PCM recorder depending on the area you purchased the linear PCM recorder and the settings you have made.
- Page 18 Identifying parts and controls (continued) Recording mode (page 69) Displays the recording mode currently specified in the menu in the stop mode. During playback or recording this displays the recording mode of the current file. File name/folder name The file name is displayed during recording, playback, and recording/playback pause.
-
Page 19: Checking The Supplied Items
Checking the supplied items Linear PCM recorder (1) Four LR6 (size AA) alkaline batteries ˎ ˎ ˎ ˎ (Supplied in the carrying case) DVD-ROM (“Sound Forge Audio Studio LE”) ˎ ˎ Operating Instructions (this manual) ˎ ˎ Using Sound Forge Audio Studio LE ˎ... -
Page 20: Preparing A Power Source
Preparing a power source Inserting batteries Battery case Use the supplied LR6 (size AA) alkaline batteries. Slide the battery cover lock lever to “RELEASE” to release the lock and open the battery compartment cover on the rear of the recorder. Push the buttons on both sides of the battery case to pull it out. -
Page 21: Turning The Power On
Turning the power on When to replace the batteries When using batteries, the remaining battery Slide the POWER switch to the “ON” position. power is indicated on the display. There is sufficient battery power. Replace all four batteries. “Low battery” appears on the display when ACCESS indicator there is no power left. - Page 22 Preparing a power source (continued) To operate with an AC adaptor (not supplied) Connect an AC adaptor (not supplied) to the DC IN 6V jack. Connect to a wall outlet AC adaptor Connect to the DC IN 6V jack Note on an AC adaptor You can use an AC adaptor that supports: Output voltage: DC6V...
-
Page 23: Setting The Clock
Setting the clock Recorded audio files are named using the 2 Press to select “ Settings“ and date and time of the clock. By setting the clock then press the button. before recording, recordings will be saved with The Settings menu is displayed. -
Page 24: Using The Home And Option Menus
Using the HOME and OPTION menus Selecting the desired function When a window urging you to make settings, press and to select the from the HOME menu desired item, and then press the By pressing and holding the HOME/BACK button. -
Page 25: Using A Memory Card (Not Supplied)
Using a memory card (not supplied) In addition to the built-in memory, you can record audio files using a memory card (not supplied). Inserting a memory card Before recording, be sure to copy all of the data saved in the memory card to a computer and format the memory card on the linear ACCESS lamp PCM recorder so that it contains no data (page... -
Page 26: Switching The Memory
Using a memory card (not supplied) (continued) Compatible memory cards To remove the memory card You can use the following memory cards with Be sure that the ACCESS indicator light is off, the linear PCM recorder. and then push the memory card into the SD cards up to 2 GB: supported recorder. - Page 27 MagicGate is the collective name of content ˎ ˎ memory card. Doing so may damage the data. protection technologies developed by Sony. The recorder does not support parallel data transfer. ˎ ˎ The linear PCM recorder does not support data You cannot use a ROM (read-only-memory) type or ˎ...
-
Page 28: Selecting A File
Selecting a file Selecting a file from the folder Press and to select a desired folder, and then press the button. list The file list is displayed. You can select a desired file for playback or Press and to select a desired file, editing from the HOME menu. -
Page 29: Selecting A File By Date From The Calendar
Selecting a file by date from the Press and to select a date, and then press the button. calendar Dates for which a recorded file exists are You can play a file recorded using the linear underlined. PCM recorder by searching from the calendar. -
Page 30: Using The Remote Control
Before using the remote control, remove the insulation sheet . Note The wireless remote control transmitter unit uses a Sony CR2025 lithium battery. Using a different battery may cause the risk of fire or explosion. Connecting the receiver unit The wireless remote control transmitter unit... -
Page 31: Controlling Operations From The Transmitter Unit
Controlling operations from the Press and to select “CH1,” “CH2,” or “CH3” and then press the transmitter unit button. Press the appropriate buttons on the In the stop mode, press and hold the transmitter unit to control operations on the HOME/BACK button for 1 second or linear PCM recorder. -
Page 32: Preventing Unintentional Operations (Hold)
Preventing unintentional operations (HOLD) You can disable all the buttons (HOLD) in order “HOLD” appears for approximately 3 seconds, to prevent unintentional operations when you indicating that all the button operations are carry the linear PCM recorder, etc. disabled. To disable the button operations Slide the HOLD switch to “ON”... -
Page 33: Preparation Before Recording
Preparation before recording When you position the linear PCM recorder, On the characteristics of the built-in place it so that the microphones point to microphones the sound source. For accurate recording of The built-in microphones are unidirectional. left and right sources, place the linear PCM You can change the directions of the recorder with its front side facing upward (see microphones. -
Page 34: When Rotating Both Capsules Of The Microphones To 120˚ To Face Outside (Wide Stereo Position)
Preparation before recording (continued) When rotating both capsules of We recommend a trial recording The recording environment, including the size the microphones to 120˚ to face of the room and the speaker’s voice level, outside (Wide stereo position) is different for each recording. The desired The microphone on the right records sound sound quality also differs depending on the from the right;... -
Page 35: To Reduce Noise In The Recording
To reduce noise in the recording Setting the LCF(Low Cut) To reduce noise such as projector noise caused by air from the projector air vents, Sounds that may be recorded as noise enable “LCF(Low Cut)” (low cut filter) in the The linear PCM recorder may record various menu. -
Page 36: Recording Analog Sound
Recording analog sound Recording using the built-in This section explains how to record analog sound signals from the line output of an microphones external device or by using the built-in or This sub-section explains how to record sound external microphones. sources in the built-in memory with the built- INPUT switch in microphones. - Page 37 When checking the level on the peak Press the and buttons to select meter of the display the desired folder, and press the When recording sound that has “sharp button. attack” parts such as percussive sound, use You can save recorded files in a folder the peak meter to check the level.
- Page 38 Recording analog sound (continued) Note Notes The peak level lamps do not light during digital While is lit on the display, do not remove the ˎ ˎ recording. batteries, an AC adaptor (not supplied) or a memory Press PAUSE (or ) button. card.
-
Page 39: Monitoring The Recording
Monitoring the recording Connect optional headphones or earphones to the (headphone) jack of the linear PCM recorder to monitor the recording sound. The volume of monitored sound can be adjusted by turning the volume dial. The volume of monitored sound does not affect the recording volume. -
Page 40: Recording A Few Seconds In Advance, Before Starting To Record (Pre-Recording)
Recording a few seconds in advance, before starting to record (Pre-Recording) The Pre-Recording feature allows you to Press the PAUSE (or ) button. record sound sources for a maximum of five The standby for recording mode is released, seconds prior to the point when the recording and recording starts. -
Page 41: Recording Using Other Devices
Recording using other devices Recording with an external Recording from external microphone equipment (Line Input) You can connect an optional external You can connect an external device such as microphone to the linear PCM recorder. a CD player, MD player, or DAT player to the linear PCM recorder and record its playback Connect an external microphone to sound. -
Page 42: Digital Recording
Digital recording This section explains digital recording: Notes recording digital sound signals from an During digital recording, the following features ˎ ˎ external digital device such as a CD or DAT cannot be used: player. Setting the recording level/MIC ATT switch/LIMITER When digital signals are input setting/Setting the recording mode/LCF setting/ SBM setting/Pre-Recording/S/N100dB... -
Page 43: Recording Digital Signals From External Equipment (Optical Input)
Recording digital signals from external equipment (Optical Input) Connect an optional optical digital Press the PAUSE (or ) button audio cable from the digital output when you want to start recording. jacks of external digital equipment The standby for recording mode is released, to the LINE IN (OPT) jack of the linear and recording starts. -
Page 44: Synchronizing Recording With Playback (Digital Synchronized Recording)
Synchronizing recording with playback (Digital Synchronized Recording) Some portable digital devices such as portable Press the and buttons to select CD/MD/DAT players do not output digital “ON,” and press the button to fix signals while playback is stopped. With the the setting. -
Page 45: Recording Across Memory Media (Cross-Memory Recording)
Recording across memory media (Cross-Memory Recording) When the built-in memory or a memory card currently being used becomes full during recording, the linear PCM recorder automatically switches its destination to the other memory media and continues recording (Cross-Memory Recording). In the stop mode, press and hold the HOME/BACK button for 1 second Settings”... -
Page 46: Playing A File
Playing a file You can play a file recorded using the linear Volume dial PCM recorder or a music file transferred from your computer through the built-in speaker. Select a file you want to play using the HOME menu (page 28). - Page 47 Operations during playback When files are played to the end of the last file Operation When you play or fast play to the end of the ˎ ˎ last file, “FILE END” lights up for 5 seconds. Stop playback Press the STOP button.
-
Page 48: Playing A File Repeatedly
Playing a file (continued) Playing a file repeatedly To cancel A-B repeat playback, press the OPTION button to display the OPTION menu, During playback, press and hold the select “End A-B Repeat Mode,” and then press button. button. The repeat play mark ( 1) appears. -
Page 49: Setting The Playback Sound Quality
Setting the playback sound quality Selecting the sound effect Adjusting the playback tone (Key Control) You can set the effect you want for the playback of a selected file. You can adjust the playback sound to higher or lower semitones in 13 steps. This is Select a file you want to play using useful for practicing songs to be recorded in the HOME menu (page 28). -
Page 50: Adjusting The Playback Speed (Dpc(Speed Control))
Setting the playback sound quality (continued) Adjusting the playback speed Improving the playback sound (DPC(Speed Control)) quality (Upsampling) You can adjust the playback speed in a By interpolating and raising the sampling range from 0.25 times to 2.00 times. The frequency to 2 times or 4 times the original file is played in natural tones using a digital frequency of the source sound, you can... -
Page 51: Connecting External Equipment For Playback
Connecting external equipment for playback Connecting a digital device To output recorded files from speakers of external equipment, connect the audio input jack or digital input jack of the external AV amplifier/player (digital type) equipment to the LINE OUT (OPT) jack of the linear PCM recorder using an audio cable or optical digital cable. -
Page 52: Organizing Files
Organizing files Moving a file to a different folder You can move a selected file to the desired folder. Select the file you want to move from the HOME menu (page 28). In play or playback stop mode, press ... -
Page 53: Copying A File To A Different Folder
Copying a file to a different To cancel copying the file Press the HOME/BACK button while “Please folder wait” appears on the display. “Interrupt You can copy a selected file to the desired process?” is displayed. Press folder. This function is useful for saving a to select “Yes,”... -
Page 54: Using Track Marks
Using track marks Adding a track mark Erasing a track mark You can add a track mark at a point at which You can erase the track mark that is located you would like to divide a file later or that you immediately before the current position. -
Page 55: Setting Fading In/Out Effects
Setting fading in/out effects You can add fading in/out effects to a file To cancel fading in/out effects recorded in the LPCM (.wav) format. Fading Press the HOME/BACK button while “Please ˎ ˎ time can be specified for each fading in and wait”... -
Page 56: Dividing A File
Dividing a file Dividing a file at the current When “Divide?” is displayed, press and to select “Yes,” and press position the button. You can divide a file into two parts while in the The file is divided into two. New file stop mode. - Page 57 The divided files are named as follows: ˎ ˎ “Divide at This Position”: The divided files will be ˋ ˎ suffixed with a sequential number (“_1,” “_2”). “At All Track Marks”: A suffix made up of a ˋ ˎ sequential number (“_01,” “_02”) is added to each of the divided files.
-
Page 58: Combining Files
Combining files You can combine two recorded LPCM (.wav) or To cancel combining DSD (.dsf) files into one. Select two files that Press the HOME/BACK button while “Please are identical in file format (including sampling wait” appears on the display. “Interrupt frequency, bit rate, and number of channels), process?”... -
Page 59: Erasing Files
Erasing files Erasing a file Erasing all of the files in a folder or on a particular date You can select a file and erase it. You can erase all of the files in a folder by Select a file that you want to erase selecting “By Folder”... -
Page 60: Protecting A File
Protecting a file You can protect an important file. A protected file is marked with the (protect) indicator and is regarded as a read-only file that you cannot erase or edit. Select the recorded file that you want to protect from the HOME menu (page 28). -
Page 61: Registering A Function To F1/F2 Function Keys
Registering a function to F1/F2 function keys By registering frequently-used functions to the F1 and F2 buttons, you can quickly access these functions and display the setting windows just pressing the F1 or F2 key. Press and hold the HOME/BACK button for 1 second or more to display the HOME menu, select “... -
Page 62: Using The Linear Pcm Recorder With Your Computer
Using the linear PCM recorder with your computer When the linear PCM recorder is connected to Managing and editing files using the your computer, you can transfer data between Sound Forge Audio Studio LE software them linear PCM recorder and your computer. The supplied Sound Forge Audio Studio LE software allows you to transfer the files that Copying files from the linear PCM... -
Page 63: Connecting The Linear Pcm Recorder To Your Computer
Connecting the linear PCM recorder to your computer To exchange files between the linear PCM The linear PCM recorder is recognized by the recorder and your computer, connect the computer as soon as the connection is made. linear PCM recorder to your computer. While the linear PCM recorder is connected to the computer, “Connecting”... -
Page 64: Structure Of Folders And Files
Structure of folders and files Built-in memory You can display the structure of folders and files of the linear PCM recorder on your The folders and files in the built-in memory of computer by connecting the linear PCM the linear PCM recorder are displayed on the recorder to your computer. -
Page 65: Memory Stick
SD card Tips The title or artist name, etc., registered in the music ˎ ˎ files, can be displayed on the linear PCM recorder. It is useful if you input the information using the software you use to make the music files on your computer. -
Page 66: Disconnecting The Linear Pcm Recorder From Your Computer
Disconnecting the linear PCM recorder from your computer Follow the procedures below; otherwise, when the linear PCM recorder contains data files, the files may be damaged. Make sure that the ACCESS indicator on the linear PCM recorder does not light. Perform the following operation on your computer. -
Page 67: Option Menu Items
OPTION menu items ˎ After you have selected a function from the In file list display HOME menu, you can display the OPTION OPTION menu item See page: menu by pressing the OPTION button. The OPTION menu items displayed differ File Selection depending on the display on the window: Sort File Names... - Page 68 OPTION menu items (continued) Music ˎ In file list display OPTION menu item See page: Sort File Names Protect Erase a File Erase All Files Move/Copy File 52, 53 File Information ˎ In file selection display OPTION menu item See page: Start A-B Repeat Mode DPC(Speed Control)
-
Page 69: Settings Menu Items
Settings menu items Menu Item Settings (*: Default setting) Recording Recording Folder You can select the destination folder where you save the files Settings recorded using the linear PCM recorder (page 36). FOLDER01*/FOLDER02/FOLDER03/FOLDER04/FOLDER05 REC Mode You can set the recording mode in which the files are recorded. ˎLPCM You can select the sampling frequency and quantifying bit number for recording. - Page 70 Settings menu items (continued) Menu Item Settings (*: Default setting) Recording SBM(Super Bit When LPCM 16bit REC Mode is selected, you can reduce noise using Settings Mapping) the Super Bit Mapping function. The Super Bit Mapping function works to reduce noise. OFF*: The Super Bit Mapping function is disabled.
- Page 71 Menu Item Settings (*: Default setting) Recording LIMITER With two A/D converters for one channel, the linear PCM recorder Settings always reserves audio signals that are 12 dB lower than audio processed in the normal circuit in addition to the normal audio signals.
- Page 72 Settings menu items (continued) Menu Item Settings (*: Default setting) Recording S/N 100dB With two A/D converters for one channel, the linear PCM recorder Settings always reserves audio signals that are 12 dB lower than audio processed in the normal circuit in addition to the normal audio signals.
- Page 73 Menu Item Settings (*: Default setting) Recording Cross-Memory When the built-in memory or a memory card currently being used Settings Recording becomes full during recording, the linear PCM recorder automatically switches its destination to the other memory media and continues recording. You can enable or disable the Cross- Memory function.
- Page 74 Settings menu items (continued) Menu Item Settings (*: Default setting) Playback Play Mode You can select the playback mode, such as shuffle play or repeat Settings play, according to your purpose. 1 Play 1 File: Only the currently selected file is played. Play Folder*: All files in the currently selected folder are played.
- Page 75 Menu Item Settings (*: Default setting) Common Battery Setting For optimum operations, you can select the type of batteries you Settings are using for the linear PCM recorder. Alkaline Battery*: Select this option if using alkaline batteries. NiMH Battery: Select this option if using rechargeable NiMH batteries.
-
Page 76: Precautions
Precautions On power In circumstances where you get sweaty. ˋ ˎ If you touch the linear PCM recorder with Operate the unit only on 6.0V DC with four wet hands or if you put the linear PCM alkaline batteries or 4.8V DC with four nickel recorder in the pocket of sweaty clothes, metal hydride rechargeable batteries or 6.0V the linear PCM recorder may get wet. -
Page 77: Troubleshooting
Please access the following support home page to get the support information about your linear PCM recorder: For customers in Europe: http://support.sony-europe.com/DNA For customers in the U.S.A.: http://www.sony.com/recordersupport For customers in Canada: http://www.sony.ca/ElectronicsSupport Note that recorded files may be deleted during service or repair work. - Page 78 Troubleshooting (continued) Symptom Cause/Solution The linear PCM recorder The batteries have been inserted with the +/– facing in the incorrect ˎ ˎ does not operate. direction. Reinsert them correctly (page 20). The batteries have run out. Replace them with new ones (page 20). ˎ...
- Page 79 Symptom Cause/Solution You cannot divide a file. You need a certain amount of free space in the memory to divide a file. ˎ ˎ 199 files have been recorded in the selected folder. Erase some of the files ˎ ˎ or select another folder.
- Page 80 Troubleshooting (continued) Symptom Cause/Solution The linear PCM recorder Disconnect the linear PCM recorder from your computer and reconnect it. ˎ ˎ is not recognized by your Operation is not guaranteed if you use any system environment other than ˎ ˎ computer.
- Page 81 Symptom Cause/Solution Sound comes from the If you plug in the headphones not securely during playback, the sound may ˎ ˎ built-in speaker even come from the speaker. Unplug the headphones, and then insert them when headphones are securely. plugged in. Playback speed is too “DPC(Speed Control)”...
-
Page 82: Error Messages
Error messages Message Meaning/Solution Set Date&Time The clock is not set. Set it before operating the linear PCM recorder (page 23). Only activated for 16-bit The “SBM” item is effective only when the quantifying bit number is set to 16 LPCM bit (page 70). - Page 83 Message Meaning/Solution File damaged The file you are trying to play or edit is damaged. It cannot be played or edited on the linear PCM recorder. No file There are no files in the selected folder. Continue recording with The file size of the file being recorded exceeds 1 GB for an MP3 file and 2 GB new file for an LPCM/DSD file.
- Page 84 PCM recorder completely, and then turn on the linear PCM recorder again. If this message appears again, consult with qualified Sony personnel (see the warranty for contact information). Process error A process error has occurred. Remove the batteries or an AC adaptor (not supplied) to turn off the linear PCM recorder completely, and then turn on the linear PCM recorder again.
-
Page 85: System Limitations
System limitations There are some system limitations of the linear PCM recorder. The issues described below are not malfunctions of the linear PCM recorder. Symptom Cause/Remedy You cannot record files up to If you record files in a mixture of recording modes, the recordable time the maximum recording time. -
Page 86: Specifications
Specifications System requirements Notes One of the above operating systems should be by ˎ ˎ When you use the linear PCM recorder default pre-installed. Any operating system other connected to a computer or as a USB mass than those indicated above, upgraded operating storage device, your computer must meet systems or multi-boot environment are not supported. -
Page 87: Design And Specifications
Design and specifications Compatible file formats* *1 Not all encoders are supported. Capacity (User available capacity: when the built-in memory is formatted with the linear PCM recorder) Bit rate: 1 bit ˎ ˎ 32 GB (approx. 25.60 GB = Sampling frequencies: 2.8224 MHz ˎ... - Page 88 Specifications (continued) Input/output Bit rate: 32 kbps - 192 kbps (Supports MIC (microphone) jack (stereo mini jack) ˎ ˎ variable bit rate (VBR)) Input impedance: 22 k Rated input level: 2.5 mV Sampling frequencies: 44.1 kHz ˎ ˎ Minimum input level: 0.7 mV File extension: .wma ˎ...
- Page 89 General Optional accessories* Maximum power output Stereo headphones 200 mW MDR-1R MDR-7520 Power requirements Four LR6 (size AA) alkaline batteries Rechargeable battery (supplied)/AC adaptor (not supplied): NH-AA-B4KN 6 V DC Battery charger Four nickel metal hydride rechargeable BCG-34HRE4KN batteries NH-AA (not supplied): BCG-34HH4KN 4.8 V DC Depending on the region, some of the optional...
- Page 90 Specifications (continued) Maximum recordable time* The total maximum recordable time (approximate) of all the folders is as follows. Built-in memory (32 GB) REC Mode Maximum recordable time DSD 2.8MHz/1bit (STEREO) Approx. 10 hrs. 50 min. LPCM 192kHz/24bit (STEREO) Approx. 6 hrs. 35 min. LPCM 176.4kHz/24bit (STEREO) Approx.
- Page 91 REC Mode Memory card 2 GB 4 GB 8 GB 16 GB 32 GB 64 GB 128 GB LPCM 88.2kHz/16bit Approx. Approx. Approx. Approx. Approx. Approx. Approx. (STEREO) 1 hr. 3 hrs. 6 hrs. 12 hrs. 24 hrs. 48 hrs. 97 hrs. 30 min. 0 min. 5 min. 10 min.
- Page 92 Specifications (continued) Battery life* When using alkaline batteries (Continuous using of Sony alkaline battery LR6(SG)) (supplied) REC Mode Recording Playback With monitor without monitor through speakers* with headphones DSD 2.8MHz/1bit Approx. 8 hrs. Approx. 12 hrs. Approx. 17 hrs. Approx. 17 hrs.
-
Page 93: Notice For Users
Sony Corporation. The use of media and Memory Stick IN NO EVENT SHALL SONY CORPORATION BE media for recording copyright-protected LIABLE FOR ANY INCIDENTAL, CONSEQUENTIAL graphics or other data is limited to the... -
Page 94: Trademarks
ˎ ˎ Sound Forge is a trademark or registered ˎ ˎ Corporation. trademark of Sony Creative Software, Inc. in MPEG Layer-3 audio coding technology and ˎ ˎ the United States and other countries. patents licensed from Fraunhofer IIS and Thomson. -
Page 95: License
Source code is provided on the web. Use the this list of conditions and the following following URL to download it. disclaimer in the documentation and/ http://www.sony.net/Products/Linux/ or other materials provided with the We would prefer you do not contact us about distribution. - Page 96 License (continued) THIS SOFTWARE IS PROVIDED BY THE COPYRIGHT HOLDERS AND CONTRIBUTORS ”AS IS” AND ANY EXPRESS OR IMPLIED WARRANTIES, INCLUDING, BUT NOT LIMITED TO, THE IMPLIED WARRANTIES OF MERCHANTABILITY AND FITNESS FOR A PARTICULAR PURPOSE ARE DISCLAIMED. IN NO EVENT SHALL THE FOUNDATION OR CONTRIBUTORS BE LIABLE FOR ANY DIRECT, INDIRECT, INCIDENTAL, SPECIAL, EXEMPLARY, OR CONSEQUENTIAL DAMAGES INCLUDING,...
-
Page 97: Index
Index Symbols (headphone) jack ... 39, 46 Easy Search ......73 Maximum recordable time ..90 button ......23, 47 Effect ........49 Memory card ......25 button ......23, 47 Error messages ....... 82 Memory card slot ..... 25 ... - Page 98 Index (continued) REC LEVEL dial ..... 14, 37 Track Mark ....... 54 REC Mode ........ 69 Tripod ........35 Recording ......... 33 Troubleshooting ....... 77 Digital recording ....42 Digital Synchronized Recording ...... 44 Pause ........ 38 USB connector ......63 Recording analog sound ......
- Page 100 ©2014 Sony Corporation Printed in China 4-487-745-11(1)