
Related Manuals for Motorola KVL 4000


Summary of Contents for Motorola KVL 4000
- Page 1 ASTRO ® INTEGRATED VOICE AND DATA KVL 4000 KEY VARIABLE LOADER ASTRO 25 USER GUIDE January 2013 *6871018P37* 6871018P37-F © 2013 Motorola Solutions, Inc. All rights reserved...
- Page 3 Accordingly, any copyrighted Motorola computer programs contained in the Motorola products described in this document may not be copied or reproduced in any manner without the express written permission of Motorola. © 2013 Motorola Solutions, Inc. All Rights Reserved No part of this document may be reproduced, transmitted, stored in a retrieval system, or translated into any language or computer language, in any form or by any means, without the prior written permission of Motorola Solutions, Inc.
- Page 5 Document History Version Description Date 6871018P37-A Original release of the KVL 4000 Key Variable May 2010 Loader ASTRO 25 User Guide 6871018P37-B Updated as follows: November 2010 • Added the following sections: – “Performing the OS Hardening” – “Unlocking the Operator Account”...
- Page 6 KVL 4000 Key Variable Loader ASTRO 25 User Guide Version Description Date • “Selecting the Password Masking Mode” • “KVL 4000 – Loading Encryption Keys into Target Devices” • “Updating a Target Device” • “KVL 4000 Disaster Recovery” • “Troubleshooting KVL Application and/or VPN Software Failure”...
- Page 7 Document History Version Description Date • “Setting the PDA USB Mode” Added/updated the following figures: • Figure 1-2 Personal Digital Assistant (PDA) • Figure 1-13 KVL and USB Modem – Connected • Figure 1-15 CRYPTR micro and KVL - Connected •...
-
Page 9: Table Of Contents
2.1.4.4 Selecting the Password Masking Mode ................2-11 2.2 KVL 4000 System-Dependent Parameters ................... 2-11 2.2.1 KVL 4000 – Switching Between the Modes of Operation .............. 2-11 2.2.2 Setting the Baud Rate for RS-232 Communication ............... 2-12 2.2.3 Changing the FIPS Mode ......................2-13... - Page 10 3.2.2.5 Renaming a Group ......................3-13 3.3 Modifying Encryption Keys......................3-14 3.4 Deleting Encryption Keys......................... 3-16 4 KVL 4000 – Loading Encryption Keys into Target Devices................4-1 4.1 Loading a Selected Key ........................4-1 4.2 Loading a Key Group ........................4-3 4.3 Loading All Keys ..........................
- Page 11 7.4.3 Changing the Target's MNP ..................... 7-21 7.4.4 Changing the Target's RSI and KMF RSI ................... 7-22 8 KVL 4000 Operations Through a Remote Control Head ..................8-1 8.1 Performing KVL Operations Through a Remote Control Head ..............8-1 8.2 Setting Up KVL for Remote Control Head Operations ................8-1 8.2.1 Entering the SEK and KEK .......................
- Page 13 NCP Secure Client Screen – KVL 4000 Through Network .............. 1-44 Figure 1-45 NCP Secure Client Screen – KVL 4000 at Firewall – Connected ............1-45 Figure 1-46 NCP Secure Client Screen – KVL 4000 Through Network – Connected ..........1-46 Figure 1-47 Programs Screen ........................
- Page 14 KVL 4000 Key Variable Loader ASTRO 25 User Guide Figure 3-3 Manage Keys Screen – Entering a Key (Example) ................3-4 Figure 3-4 Manage Keys Screen – Creating a Group (Example) ................ 3-6 Figure 3-5 Adding Keys to a Group – Example ....................3-7 Figure 3-6 Viewing Keys in a Group (Example) .....................
- Page 15 Document History Figure 12-14 Assembling Back Housing to Front Housing ................12-13 Figure 12-15 Tightening Back Housing ....................... 12-14 Figure 12-16 Pressing Dust Covers ......................12-14 xiii...
- Page 17 PDA Controls and Ports Used in the KVL Operation................ 1-3 Table 1-2 Security Adapter Ports and Interfaces .................... 1-5 Table 1-3 Sounds Played by the KVL 4000 ....................1-7 Table 12-1 KVL User Entry Errors ......................12-1 Table 12-2 KVL Operational Errors ......................12-2 Table 12-3 KVL 4000 Disaster Recovery ....................
- Page 19 List of Processes 7.1 — Setting Up the KVL for KMF Operations ........................7-1 8.1 — Performing KVL Operations Through a Remote Control Head..................8-1 xvii...
- Page 21 2.1.4.3 — Clearing KVL Passwords............................2-10 2.1.4.4 — Selecting the Password Masking Mode ........................2-11 2.2.1 — KVL 4000 – Switching Between the Modes of Operation ..................2-11 2.2.2 — Setting the Baud Rate for RS-232 Communication....................2-12 2.2.3 — Changing the FIPS Mode............................2-13 2.2.4.1 —...
- Page 22 KVL 4000 Key Variable Loader ASTRO 25 User Guide 3.2.2.2 — Adding Keys to a Group ............................3-8 3.2.2.3 — Deleting Keys from a Group............................3-10 3.2.2.4 — Deleting a Group..............................3-11 3.2.2.5 — Renaming a Group ..............................3-13 3.3 — Modifying Encryption Keys ............................3-14 3.4 —...
- Page 23 List of Procedures 7.4.2 — Viewing the Target's RSI and KMF RSI........................7-20 7.4.3 — Changing the Target's MNP ............................7-21 7.4.4 — Changing the Target's RSI and KMF RSI........................7-22 8.2.1 — Entering the SEK and KEK ............................8-2 8.2.2 — Entering the MNP for Remote Control Head Operations.....................8-3 8.2.3 —...
- Page 25 User Guide This manual provides step-by-step instructions for using the Key Variable Loader (KVL) to create and store encryption keys, and then load them into other Motorola secure equipment, such as radios, fixed encryption units, digital interface units (DIUs), and others.
- Page 26 KVL 4000 Key Variable Loader ASTRO 25 User Guide Related Information Purpose Standards and Guidelines for Provides standards and guidelines that should Communication Sites be followed when setting up a Motorola communications site. Also known as R56 manual. This may be purchased on CD 9880384V83, by...
- Page 27 (iii) in strict accordance with this Agreement. 3.3 You may install and use the Products on a single Motorola PDA and KVL 4000 security adapter, provided that the use is in conformance with the terms set forth in this Agreement.
- Page 28 Title and copyrights to the Products and any copies made by you remain with Motorola and its licensors. You will not, and will not permit others to: (i) modify, translate, decompile, bootleg, reverse engineer, disassemble, or extract the inner workings of the Software or Documentation, (ii) copy the look-and-feel or functionality of the Software or Documentation;...
- Page 29 8. Transfer In the case of Software designed to operate on Motorola equipment, you may not transfer the Software to another party except: (i) if you are an end-user, when you are transferring the Software together with the Motorola equipment on which it operates;...
- Page 30 The entire liability of Motorola, and your exclusive remedy under the warranty provided in this Agreement will be, at Motorola's option, to repair or replace any Media found to be defective within the warranty period, or to refund the purchase price and terminate this Agreement. To seek such a remedy, you must return the entire Product to Motorola, with a copy of the original purchase receipt, within the warranty period.
- Page 31 Your right to use the Products will terminate immediately without notice upon a breach of this Agreement by you. Within 30 days after termination of this Agreement, you will certify to Motorola in writing that through your best efforts, and to the best of your knowledge, the original and all copies, in whole or in part, in any form, of the Software and all related material and Documentation, have been destroyed, except that, with prior written consent from Motorola, you may retain one copy for archival or backup purposes.
- Page 33 The Motorola Solutions Software that may be included on this media, or included in the Motorola Solutions Product, is Copyright (c) by Motorola Solutions, Inc., and its use is subject to the licenses, terms and conditions of the agreement in force between the purchaser of the Motorola Solutions Product and Motorola Solutions, Inc.
- Page 34 KVL 4000 Key Variable Loader ASTRO 25 User Guide PUBLICLY AVAILABLE SOFTWARE LIST – KVL SOFTWARE INSTALLATION WIZARD Name: RAPI2 Version: Description: A managed wrapper to access the features exposed by the COM interfaces for the Remote API 2. These classes allow the developer to access information, files, and the registry on a device connected through ActiveSync from desktop applications.
- Page 35 PUBLICLY AVAILABLE SOFTWARE LIST – PDA Redistribution and use in source and binary forms, with or without modification, are permitted provided that the following conditions are met: • Redistributions of source code must retain the above copyright notice, this list of conditions and the following disclaimer.
- Page 36 KVL 4000 Key Variable Loader ASTRO 25 User Guide THIS SOFTWARE IS PROVIDED BY THE COPYRIGHT HOLDERS AND CONTRIBUTORS “AS IS” AND ANY EXPRESS OR IMPLIED WARRANTIES, INCLUDING, BUT NOT LIMITED TO, THE IMPLIED WARRANTIES OF MERCHANTABILITY AND FITNESS FOR A PARTICULAR PURPOSE ARE DISCLAIMED.
- Page 37 Buffer Management Source Code from OpenBSD Operating System, as well as, OpenSSH Project. Version: Description: This Package was included by Commercial Third Party Software Development Kit, from WindRiver-Interpeak, within the Motorola Product. Copyright 2000-2005 Interpeak AB (http://www.interpeak.se). All rights reserved. xxxv...
- Page 38 KVL 4000 Key Variable Loader ASTRO 25 User Guide Software Site: http://www.openbsd.org License: The utilized Code is under BSD Type of License Author: Tatu Ylonen <ylo@cs.hut.fi> Copyright (c) 1995 Tatu Ylonen <ylo@cs.hut.fi>, Espoo, Finland All rights reserved. Functions for manipulating fifo buffers (that can grow if needed).
- Page 39 PUBLICLY AVAILABLE SOFTWARE LIST – SECURITY ADAPTER Source Code: No Source Code Distribution Obligations License: The utilized Code is under BSD and MIT Type of Licenses sccl.c, vscanf.c Copyright (c) 1990 The Regents of the University of California. All rights reserved. Redistribution and use in source and binary forms are permitted provided that the above copyright notice and this paragraph are duplicated in all such forms, and that any documentation related to such distribution and use acknowledge that the software was developed by the University of California, Berkeley.
- Page 40 KVL 4000 Key Variable Loader ASTRO 25 User Guide PUBLICLY AVAILABLE SOFTWARE COMMON LICENSES No Common Licenses included. xxxviii...
- Page 41 One (1) Year MOTOROLA, at its option, will at no charge either repair the Product (with new or reconditioned parts), replace it (with a new or reconditioned Product), or refund the purchase price of the Product during the warranty period provided it is returned in accordance with the terms of this warranty.
- Page 42 Product item, transportation and insurance prepaid, to an authorized warranty service location. Warranty service will be provided by MOTOROLA through one of its authorized warranty service locations. If you first contact the company which sold you the Product (e.g., dealer or communication service provider), it can facilitate your obtaining warranty service.
- Page 43 VI. PATENT AND SOFTWARE PROVISIONS: MOTOROLA will defend, at its own expense, any suit brought against the end user purchaser to the extent that it is based on a claim that the Product or parts infringe a United States patent, and MOTOROLA will pay those costs...
-
Page 45: Kvl 4000 - Introduction
• Changing the power settings (setting the timeout for turning off the display to conserve battery power) Set up the PDA so that it turns itself off when it is not in use to preserve the KVL 4000 battery life. -
Page 46: Personal Digital Assistant
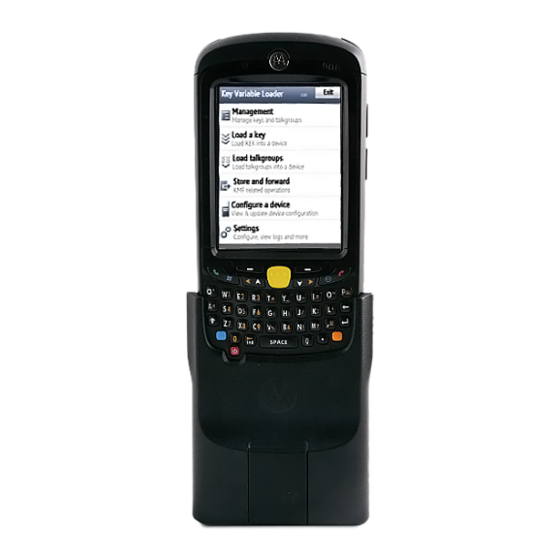
Figure 1-1 KVL 4000 Key Variable Loader 1.2.1.1 Personal Digital Assistant The Personal Digital Assistant (PDA) is the host component of the KVL 4000, responsible for controlling all operations of the device. It is a Motorola rugged handheld computer operating Windows Mobile 6.5. The PDA model used as part of the KVL 4000 is MC55A0. -
Page 47: Figure 1-2 Personal Digital Assistant (Pda)
1.2.1.1 Personal Digital Assistant Figure 1-2 Personal Digital Assistant (PDA) Table 1-1 PDA Controls and Ports Used in the KVL Operation Callout Item Description Number Charging/Battery Status LED Blinks when the battery is charging; solid when the battery is charged. Touch screen Navigate through the UI by tapping or dragging items on the screen. -
Page 48: Security Adapter
(available at http://www.motorola.com/enterprisemobility/manuals). 1.2.1.2 Security Adapter The Security Adapter is an integral component of the KVL 4000, providing secure storage of encryption keys, cryptographic operations, and port access for the KVL 4000. Always make sure to exit the KVL application on the PDA before disconnecting the Security Adapter. -
Page 49: Figure 1-3 Security Adapter
1.2.1.2 Security Adapter Figure 1-3 Security Adapter Table 1-2 Security Adapter Ports and Interfaces Callout Item Description Number Key load Port Serves as the interface to all target devices for key loading and upgrade operations. Tricolored LED Serves as the diagnostic status indicator for the KVL. The available states are: •... -
Page 50: Kvl 4000 Key Features
KVL 4000 Key Variable Loader ASTRO 25 User Guide Table 1-2 Security Adapter Ports and Interfaces (cont'd.) Callout Item Description Number DB9 Port (RS-232) Serves as the interface to: • a PC for transferring log records • a radio for Tactical OTAR key management •... -
Page 51: Kvl 4000 Sounds
• Store & Forward • KEK Key loading • Tactical OTAR • Remote Control Head key loading 1.2.3 KVL 4000 Sounds Table 1-3 Sounds Played by the KVL 4000 Description Sound name attention Played for any case when your attention is needed. -
Page 52: Using The Kvl 4000
KVL 4000 Key Variable Loader ASTRO 25 User Guide 1.2.4 Using the KVL 4000 Secure communications systems are designed to provide coded (encrypted) voice and data signals between some or all links in the system (including RF links and network links). In order to do this, each device, such as a radio or fixed encryption unit, is loaded with a multi-digit encryption variable (a key). -
Page 53: Kvl 4000 - Getting Started
1.4 KVL 4000 – Getting Started Figure 1-4 KVL 4000 Main Screen 1.4 KVL 4000 – Getting Started 1.4.1 Applying Enhanced Security Settings Through the KVL Software Installation Wizard Prerequisites: • Ensure that you have the USB Programming Cable. • For Windows XP, ensure that Microsoft ActiveSync is installed on your PC. -
Page 54: Figure 1-5 Pda And Pc - Connected
PDA USB Mode, page 12-5 to put the PDA into the USB Client or USB OTG mode. Insert the CD provided by Motorola and run the Setup.exe file to start the KVL Software Installation Wizard. Step result: The End User License Agreement screen appears. -
Page 55: Applying Transparent Security Settings Through The Kvl Software Installation Wizard
1.4.2 Applying Transparent Security Settings Through the KVL Software Installation Wizard In the window that appears, select the check box next to Your device is using Transparent Security Settings (default), and click Next. The Enhanced Security Settings will be applied after the KVL application reinstallation/upgrade. -
Page 56: Connecting The Pda And The Security Adapter
PDA USB Mode, page 12-5 to put the PDA into the USB Client or USB OTG mode. Insert the CD provided by Motorola and run the Setup.exe file to start the KVL Software Installation Wizard. Step result: The End User License Agreement screen appears. -
Page 57: Connecting The Kvl To Target Devices
1.4.4 Connecting the KVL to Target Devices Connect the PDA and the Security Adapter. Figure 1-6 PDA and Security Adapter – Connecting To secure the Adapter, slide the locking tabs up fully until a click is felt indicating they are in the locked position. -
Page 58: Figure 1-8 Kvl And Radios - Connected (Example)
KVL 4000 Key Variable Loader ASTRO 25 User Guide ® • Secure ASTRO 25 Multiple Key Target Radio • Another KVL unit (see 1.4.4.2 Connecting Two KVL Units, page 1-16) • Radio Network Controller (RNC) • Digital Interface Unit (DIU) •... -
Page 59: Figure 1-9 Kvl And Kmf - Connected
1.4.4.1 Connecting the KVL to a Radio or Another Target Device Figure 1-9 KVL and KMF – Connected Figure 1-10 KVL and MGEG – Connected (Example) 6871018P37-F - January 2013 1-15... -
Page 60: Connecting Two Kvl Units
Connect two KVLs through their key load ports. Figure 1-11 Two KVL Units – Connected The KVL 4000 is also compatible with the previous models of the KVL. 1.4.4.3 Connecting the KVL to the KMF 1.4.4.3.1 Connecting the KVL to the KMF – Direct Connection Prerequisites: Ensure you have a Null Modem Cable. -
Page 61: Connecting The Kvl To The Usb Modem For The Kmf Communication
1.4.4.3.2 Connecting the KVL to the USB Modem for the KMF Communication Procedure Steps Take a Null Modem Cable. Connect the KVL to the KMF through the DB9 Port (RS-232). Depending on the cable type, you may need to use a DB9 Gender Changer. Figure 1-12 KVL and KMF –... -
Page 62: Connecting The Kvl To The Serial Modem For The Kmf Communication
KVL 4000 Key Variable Loader ASTRO 25 User Guide Procedure Steps Connect the power supply to the KVL. It is recommended that you keep the power supply connected to the KVL during the operation. Connect the KVL to the USB modem. -
Page 63: Connecting The Kvl To The Network For The Kmf Communication
Connect the KVL to the serial modem through the KVL DB9 (RS-232) Port. Figure 1-14 KVL and Serial Modem – Connected (Example) Since the KVL 4000 has no flow control, you need to configure any attached external modem to: • Override the modem's Data Terminal Ready signal. -
Page 64: Figure 1-15 Kvl And Usb To Ethernet Adapter - Connected
KVL 4000 Key Variable Loader ASTRO 25 User Guide Connect the KVL to the power supply. It is recommended that you keep the power supply connected to the KVL during the operation. Connect the USB to Ethernet Adapter to the USB Port on the KVL using the MINI-B to Type-A USB Cable. -
Page 65: Connecting The Kvl To The Cryptr Micro
Figure 1-16 CRYPTR micro and KVL - Connected 1.4.5 Charging the KVL 4000 Prerequisites: Ensure that you have: • Power Supply • AC Line Cord (See B KVL 4000 – Orderable Parts, page B-1 for the list of compatible AC Line Cords.) 6871018P37-F - January 2013 1-21... -
Page 66: Figure 1-17 Kvl 4000 - Charging
KVL 4000 Key Variable Loader ASTRO 25 User Guide Procedure Steps Connect one end of the AC Line Cord to the power source. Connect the other end of the AC Line Cord to the power supply. Connect the power supply to the KVL through the Charging Port on the Security Adapter. -
Page 67: Launching The Kvl Application
1.4.6 Launching the KVL Application 1.4.6 Launching the KVL Application Procedure Steps If the device is not already powered on, press the Power button on the PDA. If you reboot the device, the KVL application launches automatically. Step result: The KVL powers on and the Today screen appears. Figure 1-18 Today Screen 6871018P37-F - January 2013 1-23... -
Page 68: Figure 1-19 Welcome Screen
KVL 4000 Key Variable Loader ASTRO 25 User Guide Tap the Key Variable Loader button. If the PDA and the Security Adapter are not compatible, a notification appears. Step result: If there are no passwords defined for your KVL, the KVL application launches and the KVL main screen appears. -
Page 69: Exiting The Kvl Application
If you log on as an Administrator and there are upgrades available for the Security Adapter or a target device, the Upgrades available screen appears. For more information on upgrades, see the KVL 4000 FLASHPort Upgrade User Guide. If you log on as an Operator and enter an incorrect password 3 times, your account is locked. Wait 15 minutes to try again, or contact an Administrator to unlock your account (see 12.3 Unlocking the... -
Page 70: Configuring Vpn Settings
The KVL can use an Ethernet connection to communicate with the KMF. If applicable, you can establish this connection within your organization’s trusted network, or you can use the VPN client provided by Motorola. To be able to use the VPN client, configure the VPN settings on the PDA. -
Page 71: Configuring Vpn Settings - Kvl Directly Connected To The Firewall
When and where to use: If you are going to establish the KVL to KMF Ethernet connection using the VPN client provided by Motorola, use these steps to create a configuration profile for a scenario when the KVL is going to be directly connected to the Firewall. -
Page 72: Figure 1-22 Ncp Entry Configuration Manager Wm Window
KVL 4000 Key Variable Loader ASTRO 25 User Guide On the desktop, select Start → Programs → NCP Secure Client → NCP Entry Configuration Manager Step result: The NCP Entry Configuration Manager WM launches. Figure 1-22 NCP Entry Configuration Manager WM Window On the NCP Entry Configuration Manager WM window, select Configuration →... -
Page 73: Figure 1-24 Assistant For New Profile - Pre-Shared Key Window
1.4.8.1 Configuring VPN Settings - KVL Directly Connected to the Firewall On the Profile Settings window, click Add. Step result: The Assistant for New Profile – Pre-shared Key window appears. Figure 1-24 Assistant for New Profile – Pre-shared Key Window Select Link to Corporate Network Using IPSec, and click Next. -
Page 74: Figure 1-26 Assistant For New Profile - Communication Medium Window
KVL 4000 Key Variable Loader ASTRO 25 User Guide In the Name of the connection field, type KVL4000 at Firewall, and click Next. Step result: The Assistant for New Profile – Communication Medium window appears. Figure 1-26 Assistant for New Profile – Communication Medium Window From the Communication Media drop-down list, select LAN (over IP), and then click Next. -
Page 75: Figure 1-28 Assistant For New Profile - Ipsec Configuration Window
1.4.8.1 Configuring VPN Settings - KVL Directly Connected to the Firewall On the VPN Gateway Parameters window, perform the following actions: a. In the Gateway (Tunnel Endpoint) field, enter the IP address you obtained from the system administrator. For systems with the Dynamic System Resilience (DSR) feature, in case of a switchover, you will need to change the IP address to be able to contact the backup Gateway. -
Page 76: Figure 1-29 Assistant For New Profile - Pre-Shared Key
KVL 4000 Key Variable Loader ASTRO 25 User Guide On the IPSec Configuration window, click Next. Step result: The Assistant for New Profile – Pre-shared Key window appears. Figure 1-29 Assistant for New Profile – Pre-shared Key 6871018P37-F - January 2013... -
Page 77: Figure 1-30 Assistant For New Profile - Ipsec Configuration - Ip Addresses Window
1.4.8.1 Configuring VPN Settings - KVL Directly Connected to the Firewall In the Pre-shared Key window, perform the following actions: a. In the appropriate fields, enter and reenter the Shared Secret. The Pre-shared key that you enter here must match the Pre-shared key on the Firewall. For more information, see the Firewall manual. -
Page 78: Figure 1-31 Assistant For New Profile - Firewall Settings Window
KVL 4000 Key Variable Loader ASTRO 25 User Guide 10 From the IP Address Assignment drop-down list, select Local IP Address, and then click Next. Step result: The Assistant for New Profile – Firewall Settings window appears. Figure 1-31 Assistant for New Profile – Firewall Settings Window 11 On the Firewall Settings window, click Finish. -
Page 79: Configuring Vpn Settings - Kvl Connected To The Firewall Through A Network
When and where to use: If you are going to establish the KVL to KMF Ethernet connection using the VPN client provided by Motorola, use these steps to create a configuration profile for a scenario when the KVL is going to be connected to the Firewall through a network. -
Page 80: Figure 1-33 Profile Settings Window
KVL 4000 Key Variable Loader ASTRO 25 User Guide On the NCP Entry Configuration Manager WM window, select Configuration → Profile Settings. Step result: The Profile Settings window appears. Figure 1-33 Profile Settings Window On the Profile Settings window, click Add. -
Page 81: Figure 1-35 Assistant For New Profile - Connection Name Window
1.4.8.2 Configuring VPN Settings - KVL Connected to the Firewall Through a Network Select Link to Corporate Network Using IPSec, and click Next. Step result: The Assistant for New Profile – Connection Name window appears. Figure 1-35 Assistant for New Profile – Connection Name Window In the Name of the connection field, type KVL4000 through Network, and click Next. -
Page 82: Figure 1-37 Assistant For New Profile - Vpn Gateway Parameters Window
KVL 4000 Key Variable Loader ASTRO 25 User Guide From the Communication Media drop-down list, select LAN (over IP), and then click Next. Step result: The Assistant for New Profile – VPN Gateway Parameters window appears. Figure 1-37 Assistant for New Profile – VPN Gateway Parameters Window... -
Page 83: Figure 1-38 Assistant For New Profile - Ipsec Configuration Window
1.4.8.2 Configuring VPN Settings - KVL Connected to the Firewall Through a Network On the VPN Gateway Parameters window, perform the following actions: a. In the Gateway (Tunnel Endpoint) field, enter the IP address you obtained from the system administrator. For systems with the Dynamic System Resilience (DSR) feature, in case of a switchover, you will need to change the IP address to be able to contact the backup Gateway. -
Page 84: Figure 1-39 Assistant For New Profile - Pre-Shared Key
KVL 4000 Key Variable Loader ASTRO 25 User Guide On the IPSec Configuration window, click Next. Step result: The Assistant for New Profile – Pre-shared Key window appears. Figure 1-39 Assistant for New Profile – Pre-shared Key 6871018P37-F - January 2013... -
Page 85: Figure 1-40 Assistant For New Profile - Ipsec Configuration - Ip Addresses Window
1.4.8.2 Configuring VPN Settings - KVL Connected to the Firewall Through a Network In the Pre-shared Key window, perform the following actions: a. In the appropriate fields, enter and reenter the Shared Secret. The Pre-shared key that you enter here must match the Pre-shared key on the Firewall. For more information, see the Firewall manual. -
Page 86: Figure 1-41 Assistant For New Profile - Firewall Settings Window
KVL 4000 Key Variable Loader ASTRO 25 User Guide 10 From the IP Address Assignment drop-down list, select Local IP Address, and then click Next. Step result: The Assistant for New Profile – Firewall Settings window appears. Figure 1-41 Assistant for New Profile – Firewall Settings Window 11 On the Profile Settings window, click OK. -
Page 87: Establishing The Vpn Connection
When and where to use: Use these steps if you want to establish the KVL to KMF Ethernet connection using the VPN client provided by Motorola. Procedure Steps In the upper left corner of the PDA screen, select Start → Programs. -
Page 88: Figure 1-43 Ncp Secure Client Screen - Kvl 4000 At Firewall
Select the NCP Secure Client icon. Step result: The NCP Secure Client screen appears. Figure 1-43 NCP Secure Client Screen – KVL 4000 at Firewall Figure 1-44 NCP Secure Client Screen – KVL 4000 Through Network 6871018P37-F - January 2013... -
Page 89: Figure 1-45 Ncp Secure Client Screen - Kvl 4000 At Firewall - Connected
Type in your VPN Password and select OK. Step result: The Connecting animation appears, followed by the Connected screen. The VPN connection is established. Figure 1-45 NCP Secure Client Screen – KVL 4000 at Firewall – Connected 6871018P37-F - January 2013 1-45... -
Page 90: Terminating The Vpn Connection
Figure 1-46 NCP Secure Client Screen – KVL 4000 Through Network – Connected 1.4.10 Terminating the VPN Connection When and where to use: Use these steps if you established the KVL to KMF Ethernet connection using the VPN client provided by Motorola. 6871018P37-F - January 2013 1-46... -
Page 91: Figure 1-47 Programs Screen
1.4.10 Terminating the VPN Connection Procedure Steps In the upper left corner of the PDA screen, select Start → Programs. Step result: The Programs screen appears. Figure 1-47 Programs Screen Select the NCP Secure Client icon. Step result: The NCP Secure Client screen appears. Select Disconnect. -
Page 93: Kvl 4000 - Performing Initial Programming
Before using your KVL to enter and load encryption keys, set several parameters that determine how the KVL operates. 2.1 KVL 4000 User Preference Parameters The user preference parameters and settings are not required for operation of the KVL, but instead provide a way of customizing certain functions to suit your individual needs. -
Page 94: Figure 2-1 Kvl Screen In Day Time Color Scheme (Example)
KVL 4000 Key Variable Loader ASTRO 25 User Guide When and where to use: Use these steps to set the KVL screen color scheme. Figure 2-1 KVL Screen in Day Time Color Scheme (Example) Figure 2-2 KVL Screen in Night Time Color Scheme (Example) -
Page 95: Turning Sharing On/Off
Step result: A list of available values appears (On/Off), with the currently set value highlighted. Select the desired value. Tap Done on the consecutive screens to return to the KVL main screen. 2.1.4 KVL 4000 – Managing Passwords The KVL provides two levels of security access: • Administrator •... -
Page 96: Setting Up Passwords On The Kvl
KVL 4000 Key Variable Loader ASTRO 25 User Guide • adding and deleting keys in a group • converting keys • adding, deleting, and editing Tactical OTAR groups • entering and changing Tactical OTAR MNP • entering and changing KVL RSI •... -
Page 97: Setting Up The Administrator Password
2.1.4.1.2 Setting Up the Administrator Password Procedure Steps On the KVL main screen, select Settings → Security → Passwords → Define passwords → Operator. Step result: The New password and Repeat password entry fields appear. In the New password entry field, type the password of your choice using the PDA keypad. The password must contain between 15 and 30 characters, including at least 1 special character, 1 numeric character, and 1 uppercase character. -
Page 98: Changing Passwords On The Kvl
KVL 4000 Key Variable Loader ASTRO 25 User Guide Procedure Steps On the KVL main screen, select Settings → Security → Passwords → Define passwords → Administrator. Step result: The New password and Repeat password entry fields appear. In the New password entry field, type the password of your choice using the PDA keypad. -
Page 99: Changing The Operator Password (Administrator Access Level)
2.1.4.2.2 Changing the Operator Password (Administrator Access Level) Procedure Steps Log on as an Operator. Step result: The KVL main screen appears. Select Settings → Security → Password. Step result: The Operator screen appears, with the Current password, New password, and Repeat password entry fields. -
Page 100: Changing The Administrator Password
KVL 4000 Key Variable Loader ASTRO 25 User Guide Procedure Steps Log on as an Administrator. If you are prompted for upgrades, select No, not now. Step result: The KVL main screen appears. Select Settings → Security → Passwords → Update passwords → Operator. - Page 101 2.1.4.2.3 Changing the Administrator Password Procedure Steps Log on as an Administrator. If you are prompted for upgrades, select No, not now. Step result: The KVL main screen appears. Select Settings → Security → Passwords → Update passwordsAdministrator. Step result: The Current password, New password, and Repeat password entry fields. In the Current password entry field, type the current password using the PDA keypad.
-
Page 102: Clearing Kvl Passwords
KVL 4000 Key Variable Loader ASTRO 25 User Guide 2.1.4.3 Clearing KVL Passwords Prerequisites: Only an Administrator can clear passwords. Procedure Steps Log on as an Administrator. If you are prompted for upgrades, select No, not now. Step result: The KVL main screen appears. -
Page 103: Selecting The Password Masking Mode
Set the parameters in this section depending on the particular system (ASN, ASTRO ® 25, or Radio Authentication) in which the KVL is operating. 2.2.1 KVL 4000 – Switching Between the Modes of Operation ® ® The KVL provides three modes of operation: ASN (Advanced SECURENET... -
Page 104: Setting The Baud Rate For Rs-232 Communication
KVL 4000 Key Variable Loader ASTRO 25 User Guide Procedure Steps On the KVL main screen, select Settings → System. Step result: A list of available modes appears (ASN, ASTRO ® 25, and Radio Authentication), with the currently used mode highlighted. -
Page 105: Changing The Fips Mode
2.2.3 Changing the FIPS Mode Procedure Steps On the KVL main screen, select Settings → General → Baud Rate. Step result: A list of available values appears, with the currently set value highlighted. You can choose from the following values: •... -
Page 106: Managing The System Key (Dvi-Xl Only)
KVL 4000 Key Variable Loader ASTRO 25 User Guide Procedure Steps On the KVL main screen, select Settings → Security → FIPS mode. Step result: The list of available values appears, with the currently selected value highlighted. The available values are: •... -
Page 107: Entering The User-Defined System Key
2.2.4.1 Entering the User-Defined System Key 2.2.4.1 Entering the User-Defined System Key Prerequisites: Only an Administrator can enter the System Key. When and where to use: Instead of using the default System Key, you can enter your own System Key. Changing the System Key deletes all associated keys. -
Page 108: Setting Up The Kvl To Use The Default System Key
KVL 4000 Key Variable Loader ASTRO 25 User Guide Procedure Steps On the KVL main screen, select Settings → Security → System Key. Tap the New > key. Step result: A Key Data Info Field and a Hex Entry Keypad appear. -
Page 109: Kvl 4000 - Managing Encryption Keys
KVL 4000 – Managing Encryption Keys 3.1 Entering Encryption Keys This section covers the following topics: • 3.1.1 Entering Encryption Keys Manually, page 3-1 • 3.1.2 Auto-Generating Encryption Keys, page 3-3 3.1.1 Entering Encryption Keys Manually Prerequisites: Only an Administrator can enter keys. - Page 110 KVL 4000 Key Variable Loader ASTRO 25 User Guide Select the + button to define a new key. Select Enter manually to enter keys one by one. Enter the name of the key using the PDA keypad. The name can consist of up to 8 characters, including spaces.
-
Page 111: Auto-Generating Encryption Keys
3.1.2 Auto-Generating Encryption Keys 12 Tap Auto to generate the key automatically, or enter the key using the keypad. At any time, you can review the digits you have entered by tapping anywhere on the Key Data Info field. This brings up a Review key screen. For DES keys only: As you enter each digit of the encryption key, the KVL checks it for validity. -
Page 112: Figure 3-3 Manage Keys Screen - Entering A Key (Example)
KVL 4000 Key Variable Loader ASTRO 25 User Guide When and where to use: Use these steps to quickly generate multiple encryption keys. Procedure Steps Select Manage keys on the KVL main screen. Step result: The Manage keys screen appears. -
Page 113: Using Key Groups
3.2 Using Key Groups Select Initial CKR ID and type the CKR for the first key. Consequent keys will increment from that ID. Valid CKRs for TEKs are 1 through 4095. Valid CKRs for KEKs are 61440 through 65535. Tap Done when ready. 10 Select Initial Key ID and type the Key ID for the first key. -
Page 114: Figure 3-4 Manage Keys Screen - Creating A Group (Example)
KVL 4000 Key Variable Loader ASTRO 25 User Guide Select Manage keys on the KVL main screen. Step result: The Manage keys screen appears with a list of available keys. Figure 3-4 Manage Keys Screen – Creating a Group (Example) Select the Groups tab. -
Page 115: Modifying Groups
3.2.2 Modifying Groups Add all the desired keys to the created group. To add a key, drag the slider to the right. To exclude a key, drag the slider to the left. When finished, tap Done. Step result: The group is saved and displayed in the groups list. Figure 3-5 Adding Keys to a Group –... -
Page 116: Viewing Keys In A Group
KVL 4000 Key Variable Loader ASTRO 25 User Guide 3.2.2.1 Viewing Keys in a Group Procedure Steps Select Manage keys on the KVL main screen. Step result: The Manage keys screen appears with a list of available keys. Select the Groups tab. -
Page 117: Figure 3-7 Group With Available Keys (Example)
3.2.2.2 Adding Keys to a Group When and where to use: Use these steps to add keys to a group. A group may consist of up to 512 keys. Procedure Steps Select Manage keys on the KVL main screen. Step result: The Manage keys screen appears. Select the Groups tab. -
Page 118: Deleting Keys From A Group
KVL 4000 Key Variable Loader ASTRO 25 User Guide Add all the desired keys to the group. To add a key, drag the slider to the right. To exclude a key, drag the slider to the left. When finished, tap Done. -
Page 119: Deleting A Group
3.2.2.4 Deleting a Group Tap Edit keys. Step result: A list of all available keys appears. Figure 3-8 Deleting Keys from a Group (Example) Delete all the desired keys from the group. To delete a key, drag the slider associated with the selected key to the left. -
Page 120: Figure 3-9 Deleting A Group (Example)
KVL 4000 Key Variable Loader ASTRO 25 User Guide Select the Groups tab. You can use the smart bar on the right side of the screen to scroll through the list or quickly jump within the list to a selected area. If the list fits completely on the screen, the smart bar is disabled. -
Page 121: Renaming A Group
3.2.2.5 Renaming a Group 3.2.2.5 Renaming a Group Prerequisites: Only an Administrator can rename a group. Procedure Steps Select Manage keys on the KVL main screen. Step result: The Manage keys screen appears. Select the Groups tab. You can use the smart bar on the right side of the screen to scroll through the list or quickly jump within the list to a selected area. -
Page 122: Modifying Encryption Keys
KVL 4000 Key Variable Loader ASTRO 25 User Guide Tap Done to confirm. Tap Done on the consecutive screens to return to the KVL main screen. 3.3 Modifying Encryption Keys You can modify an Encryption Key (TEK or KEK) stored in a specific CKR location in the KVL memory. -
Page 123: Figure 3-12 Key Details Screen (Example)
3.3 Modifying Encryption Keys From the list of available keys, select the key you want to modify. You can use the smart bar on the right side of the screen to scroll through the list or quickly jump within the list to a selected area. If the list fits completely on the screen, the smart bar is disabled. Step result: A screen with details for the selected key appears. -
Page 124: Deleting Encryption Keys
KVL 4000 Key Variable Loader ASTRO 25 User Guide Scroll down the screen and select Key. Step result: The Enter key screen appears with the Hex keypad. Tap Auto to generate the key automatically, or enter the key using the Hex keypad. -
Page 125: Figure 3-13 Manage Keys Screen - Deleting A Key (Example)
3.4 Deleting Encryption Keys Procedure Steps Select Manage keys on the KVL main screen. Step result: The Manage keys screen appears with the list of available keys. Figure 3-13 Manage Keys Screen – Deleting a Key (Example) From the list of available keys, select the key you want to delete. You can use the smart bar on the right side of the screen to scroll through the list or quickly jump within the list to a selected area. -
Page 127: Kvl 4000 - Loading Encryption Keys Into Target Devices
25 Single Key Target Radio • Secure ASTRO ® 25 Multiple Key Target Radio • Another KVL unit (see Chapter 6 KVL 4000 – Sharing Keys Between KVLs) • Radio Network Controller (RNC) • Digital Interface Unit (DIU) • Motorola Gold Elite Gateway (MGEG) •... -
Page 128: Figure 4-1 Load Keys & Groups Screen - Example
KVL 4000 Key Variable Loader ASTRO 25 User Guide On the KVL main screen, Select Load keys & groups → Load keys & groups. Step result: The list of available keys appears. Figure 4-1 Load Keys & Groups Screen – Example You can use the smart bar on the right side of the screen to scroll through the list or quickly jump within the list to a selected area. -
Page 129: Loading A Key Group
4.2 Loading a Key Group Select the key you want to load by dragging the slider to the right. KVL displays an animation indicating a busy loading state. During this time, you can scroll to find the next key. Figure 4-2 Loading a Key (Example) Step result: The key has been loaded to the target device. -
Page 130: Figure 4-3 Load Keys & Groups Screen - Loading A Group (Example)
KVL 4000 Key Variable Loader ASTRO 25 User Guide Procedure Steps On the KVL main screen, select Load keys & groups → Load keys & groups. Step result: The list of keys appears. Figure 4-3 Load Keys & Groups Screen – Loading a Group (Example) Select the Groups tab. -
Page 131: Figure 4-4 Loading A Group (Example)
4.2 Loading a Key Group Select the group you want to load by dragging the slider to the right. Step result: An animation appears next to the group to indicate it is being loaded. When the process is successful, a completed tone is played. Figure 4-4 Loading a Group (Example) Because key groups may contain undefined keys (CKRs with no KID or key data), the number of keys loaded may differ from the number of keys in the key group. -
Page 132: Loading All Keys
KVL 4000 Key Variable Loader ASTRO 25 User Guide 4.3 Loading All Keys Prerequisites: In order to load all keys from the KVL into the target device, the KVL and the target device must be equipped with the same algorithms. -
Page 133: Loading All Key Groups
4.4 Loading All Key Groups Connect the target device to the KVL using an appropriate key load cable. (See 1.4.4.1 Connecting the KVL to a Radio or Another Target Device, page 1-13.) Step result: A tone is played to indicate the start of the loading process and a progress animation appears, indicating the current key and the total number of keys being loaded. -
Page 134: Figure 4-7 Load Keys & Groups Screen - Loading All Groups (Example)
KVL 4000 Key Variable Loader ASTRO 25 User Guide On the KVL main screen, select Load keys & groups → Load keys & groups. Step result: The list of keys appears. Figure 4-7 Load Keys & Groups Screen – Loading All Groups (Example) Select the Groups tab. - Page 135 4.4 Loading All Key Groups Connect the target device to the KVL using an appropriate key load cable. (See 1.4.4.1 Connecting the KVL to a Radio or Another Target Device, page 1-13.) Step result: A tone is played to indicate the start of the loading process and a progress animation appears, indicating the current group and the total number of groups being loaded.
-
Page 137: Kvl 4000 - Managing Keys In Target Devices
KVL 4000 – Managing Keys in Target Devices 5.1 Removing Keys from Target Devices KVL allows you to erase encryption keys stored in a secure target device, such as a radio. This feature permanently erases the encryption key from the CKR memory location in the target device. -
Page 138: Figure 5-1 Configure A Radio Screen
KVL 4000 Key Variable Loader ASTRO 25 User Guide Connect the target device to the KVL using an appropriate key load cable. (See 1.4.4.1 Connecting the KVL to a Radio or Another Target Device, page 1-13.) Step result: A tone is played and a list of available options appears. -
Page 139: Removing A Key Group From A Target Device
5.1.2 Removing a Key Group from a Target Device Select Remove keys → Remove keys & groups. Step result: The list of keys appears. Figure 5-2 Remove Keys & Groups Screen (Example) You can use the smart bar on the right side of the screen to scroll through the list or quickly jump within the list to a selected area. -
Page 140: Figure 5-3 Configure A Radio Screen - Removing A Group
KVL 4000 Key Variable Loader ASTRO 25 User Guide Select Configure a radio on the KVL main screen. Step result: You are prompted to connect the target device. Connect the target device to the KVL using an appropriate key load cable. (See 1.4.4.1 Connecting the KVL... -
Page 141: Figure 5-4 Remove Keys & Groups Screen - Removing A Group (Example)
5.1.2 Removing a Key Group from a Target Device Select Remove keys → Remove keys & groups. Step result: The list of keys appears. Figure 5-4 Remove Keys & Groups Screen – Removing a Group (Example) Select the Groups tab. You can use the smart bar on the right side of the screen to scroll through the list or quickly jump within the list to a selected area. -
Page 142: Removing All Keys From A Target Device
KVL 4000 Key Variable Loader ASTRO 25 User Guide Select the group you want to remove by dragging the slider from left to right. Step result: An animation appears and a group is removed from the target device. Figure 5-5 Group Removed (Example) Remove another group, or disconnect the target device and tap Done on the consecutive screens to return to the KVL main screen. -
Page 143: Figure 5-6 Configure A Radio Screen - Removing All Keys
5.1.3 Removing All Keys from a Target Device Connect the target device to the KVL using an appropriate key load cable. (See 1.4.4.1 Connecting the KVL to a Radio or Another Target Device, page 1-13.) Step result: A tone is played and a list of available options appears. Figure 5-6 Configure a Radio Screen –... -
Page 144: Removing All Key Groups From A Target Device
KVL 4000 Key Variable Loader ASTRO 25 User Guide Select Remove keys → Remove keys & groups. Step result: The list of keys appears. Figure 5-7 Remove Keys & Groups Screen – Removing All Keys (Example) Select the Remove All button. -
Page 145: Figure 5-8 Configure A Radio Screen - Removing All Groups
5.1.4 Removing All Key Groups from a Target Device Connect the target device to the KVL using an appropriate key load cable. (See 1.4.4.1 Connecting the KVL to a Radio or Another Target Device, page 1-13.) Step result: A tone is played and a list of available options appears. Figure 5-8 Configure a Radio Screen –... -
Page 146: Removing All Keys And All Key Groups From A Target Device
KVL 4000 Key Variable Loader ASTRO 25 User Guide Select Remove keys → Remove keys & groups. Step result: The list of keys appears. Figure 5-9 Remove Keys & Groups Screen – Removing All Groups (Example) Select the Groups tab. -
Page 147: Figure 5-10 Configure A Radio Screen - Removing All Keys And Groups
5.1.5 Removing All Keys and All Key Groups from a Target Device Select Configure a radio on the KVL main screen. Step result: You are prompted to connect the target device. Connect the target device to the KVL using an appropriate key load cable. (See 1.4.4.1 Connecting the KVL to a Radio or Another Target Device, page 1-13.) -
Page 148: Viewing Keys In Target Devices
KVL 4000 Key Variable Loader ASTRO 25 User Guide Select Remove keys → Remove all. Step result: A confirmation screen appears. Figure 5-11 Remove All Screen Tap Remove Now >. Step result: All keys and key groups are removed. Disconnect the target device and connect another target device to remove keys and key groups from, or tap Done on the consecutive screens to return to the KVL main screen. -
Page 149: Figure 5-12 Configure A Radio Screen - Viewing Keys
5.2 Viewing Keys in Target Devices Connect the target device to the KVL using an appropriate key load cable. (See 1.4.4.1 Connecting the KVL to a Radio or Another Target Device, page 1-13.) Step result: A tone is played and a list of available options appears. Figure 5-12 Configure a Radio Screen –... -
Page 151: Kvl 4000 - Sharing Keys Between Kvls
• Sharing cannot be performed between a KVL in ASN mode and a KVL in ASTRO 25 mode. (To change the mode of operation, see 2.2.1 KVL 4000 – Switching Between the Modes of Operation, page 2-11.) • Only key data and key groups are shared. KVL configuration settings, the UKEK for each algorithm, and log records for the target KVL remain unchanged. -
Page 152: Figure 6-1 Load Keys & Groups Screen - Sharing A Key (Example)
KVL 4000 Key Variable Loader ASTRO 25 User Guide On the KVL main screen, select Load keys & groups → Load keys & groups. Step result: The list of available keys appears. Figure 6-1 Load Keys & Groups Screen – Sharing a Key (Example) You can use the smart bar on the right side of the screen to scroll through the list or quickly jump within the list to a selected area. -
Page 153: Sharing A Key Group And Associated Keys
6.2 Sharing a Key Group and Associated Keys Select another key to share, or disconnect the KVLs and tap Done on the consecutive screens to return to the KVL main screen. 6.2 Sharing a Key Group and Associated Keys Prerequisites: If you share a key group that contains at least one DVI-XL key, the System Keys in both KVLs must match for the sharing to be successful. -
Page 154: Sharing All Keys And All Groups
KVL 4000 Key Variable Loader ASTRO 25 User Guide Connect the target KVL using the KVL to KVL cable. (See 1.4.4.2 Connecting Two KVL Units, page 1-16.) For the sharing operation to work, the target KVL must have the sharing function turned on and must be on its main screen. - Page 155 6.3 Sharing All Keys and All Groups Procedure Steps Select Load keys & groups on the KVL main screen. Connect the target KVL using the KVL to KVL cable. (See 1.4.4.2 Connecting Two KVL Units, page 1-16.) For the sharing operation to work, the target KVL must have the sharing function turned on and must be on its main screen.
-
Page 157: Using Kvl 4000 In Otar Systems
This chapter is applicable if your KVL is configured to support KMF operation. The Motorola Over-the-Air Rekeying (OTAR) system is a secure communications system in which encryption keys can be sent to subscriber units via radio transmission in addition to directly connecting a KVL to a radio to load keys. -
Page 158: Entering The Ukek
KVL 4000 Key Variable Loader ASTRO 25 User Guide Process Steps Enter a Unique Key Encryption Key (UKEK) required per algorithm in the KVL for OTAR systems. See 7.1.1 Entering the UKEK, page 7-2. The UKEK consists of a KID and Key Data. -
Page 159: Selecting Main Or Backup Kmf
7.1.2 Selecting Main or Backup KMF When and where to use: Use these steps to enter the UKEK. You enter the UKEK only once, after which it is permanently stored in the KVL memory. The UKEK is destroyed if the FIPS mode is enabled. Procedure Steps On the KVL main screen, select Settings →... -
Page 160: Entering Main And Backup Kmf Phone Numbers
KVL 4000 Key Variable Loader ASTRO 25 User Guide Procedure Steps On the KVL main screen, select Settings → KMF → Active KMF. Step result: A list of available options (Main or Backup KMF) appears, with the currently selected KMF highlighted. -
Page 161: Figure 7-1 Phone #S Screen
7.1.3 Entering Main and Backup KMF Phone Numbers On the KVL main screen, select Settings → KMF → Phone #s. Step result: The phone keypad appears. Figure 7-1 Phone #s Screen The screen appears with the tab for the currently selected KMF open. Select the tab for the KMF you want to enter the phone number for. -
Page 162: Entering Main And Backup Kmf Ports
KVL 4000 Key Variable Loader ASTRO 25 User Guide Enter the phone number using the phone keypad. If you need to enter an * or # characters, use the PDA keypad. • As you tap the digits, they appear in the phone info field. -
Page 163: Entering Main And Backup Kmf Ip Addresses
7.1.5 Entering Main and Backup KMF IP Addresses Procedure Steps On the KVL main screen, select Settings → KMF → KMF port. Step result: A decimal keypad appears. Enter the port number for the Main KMF. The available range is 49156 through 65535. If you change the default value, ensure it matches the port number configured on the KMF. -
Page 164: Entering The Kmf Rsi
KVL 4000 Key Variable Loader ASTRO 25 User Guide Procedure Steps On the KVL main screen, select Settings → KMF → IP address. Step result: A decimal keypad appears. Enter the IP address of the Main KMF. Select the Backup tab and enter the IP address of the Backup KMF. -
Page 165: Entering The Mnp For Otar
7.1.7 Entering the MNP for OTAR Procedure Steps On the KVL main screen, select Settings → KMF → KMF RSI. Step result: The decimal keypad appears. Enter the RSI using the decimal keypad. • The available values range from 1 through 9999999. The default value is 9999999. •... -
Page 166: Entering The Kvl Rsi For Otar
KVL 4000 Key Variable Loader ASTRO 25 User Guide Procedure Steps On the KVL main screen, select Settings → KMF → MNP. Step result: A decimal keypad appears. Enter the MNP using the decimal keypad. • The available values range from 0 through 65535. The default value is 1000. -
Page 167: Using The Store And Forward Feature
7.2 Using the Store and Forward Feature Procedure Steps On the KVL main screen, select Settings → KVL RSI. Step result: A decimal keypad appears. Enter the RSI using the decimal keypad. • The available values range from 1 through 9999999. The default value is 9999998. •... -
Page 168: Downloading Keys From Kmf To Kvl Using Modem Connection
KVL 4000 Key Variable Loader ASTRO 25 User Guide Procedure Steps Connect the KVL to the KMF using the Null Modem Cable. (See 1.4.4.3.1 Connecting the KVL to the KMF – Direct Connection, page 1-16.) On the KVL main screen, select Store & Forward → Connect to KMF → Direct. -
Page 169: Downloading Keys From Kmf To Kvl Using Serial Modem Connection
7.2.2.2 Downloading Keys from KMF to KVL Using Serial Modem Connection Procedure Steps Connect the KVL to the USB modem. (See 1.4.4.3.2 Connecting the KVL to the USB Modem for the KMF Communication, page 1-17.) For the USB communication to work, the power supply must be connected to the KVL at all times. On the KVL main screen, select Store &... -
Page 170: Downloading Keys From Kmf To Kvl Using Network Connection
KVL 4000 Key Variable Loader ASTRO 25 User Guide Procedure Steps Connect KVL to the serial modem. (See 1.4.4.3.3 Connecting the KVL to the Serial Modem for the KMF Communication, page 1-18.) On the KVL main screen, select Store & Forward → Connect to KMF → Through modem (Serial). -
Page 171: Updating A Target Device
1.4.4.3.4 Connecting the KVL to the Network for the KMF Communication, page 1-19. If you want to establish the KVL to KMF Ethernet connection using the VPN client provided by Motorola, see 1.4.9 Establishing the VPN Connection, page 1-43. Launch the KVL application. -
Page 172: Viewing The List Of Received Jobs
KVL 4000 Key Variable Loader ASTRO 25 User Guide Procedure Steps On the KVL main screen, select Store & Forward → Forward to radio. Step result: A list of available target devices appears. You can use the Sort button to sort the target devices on the list by: •... -
Page 173: Clearing The List Of Received Jobs
7.2.6 Clearing the List of Received Jobs Procedure Steps On the KVL main screen, select Store & Forward → View received jobs. Step result: A list of received jobs appears. You can use the Sort button to sort items on the list by: •... -
Page 174: Performing A Keyset Changeover On A Target Device
KVL 4000 Key Variable Loader ASTRO 25 User Guide Procedure Steps Perform 7.2.5 Viewing the List of Received Jobs, page 7-16. Tap the Clear button. Step result: A confirmation screen appears. To restore the list, tap the Undo button. Tap Accept. -
Page 175: Managing Otar Configuration Parameters In Target Devices
7.4 Managing OTAR Configuration Parameters in Target Devices Procedure Steps Select Configure a radio on the KVL main screen. Step result: You are prompted to connect a target device. If a device is already connected, this prompt is skipped. If a device becomes disconnected, you are returned to the prompt. -
Page 176: Viewing The Target's Rsi And Kmf Rsi
KVL 4000 Key Variable Loader ASTRO 25 User Guide Prerequisites: Ensure you have: • an appropriate key load cable • an adaptor (if required) Procedure Steps Select Configure a radio on the KVL main screen. Step result: You are prompted to connect a target device. -
Page 177: Changing The Target's Mnp
7.4.3 Changing the Target's MNP Procedure Steps Select Configure a radio on the KVL main screen. Step result: You are prompted to connect a target device. If the device is already connected, this prompt is skipped. If a device becomes disconnected, you are returned to the prompt. -
Page 178: Changing The Target's Rsi And Kmf Rsi
KVL 4000 Key Variable Loader ASTRO 25 User Guide Procedure Steps Perform 7.4.1 Viewing the Target's MNP, page 7-19. Tap the MNP list item. Step result: A decimal keypad appears. Delete the existing MNP using the < Del key, and enter the new MNP using the decimal keypad. - Page 179 7.4.4 Changing the Target's RSI and KMF RSI Procedure Steps Perform 7.4.2 Viewing the Target's RSI and KMF RSI, page 7-20. Tap the RSI or KMF RSI list item, depending on which one you want to change. Step result: A screen with the decimal keypad appears. Delete the existing value using the <...
-
Page 181: Kvl 4000 Operations Through A Remote Control Head
The radio may be mounted in a vehicles trunk along with other assorted equipment or in another equally inaccessible location. Motorola's Remote Control Head Key loading feature allows you to remotely perform operations on a radio through a Remote Control Head that can be mounted in a vehicles cabin. -
Page 182: Entering The Sek And Kek
KVL 4000 Key Variable Loader ASTRO 25 User Guide Process Steps Enter a Signaling Encryption Key (SEK) and a Key Encryption Key (KEK) required per algorithm in the KVL. See 8.2.1 Entering the SEK and KEK, page 8-2. • The KEK secures keys exchanged between the KVL and the radio through the Remote Control Head. -
Page 183: Entering The Mnp For Remote Control Head Operations
8.2.2 Entering the MNP for Remote Control Head Operations Procedure Steps On the KVL main screen, select Settings → Control head keys. Step result: A list of available algorithms appears. Select the desired algorithm. Step result: A screen with the SEK and KEK entries appears. Since both parameters are required, the Done button is not available until you have entered both the SEK and KEK. -
Page 184: Entering The Kvl Rsi For Remote Control Head Operations
KVL 4000 Key Variable Loader ASTRO 25 User Guide Procedure Steps On the KVL main screen, select Settings → Tactical OTAR → MNP. Step result: A decimal keypad appears. Enter the MNP using the decimal keypad. • The available values range from 0 through 65535. The default value is 1000. -
Page 185: Provisioning A Radio For Remote Control Head Key Loading
8.3 Provisioning a Radio for Remote Control Head Key Loading Procedure Steps On the KVL main screen, select Settings → KVL RSI. Step result: A decimal keypad appears. Enter the RSI using the decimal keypad. • The available values range from 1 through 9999999. The default value is 9999998. •... -
Page 186: Connecting The Kvl To The Mobile Radio's Remote Control Head
KVL 4000 Key Variable Loader ASTRO 25 User Guide Scroll down the screen and select Provision radio. Step result: A list of available algorithms appears. Tap Start >. Step result: The provisioning process starts for each of the defined algorithms one by one. The status of the process is indicated on the list item for each algorithm: •... -
Page 187: Figure 8-1 Kvl Connected To A Mobile Radio's Remote Control Head
8.4 Connecting the KVL to the Mobile Radio's Remote Control Head Procedure Steps Take the data cable (HKN6183) and the DB9 Gender Changer (provided with the KVL). Connect the KVL to the mobile radio's Remote Control Head through the DB9 (RS-232) Port and the DB9 Gender Changer. -
Page 189: Kvl 4000 - Working With Tactical Otar Groups
Groups Tactical OTAR is a Motorola feature that allows a KVL to wirelessly manage a key (TEK only) for a small group of radios, with one radio serving as an RF modem. The radio serving as an RF modem must be equipped with the Tactical Rekey/OTAR feature. -
Page 190: Setting Up Tactical Otar
KVL 4000 Key Variable Loader ASTRO 25 User Guide 9.2 Setting Up Tactical OTAR Prerequisites: All radios must be configured with distinct RSIs and IP addresses for proper operation. Procedure Steps Create a Tactical OTAR group (see 9.3 Creating a New Tactical OTAR Group, page 9-2). - Page 191 9.3 Creating a New Tactical OTAR Group Select an algorithm for the group. The Algorithm list item is read-only if only a single algorithm is defined. Select TEK to define the Traffic Encryption Key for the group. Step result: The list of TEKs appears. You can either select a key from the list or enter a new key by tapping the + button.
-
Page 192: Deleting An Existing Tactical Otar Group
KVL 4000 Key Variable Loader ASTRO 25 User Guide 9.4 Deleting an Existing Tactical OTAR Group Prerequisites: Only an Administrator can delete a Tactical OTAR group. Procedure Steps On the KVL main screen, select Tactical OTAR → Manage OTAR groups. -
Page 193: Adding A Member To A Tactical Otar Group
9.6 Adding a Member to a Tactical OTAR Group Procedure Steps On the KVL main screen, select Tactical OTAR → Manage OTAR groups. Step result: The list of available Tactical OTAR groups (if any) appears. You can use the smart bar on the right side of the screen to scroll through the list or quickly jump within the list to a selected area. -
Page 194: Removing A Member From A Tactical Otar Group
KVL 4000 Key Variable Loader ASTRO 25 User Guide Procedure Steps On the KVL main screen, select Tactical OTAR → Manage OTAR groups. Step result: The list of available Tactical OTAR groups (if any) appears. You can use the smart bar on the right side of the screen to scroll through the list or quickly jump within the list to a selected area. -
Page 195: Editing The Tek Of A Tactical Otar Group
9.8 Editing the TEK of a Tactical OTAR Group Procedure Steps On the KVL main screen, select Tactical OTAR → Manage OTAR groups. Step result: The list of available Tactical OTAR groups (if any) appears. You can use the smart bar on the right side of the screen to scroll through the list or quickly jump within the list to a selected area. -
Page 196: Updating A Tactical Otar Group
KVL 4000 Key Variable Loader ASTRO 25 User Guide Procedure Steps On the KVL main screen, select Tactical OTAR → Manage OTAR groups. Step result: The list of available Tactical OTAR groups (if any) appears. You can use the smart bar on the right side of the screen to scroll through the list or quickly jump within the list to a selected area. - Page 197 9.9 Updating a Tactical OTAR Group Procedure Steps Power on all the member radios of the Tactical OTAR group. On the KVL main screen, select Tactical OTAR → Update an OTAR group. Step result: The list of available Tactical OTAR groups appears. You can use the smart bar on the right side of the screen to scroll through the list or quickly jump within the list to a selected area.
-
Page 199: Managing Log Records
Managing Log Records The KVL maintains a running record of the most recent 100 successful key load operations. The format of each log record entry on the list is as follows: • First line: Date/Time • Second line: Role/Action Performed •... -
Page 200: Clearing Log Records
KVL 4000 Key Variable Loader ASTRO 25 User Guide Procedure Steps On the KVL main screen, select Settings → Operations log. Step result: The list of log records appears. Figure 10-1 Operations Log (Example) You can scroll through the list or quickly jump to a selected area using the smart bar on the right side of the screen. -
Page 201: Figure 10-2 Operations Log - Clear (Example)
10.3 Clearing Log Records On the KVL main screen, select Settings → Operations log. Step result: The list of log records appears. Figure 10-2 Operations Log – Clear (Example) 6871018P37-F - January 2013 10-3... -
Page 202: Exporting Log Records To A Pc
KVL 4000 Key Variable Loader ASTRO 25 User Guide Select the Clear button. Step result: A confirmation screen appears. Figure 10-3 Clearing Logs – Confirmation Screen To restore the log, tap Undo. Tap Accept to confirm. Only the logs for the current mode of operation (ASN, ASTRO ®... - Page 203 10.4 Exporting Log Records to a PC Prerequisites: A communications program, such as Microsoft HyperTerminal, must be running on the PC in order to export log records. Procedure Steps Connect an appropriate cable between the KVL DB9 Port (RS-232) and a COM port on the PC. Depending on the cable type, you may need to use a gender changer.
-
Page 205: Kvl 4000 - Converting Encryption Keys
KVL 4000 – Converting Encryption Keys This chapter is applicable only if your KVL is configured to work in both ASN and ASTRO ® 25 modes of operation. If your KVL is configured to work in both ASN and ASTRO ®... -
Page 206: Figure 11-1 Manage Keys Screen - Converting Asn Key (Example)
KVL 4000 Key Variable Loader ASTRO 25 User Guide On the KVL main screen, select Manage → Keys. Step result: The Manage keys screen appears, with a list of available Traffic keys. Figure 11-1 Manage Keys Screen – Converting ASN Key (Example) To see the list of available Shadow keys, select the Shadow tab. -
Page 207: Figure 11-2 Converting To Astro 25 (Example)
11.3 Converting a Key from ASN to ASTRO 25 Select the desired key. Step result: A screen with details for the selected key appears. Figure 11-2 Converting to ASTRO 25 (Example) Select Convert to ASTRO25. Step result: If you have made changes to the key, you are prompted to confirm conversion. Otherwise, you are prompted to provide details for the ASTRO ®... -
Page 208: Converting A Key From Astro 25 To Asn
KVL 4000 Key Variable Loader ASTRO 25 User Guide If you want to convert another key, perform step 2 through step 8 for this key. Otherwise, tap Done to return to the KVL main screen. 11.4 Converting a Key from ASTRO 25 to ASN Prerequisites: Only an Administrator can convert keys. -
Page 209: Figure 11-4 Converting To Asn (Example)
11.4 Converting a Key from ASTRO 25 to ASN Select the desired key. Step result: A screen with details for the selected key appears. Figure 11-4 Converting to ASN (Example) Select Convert to ASN. Step result: If you have made changes to the key, you are prompted to confirm conversion. Otherwise, a screen with the decimal keypad appears, prompting you to enter the Physical ID for the key. -
Page 211: Kvl 4000 - Troubleshooting
KVL 4000 – Troubleshooting 12.1 KVL Error Messages Error messages displayed by the KVL can be divided into two types: • User Entry Errors - Displayed in response to an illegal or disallowed action (such as entering an invalid value, entering a duplicate KID, and so on). See 12.1.1 KVL User Entry Errors, page... -
Page 212: Kvl Operational Errors
KVL 4000 Key Variable Loader ASTRO 25 User Guide Table 12-1 KVL User Entry Errors (cont'd.) Error/Status Message Probable Cause Remedy Error Key could Displayed when you have entered Enter another PID value. not be converted. a duplicate PID value while... - Page 213 12.1.2 KVL Operational Errors Table 12-2 KVL Operational Errors (cont'd.) Error/Status Message Probable Cause Remedy Forward jobs for this target device. Radio has already The KVL has already delivered the Connect to the KMF before been updated. jobs it had to this target device. No attempting another upload to this additional updates can be made.
-
Page 214: Performing A System Reset
KVL 4000 Key Variable Loader ASTRO 25 User Guide Table 12-2 KVL Operational Errors (cont'd.) Error/Status Message Probable Cause Remedy Oops Could not The target device may be Check connection and retry the update radio. disconnected. operation. Check connection. Oops Could not get... -
Page 215: Unlocking The Operator Account
12.3 Unlocking the Operator Account Procedure Steps On the KVL main screen, select Settings → System reset. Alternatively, if user authentication is set on your KVL, press the Windows key on the PDA and hold it for 5 seconds to go to the System Reset screen. Use this option with caution as a system reset resets the KVL to its original state. -
Page 216: Kvl 4000 Disaster Recovery
12.6 Troubleshooting KVL Application and/or VPN Software Failure If you are experiencing problems with the KVL and/or NCP applications, follow “Running the KVL Software Installation Wizard” in the KVL 4000 FLASHPort Upgrade User Guide to reinstall the applications. 6871018P37-F - January 2013 12-6... -
Page 217: Disassembling The Security Adapter
12.7 Disassembling the Security Adapter 12.7 Disassembling the Security Adapter When and where to use: Use these steps to disassemble the Security Adapter. Figure 12-2 Security Adapter – Exploded View Make sure to exit the KVL application on the PDA before disconnecting the Security Adapter. Otherwise, you may lose any unsaved work or cause data corruption. -
Page 218: Figure 12-3 Removing Back Housing
KVL 4000 Key Variable Loader ASTRO 25 User Guide Remove the self-tapping screws and then remove the back housing. Figure 12-3 Removing Back Housing Remove the dust covers from the tongue features on the front housing. Figure 12-4 Removing Dust Covers... -
Page 219: Assembling The Security Adapter
12.8 Assembling the Security Adapter Remove the connectors from the front housing connector holes, disconnect the 30-pins board-to-board connector from the flex to the PCB, and remove the PCB assembly from the front housing. Figure 12-5 Removing PCB Assembly Remove the USB clip from the USB connector and the foam pad from the DB-9 connector on the PCB assembly. Figure 12-6 Removing USB Clip and Foam Pad 12.8 Assembling the Security Adapter Procedure Steps... -
Page 220: Figure 12-7 Assembling Usb Clip
KVL 4000 Key Variable Loader ASTRO 25 User Guide Attach the USB clip to the USB connector on the PCB. Figure 12-7 Assembling USB Clip Attach the foam pad on top of the DB-9 connector. Ensure that the foam pad is aligned to the middle of the DB-9 face. -
Page 221: Figure 12-9 Assembling O-Ring
12.8 Assembling the Security Adapter Dress the O-ring to the O-ring groove at the back housing. Ensure that the O-ring tabs are slotted to the back housing features. Orient the O-ring so that its tabs' size matches the back housing features' size. Figure 12-9 Assembling O-Ring Connect the 30-pins board-to-board connector from the flex to the PCB. -
Page 222: Figure 12-11 Assembling Front Housing - Connectors
KVL 4000 Key Variable Loader ASTRO 25 User Guide Slot the connectors through the front housing connector holes. Figure 12-11 Assembling Front Housing – Connectors Place the PCB assembly to the front housing. Ensure the PCB sits properly on screw bosses. -
Page 223: Figure 12-13 Assembling Dust Covers
12.8 Assembling the Security Adapter Slot in the dust cover retention holes through the tongue features on the front housing. Figure 12-13 Assembling Dust Covers Press down the back housing to the front housing vertically. Before closing the back housing, verify that the USB clip is assembled correctly. -
Page 224: Contacting Motorola
KVL 4000 Key Variable Loader ASTRO 25 User Guide Tighten the back housing with the self-tapping screws (tightening torque: 7 lbf.in). Figure 12-15 Tightening Back Housing 10 Press the dust covers until they are flush with the front housing. Figure 12-16 Pressing Dust Covers Result: The assembly is complete. -
Page 225: Motorola System Support Center And Radio Support Center
• Motorola Radio Support Center: – Phone: 800-247-2346 – Fax: 800-318-0281 The Motorola Radio Support Center repairs mobile and portable radios, and related RF equipment. 12.9.2 North America Parts Organization The North America Parts Organization is your source for manuals, replacement parts, and assemblies. -
Page 227: Appendix A Kvl 4000 - Performance Specifications
Appendix A: KVL 4000 - Performance Specifications Table A-1 Physical Characteristics Item Description KVL (PDA + Security Adapter) Height: 216 mm (8.5 in) Width: 84 mm (3.3 in) Depth: 39 mm (1.5 in) Weight: 473 g Table A-2 Encryption Supported Encryption Protocols 12 kbps Advanced SECURENET ®... -
Page 228: Table A-4 Electromagnetic Compatibility
KVL 4000 Key Variable Loader ASTRO 25 User Guide In the ASN mode, the KVL GUI does not distinguish between DES, DES-XL, and DES-OFB, but you can load keys for all DES types by selecting the DES option. ADP does not support the following features related to OTAR: •... -
Page 229: Appendix B Kvl 4000 - Orderable Parts
Appendix B: KVL 4000 – Orderable Parts Table B-1 KVL 4000 Model Item Count Part Number MC55 Kit (see Table B-2 MC55 Kit) NNTN7864 Security Adapter Super Tanapa (see Table B-3 Security NTN2564 Adapter Super Tanapa) KVL 4000 Documentation CD... -
Page 230: Table B-5 Interface Cables
KVL 4000 Key Variable Loader ASTRO 25 User Guide Table B-5 Interface Cables Adaptor Item Part Number Used with Required Key Load Cable TKN8531 XTL 5000/2500 TRN7414 (W Control Head) HKN6182 (M/O Control Head) XTS 5000/3000/2500 NTN8613 ASTRO Spectra TRN7414... - Page 231 Appendix B KVL 4000 – Orderable Parts Table B-6 Optional Accessories (cont'd.) Item Part Number MultiMobile ™ USB Modem V.92/56K DSMT9234MUCDCXR CradlePoint Technology USB to Ethernet Adapter PS6U1UPE 3600mAH Battery BTRY-MC55EAB02 6871018P37-F - January 2013...
-
Page 233: Appendix C Radio Frequency Interference Requirements
Appendix C: Radio Frequency Interference Requirements C.1 Radio Frequency Interference Requirements – This equipment has been tested and found to comply with the limits for a Class A digital device, pursuant to Part 15 of the FCC Rules. These limits are designed to provide reasonable protection against harmful interference when the equipment is operated in a commercial environment. -
Page 235: Appendix D Acronyms
Key Management Facility Key Management Message Signaling Encryption Key Key Variable Loader Light Emitting Diode Logical ID Motorola Data Communications MGEG Motorola Gold Elite Gateway Message Number Period OTAR Over-the-Air Rekeying Physical ID Radio Network Controller Radio Set Identifier Traffic Encryption Key... - Page 236 KVL 4000 Key Variable Loader ASTRO 25 User Guide Table D-1 Acronyms (cont'd.) Item Description Unique Shadow Key Virtual Private Network WACN Wide Area Communications Network 6871018P37-F - January 2013...