Campbell CR300 Series Getting Started Manual
Compact datalogger
Hide thumbs
Also See for CR300 Series:
- Product manual (321 pages) ,
- Operator's manual (86 pages) ,
- Getting started manual (27 pages)
Table of Contents
Advertisement
Quick Links
Advertisement
Table of Contents

Related Manuals for Campbell CR300 Series


Summary of Contents for Campbell CR300 Series
- Page 1 Revision: 07/10/2020 Copyright © 2000 – 2020 Campbell Scientific, Inc.
-
Page 2: Table Of Contents
Table of Contents 1. Getting started 2. USB or RS-232 communications 3. Cellular communications option 3.1 Pre-installation 3.1.1 Establish cellular service 3.1.1.1 Selecting a data service 3.1.2 Install the SIM card 3.1.3 Konect PakBus Router setup 3.1.3.1 Get started 3.1.3.2 Set up Konect PakBus Router 3.2 Installation 3.2.1 Modules using Konect PakBus Router (private dynamic IP) 3.2.1.1 Configure data logger... -
Page 3: Getting Started
You may not find it necessary to progress beyond this. However, should you want to dig deeper into the complexity of the data logger functions or quickly look for details, extensive information is available in the full CR300 series manual. This exercise will guide you through the following steps:... -
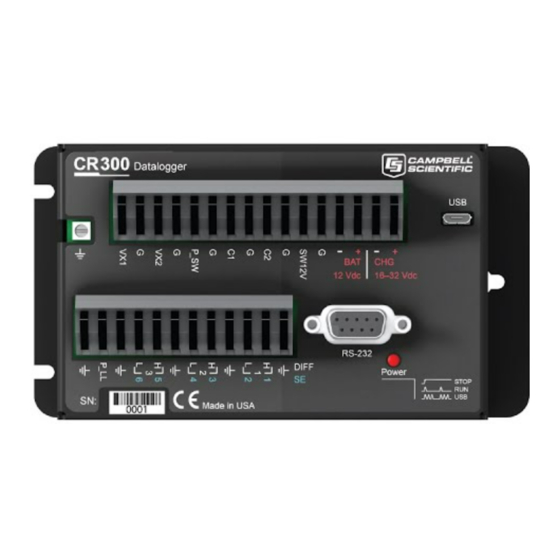
Page 4: Usb Or Rs-232 Communications
4. If prompted, select the Direct Connect connection type and click Next. 5. If this is the first time connecting this computer to a CR300 series via USB, click Install USB Driver, select your data logger, click Install, and follow the prompts to install the USB drivers. - Page 5 RS-232 connections default to 115200 baud. NOTE: Unlike the RS-232 port on some other Campbell Scientific data loggers that autobaud, the CR300 RS-232 port does not. If the hardware and software settings for baud rate and PakBus address do not match, you will not be able to connect.
-
Page 6: Cellular Communications Option
✓ ✓ CELL220 and New automatic Zealand 3G fallback ✓ CELL225 4G LTE Japan More than 600 other providers are available worldwide through Campbell Scientific. 3.1 Pre-installation 3.1.1 Establish cellular service 3.1.2 Install the SIM card 3. Cellular communications option... -
Page 7: Establish Cellular Service
3.1.3 Konect PakBus Router setup 3.1.1 Establish cellular service For better security, we recommend using Konect PakBus® Router with a private dynamic IP address. This method allows only incoming PakBus communication. No other incoming communication is supported. However, all forms of outbound communication from the data logger are supported, including but not limited to PakBus, email, and FTP. -
Page 8: Konect Pakbus Router Setup
FIGURE 3-1. SIM card installation 3.1.3 Konect PakBus Router setup 3.1.3.1 Get started You will need the Konect PakBus Router redemption code that came on a card with the CR300- CELL series. Open a web browser and go to www.konectgds.com. First-time users need to create a free account. -
Page 9: Set Up Konect Pakbus Router
3.1.3.2 Set up Konect PakBus Router 1. Sign in to www.konectgds.com using your Passport ID and Password found in the two received emails. Once logged in, you will be at the Welcome page. 2. Click Devices and services on the command bar to the left and select Redeem PakBus Router Code. -
Page 10: Installation
3.2 Installation 3.2.1 Modules using Konect PakBus Router (private dynamic IP) 3.2.1.1 Configure data logger 3.2.1.2 Set up LoggerNet 3.2.1.3 Test the connection 3.2.1.1 Configure data logger 1. Connect the cellular antenna, if it is not already connected. When using a MIMO antenna with multiple cellular connections, connect the primary cable to Cellular and the secondary to Diversity. - Page 11 3. On the Datalogger tab, change the data logger PakBus Address and PakBus/TCP Password to match the values entered in the Konect PakBus Router setup.The PakBus/TCP Password will make the data logger authenticate any incoming or outgoing PakBus/TCP connection. 4. On the Network Services tab in the PakBus/TCP Client field, enter the DNS address and Port number noted during the Konect PakBus Router setup.
-
Page 12: Set Up Loggernet
10. Click Apply to save the changes. Verify the settings in the summary window. (Recommended) Save a copy of the settings to a file on the computer. Click OK. 11. Click Disconnect and close Device Configuration Utility. 3.2.1.2 Set up LoggerNet The LoggerNet Network Map is configured from the LoggerNet Setup screen. - Page 13 5. Leave the default settings for the PakBusPort. PakBus Port Always Open should not be checked. In the TCP Password field enter the TCP Password; this must match the value entered in the Konect PakBus Router setup and LoggerNet setup. 6.
-
Page 14: Test The Connection
3.2.1.3 Test the connection Use the Connect screen to test the connection. Click on the appropriate station and click Connect to initiate a call to the data logger. The data logger must have 12 V power. TIP: The connection time is subject to many external factors. It is often less than 30 seconds but could be up to 15 minutes. - Page 15 Table 3-1: Signal strength RSSI (3G) RSRP (4G) Quality estimate Excellent -70 or greater -90 or greater Good -71 to -85 -91 to -105 Fair -86 to -100 -106 to -115 Poor less than -100 less than -115 Because signal strength can vary due to multipath, interference, or other environmental effects, it may not give a true indication of communications performance or range.
-
Page 16: Creating A Short Cut Data Logger Program
Use the Short Cut software to generate a program for your data logger. Short Cut is included with your data logger support software. This section will guide you through programming a CR300 series data logger to measure the voltage of the data logger power supply, the internal temperature of the data logger, and a thermocouple. - Page 17 To change the noise rejection or sensor support option for future programs, use the Program menu. 4. A list of Available Sensors and Devices and Selected Measurements Available for Output display. Battery voltage BattV and internal temperature PTemp_C are selected by default.
- Page 18 for Output list. For the example program, select BattV and click the Average button to add it to the Selected Measurements for Output list. Repeat this procedure for PTemp_C and Temp_C. 16. Click Finish and give the program a meaningful name such as a site identifier. Click Save. 17.
-
Page 19: Sending A Program To The Data Logger
5. Sending a program to the data logger TIP: It is good practice is to always retrieve data from the data logger before sending a program; otherwise, data may be lost. See Collecting data (p. 20) for detailed instruction. Some methods of sending a program give the option to retain data when possible. Regardless of the program upload tool used, data will be erased when a new program is sent if any change occurs to one or more data table structures in the following list: Data table name(s) - Page 20 6. Click Details, select the Table Fill Times tab. Ensure that the times shown are expected for your application. Click OK. After sending a program, it is a good idea to monitor the Public Table to make sure sensors are taking good measurements.
-
Page 21: Working With Data
6. Working with data 6.1 Default data tables By default, the data logger includes three tables: Public, Status, and DataTableInfo. Each of these tables only contains the most recent measurements and information. The Public table is configured by the data logger program, and updated at the scan interval set within the data logger program, It shows measurement and calculation results as they are made. -
Page 22: Collecting Data
6.2 Collecting data The data logger writes to data tables based on intervals and conditions set in the CRBasic program. After the program has been running for enough time to generate data records, data may be collected by using data logger support software. During data collection, data is copied to the computer and still remains on the data logger. -
Page 23: Viewing Historic Data
3. Select an option for What to Collect. Either option creates a new file if one does not already exist. New data from data logger (Append to data files): Collects only the data in the selected tables stored since the last data collection and appends this data to the end of the existing table files on the computer. - Page 24 Campbell Scientific regional offices Australia France Thailand Location: Garbutt, QLD Australia Location: Vincennes, France Location: Bangkok, Thailand Phone: 61.7.4401.7700 Phone: 0033.0.1.56.45.15.20 Phone: 66.2.719.3399 Email: info@campbellsci.com.au Email: info@campbellsci.fr Email: info@campbellsci.asia Website: www.campbellsci.com.au Website: www.campbellsci.fr Website: www.campbellsci.asia Brazil Germany Location: São Paulo, SP Brazil...