VeriFone V200c Installation Manual
Hide thumbs
Also See for V200c:
- Installation manual (13 pages) ,
- Getting started manual (4 pages) ,
- Reference manual (66 pages)

Related Manuals for VeriFone V200c


Summary of Contents for VeriFone V200c
- Page 1 V200c and V400c Installation Guide Verifone Part Number DOC420-003-EN-C, Revision C...
- Page 2 Verifone, Inc. The information contained in this document is subject to change without notice. Although Verifone has attempted to ensure the accuracy of the contents of this document, this document may include errors or omissions. The examples and sample programs are for illustration only and may not be suited for your purpose.
-
Page 3: Table Of Contents
ONTENTS ........5 R EF AC E Audience. - Page 4 MOD 10 RS-232 + USB/Mini-USB Multi-Communication Dongle..36 V200c Plus and V400c Plus Additional Features ..... 36...
-
Page 5: Preface
REFACE This guide is the primary source of information for setting up and installing V200c and V400c terminals. Audience This guide describes the card reader’s features, and provides the basic information for its installation and configuration. Organization This guide is organized as follows:... -
Page 6: Conventions And Acronyms
Acronyms. The pencil icon is used to If exchanging cables, use a highlight important information. Verifone-approved cable. NOTE The caution symbol indicates Using an incorrectly rated power possible hardware or software supply can damage the unit or CAUTION failure, or loss of data. - Page 7 REFACE Conventions and Acronyms Table 2 Acronym Definitions (continued) Acronym Definitions PIN Transaction Security QVGA Quarter Video Graphics Array RJ45 Registered Jack 45 modular connector Secure Access Module Smart card Smart card reader Secure Digital Static Data Authentication SDHC Secure Digital High Capacity Subscriber Identity Module SubMiniature version A connector Thin-film transistor...
- Page 8 REFACE Conventions and Acronyms V200 V400 C AND NSTALLATION UIDE...
-
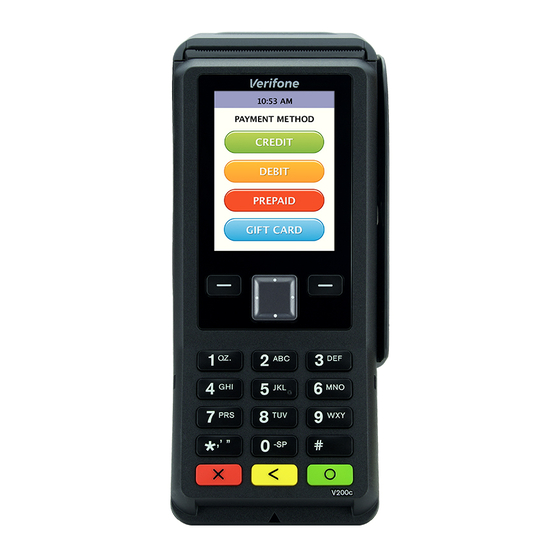
Page 9: Device Overview
Benefits magnetic-stripe card reader (MSR) and smart card (SC) payment processing with a fast internal thermal printer (ITP). The V200c and V400c has a clear color TFT LCD display and the V400c adds touchscreen capability. The V200c CTLS, V200c Plus, V400c, and V400c Plus offer quick contactless (CTLS) functionality. -
Page 10: Performance
Backlit keypad with tactile and audible feedback Security • PCI-approved for debit and other PIN-based transactions: • V200c terminals are PCI PTS POI v4.x and PCI PTS POI v5.x approved • V400c terminals are PCI PTS POI v5.x approved •... -
Page 11: Countertop Performance In A Hand-Over Design
V200c and V400c terminals ensure uncompromising reliability from Verifone, the worldwide leader in e-payment. True Multi- • V200c CTLS, V200c and V400c terminals offer 256MB while the V200c Plus Application and V400c Plus terminals offers 512MB of dynamic memory allocation for the Capability operating system, which supports multiple applications on a single terminal. - Page 12 EVICE VERVIEW Features and Benefits V200 V400 C AND NSTALLATION UIDE...
-
Page 13: Setup Selecting Unit Location
Using the Smart Card Reader • Using the Magnetic Card Reader Verifone ships variants of V200c and V400c terminals for different markets; your NOTE terminal may have a slightly different configuration. This Installation Guide documents features for both V200c and V400c terminals. -
Page 14: Environmental Factors
Visual shields designed into the check-stand. These shields may be solely for shielding purposes, or may be part of the general check-stand design. • Position the V200c and V400c so that it is angled in such a way that PIN spying is difficult. •... -
Page 15: Unpacking The Shipping Carton
• Offer PIN security literature at the point of sale • Use signage to limit the view of V200c and V400c terminals to just that of the cardholder Unpacking the Open the shipping carton and carefully inspect its contents for possible tampering Shipping Carton or shipping damage. -
Page 16: Periodic Inspection
If a label or component appears damaged, immediately notify the shipping company and your Verifone representative or service provider. Periodic Periodically inspect V200c and V400c terminals for possible tampering. Signs of Inspection tampering include: •... -
Page 17: Examining Unit Features
A backlit 12-key keypad Three color-coded function keys below the keypad (icons at right; from left to right: CANCEL, BACKSPACE/CLEAR, ENTER) The V200c has physical navigation and selection keys: 4-way navigation button centered at the top of the keypad, below the LCD screen Two selection keys on the left and right side of the navigation button The V400c terminal uses on-screen navigation and selection keys. -
Page 18: Connection Ports
Notice that the ports are recessed. Different ports provide connections to communications lines, optional peripheral devices, and the power supply. Figure 2 shows how to open the rear cover of the V200c and V400c device. Figure 2 Opening the Rear Cover... - Page 19 ETUP Examining Unit Features Using the connection The connection ports offer multiple connectivity for the V200c and V400c terminal. ports Please refer to the following list of peripheral devices for the connectivity options. NOTE Verifone ships variants of the V200c and V400c terminals for different markets.
-
Page 20: Establishing Communication
Establishing You can connect V200c and V400c terminals to a telephone line and/or Ethernet Communication cable. On V200c and V400c Plus units, you can also connect via Wi-Fi or Bluetooth. Connecting by Connect the telephone cord to the communication port on the terminal, then route... -
Page 21: Connecting By Ethernet Cable
Printer V200c and V400c terminals use rolls of 57 mm wide x up to 40 mm diameter rolls of single-ply, thermal sensitive paper. A pink out-of-paper indicator line appears on the edge of the paper before the end of the roll. - Page 22 ETUP Loading a Paper Roll in the Printer Installing a paper roll Hook your finger under the latch and lift up to swing the paper roll cover open Figure Figure 6 Opening the Printer Cover Remove any partial roll of paper in the printer tray by lifting it up. Loosen the glued leading edge of the new paper roll or remove the protective strip.
-
Page 23: Installing Or Replacing Msam Cards
Electrostatic discharges can damage this equipment. Verifone recommends using a grounded anti-static wrist strap. NOTE Verifone ships variants of the V200c and V400c terminals for different markets. Your terminal may have different features described in this section. Installing or replacing Remove the power pack from the power outlet. -
Page 24: Connecting Optional Devices
Figure 10 Installing an MSAM Card Replace the terminal rear cover. Connecting V200c and V400c devices support multiple peripheral devices designed for use Optional with electronic point-of-sale terminals. Devices Before connecting any peripheral device, remove the power plug from the CAUTION terminal. -
Page 25: Optional Device Connections
Connecting to a PC Figure 11 shows how to connect the V200c and V400c device to a computer via the Multi-Communication port using the MOD 10 RS-232 + Mini-USB Multi- Communication dongle (VPN CBL420-002-02-A). Figure 11... -
Page 26: Connecting To Ecrs
ETUP Connecting Optional Devices Connecting to ECRs V200c and V400c terminals support electronic cash registers (ECRs). Figure 12 shows how to make a peripheral connection to the Multi- Communication port using the MOD 10 RS-232 + USB Multi-Communication dongle (VPN CBL420-002-01-A) -
Page 27: Connecting The Terminal Power Pack
Communication port Figure 14 Sample PIN pad Connection on Multi- Communication Port Connecting the After connecting optional peripherals, prepare to connect the V200c and V400c Terminal Power terminal to your power source. Pack Using an incorrectly rated power supply may damage the terminal or cause it not CAUTION to work as specified. - Page 28 Connect the power cord to the wall outlet. The terminal lights activate when the terminal has power. If the terminal comes pre-loaded with an application, this starts after the initial Verifone copyright screen and usually displays its own copyright screen. V200 V400...
-
Page 29: Installing Privacy Shield
NOTE The following illustrations show V400c examples, but the same privacy shield installation process works for V200c terminals. Insert the pins into the front privacy shield slots of the V200c and V400c terminal. Figure 17 Inserting Front Pins of V200c and V400c Privacy Shield... - Page 30 ETUP Installing Privacy Shield Push down the rear section of the privacy shield until the side pins lock in place. Figure 18 Snapping Side Pins in Place Figure 19 shows an example of a terminal with a privacy shield. Figure 19 Installed Privacy Shield V200 V400...
-
Page 31: Using The Contactless Reader
ETUP Using the Contactless Reader Using the V200c CTLS, V200c Plus, V400c, and V400c Plus units support CTLS functions Contactless when signaled by an application to conduct a contactless (CTLS) smart card Reader transaction. To perform a contactless smart card transaction Gently tap or hold the card (within 4 cm) on the landing zone (see Figure 20). -
Page 32: Using The Smart Card Reader
ETUP Using the Smart Card Reader Using the Smart V200c and V400c terminals support credit or debit card transactions via the smart Card Reader card reader. Smart card transaction procedures may vary from one application to another. Verify the procedure with your application provider before performing a smart card transaction. -
Page 33: Using The Magnetic Card Reader
ETUP Using the Magnetic Card Reader Using the V200c and V400c terminals support credit or debit card transactions via the Magnetic Card magnetic card reader. Reader V200c and V400c terminals use the same magnetic card reader. NOTE Figure 22 shows a V400c example, but the same process works for V200c terminals. - Page 34 ETUP Using the Magnetic Card Reader V200 V400 C AND NSTALLATION UIDE...
-
Page 35: Hapter
HAPTER Specifications This chapter discusses power requirements, dimensions, and other specifications of V200c and V400c units. Part numbers use the following conventions: • V200c M420-xxx-11-xxx • V200c CTLS M420-xxx-01-xxx • V200c Plus M420-xxx-04-xxx • V400c M425-xxx-01-xxx • V400c Plus M425-xxx-04-xxx... -
Page 36: Sam Requirements
• Supports the optional MOD 10 RS-232 + USB/Mini-USB Multi- Communication dongle Display • V200c terminals have a 2.8-inch portrait mode transmissive TFT LCD (QVGA, 240 x 320) • V400c terminals have a 3.5-inch portrait mode capacitive color touchscreen LCD (HVGA, 320 x 480) •... -
Page 37: Hapter
HAPTER Maintenance and Cleaning Maintenance Treat your V200c and V400c terminals with care. They have no user-serviceable parts. The following suggestions will help you protect your warranty coverage. • Do not store the device in hot areas. High temperatures can shorten the life of electronic devices, damage batteries, and warp or melt certain plastics. -
Page 38: Cleaning The Msr
Do not attempt to clean the smart card reader (SCR). Doing so may void any warranty. For smart card reader service, contact your Verifone distributor or service provider. If you find foreign objects in the SCR, send your terminal to a Verifone authorized CAUTION repair center. -
Page 39: Hapter
HAPTER Service and Support For V200c and V400c problems, contact your local Verifone representative or service provider. For device product service and repair information: • USA – Verifone Service and Support Group, 1-800-834-4366, Monday - Friday, 8 A.M. - 8 P.M., eastern time •... -
Page 40: Accessories And Documentation
You will be issued MRA number(s) and the fax will be returned to you. NOTE One MRA number must be issued for each unit you return to Verifone, even if you are returning several of the same model. Describe the problem(s) and provide the shipping address where the repaired or replacement unit must be returned. -
Page 41: Connection Cables
(includes PPL435-010-01-A, PPL425-005-01-A, below) PPL435-010-01-A Stylus with Fixing Cord PPL425-005-01-A Cover with Stylus Holder Documentation VPN DOC420-001-EN V200c Certifications and Regulations Sheet VPN DOC420-002-EN V200c Quick Installation Guide VPN DOC425-001-EN V400c Certifications and Regulations Sheet VPN DOC425-002-EN V400c Quick Installation Guide... - Page 42 ERVICE AND UPPORT Accessories and Documentation V200 V400 C AND NSTALLATION UIDE...
-
Page 43: Troubleshooting Guidelines
HAPTER Troubleshooting Guidelines This chapter lists possible malfunctions that may occur while operating V200c and V400c devices and recommends appropriate corrective actions. If the problem persists - even after performing the outlined guidelines, or if the problem is not described, contact your local Verifone representative for assistance. -
Page 44: Printer Paper Jam
Install printer paper. If the problem persists, it may be due to poor paper quality. Install a new roll of higher-quality paper. CAUTION Poor-quality paper may jam the printer. To order high-quality Verifone paper, refer Accessories and Documentation. Keypad Does... -
Page 45: Peripheral Device Does Not Work
Try a different serial cable. See Connecting Optional Devices. • If the problem persists, contact your local Verifone representative. Transactions There are several reasons why the card reader may not be processing Fail To Process transactions. Use the following steps to troubleshoot failures. -
Page 46: Printer Does Not Print
Printer Does Not Print experiencing difficulties with their line, contact the telephone company and have your line checked. • If the telephone line works, contact your local Verifone representative for assistance. Printer Does Not If the printer does not work properly: Print •... -
Page 47: Hapter
HAPTER Port Pinouts Port Pinout This section contains port pinout tables for V200c and V400c terminals. Definitions Ethernet Port (LAN) Connector Function Description TXD+ Transmit data + TXD- Transmit data - RXD+ Receive data + No connection No connection RXD-... -
Page 48: Usb Pinout (Host Port)
INOUTS Port Pinout Definitions USB Pinout (Host Connector Function Description Port) +5 V 5 V USB Power (600 mA) DATA- USB Host Signal - DATA+ USB Host Signal + USB ID pin/Ground Receptacle Plug RS-232 Port (COM1) Connector Function Description Portpwr Port power (11.6 V typ., (9 to12 V DC) -
Page 49: Usb Mini-B Pinout
INOUTS Port Pinout Definitions USB Mini-B Pinout Connector Function Description 5 V 0 5 V USB Power DATA- USB Device Signal - DATA+ USB Device Signal + Receptacle USB Ground Plug NOTE This USB Mini-B port is part of the RS-232 + Mini-USB Multi-Communication dongle (VPN CBL420-002-02-A). - Page 50 INOUTS Port Pinout Definitions V200 V400 C AND NSTALLATION UIDE...
-
Page 51: A P P En Di
Papier de mauvaise qualité peut provoquer un and create excessive paper dust. To bourrage et de créer excessive de poussière order high-quality Verifone paper, refer de papier. Pour commander - papier de haute to Accessories and Documentation. qualité Verifone, consultez Accessoires et documentation. - Page 52 Respecter les précautions standard lors de la handling electrostatically sensitive manipulation des appareils sensibles aux devices. Electrostatic discharges can décharges électrostatiques. Les décharges damage this equipment. Verifone électrostatiques peuvent endommager cet recommends using a grounded anti- équipement. Verifone recommande d'utiliser static wrist strap.
- Page 53 If you find foreign objects in the SCR, Si vous trouvez des objets de valeur dans le and Cleaning send your terminal to a Verifone SCR envoyez votre terminal à centres de authorized repair center. réparation autorisé Verifone. Do not use Verifone’s recommended...
- Page 54 Verifone, Inc. 1-800-Verifone www.verifone.com V200c and V400c Installation Guide Verifone Part Number DOC420-003-EN-C, Revision C...