Advertisement
Quick Links
DTP2 R 212 Series • Setup Guide
This guide provides instructions for an experienced installer to install, set up, and operate the following Extron DTP2 R 212 Series twisted
pair (TP) switching receivers:
•
DTP2 R 212 — Twisted pair receiver with a range of up 330 feet (100 M) from the transmitter
•
DTP2 R 212 SA — Twisted pair receiver with a range of up 330 feet (100 M) and a built-in audio amplifier
For more information on any subject in this guide, see the DTP2 R 212 Series User Guide, available at www.extron.com.
NOTE:
The receivers switch between a local HDMI input and a TP signal from a compatible DTP transmitter. The switching receivers are
compatible with all Extron DTP2 and legacy DTP products. The receiver and a compatible transmitter are rated for a range of up to
330 feet (100 M).
Installation
Step 1 — Mounting
Turn off or disconnect all equipment power sources and mount the DTP2 R 212 Series as required.
Step 2 — Connections and Settings
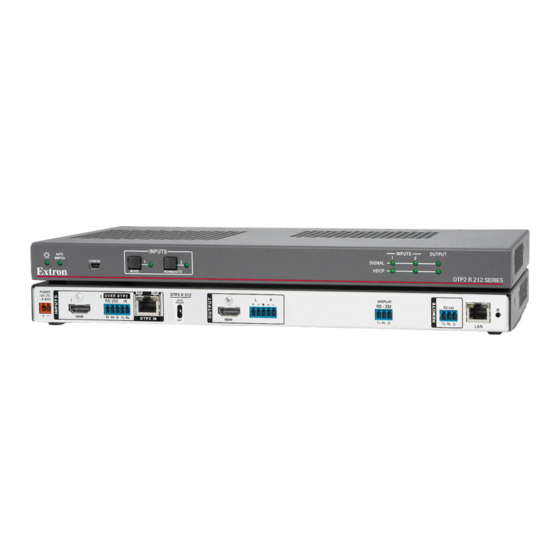
Rear panel
NOTE:
Figure 1 is a composite drawing showing the features of all models. Items
POWER
OVER DTP2
12V
2
RS-232
IR
3.0 A MAX
1
Tx
Rx G
Tx
HDMI
L
A
C
*
DTP2 R 212 SA only
…
DTP2 R 212 only
Figure 1.
DTP2 R 212 SA and DTP2 R 212 Rear Panel
A
HDMI input 1
B
DTP2 input 2
(see
page
C
Over DTP2 connector
D
HDMI output
E
Audio output
*
F
Amplified output
G
Display RS-232 port
A
HDMI input 1 — Plug an HDMI digital video source into the switcher via this HDMI connector. This connector can also
accept DVI video with appropriate adapters. See
Bracket™ to secure the connector to the switcher.
NOTE:
The maximum HDMI cable length is 4.5 m (15 feet).
SIG
LINK
DTP2 R 212 SA
SEND POWER
OFF
Rx
DTP2 IN
HDMI
B
M
D
2)
CLASS 2
4/8 OHM
L
R
WIRING
L
R
*
E
F
*
H
Volume control port
*
I
Volume select switch
J
Remote RS-232 port
K
LAN port
L
Power
M
…
Send Power switch
N
Reset button
HDMI connectors
on page 7 to use the LockIt HDMI Cable Lacing
F
H
I
,
, and
are present on only one model.
VOL
DISPLAY
10V
50mA
RS-232
RS-232
Tx
Rx
G
Tx
Rx G
V
C
G
*
*
G
H
I
J
(see
page
3)
R
LAN
K
N
1
1
Advertisement

Related Manuals for Extron electronics DTP2 R 212 Series


Summary of Contents for Extron electronics DTP2 R 212 Series
- Page 1 DTP2 R 212 Series • Setup Guide This guide provides instructions for an experienced installer to install, set up, and operate the following Extron DTP2 R 212 Series twisted pair (TP) switching receivers: • DTP2 R 212 — Twisted pair receiver with a range of up 330 feet (100 M) from the transmitter •...
- Page 2 DTP2 R 212 Series • Setup Guide (Continued) DTP2 input 2 (see figure 1 on page 1) — Connect an STP cable between a compatible Extron DTP transmitting device LINK RJ-45 and this connector (see TP connectors on page 8 to properly wire the connector and for detailed NOTES).
-
Page 3: Operation
The DTP2 R 212 (non SA model) can either receive from or send power to the connected receiver. Switcher Reset button and LED — Initiates four levels of switcher reset. See the DTP2 R 212 Series User Guide, available at www.extron.com. -
Page 4: Making Connections
DTP2 R 212 Series • Setup Guide (Continued) Mode button page 3)— Press and hold to enable toggling between normal and auto switch modes. (see Normal/Auto Button — Toggles between auto switch and manual mode (see “Selecting the switch mode,” below). - Page 5 TP connectors Both RJ-45 ports, the DTP input port and the LAN (Ethernet) port, use twisted pair cables (see figure 4). Crossover Cable Straight-through Cable Pins: 12345678 End 1 End 2 End 1 End 2 Wire color Wire color Wire color Wire color White-green White-orange...
- Page 6 For information on safety guidelines, regulatory compliances, EMI/EMF compatibility, accessibility, and related topics, see the Extron Safety and Regulatory Compliance Guide on the Extron website. © 2020 Extron Electronics — All rights reserved. www.extron.com 68-2986-50 Rev. A All trademarks mentioned are the property of their respective owners.