Extron electronics DTP3 T 202 User Manual
Hdmi twisted pair transmitters and receivers
Hide thumbs
Also See for DTP3 T 202:
- User manual (47 pages) ,
- Setup manual (4 pages) ,
- User manual (39 pages)

Related Manuals for Extron electronics DTP3 T 202


Summary of Contents for Extron electronics DTP3 T 202
- Page 1 User Guide DTP Systems DTP3 T 202/DTP3 R 201 HDMI Twisted Pair Transmitters and Receivers 68‑3445‑01 Rev. C 09 21...
- Page 2 Safety Instructions...
- Page 3 Copyright © 2021 Extron. All rights reserved. www.extron.com Trademarks All trademarks mentioned in this guide are the properties of their respective owners. ® The following registered trademarks ( ), registered service marks ( ), and trademarks ( ) are the property of RGB Systems, Inc. or Extron (see the current list of trademarks on the Terms of Use page at www.extron.com):...
- Page 4 FCC Class A Notice This equipment has been tested and found to comply with the limits for a Class A digital device, pursuant to part 15 of the FCC rules. The Class A limits provide reasonable protection against harmful interference when the equipment is operated in a commercial environment.
- Page 5 Conventions Used in this Guide Notifications The following notifications are used in this guide: WARNING: Potential risk of severe injury or death. AVERTISSEMENT : Risque potentiel de blessure grave ou de mort. CAUTION: Risk of minor personal injury. ATTENTION : Risque de blessure mineure.
-
Page 7: Table Of Contents
Host-to Unit Instructions ....... 17 Error Message ..........17 Timeout ............17 Using the Command and Response Table ..17 Symbol Definitions ........17 Command and Response Table for SIS Commands ............19 DTP3 T 202 / DTP3 R 201 • Table of Contents... - Page 8 DTP3 T 202 / DTP3 R 201 • Table of Contents viii...
-
Page 9: Introduction
4K @ 60 Hz, 4:4:4, supporting data rates up to 18 Gbps. Both units are HDMI (2.0b and 1.4) and HDCP (2.3 and 1.x) compliant. HDCP, and CEC transmission is negotiated from source to sink. The DTP3 T 202 has EDID Minder ®... -
Page 10: Tp Cable Advantages
EDID Minder automatically manages EDID communication between connected • devices (DTP3 T 202) — EDID Minder ensures that the source powers up properly and reliably outputs content for display. • HDCP 2.3 compliant — Ensures display of content-protected 4K video media and maintains interoperability with earlier versions of HDCP. - Page 11 HDR video. • DTP3 output is compatible with HDBaseT-enabled devices (DTP3 T 202) — The DTP output can be configured to send video and embedded audio, plus bidirectional RS-232 signals to an HDBaseT-enabled display.
-
Page 12: Installation And Operation
Connect control devices. Connect your computer to the front panel Config port (see figure 8, on page 11) to configure and control the transmitter and receiver via SIS commands. Power on the output display. DTP3 T 202 / DTP3 R 201 • Installation and Operation... -
Page 13: Connections
ATTENTION: • The DTP3 T 202 and DTP3 R 201 devices are configured to output power to DTP3 models only. If connected to a non-DTP3 device, set the toggle switch to the DOWN (OFF) position. Failure to turn the power OFF will damage the connected device. -
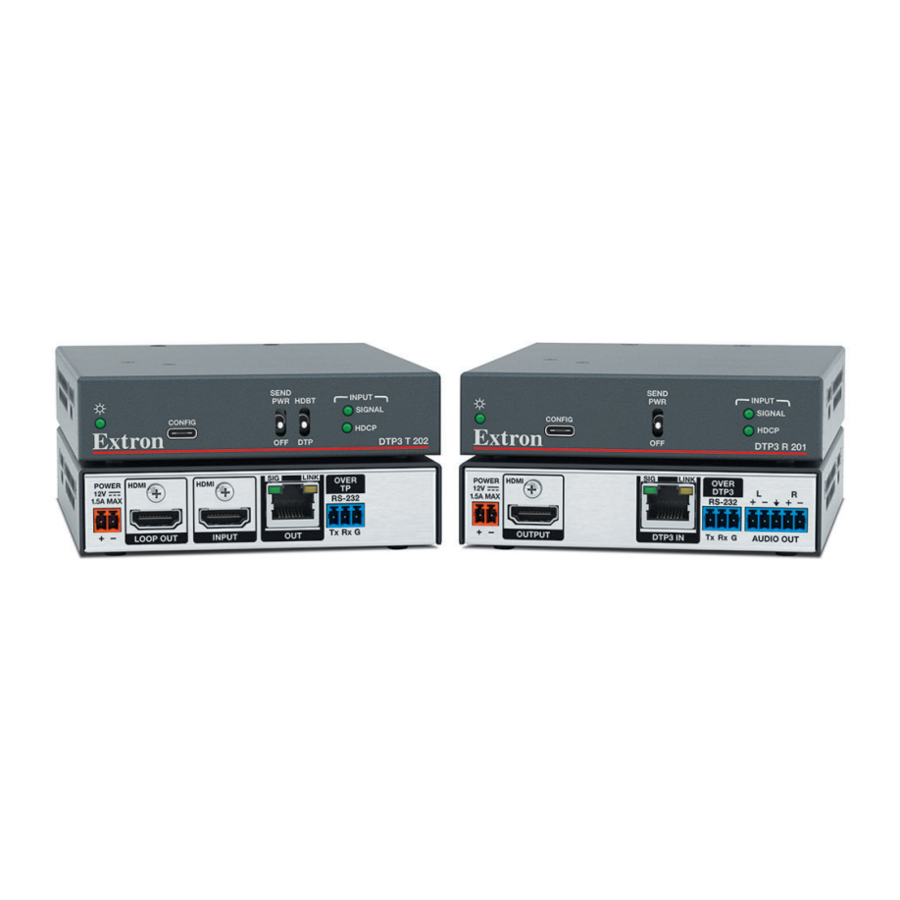
Page 14: Receiver Rear Panel Connections
RJ-45 port. Ensure the opposite end of this cable is connected to the transmitter Output port (see figure 2, on page 5). • Signal LED — This green LED indicates the unit is receiving a TMDS clock signal on DTP3 In port. DTP3 T 202 / DTP3 R 201 • Installation and Operation... - Page 15 S’ils sont trop courts, ils peuvent être tirés facilement, même s’ils sont correctement serrés par les borniers à vis. DTP3 T 202 / DTP3 R 201 • Installation and Operation...
-
Page 16: Securing The Hdmi Connector
N’utilisez pas le câble audiovisuel Skew-Free UTP version améliorée UTP23SF-4 • Extron ou le câble STP201 pour relier les produits XTP à des émetteurs ou récepteurs DTP3. Le DTP3 ne fonctionne pas correctement avec ces câbles. DTP3 T 202 / DTP3 R 201 • Installation and Operation... -
Page 17: Power Supply Wiring
Separate twisted pair cables from AC power cables. Power Supply Wiring A 12 VDC, 2.0 A power supply is provided with the DTP3 T 202 transmitter. Follow these instructions to wire the 2-pole captive screw connector to your power supply: CAUTION: Risk of minor personal injury: •... - Page 18 Si le produit n’est pas fourni avec une source d’alimentation, il doit être utilisé avec une source d’alimentation certifiée UL de classe 2 ou LPS avec une tension nominale de 12 Vcc, 1,8 A minimum (DTP3 T 202) ou 12 Vcc, 1,7 A minimum (DTP3 R 201).
-
Page 19: Rs-232 Connector Wiring
— Lights when the unit is receiving power, either locally or remotely (over the Power LED DTP3 cable). DTP3 T 202 Rear Panel DTP3 T 202 / DTP3 R 201 • Installation and Operation DTP3 R 201 Rear Panel LINK LINK... - Page 20 ATTENTION: • The DTP3 T 202 and DTP3 R 201 devices are configured to output power to DTP3 models only. If connected to a non-DTP3 device, set the toggle switch to the DOWN (OFF) position. Failure to turn the power OFF will damage the connected device.
-
Page 21: Connecting To The Front Panel Usb Port
Connecting a PC to the DTP3 Device Front Panel USB Port If this is the first time the DTP3 device has been connected to the PC, the Found New Hardware Wizard opens (see figure 11). DTP3 T 202 / DTP3 R 201 • Installation and Operation... - Page 22 Windows Update to search the web at this time (for example, if the driver is already on your computer). Click Next ( The next screen of the Wizard opens: Figure 12. Installing the Software Automatically DTP3 T 202 / DTP3 R 201 • Installation and Operation...
-
Page 23: Resetting
Configure the transmitter or receiver as required using SIS Commands (see Configuration and Control on page 16). Resetting Use the SIS command to reset the transmitter or receiver to its factory default settings (see Reset on page 21). DTP3 T 202 / DTP3 R 201 • Installation and Operation... -
Page 24: Sis Configuration And Control
New passwords must be configured to secure the device. • On password-protected connections, there are two levels of protection: administrator and user. Administrators have full access to all editing functions. DTP3 T 202 / DTP3 R 201 • SIS Configuration and Control... -
Page 25: Simple Instruction Set Control
| or } = Soft carriage return (no line feed) = Space • E or W = Escape key NOTE: If unit does not support or recognize the entered commands, nothing happens and no response is issued. DTP3 T 202 / DTP3 R 201 • SIS Configuration and Control... - Page 26 2 = HDBT mode X1% = Password: Maximum length 128 characters. All alpha-numeric characters permitted except |, and “space”. Passwords are case-sensitive and cannot be a single spaced. DTP3 T 202 / DTP3 R 201 • SIS Configuration and Control...
-
Page 27: Command And Response Table For Sis Commands
= Native resolution and refresh rate from currently assigned EDID, for example: 1920x1080 @ 60 Hz. Remote Send Power Switch Send Power switch status RPWR Rpwr Verbose mode 2/3 KEY: = Remote power: = Remote power disabled = Remote power (48 VDC) enabled DTP3 T 202 / DTP3 R 201 • SIS Configuration and Control... - Page 28 Alphanumeric characters and hyphens only. No distinction between upper and lose case. No spaces. First character must be a letter and the last character cannot be a hyphen. DTP3 T 202 / DTP3 R 201 • SIS Configuration and Control...
- Page 29 Absolute system reset to factory All device settings to ZQQQ settings factory default; however, firmware version remains the same. Reset to factory default settings Reset device to factory ZXXX default. DTP3 T 202 / DTP3 R 201 • SIS Configuration and Control...
-
Page 30: Product Configuration Software
For software, either click the Software link ( ) or, if the software is listed, click directly on that link (see the PCS Product Configuration Software link ) and skip to step 5 on page 23). DTP3 T 202 / DTP3 R 201 • Product Configuration Software... - Page 31 Navigate to the folder where the software file was downloaded. Double-click the executable file and follow the on-screen directions to install the software. For Firmware: To install via PCS, see Update Firmware in the Device Menu. DTP3 T 202 / DTP3 R 201 • Product Configuration Software...
-
Page 32: Connecting To Pcs
Extron PCS window opens to the Device Discovery panel (see figure 18). Figure 18. Device Discovery Screen Select the DTP3 R 201 device by clicking on it to highlight it in the list ( Click Connect ( DTP3 T 202 / DTP3 R 201 • Product Configuration Software... -
Page 33: Tcp/Ip Panel
), enter the port number or leave the field blank. PCS scans for the port if blank. NOTE: Select the Show Characters checkbox ( ) to display the password characters. Click the Connect button ( ). A new device tab opens. DTP3 T 202 / DTP3 R 201 • Product Configuration Software... -
Page 34: Software Overview
Show Expanded Device Tabs Selecting Show Expanded Device Tabs from the Software menu displays the device IP address or connection method in the Device tab. Figure 22. Expanded Device Tab DTP3 T 202 / DTP3 R 201 • Product Configuration Software... - Page 35 Click the Details button (figure 24, ) for more information. To display details about third-party software packages and associated licensing, click Licenses ( Click OK ( ) to close the dialog box. DTP3 T 202 / DTP3 R 201 • Product Configuration Software...
-
Page 36: Device Menu
PC. This exported configuration can be saved as a backup file (with a .extz extension), or used to replicate settings from one device to other devices of the same model. When restoring a configuration, select specific device settings. DTP3 T 202 / DTP3 R 201 • Product Configuration Software... - Page 37 DTP3 R 201 PCS Help File) in a separate window. About this Module — Open the About This Module dialog box, with the module • part number and firmware version of the connected device. DTP3 T 202 / DTP3 R 201 • Product Configuration Software...
-
Page 38: Equipment Mounting
Reliable earthing (grounding) — Maintain reliable grounding of rack-mounted equipment. Pay particular attention to supply connections other than direct connections to the branch circuit (for example, use of power strips). DTP3 T 202 / DTP3 R 201 • Equipment Mounting... -
Page 39: Extron Warranty
Extron Warranty Extron warrants this product against defects in materials and workmanship for a period of three years from the date of purchase. In the event of malfunction during the warranty period attributable directly to faulty workmanship and/ or materials, Extron will, at its option, repair or replace said products or components, to whatever extent it shall deem necessary to restore said product to proper operating condition, provided that it is returned within the warranty period, with proof of purchase and description of malfunction to: USA, Canada, South America,...