Milnor 68036M5K Installation And Service
Hide thumbs
Also See for 68036M5K:
- Schematic/electrical parts (83 pages) ,
- Safety manual (79 pages) ,
- Manual (75 pages)
Table of Contents
Advertisement
Quick Links
Advertisement
Table of Contents

Related Manuals for Milnor 68036M5K


Summary of Contents for Milnor 68036M5K
- Page 1 Published Manual Number/ECN: MPI6836MAE/2016362A • Publishing System: TPAS2 • Access date: 08/29/2016 • Document ECNs: Latest Installation and Service 68036M5K, 72046M5K PELLERIN MILNOR CORPORATION POST OFFICE BOX 400, KENNER, LOUISIANA 70063-0400, U.S.A.
-
Page 3: Table Of Contents
Safety Stands BMP150055/2016046A Safety Light Screen Components & Installation BMP150061/2016046A Understanding Tag Guidelines BIUUUI02MK/20160713 Fastener Torque Requirements BIUUUM04/20080506 Safety Placard Use and Placement 48040M7K, 68036M5K, 72046M5K BMP150027/2016046A Guards and Covers BMP150029/2015443A 2. Installation 48040F_, 48040H_, & 68036H_ Washer Extractor Installation BIIFLI01AC/20140321 About the Forces Transmitted by Milnor®... - Page 4 6. Door Assemblies 48" Door Installation BMP150043/2015155A 48" Door Hydraulic Components BMP120050/2015155A 48" Door BMP120047/2015155A Door Latch BIIFGM19/2010285A 7. DRYEL Loading DRYELL Hydraulics 68036M5K, 72046M5K BMP150045/2015155A DRYELL Loading BMP150031/2015155A DRYELL Folding Doors BMP150032/2015155A 8. Water and Steam Water BMP150033/2015292A Balancing Valves 72046M5K...
-
Page 5: Limited Standard Warranty
(unless the time period is specifically extended for certain parts pursuant to a specific MILNOR published extended warranty) from our factory with no operating hour limitation. This warranty is contingent upon the equipment being installed, operated and serviced as specified in the operating manual supplied with the equipment, and operated under normal conditions by competent operators. -
Page 6: How To Get The Necessary Repair Components
• If the component is an electrical component, give the schematic number if known. • If the component is a motor or an electrical control, give the nameplate data from the used component. To write to the Milnor factory: Pellerin Milnor Corporation Post Office Box 400... -
Page 7: Trademarks Of Pellerin Milnor Corporation
Trademarks of Pellerin Milnor Corporation BIUUUD14 (Published) Book specs- Dates: 20140821 / 20140821 / 20140821 Lang: ENG01 Applic: UUU Trademarks of Pellerin Milnor Corporation These words are trademarks of Pellerin Milnor Corporation: Table 1: Trademarks AutoSpot™ E-P Plus® Linear Costa Master™ MilTouch™... -
Page 9: Safety
Safety... -
Page 10: Safety-Tilting Washer-Extractors
The owner/user must familiarize himself with the contents of all machine instruction manuals. The owner/user should direct any questions about these instructions to a Milnor® dealer or the Milnor® Service department. - Page 11 The Safety Guide and other machine manuals must be available at all times to the appropriate personnel. See the machine service manual for safety placard part numbers. Contact the Milnor Parts department for replacement placards or manuals. Maintenance —Ensure the machine is inspected and serviced in accordance with the norms of 1.5.
- Page 12 The following are instructions about hazards related to the cylinder and laundering process. DANGER 7 : Entangle and Sever Hazards—Contact with goods being processed can cause the goods to wrap around your body or limbs and dismember you. The goods are normally isolated by the locked cylinder door. PELLERIN MILNOR CORPORATION...
- Page 13 • Do not operate the machine with any evidence of damage or malfunction. PELLERIN MILNOR CORPORATION...
- Page 14 • Do not tamper with or disable any safety device or operate the machine with a malfunctioning safety device. Request authorized service. • Do not operate a damaged or malfunctioning machine. Request authorized service. • Do not attempt unauthorized servicing, repairs, or modification. PELLERIN MILNOR CORPORATION...
- Page 15 Hazards include but are not limited to panic, burns, poisoning, suffocation, heat prostration, biological contamination, electrocution, and crushing. • Do not enter the cylinder until it has been thoroughly purged, flushed, drained, cooled, and immobilized. — End of BIUUUS27 — PELLERIN MILNOR CORPORATION...
-
Page 16: How To Use The Red Safety Support(S) For Maintenance
When not in use, stow the safety supports as explained herein. Figure 1: Safety Stands for Rubber Spring-resting, Hydraulic-tilt Washer-extractor Models (stowed shown at top, deployed shown at bottom) PELLERIN MILNOR CORPORATION... - Page 17 (the shell is horizontal). Put the Safety Support(s) in Position —Lower the safety stands from within the 2.2. channel as follows: 1. Remove the cotter pins from all six retaining pins. PELLERIN MILNOR CORPORATION...
- Page 18 A location is provided on the machine for stowing the safety bar when not in use. — End of BIUUUS06 — PELLERIN MILNOR CORPORATION...
-
Page 19: Safety Stands
BMP150055/2016046A Page (1 / 3) Safety Stands 48040M7K, 68036M5K, 72044M5K Figure 1: Safety Stands 68036M5K, 72046M5K 5,6,7 5,6,7 Safety stands stored Safety stands released and locked in place 68036M5K, 7246M5K Remove pins and drop legs. (Both Extend legs and install pins and sides) cotter pins. - Page 20 BMP150055/2016046A Page (2 / 3) Safety Stands 48040M7K, 68036M5K, 72044M5K Figure 2: Safety Stands - 48040M7K Safety Stands Stored Install pins and cotter pins, both Remove pins and drop legs, both sides. sides. 5,6,7 5,6,7 Safety stands down and locked in place...
- Page 21 BMP150055/2016046A Page (3 / 3) Safety Stands 48040M7K, 68036M5K, 72044M5K Parts List—Safety Stands Find the correct assembly first, then find the needed components. The item letters (A, B, C, etc.) assigned to assemblies are referred to in the "Used In" column to identify which components belong to an assembly. The item numbers (1, 2, 3, etc.) assigned to components relate the parts list to the illustration.
-
Page 22: Safety Light Screen Components & Installation
BMP150061/2016046A Page (1 / 3) Safety Light Screen Components & Installation 48040M7K, 68036M5K, 72046M5K Figure 1: Replacement parts PELLERIN MILNOR CORPORATION PELLERIN MILNOR CORPORATION... - Page 23 BMP150061/2016046A Page (2 / 3) Safety Light Screen Components & Installation 48040M7K, 68036M5K, 72046M5K Figure 2: Safety Light Screen Installation Detail: Stand Placement Mirror Mirror Stand Stand Detail: Stand base mounting hole pattern Post level Receiver Emitter Pole (supplied) leveling...
- Page 24 Page (3 / 3) Safety Light Screen Components & Installation 48040M7K, 68036M5K, 72046M5K Parts List—Safety Light Screen Components & Installation Find the correct assembly first, then find the needed components. The item letters (A, B, C, etc.) assigned to assemblies are referred to in the "Used In"...
- Page 25 Tag Guidelines for the Models Listed Below BIUUUI02MK (Published) Book specs- Dates: 20160713 / 20160713 / 20160713 Lang: ENG01 Applic: 48040M7K 68036M5K 72046M5K Tag Guidelines for the Models Listed Below 48040M7K 68036M5K 72046M5K Notice 1 : This information may apply to models in addition to those listed above. It applies to paper tags.
- Page 26 Read the manuals before proceeding. This symbol appears on most tags. The machine ships with safety, operator, and routine maintenance guides for customer use. Milnor dealer manuals for installing, servicing, and commissioning this machine are also available from the Milnor Parts department.
- Page 27 Most, but not all shipping restraints display the color red. Some shipping restraints are also safety stands. Do not discard these. B2T2004027: Steam connection (optional) — End of BIUUUI02 — PELLERIN MILNOR CORPORATION...
-
Page 28: Fastener Torque Requirements
If fastener torque specifications or threadlocking compound requirements in an assembly document vary from the specifications in this document, use the assembly document. Figure 1: Common Bolts Used in Milnor Equipment Bolt Head Identifying Marks Legend SAE Grades 1 and 2, ASTM A307, and stainless steel... - Page 29 Table 3: Torque Values for Plated Fasteners 5/16-inch and Smaller Bolt Grade Grade 2 Grade 5 Grade 8 Grade BC Bolt Size Pound-Inches Pound-Inches Pound-Inches Pound-Inches 1/4 x 20 1/4 x 28 5/16 x 18 5/16 x 24 PELLERIN MILNOR CORPORATION...
- Page 30 With Threadlocking Compound 1.1.2. Table 5: Threadlocking Compound Selection by Bolt Size Bolt Size LocTite Product 1/4" 1/4" – 5/8" 5/8" – 7/8" 1" + LocTite 222 LocTite 242 LocTite 262 LocTite 272 High temperature LocTite 277 PELLERIN MILNOR CORPORATION...
- Page 31 Table 8: Torque Values for Applications of LocTite 262 Bolt Grade Grade 2 Grade 5 Grade 8 Grade BC Bolt Size Pound-feet Pound-feet Pound-feet Pound-feet 3/4 x 10 3/4 x 16 7/8 x 9 7/8 x 14 PELLERIN MILNOR CORPORATION...
- Page 32 Table 11: Torque Values for Stainless Steel Fasteners 5/16-inch and Smaller 18-8 Stainless with 316 Stainless 18-8 Stainless Loctite 767 Nominal Pound- Pound- Pound- Bolt Size Inches Inches Inches 1/4 x 20 1/4 x 28 5/16 x 18 5/16 x 24 PELLERIN MILNOR CORPORATION...
- Page 33 CAUTION 2 : Malfunction Hazard—Improper application of threadlocking compounds may result in fasteners becoming loose from impact, heat, or vibration. Loose fasteners can cause the equipment to malfunction. • Read and follow the threadlocking compound manufacturer's instructions and warnings. PELLERIN MILNOR CORPORATION...
- Page 34 No threadlocking compound here Cover this area Nut depth Disassembly —For low-strength and medium-strength products, disassemble with hand tools. 3.3. For high-strength products, apply localized heat for five minutes. Disassemble with hand tools while the parts are still hot. PELLERIN MILNOR CORPORATION...
- Page 35 Fastener Torque Requirements Figure 4: Disassembly Use Localized Heat Legend Soldering gun heating small fastener Torch heating large fastener — End of BIUUUM04 — PELLERIN MILNOR CORPORATION...
- Page 36 BMP150027/2016046A Page (1 / 2) Safety Placard Use and Placement 48040M7K, 68036M5K, 72046M5K On steam pipe if equipped REAR VIEW LEFT VIEW FRONT VIEW RIGHT VIEW Notes: 1. Replace placard immediately, if removed or unreadable. 2. Approximate locations of placards are shown. Mounting holes are provided on the machine. Use #8 self-tapping screws.
- Page 37 Page (2 / 2) Safety Placard Use and Placement 48040M7K, 68036M5K, 72046M5K Parts List—Safety Placard Use and Placement Find the correct assembly first, then find the needed components. The item letters (A, B, C, etc.) assigned to assemblies are referred to in the "Used In"...
-
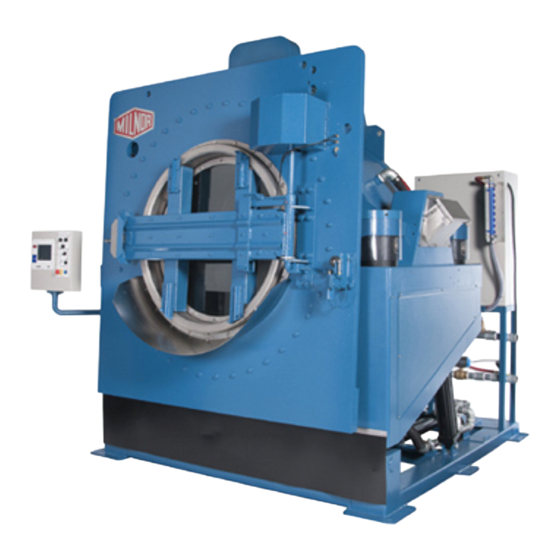
Page 38: Guards And Covers
BMP150029/2015443A Page (1 / 5) Guards and Covers 48040M7K, 68036M5K, 72046M5K Figure 1: Installed view 6836M5K shown PELLERIN MILNOR CORPORATION PELLERIN MILNOR CORPORATION... - Page 39 BMP150029/2015443A Page (2 / 5) Guards and Covers 48040M7K, 68036M5K, 72046M5K Figure 2: Drive covers Brake cover 6836M5K Drive Covers Brake cover not shown 26,27,28 26,27,28 Jackshaft & motor cover 7246M5K Drive Covers PELLERIN MILNOR CORPORATION PELLERIN MILNOR CORPORATION...
- Page 40 BMP150029/2015443A Page (3 / 5) Guards and Covers 48040M7K, 68036M5K, 72046M5K Figure 3: Rear Belt Guard 7246M5K shown Detail See Detail A. See Detail B. 11,16 17,18 27,28,29 Typical 23,24,25 Locking Bolts Detail A Detail B Detail C Pivot shaft Pivot shaft “Locking”...
- Page 41 BMP150029/2015443A Page (4 / 5) Guards and Covers 48040M7K, 68036M5K, 72046M5K Figure 4: Rear Belt Guard & Door Torque Motor Cover 48040M7K Rear Belt Guard Parts List—Guards and Covers Find the correct assembly first, then find the needed components. The item letters (A, B, C, etc.) assigned to assemblies are referred to in the "Used In"...
- Page 42 BMP150029/2015443A Page (5 / 5) Guards and Covers 48040M7K, 68036M5K, 72046M5K Parts List—Guards and Covers Find the correct assembly first, then find the needed components. The item letters (A, B, C, etc.) assigned to assemblies are referred to in the "Used In"...
-
Page 43: Installation
Installation... -
Page 44: 48040F_, 48040H_ & 68036H_ Washer Extractor Installation
Do not hesitate to file a claim with the carrier if the machine is damaged in any way during shipment. Milnor will be glad to assist you in filing your claim, but is not responsible for any shipping damage to the machine once it has been delivered to the carrier in good condition. - Page 45 It is occasionally possible to reduce the overall dimensions by removing piping or other special modifications. Consult Milnor for additional information. 2. Sufficient clearance must be provided for normal operation and maintenance procedures.
- Page 46 Re-install the weldment as shown in Figure 4 and store the shims underneath the mid frame as shown in Figure 5. Retain center bolts in the event that the machine is moved. PELLERIN MILNOR CORPORATION...
- Page 47 Cup weldment when setup for operation Figure 5: Shims stored under the mid frame Before Tilting Machine WARNING 5 : Crush/Sever hazard—Tilting mechanisms can crush or sever parts of your body caught in them. PELLERIN MILNOR CORPORATION...
- Page 48 7). Remove these bolts after machine is anchored and grouted, service connections are complete and all other installation steps are complete. Figure 6: Safety stand in place Figure 7: Tilting Mid Frame to Floor Locking Bolts — End of BIIFLI01 — PELLERIN MILNOR CORPORATION...
-
Page 49: About The Forces Transmitted By Milnor® Washer-Extractors
• the liquor level and chemical conditions in the bath preceding extraction, and • other miscellaneous factors. ® Estimates of the maximum force normally encountered are available for each Milnor model and ® size upon request. Floor or foundation sizes shown on any Milnor... - Page 50 All data is subject to change without notice and may have changed since last printed. It is the sole responsibility of every potential owner to obtain written ® confirmation that any data furnished by Milnor applies for the model(s) and serial number(s) of the specific machines.
-
Page 51: Shipping Brackets
BMP150056/2016046A Page (1 / 2) Shipping Brackets 48040M7K, 68036M5K, 72046M5K Tilt Frame to Base (2 places) Shell to Tilt Frame (4 places) (6 places per stand) 11,12,13 9,10 Section A-A (4 places) 14,15,16 (8 places) Electric boxes, water inlets, and hydraulic tank are not shown. - Page 52 BMP150056/2016046A Page (2 / 2) Shipping Brackets 48040M7K, 68036M5K, 72046M5K Parts List—Shipping Brackets Find the correct assembly first, then find the needed components. The item letters (A, B, C, etc.) assigned to assemblies are referred to in the "Used In" column to identify which components belong to an assembly. The item numbers (1, 2, 3, etc.) assigned to components relate the parts list to the illustration.
-
Page 53: Service Connections
Ball valve size Equivalent globe valve size 1-1/4" normal flow 2-1/2" 1-1/2" normal flow 2-1/2" 2" normal flow 3" Piped Inlet Specification Piped inlet requirements are as follows (see dimension drawings for sizes and locations of connection points): PELLERIN MILNOR CORPORATION... - Page 54 Therefore, the rotation of a three-phase machine must be observed and corrected when the machine is first installed. If it is necessary to reverse the rotation, simply swap the incoming power lines to the PELLERIN MILNOR CORPORATION...
- Page 55 The sizes of these fuses and wires, along with the motor fuses supplied with the machine, depend on the machine voltage. See the fuse and wire sizing information in the schematic manual and on the machine nameplate. — End of BIIFUI01 — PELLERIN MILNOR CORPORATION...
-
Page 57: Drive
Drive... -
Page 58: Drive Chart 68036M5K
X2 21923 PLATE=PULLEY PULL UP, 4840F 15K232A HEXCAPSCR 3/4-10X2 GR8 ZINC 15U321H FLTWASH 3/4 HARD ASTM F436 56050B8SK VPUL 8G5.0B TYPE SK(MASKA 8B54) WT.14LBS 56Q2CSK 2+1/8" BUSHING VPUL QD TYPE SK (SPLIT BUSHING) 56VB171XB4 VBAND 4RBX171 EACH =1 PELLERIN MILNOR CORPORATION... -
Page 59: Drive Chart 72046M5K
BMP150035/2015155A Page (1 / 2) Drive Chart 7246M5K PELLERIN MILNOR CORPORATION PELLERIN MILNOR CORPORATION... - Page 60 VPUL 10G5V8.4PD/8.50D E QD 15E239 3/4" X 3/4" X 5.00" KEY 561130S8F VPUL 8G5V11.30 QD TYPE F 56Q2RF 2+7/8" BUSH VPUL QD TYPE F 56VB750XB4 VBAND 4RBX750 560710S8SF VPUL 8G5V7.10 QD TYPE SF 56Q1RSF 1+7/8" BUSH VPUL QD TYPE SF PELLERIN MILNOR CORPORATION...
-
Page 61: Motor Mount 48040M7M
BMP150036/2015386A Page (1 / 2) Motor Mount 48040M5K, 6836M5K Figure 1: 68036M5K 6,7,12 (4 Places) Places 15,16 17,18 (2 places) 6,7,12 (4 Places) Places Places PELLERIN MILNOR CORPORATION PELLERIN MILNOR CORPORATION... -
Page 62: Motor Mount 72046M5K
LOKWASHER MEDIUM 5/8 ZINCPL 15G238 HXNUT 5/8-11UNC2B SAE ZINC GR2 17R031A13A THRD ROD 1-8 X 13" GR8 ZNPL 15G250 HXNUT 1-8UNC2B SAE ZNC GR2 15U393 FLTWASH 1" HARD ASTM F436 17W060 SPHERICALWASHER SET 1" M/F 15K226L HEXCAPSCW 5/8-11X3.5 GR8 ZINC PELLERIN MILNOR CORPORATION... - Page 63 03 17130 4840M EXTRACTOR MOTOR PLATE W3 17142 BRAKE TEFC MOTOR TORQARM-4840M 02 21859C BRAKE TORQUE ARM,4840 CAST 15K151 HXCAPSCR 1/2-13UNC24X1.25 GR5 15U300 LOKWASHER REGULAR 1/2 ZINC PLT 15U490 FLTWASH 1+1/2X17/32X1/4 ZINC 15G230 HXNUT 1/2-13UNC2B SAE ZINC GR2 PELLERIN MILNOR CORPORATION...
- Page 64 Page (1 / 2) Motor Mount 7246M5K Torque arm Typical rear bolt 2 places 17,20,19,6 17 6 25,26 Typical 21,22,23,24 6 places 17,20 19,6 Typical Typical 2 places 4 places Typical 4 places Typical 8 places PELLERIN MILNOR CORPORATION PELLERIN MILNOR CORPORATION...
- Page 65 LOKWASHER MEDIUM 5/8 ZINCPL 15U314 FLATWASHER(USS STD) 5/8" ZNC P 15K171B HEXCAPSCR 1/2-13X1+3/4 GR8 ZIN 15U300 LOKWASHER REGULAR 1/2 ZINC PLT 02 11603C WASHER DBLR=1.5W/CUTOFF SIDE 15G230 HXNUT 1/2-13UNC2B SAE ZINC GR2 15K173A HXCAPSCR 1/2-13UNC2AX1.75 GR5 02 19283 NUT=1/2-13UNCX1+1/2SQ SPEC PELLERIN MILNOR CORPORATION...
- Page 66 BMP150049/2015155A Page (1 / 3) Jackshaft 72046M5K Figure 1: Jackshaft Installation Detail A Detail B (Uses 2) (As required) 24,25,26 27,28 24,25,26 Detail A 27,28 (Bolt front and back, 4226SR2 shown) Detail B PELLERIN MILNOR CORPORATION PELLERIN MILNOR CORPORATION...
- Page 67 BMP150049/2015155A Page (2 / 3) Jackshaft 72046M5K Figure 2: Jackshaft Bearing and lubrication 13,14 13,14 Section B-B 10,23 23,11 Section A-A 12,23 Insert all 1/2” fasteners hand tight. Then, torque in the sequence shown, front and back. PELLERIN MILNOR CORPORATION...
- Page 68 HXNUT 5/8-11UNC2B SAE ZINC GR2 20C007H THDLK REMVBL-#24221 5N0C03AG42 NPT NIP 1/8X3 TBE GALSTL SK40 5SCC0CBE NPT COUP 1/8 BRASS 125# 103A-A 54M025 HYDFIT 1/8"-90 ALEMITE 1613-B 15K151 HXCAPSCR 1/2-13UNC24X1.25 GR5 15U300 LOKWASHER REGULAR 1/2 ZINC PLT PELLERIN MILNOR CORPORATION...
- Page 69 BIIFGM08 (Published) Book specs- Dates: 20150812 / 20150812 / 20150812 Lang: ENG01 Applic: IFG Cylinder Installation 68036F5N, 68036H5N, 68036H5K, 68036M5K, 72046M5K Figure 1: Cylinder Installation Cross Section Legend Detailed view, Top connection between the shell front and the shell side sheet...
- Page 70 Cylinder Installation 68036F5N, 68036H5N, 68036H5K, 68036M5K, 72046M5K Figure 2: Shell front, Shell, Cylinder Detailed views Legend Detailed view, Top connection between the shell front and the shell side sheet Detailed view, Bottom connection between the shell front and the shell side sheet...
- Page 71 Figure 4: Shell Top view Legend Shell There are four plugs in the shell. There are two on each side of the shell. For maintenance, replace the plugs with the bolts that hold the cylinder. PELLERIN MILNOR CORPORATION...
- Page 72 Cylinder Installation 68036F5N, 68036H5N, 68036H5K, 68036M5K, 72046M5K Table 1: Parts List—Cylinder Installation Find the assembly for your machine and the letter shown in the "Item" column. The components for your machine will show this letter or the word "all" in the "Used In" column. The numbers shown in the "Item"...
-
Page 73: Bearing Housing Components And Installation: 68036F5N
BIIFGM07 (Published) Book specs- Dates: 20150813 / 20150813 / 20150813 Lang: ENG01 Applic: IFG Bearing Housing Components and Installation: 68036F5N, 68036H5N, 68036H5K, 68036M5K, 72046M5K Figure 1: Cylinder and Bearing Installation Cross Section Legend AA. Cross Section, Cylinder and Bearing Installation AB. - Page 74 Bearing Housing Components and Installation: 68036F5N, 68036H5N, 68036H5K, 68036M5K, 72046M5K Figure 2: Detail view of the bearing housing front Detailed view Legend Apply primer and adhesive to all bolts. AD. Detailed view, Seal sleeve Cylinder Shell rear Grease inlet for the front bearing...
- Page 75 Detailed view Legend Apply primer and adhesive to all bolts. Pulley Grease inlet for the rear bearing Grease outlet for the rear bearing instances, 5 not shown instances, 4 instances, 10 Grease outlet for the rear bearing PELLERIN MILNOR CORPORATION...
- Page 76 Bearing Housing Components and Installation: 68036F5N, 68036H5N, 68036H5K, 68036M5K, 72046M5K Figure 4: Seal sleeve Detailed view Legend Apply primer and adhesive to all bolts. instances, 8 instances, 10 PELLERIN MILNOR CORPORATION...
- Page 77 Refer to the document BIIFGM08. Figure 6: Bearing housing Additional Views Legend DD. Detailed view, Grease inlet for the seals Detailed view , Grease outlet for the seals Detailed view, Compressed air inlet for the outer seal PELLERIN MILNOR CORPORATION...
- Page 78 Bearing Housing Components and Installation: 68036F5N, 68036H5N, 68036H5K, 68036M5K, 72046M5K Table 1: Parts List—Bearing Housing Components and Installation Find the assembly for your machine and the letter shown in the "Item" column. The components for your machine will show this letter or the word "all" in the "Used In" column. The numbers shown in the "Item"...
- Page 79 Flexible tubing, Adapter, .163"OD 53A500 Flexible tubing,Adapter, 1/4" 53A059A Nut, 1/4" 53A031B Pipe Fitting, Elbow, .25X1/8 53A007B Pipe Fitting, .25X.25 60E004TC Flexible tubing, 1/4"ODX.17ID 60C107 O-ring, .375X1/16 03 17190 Gasket, Seal holder, Rear — End of BIIFGM07 — PELLERIN MILNOR CORPORATION...
-
Page 80: Air Injection Components
Detailed views Legend Compressed air to the bearing seal coil Bearing seal coil Compressed air to the pressure regulator Compressed air from the bearing seal coil Compressed air to the bearing Compressed air to the bearing pressure switch PELLERIN MILNOR CORPORATION... - Page 81 Hydraulic fitting; Tube fitting nut; 1/4 53A500 Hydraulic fitting; Sleeve; 1/4; Brass 53A501 Hydraulic fitting; Insert; 1/4; Brass 60E004TE Tubing; Round; 0.25; NYLON 53A005B Hydraulic fitting; Hose end straight connector; 60E004TC Tubing; Round; 0.25; NYLON — End of BIIFLM09 — PELLERIN MILNOR CORPORATION...
- Page 82 During parts of this procedure when you open up the calipers or hydraulic lines, put a cloth under Tip: the calipers to catch hydraulic fluid and parts that will fall. For safety, fully remove spilled hydraulic fluid after brake maintenance. This will help you easily identify leaks. PELLERIN MILNOR CORPORATION...
- Page 83 Note 1: The brakes shown in this document can look different from your equipment. Note 2: Do this inspection when the maintenance schedule tells it is necessary. Do this inspection after you replace friction pads or do a caliper overhaul. PELLERIN MILNOR CORPORATION...
- Page 84 Attach the new pad to the piston. Tighten the screw. c. Make sure that the screw head is fully in the recess in the pad. 6. Make sure that the connection o-rings are clean and in their positions (Figure 2, item 7). PELLERIN MILNOR CORPORATION...
- Page 85 7. Put the caliper halves in their positions on the brake assembly. Tighten the mounting bolts to 30 foot-pounds (41 Newton-meters). 8. Bleed the brake. See Section 4 “How to Change Hydraulic Fluid and Remove (Bleed) Air from the Brake Circuit ”. 9. Supply electrical power to the machine. PELLERIN MILNOR CORPORATION...
- Page 86 2, item 7) and the hole in the spacer (Figure 2, item 10). When you disconnect the calipers, hydraulic fluid can flow from the hole at the connection O-rings. Air can get in the line. After you connect the calipers, you must bleed the system. PELLERIN MILNOR CORPORATION...
- Page 87 The Vacula suction pump can do the work more quickly than by gravity and pressure in the Tip: hydraulic cylinder. It is also cleaner because all of the hydraulic fluid goes into the container supplied. It helps you not spill the hydraulic fluid. PELLERIN MILNOR CORPORATION...
- Page 88 Section 4.3 Section 4.4. Figure 3: Pumps Used to Remove Hydraulic Fluid Quickly Alternative Pumps for Suction of Hydraulic Fluid Legend A manual suction pump The Vacula suction pump uses compressed air and holds used hydraulic fluid. PELLERIN MILNOR CORPORATION...
- Page 89 2. Apply electrical power to the machine. Release the brake. 3. See the part of the machine reference manual that tells how to operate the outputs manually. PELLERIN MILNOR CORPORATION...
- Page 90 A view of the brake rod and related components Legend The brake cylinder The rod for the brake cylinder The rod for the air cylinder The air cylinder Two nuts to lock the rods together The slot to see the nuts PELLERIN MILNOR CORPORATION...
- Page 91 M1 First mark at the view slot -- the brake released M2a. Second mark--one possible position -- the brake applied M2b. Second mark-- a different position -- the brake applied AT. Air tubing (See Figure 1,1). Air releases the brake. Spring applies the brake PELLERIN MILNOR CORPORATION...
- Page 92 1, item 1). One supplies compressed air from an air valve. The other sends this compressed air to a pressure switch. If you remove one of the two tubes when compressed air is there, you will apply the brake. 1. Disconnect the air tubing (Figure 1, item 1). PELLERIN MILNOR CORPORATION...
- Page 93 6.5. spring pressure, it will have a pressure regulator. Make sure that you adjust the air pressure of the second brake (Figure 7, item 2) to 10 – 12 PSI (0.7-0.84 kg/cm-cm). — End of BIEUUM01 — PELLERIN MILNOR CORPORATION...
-
Page 94: Disc Brake
BMP120026/2015435A Page (1 / 3) Disc Brake M9V4840_, M7V4836_, 68036F_, 68036H5_, 48040M7K, 68036M5K, 72046M5K 6836H5N Shown 15,16, 17,18 6,33 12,13,14 PELLERIN MILNOR CORPORATION... - Page 95 BMP120026/2015435A Page (2 / 3) Disc Brake M9V4840_, M7V4836_, 68036F_, 68036H5_, 48040M7K, 68036M5K, 72046M5K 22,23 27,30,31,32 Caliper Repair Kit: A double caliper is shown. 20B* The repair kit is used for single 20C* calipers also. 20D* 20E* 20F* * - 2 per kit...
- Page 96 Page (3 / 3) Disc Brake M9V4840_, M7V4836_, 68036F_, 68036H5_, 48040M7K, 68036M5K, 72046M5K Parts List—Disc Brake Find the correct assembly first, then find the needed components. The item letters (A, B, C, etc.) assigned to assemblies are referred to in the "Used In"...
-
Page 97: Air Cylinder Components And Installation
If you tighten the locknut too much, this will cause the incorrect shape. This can stop air cylinder movement. Figure 1: Compare Piston Cup Shapes Correct shape Incorrect shape Legend Lock nut Piston cup, Correct shape Piston cup, Incorrect shape Air Cylinder Components Figure 2: Air cylinder PELLERIN MILNOR CORPORATION... - Page 98 51V015 Pipe Fitting; Tee; 1/4 53A008B Hydraulic fitting; Hose end straight connector; 5SCC0EBE Pipe FittingCoupling; 1/4; 15G185 Nut; Hex; 5/16; 18 20L601F Identification tag; "F" 20L601X Identification tag; "X" 27A005A Muffler; 1/4" — End of BIIFLM11 — PELLERIN MILNOR CORPORATION...
-
Page 99: Frame And Tilt
Frame and Tilt... -
Page 100: Frame Pivots And Tilt Stops
BMP150038/2015386A Page (1 / 4) Frame Pivots and Tilt Stops 48040M7K, 68036M5K, 72046M5K Figure 1: Frame Pivots (68036M5K Shown) (2 places) 13,14,15,16 (4 places) Tilt (3 places) 14,15,16,17 frame Pivot shaft Base shims frame (2 per) 13,14,15 (2 places) View A-A: Frame Pivots, left & right... - Page 101 Frame Pivots and Tilt Stops 48040M7K, 68036M5K, 72046M5K Figure 2: Tilt Stops 22,23 24,25 22,23 18,19 24,25 20,21 View C-C: Tilt stops 68036M5K (4 places) Center back tilt stop 18,19 20,21 22,23 22,23 24,25 24,25 Tilt Stops 72046M5K (left & right)
- Page 102 BMP150038/2015386A Page (3 / 4) Frame Pivots and Tilt Stops 48040M7K, 68036M5K, 72046M5K Figure 3: Tilt Stops (48040M7K Shown) Tilt Frame Rear Stops 12,22,23,24,25 18,19 18,19 20,21 20,21 22,23 22,23 24,25 24,25 View D-D: 48040M7K (2 places) View E-E: 48040M7K (2 places)
- Page 103 Page (4 / 4) Frame Pivots and Tilt Stops 48040M7K, 68036M5K, 72046M5K Parts List—Frame Pivots and Tilt Stops Find the correct assembly first, then find the needed components. The item letters (A, B, C, etc.) assigned to assemblies are referred to in the "Used In"...
-
Page 104: Suspension: Marshmellow Springs & Shocks
BMP150048/2015443A Page (1 / 3) Suspension: Marshmellow Springs & Shocks 48040M7K, 68036M5K, 72046M5K Figure 1: Marshmellow Springs Shell Marsh- mellow spring Tilt frame Section A-A: Marshmellow Springs (4 places) PELLERIN MILNOR CORPORATION PELLERIN MILNOR CORPORATION... - Page 105 BMP150048/2015155A BMP150048/2015443A Page (2 / 3) Suspension: Marshmellow Springs & Shocks 48040M7K, 68036M5K, 72046M5K Figure 2: Shock Absorbers View B-B: Shock Absorbers (4 places) Parts List—Marshmellow Springs & Shocks Find the correct assembly first, then find the needed components. The item letters (A, B, C, etc.) assigned to assemblies are referred to in the "Used In"...
- Page 106 Page (3 / 3) Suspension: Marshmellow Springs & Shocks 48040M7K, 68036M5K, 72046M5K Parts List—Suspension: Marshmellow Springs & Shocks Find the correct assembly first, then find the needed components. The item letters (A, B, C, etc.) assigned to assemblies are referred to in the "Used In"...
- Page 107 Hydraulic Assemblies...
- Page 108 BMP150039/2015155A Page (1 / 2) Hydraulic Tank 48040M7K, 68036M5K, 72046M5K Figure 1: Hydraulic tank PELLERIN MILNOR CORPORATION...
- Page 109 BMP150039/2015155A Page (2 / 2) Hydraulic Tank 48040M7K, 68036M5K, 72046M5K Parts List—Hydraulic Tank Find the correct assembly first, then find the needed components. The item letters (A, B, C, etc.) assigned to assemblies are referred to in the "Used In" column to identify which components belong to an assembly. The item numbers (1, 2, 3, etc.) assigned to components relate the parts list to the illustration.
- Page 110 BMP150041/2015435A Page (1 / 4) Hydraulic Tilt Valves & Fittings 48040M7K, 68036M5K, 72046M5K Figure 1: Manifolds and valves Tilt Lines 13,14 Door or Dryell Lines 13,14 To/from pump To/from left cylinder To/from right cylinder Tilt Block PELLERIN MILNOR CORPORATION...
- Page 111 BMP150041/2015435A Page (2 / 4) Hydraulic Tilt Valves & Fittings 48040M7K, 68036M5K, 72046M5K Figure 2: Junction blocks and counterbalance valves See Door or Door / Dryell Load Dryell Options block Door/Dryell Block Tilt block 27,28,29 Typical Right and Left Tilt Cylinders:...
- Page 112 Page (3 / 4) Hydraulic Tilt Valves & Fittings 48040M7K, 68036M5K, 72046M5K Parts List—Hydraulic Tilt Valves & Fittings Find the correct assembly first, then find the needed components. The item letters (A, B, C, etc.) assigned to assemblies are referred to in the "Used In"...
- Page 113 Page (4 / 4) Hydraulic Tilt Valves & Fittings 48040M7K, 68036M5K, 72046M5K Parts List—Hydraulic Tilt Valves & Fittings Find the correct assembly first, then find the needed components. The item letters (A, B, C, etc.) assigned to assemblies are referred to in the "Used In"...
-
Page 114: Hydraulic Cylinder
BMP150040/2015435A Page (1 / 2) Hydraulic Cylinder 48040M7K, 68036M5K, 72046M5K Section A-A Cylinder Clevis Parts List—Hydraulic Cylinder Mounting Find the correct assembly first, then find the needed components. The item letters (A, B, C, etc.) assigned to assemblies are referred to in the "Used In"... - Page 115 BMP150040/2015435A Page (2 / 2) Hydraulic Cylinder 48040M7K, 68036M5K, 72046M5K Parts List—Hydraulic Cylinder Find the correct assembly first, then find the needed components. The item letters (A, B, C, etc.) assigned to assemblies are referred to in the "Used In" column to identify which components belong to an assembly. The item numbers (1, 2, 3, etc.) assigned to components relate the parts list to the illustration.
-
Page 117: Door Assemblies
Door Assemblies... -
Page 118: 48" Door Installation
BMP150043/2015155A Page (1 / 4) Door Installation Components 68036M5K, 72046M5K 6,7,8 3 Places 35,36,37 33,B A. Door locked switch (Interlock switch) B. Second door switch PELLERIN MILNOR CORPORATION... - Page 119 BMP150043/2015155A Page (2 / 4) Door Installation Components 68036M5K, 72046M5K 13,14,23,24,25 21,22,D 16,17 18,19 27,17,19 48,7,8 B. Second door switch C. Door open latch, See BIIFGM19. D. Door full open switch Knife Cylinder edge .3125 - .375 clearance Shellfront 39,37,41...
- Page 120 BMP150043/2015155A Page (3 / 4) Door Installation Components 68036M5K, 72046M5K Parts List—Door Installation Components Find the correct assembly first, then find the needed components. The item letters (A, B, C, etc.) assigned to assemblies are referred to in the "Used In" column to identify which components belong to an assembly. The item numbers (1, 2, 3, etc.) assigned to components relate the parts list to the illustration.
- Page 121 BMP150043/2015155A Page (4 / 4) Door Installation Components 68036M5K, 72046M5K Parts List—Door Installation Components Find the correct assembly first, then find the needed components. The item letters (A, B, C, etc.) assigned to assemblies are referred to in the "Used In" column to identify which components belong to an assembly. The item numbers (1, 2, 3, etc.) assigned to components relate the parts list to the illustration.
-
Page 122: 48" Door Hydraulic Components
BMP120050/2015155A Page (1 / 5) 48” Door Hydraulic Components 68036H5N, 68036H5K, 68036M5K, 72046M5K (6836H5K Shown) Door lines (6836H5K Shown) PELLERIN MILNOR CORPORATION... - Page 123 BMP120050/2015155A Page (2 / 5) 48” Door Hydraulic Components 68036H5N, 68036H5K, 68036M5K, 72046M5K 2,3,4 15,16,17 36 29 30 Inner shellfront (6836H5K Shown) (6836H5K Shown) PELLERIN MILNOR CORPORATION...
- Page 124 BMP120050/2015155A Page (3 / 5) 48” Door Hydraulic Components 68036H5N, 68036H5K, 68036M5K, 72046M5K 15,16,17 (6836M5K Shown) Inner shellfront (6836M5K Shown) 37,41 Door Control lines valve (6836M5K Shown) PELLERIN MILNOR CORPORATION PELLERIN MILNOR CORPORATION...
- Page 125 Page (4 / 5) 48” Door Hydraulic Components 68036H5N, 68036H5K, 68036M5K, 72046M5K Parts List—48” Hydraulic Door Components Find the correct assembly first, then find the needed components. The item letters (A, B, C, etc.) assigned to assemblies are referred to in the "Used In"...
- Page 126 Page (5 / 5) 48” Door Hydraulic Components 68036H5N, 68036H5K, 68036M5K, 72046M5K Parts List—48” Hydraulic Door Components Find the correct assembly first, then find the needed components. The item letters (A, B, C, etc.) assigned to assemblies are referred to in the "Used In"...
-
Page 127: 48" Door
BMP120047/2015155A Page (1 / 5) 48” Door 68036H5N, 68036H5K, 68036M5K, 72046M5K 4 Places 4 Places 9 31 10,11 10,11 PELLERIN MILNOR CORPORATION... - Page 128 BMP120047/2015155A Page (2 / 5) 48” Door 68036H5N, 68036H5K, 68036M5K, 72046M5K 21,22,23,24 3,4,6,7,8,D 3,4,6,7,8 10,11 74,75 10,11 40,41,42 14,15,16 33,34 35,36 72,73 PELLERIN MILNOR CORPORATION...
- Page 129 BMP120047/2015155A Page (3 / 5) 48” Door 68036H5N, 68036H5K, 68036M5K, 72046M5K BIIFGM19. 27,11 48,49,40,51,52 56,57 52,59 PELLERIN MILNOR CORPORATION...
- Page 130 BMP120047/2015155A Page (4 / 5) 48” Door 68036H5N, 68036H5K, 68036M5K, 72046M5K Parts List—48” Door Find the correct assembly first, then find the needed components. The item letters (A, B, C, etc.) assigned to assemblies are referred to in the "Used In" column to identify which components belong to an assembly. The item numbers (1, 2, 3, etc.) assigned to components relate the parts list to the illustration.
- Page 131 Page (5 / 5) Page (5 / 5) 48” Door 68036H5N, 68036H5K, 68036M5K, 72046M5K Parts List—48” Door Find the correct assembly first, then find the needed components. The item letters (A, B, C, etc.) assigned to assemblies are referred to in the "Used In"...
-
Page 132: Door Latch
Part Number Description/Nomenclature Comments Assemblies SA 15 028 Assembly, Door latch Components 02 15105 Retainer ring 02 15297 Striker 02 15298 Cylinder 02 15836 Spring 15H090 60C122 O-ring, 1"X1/8 60C128 O-ring, 1+3/8X1/8 — End of BIIFGM19 — PELLERIN MILNOR CORPORATION... -
Page 133: Dryel Loading
DRYEL Loading... - Page 134 BMP150045/2015155A Page (1 / 2) DRYELL Hydraulics 68036M5K, 72046M5K Figure 1: Hydraulic components for Dryell loading 11,12 (right) 9,10 (left) View B-B: counter-balance valves & fittings Hydraulic Tilt Cylinders: right & left 9,10 Door /Dryell Left block Cylinder 11,12 Right Cylinder Dryell Hydraulic Lines &...
- Page 135 BMP150045/2015155A Page (2 / 2) DRYELL Hydraulics 68036M5K, 72046M5K Parts List—DRYELL Hydraulics Find the correct assembly first, then find the needed components. The item letters (A, B, C, etc.) assigned to assemblies are referred to in the "Used In" column to identify which components belong to an assembly. The item numbers (1, 2, 3, etc.) assigned to components relate the parts list to the illustration.
-
Page 136: Dryell Loading
6836M5K, 7246M5K Figure 1: Components and folding doors Upper Latch Folding Doors Receptacle See BMP150032. Lifting Frame 10,11 Loadchute Lower Bottom Latch Frame Receptacle Dryell Unload Air Seal tray 7 51,52 (4 places) (Typical 51,52 4 places) (typical) PELLERIN MILNOR CORPORATION... - Page 137 Figure 2: DRYELL rear isometric view (4 places) Pivot Shaft (4 places) (8 places) 49,50 Shellfront Lower frame gusset View A-A: Dryell main pivot View B-B: yoke, pin, and shaft and flange bearings Cylinder Mounting: right & left ball bushing PELLERIN MILNOR CORPORATION...
- Page 138 BMP150031/2015155A Page (3 / 5) DRYELL Loading 6836M5K, 7246M5K Figure 3: Air seal and latches View C-C: Dryell chute View D-D: Dryell chute photoeye receiver photoeye emitter 62,63,64 60,61 65,63,64 36,37 Section E-E 56,57,57,58,59 PELLERIN MILNOR CORPORATION...
- Page 139 AIR CYL 2"BORE X 10"STROKE W/CUSHIONS 54AA00KFRE FEM ROD END ALIN#VF-8G 1/2"-20 09R012 MICSW SPDT PAINTED BZE6-RN 01 17A049Z YOKE END 3/4-16UNF YELLOW ZINC 60C075 TRUCK BUMPER 2+1/2ODW3/8HO.613 54AF1687 FLBRG 1.6875 NTN#UCF209-111T 54JH11690C SHAFTCOLLAR 1.687-SPECIAL 54E015 FLGMTBRG 3/4 BORE BRZ #FLB12 PELLERIN MILNOR CORPORATION...
- Page 140 HXNUT 1/2-13UNC2B SAE ZINC GR2 15K095 HXCPSCR 3/8-16UNC2AX1 GR5 ZINC 15U255 LOCKWASHER MEDIUM 3/8 ZINCPL 15K083V BUTSOKCAPSCR 3/8-16X3/4 SS18-8 15U240 FLATWASHER(USS STD) 3/8" ZNC P 15G218 HXLOKNUT NYL 3/8-16 STL/ZNC 15K133 HXCAPSCREW 3/8-16UNC2AX3 GR5 Z 15G246NS HXTHIN NYL LOKNUT 3/4-10UNC SS18-8 PELLERIN MILNOR CORPORATION...
-
Page 141: Dryell Folding Doors
BMP150032/2015155A Page (1 / 3) DRYELL Folding Door 6836M5K, 7246M5K Figure 1: Door Installation 12,16,17 9,14,15,16,17 11,16,17 12,16,17 19,20,21 12,16,17 Folding Door Hardware 13,15,16,17 12,16,17 18,19,20... - Page 142 BMP150032/2015155A Page (2 / 3) DRYELL Folding Door 6836M5K, 7246M5K Figure 2: Door Assembly Frontmost door (4 places) 10,19,20,21 View A-A: Bottom View PELLERIN MILNOR CORPORATION PELLERIN MILNOR CORPORATION...
- Page 143 HXCAPSCR 1/4-20X1.5 GR5 ZINC 15U188 FLTWASH 1/4 STD COMM SS18-8 15U181 LOCKWASHER MEDIUM 1/4 SS18-8 15G170 HEXNUT 1/4-20UNC2 SS18-8 15K083V BUTSOKCAPSCR 3/8-16X3/4 SS18-8 15U260 LOCKWASHER MEDIUM 3/8 SS18-8 15G206 HEXNUT 3/8-16 UNC2 SS 18-8 15K086 HXCAPSCR 3/8-16NCX3/4 SS18-8 PELLERIN MILNOR CORPORATION...
-
Page 145: Water And Steam
Water and Steam... -
Page 146: Water
BMP150033/2015292A Page (1 / 6) Water 6836M5K, 7246M5K Figure 1: Water valves installed 3,4,5 40,41 PELLERIN MILNOR CORPORATION... - Page 147 BMP150033/2015292A Page (2 / 5) Water 6836M5K, 7246M5K Figure 2: Water valve assembly Detail A (This port is for (This port is for Dryell flush.) third water.) PELLERIN MILNOR CORPORATION PELLERIN MILNOR CORPORATION...
- Page 148 BMP150033/2015292A Page (3 / 6) Water 6836M5K, 7246M5K Figure 3: Water valve assembly (This port is for auto balancing valves.) Detail A PELLERIN MILNOR CORPORATION PELLERIN MILNOR CORPORATION...
- Page 149 BMP150033/2015292A Page (4 / 6) Water 6836M5K, 7246M5K Figure 4: Water for flushing optional Dryell PELLERIN MILNOR CORPORATION PELLERIN MILNOR CORPORATION...
- Page 150 ½"N/C2WY240V50/60C VLV(DRYVC) 5N0P03AG42 NPT NIP 3/4X3 TBE GALSTL SK40 5SB0P0CNFA NPTHEXBUSH 3/4X1/8GALV150#CORD 30N100 PRESSGAUGE 1/8"BACKCN.0-30PSI 5S0KNFA NPT TEE 1/2" GALMAL 150# 5SL0KNFA NPTELB 90DEG 1/2 GALMAL 150# 51X017 UNIONSTRADT 1/2"#1404-8-8 5SP0PHFSS NPT PLUG 3/4 SQ SOLID STL/ZINC PELLERIN MILNOR CORPORATION...
- Page 151 NPT NIP 1XCLS TBE 304SS SK 40 5SL1ASFA NPT ELBOW 90DEG 1" 304SS 150# 5SB1K1ASFO NPTHEXBUSH 1.5X1 304SS 150# 51E091SS BOSS MALESTEM 1"S.S.#RMS11 60E010B367A HOSE ASSY: POLYWIRECLR TUBING 1"ID X 367"+ENDS 27A019 1"PIPESTRAP 2HOLE STAMPED GALV 12P019A CABLE CLAMP 1.25DIPPD #NE-20 PELLERIN MILNOR CORPORATION...
-
Page 152: Balancing Valves 72046M5K
BMP150051/2015292A Page (1 / 3) Balancing Valves 7246M5K Figure 1: Balancing Valves - Typical 3 (Places) Rib#3 Rib#2 Rib#1 17,18 19,20 21,22 21,22 PELLERIN MILNOR CORPORATION PELLERIN MILNOR CORPORATION... - Page 153 NPT NIP 3/4XCLS TBE GALSTL S40 96P056B71 3/4"NC 230V50/60 BURKERT #5281 60E086E27A HOSE ASSY=3/4"X27"LG+1/2X3/4 5SCC0KBE NPT COUP 1/2 BRASS 125# 53A046B ELL90 1/2TUX1/2MPT #8-8CBU 05 10004B INJECTOR SHORT NOZLE LONG BDY 05 10004E INJECTOR SHORT HOOK 05 10004F INJECTOR LONG HOOK PELLERIN MILNOR CORPORATION...
- Page 154 7246M5K AUTOBALANCE INLET 02 25113 7246M5K AUTOBALANCE INLET GASKET 02 25114 7246M5K AUTOBALANCE ACCESS COVER 02 25115 7246M5K AUTOBALANCE ACCESS COVER GASKET 15K095C HXCAPSCR 3/8-16X1.25 GR.8 ZN. 15U240L9 FLTWASH 3/8 HARD ASTM F436 60C110 ORING 1/2IDX3/32CS BUNA70 #112 PELLERIN MILNOR CORPORATION...
-
Page 155: Steam
BMP150034/2015155A Page (1 / 2) Steam 6836M5K, 7246M5K 7,8,9 PELLERIN MILNOR CORPORATION PELLERIN MILNOR CORPORATION... - Page 156 BODY-EL90MALE.25X25 #269C-4-4B 60E521C37A STMHOSE SS FLEX 1.25+2SSENDS= W3 60132 WLMT=STM/SPGR/EL .75 ORF 02 14647G GASKET=REDESIGN STM SPARGER 96TBC2AA00 1/4" N/C 2WAY AIR-OP VALVE (NO COIL) 53A016A AIR RESTRICTER=STEAM CBW 96DG030 CHECKVLV, 1/4"WATTS-SERIES 600 90A015 COPPERTUBE 1/4"O.D.X.030 X50'E PELLERIN MILNOR CORPORATION...
-
Page 157: Single Drain Valve
BMP120048/2015155A Page (1 / 2) Single Drain Valve 68036H5N, 68036H5K, 68036M5K, 72046M5K To transducer 12,13,14 6 Places 22,23,24 6 Places 18,19,20,21 2 Places Temperature Probe PELLERIN MILNOR CORPORATION... - Page 158 Page (2 / 2) Single Drain Valve 68036H5N, 68036H5K, 68036M5K, 72046M5K Parts List—Single Drain Valve Find the correct assembly first, then find the needed components. The item letters (A, B, C, etc.) assigned to assemblies are referred to in the "Used In"...
-
Page 159: Drain Valve Body With Two Valves
Drain Valve Body with Two Valves BIIFGM27 (Published) Book specs- Dates: 20100721 / 20100721 / 20100806 Lang: ENG01 Applic: IFG Drain Valve Body with Two Valves Figure 1: Installed views PELLERIN MILNOR CORPORATION... - Page 160 Drain Valve Body with Two Valves Figure 2: Drain valve body with two valves Additional Views Legend PELLERIN MILNOR CORPORATION...
- Page 161 Hexbush, 1/4X1/8 96H018 Needle valve, 1/4" X 1/8 AD 15 090A Pressure switch 15K153 Bolt, Stainless Steel, 1/2-13X1+1/4 24G032N Washer, Nylon, .5 15U310 Washer, Lock, Stainless Steel, 1/2" 15G225 Nut, Stainless Steel, 1/2-13 — End of BIIFGM27 — PELLERIN MILNOR CORPORATION...
-
Page 162: Bonnet Assembly
Bonnet Assembly BIIFGM28 (Published) Book specs- Dates: 20100722 / 20100722 / 20100806 Lang: ENG01 Applic: IFG Bonnet Assembly Figure 1: Bonnet and air cylinder Cross Section Legend Detailed views: Bumper, O-ring, Washer PELLERIN MILNOR CORPORATION... - Page 163 Bolt, 1/4-20X1 03 06429 Spring 60C106 O-ring, 5/16X1/16 02 02194 Piston cup, 2+3/8" 02 02068 Air cylinder 15U210 Washer, Lock, 5/16 15U245 Washer, Flat, 3/8" 02 16021E Washer, 3/8X1.25 02 16021D Retainer — End of BIIFGM28 — PELLERIN MILNOR CORPORATION...
-
Page 165: Chemical
Chemical... -
Page 166: Soap Chute
BMP150052/2016064A Page (1 / 2) Soap Chute 48040M7K, 68036M5K, 72046M5K 17,18 (6 places) 13,14,15,16 Nozzel within PELLERIN MILNOR CORPORATION PELLERIN MILNOR CORPORATION... - Page 167 BMP150052/2016064A Page (2 / 2) Soap Chute 48040M7K, 68036M5K, 72046M5K Hot water for flushing View A-A Parts List—Soap Chute Find the correct assembly first, then find the needed components. The item letters (A, B, C, etc.) assigned to assemblies are referred to in the "Used In"...
-
Page 168: Eight Port Peristaltic Supply Manifold
BMP150053/2015292A Page (1 / 2) Eight Port Peristaltic Supply Manifold 48040M7K, 68036M5K, 72046M5K 10,11 PELLERIN MILNOR CORPORATION PELLERIN MILNOR CORPORATION... - Page 169 BMP150053/2015292A Page (2 / 2) Eight Port Peristaltic Supply Manifold 48040M7K, 68036M5K, 72046M5K Hot water for flushing Parts List—Eight Port Peristaltic Supply Manifold Find the correct assembly first, then find the needed components. The item letters (A, B, C, etc.) assigned to assemblies are referred to in the "Used In"...
-
Page 171: Control And Sensing Assemblies
Control and Sensing Assemblies... -
Page 172: Switch Panel Pivot Arm
BMP150050/2015435A Page (1 / 2) Switch Panel Pivot Arm 48040M7K, 68036M5K, 72046M5K Figure 1: Detailed Views PELLERIN MILNOR CORPORATION PELLERIN MILNOR CORPORATION... - Page 173 Page (2 / 2) Switch Panel Pivot Arm 48040M7K, 68036M5K, 72046M5K Parts List—Switch Panel Pivot Arm Find the correct assembly first, then find the needed components. The item letters (A, B, C, etc.) assigned to assemblies are referred to in the "Used In"...
-
Page 174: Tilt Limit Switches
BMP150046/2015392A Page (1 / 1) Tilt Limit Switches 48040M7K, 68036M5K, 72046M5K DISCHARGE (Full-up) WASH LOAD 4,5 (Door) or (Full- 6,5 (DRYELL- down) autoload) Parts List—Tilt Limit Switches Find the correct assembly first, then find the needed components. The item letters (A, B, C, etc.) assigned to assemblies are referred to in the "Used In"... -
Page 175: Excursion Switch
BMP150047/2015155A Page (1 / 2) Excursion Switch 48040M7K, 68036M5K, 72046M5K 4,5,6,7 (4 places) 8,9,10,11 (2 places) Parts List—Excursion Switch Find the correct assembly first, then find the needed components. The item letters (A, B, C, etc.) assigned to assemblies are referred to in the "Used In"... -
Page 176: Temperature Probe
BMP150054/2015292A Page (1 / 1) Temperature Probe 48040M7K, 68036M5K, 72046M5K Temperature probe Parts List—Temperature Probes Find the correct assembly first, then find the needed components. The item letters (A, B, C, etc.) assigned to assemblies are referred to in the "Used In"... - Page 177 Dimensional...