Table of Contents
Advertisement
Quick Links
Advertisement
Table of Contents

Related Manuals for Eastwood 20636


Summary of Contents for Eastwood 20636
- Page 1 Part #20636 MIG STUD WELD KIT INSTRUCTIONS...
-
Page 2: Read Instructions
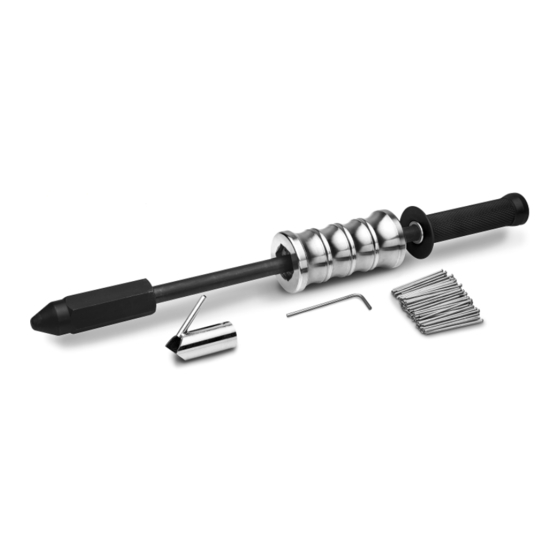
The EASTWOOD MIG STUD WELDING KIT transforms your MIG welder into a Stud Welder which can be used to repair and remove dents from sheet metal. CONTENTS The following items should be included with your Eastwood MIG Stud Welding Kit... -
Page 3: Safety Information
• Always keep a fi re extinguisher nearby while welding. • Use welding blankets to protect painted and or fl ammable surfaces; rubber weather-stripping, dash boards, engines, etc. • Ensure power supply has properly rated wiring to handle power usage. To order parts and supplies: 800.345.1178 >> eastwood.com... -
Page 4: Burn Hazard
• Electric welding heats metal and tools to temperatures that will cause severe burns! • Use protective, heat resistant gloves and clothing when using the Eastwood MIG Stud Welding Kit. Never touch work surface or Stud Welding Nozzle until it they have completely cooled. -
Page 5: Pinch Hazard
SET UP To utilize your Eastwood MIG Stud Welder Kit, you will need a MIG welder with a minimum of 100 Amp output that utilizes a Tweco style nozzle. NOTE: This was designed for Tweco-Style torches, but may work on other styles. -
Page 6: Operation
Pins while positioning. Work Surface OPERATION Several adjustments need to be made to optimize the Eastwood MIG Stud Nozzle before it will operate properly. They are: • Depth of MIG Gas Nozzle into the Stud Welding Nozzle. - Page 7 Note: The weld bead does not need to be centered on the Pin, just securely attached to the work surface metal. BURN HAZARD! Use protective, heat-resistant gloves and clothing when using the Eastwood MIG Stud Welding Kit. Never touch work surface or Stud Welding Nozzle until they have completely cooled.
- Page 8 Hand Grip to pull the dent. Some dents will require more force than others. PINCH HAZARD! Keep hands and fi ngers out from between moving components of the Slide Hammer. Keep hands fi rmly on the Hand Grip sections of the tool only. Eastwood Technical Assistance: 800.544.5118 >> techelp@eastwood.com...
- Page 9 Stud Welding process. Be aware of all power tool safety warnings. 6. Properly clean the surface and apply body fi ller as necessary followed by primer and a top coat. To order parts and supplies: 800.345.1178 >> eastwood.com...
-
Page 10: Troubleshooting
Stud Weld Weld Bead Nozzle not Adjust the Stud Weld Nozzle so that the wire is Needed to Get in direct contact with the head of the Pin. aligned Pin to Fuse to correctly Panel Eastwood Technical Assistance: 800.544.5118 >> techelp@eastwood.com... -
Page 11: Additional Items
ADDITIONAL ITEMS #13928A Replacement Pins #12807 4-1/2" Electric Angle Grinder #12036 Flap Disc, 4-1/2" Zirconia, 40-Grit #11979 Eastwood Professional 7-Piece Hammer & Dolly Set To order parts and supplies: 800.345.1178 >> eastwood.com... - Page 12 If you have any questions about the use of this product, please contact The Eastwood Technical Assistance Service Department: 800.544.5118 >> email: techelp@eastwood.com PDF version of this manual is available online >> eastwood.com/20636manual The Eastwood Company 263 Shoemaker Road, Pottstown, PA 19464, USA US and Canada: 800.345.1178 Outside US: 610.718.8335...