Avaya Aura G450 Installation, Quick Start
Communication manager branch
Hide thumbs
Also See for Aura G450:
- Cli reference manual (1334 pages) ,
- Manual (736 pages) ,
- Installing and upgrading (324 pages)

Related Manuals for Avaya Aura G450


Summary of Contents for Avaya Aura G450
- Page 1 Avaya Aura™ Communication Manager Branch G450 Media Gateway Installation Quick Start 03-603208 Issue 1 May 2009...
-
Page 3: Installation Location
Introduction This document contains the information that you require to start using your Communication Manager Branch G450 Media Gateway in the shortest possible time. Check before you install your Communication Manager Branch. Mount your Communication Manager Branch. Install Media Modules. Ground your Communication Manager Branch. - Page 4 Water or moisture cannot enter the case of the chassis. ● There is a free flow of air around the Communication Manager Branch G450 Media ● Gateway and the vents in the sides of the case are not blocked. No more than 25 feet (7.6 m) from an approved ground or close enough for use with the ●...
- Page 5 Check Unpack CAUTION: Wear an anti-static wrist ground strap when you handle components of a CAUTION: Communication Manager Branch G450 Media Gateway. Connect the strap to an approved ground, such as an unpainted metal surface. The Communication Manager Branch G450 Media Gateway comes with the following items. If any items are missing or damaged, contact your supplier.
- Page 6 Two 19 in. rack mounting brackets One cable management assembly Jumper for NVRAM init. Two 5/16 in. Round-Head Screws Two Serrated Lock Washers One Ground Screw 4 Communication Manager Branch G450 Media Gateway Installation Quick Start...
- Page 7 Mount Mount Using your Communication Manager Branch G450 Media Gateway on a table To use the Communication Manager Branch G450 Media Gateway on a tabletop, you must attach the provided rubber feet to the underside of the Communication Manager Branch G450 Media Gateway.
-
Page 8: Brackets Without Cable Guides
If you are mounting your Communication Manager Branch G450 Media Gateway is in a ● rack with other equipment already installed, position the Communication Manager Branch G450 Media Gateway to avoid imbalance. Brackets without cable guides You can attach mounting brackets without cable guides to: Each side of the front of the Communication Manager Branch G450 Media Gateway, so ●... -
Page 9: Rack Mounting
Mount 2. Attach the mounting bracket with the cable guides to the front of the chassis. Rack mounting 1. Attach the mounting brackets to the Communication Manager Branch G450 Media Gateway. Use five of the supplied screws for each bracket. Figure 2: Front mounting bracket placement Figure 3: Middle mounting bracket placement 2. - Page 10 9. Either tighten the two bottom-most screws inserted in step 2, or remove the screws completely. 10. Verify that ventilation slots are unobstructed. Mounting your Communication Manager Branch G450 Media Gateway on a wall To mount the CMBE G450 Media Gateway on a wall, use the two mounting brackets without cable guides.
- Page 11 Mount Figure 4: Attaching the bracket for wall mounting Issue 1 May 2009...
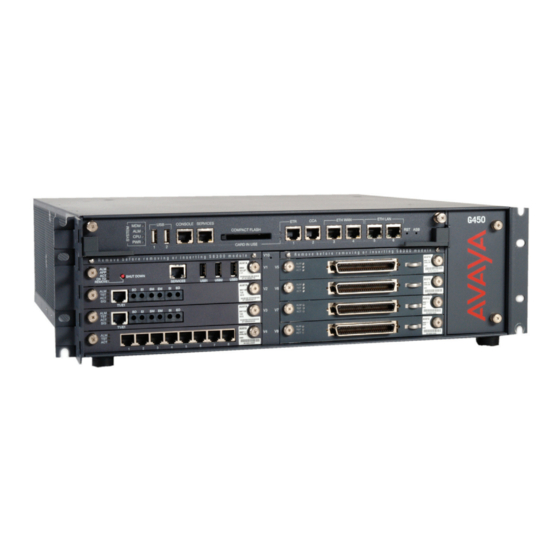
- Page 12 Install The required media modules might be pre-installed in the Communication Manager Branch G450 Media Gateway. In this case, skip this section. If the Media Modules are not pre-installed, or if you want to replace modules or add new media modules, install the necessary Media Modules and related components to support the configuration required for your site.
- Page 13 Install Table 2: Permitted slots for media modules Media Permitted Description module slots MM710B V1 – V8 One E1/T1 trunk port for connecting an E1/T1 telephone trunk. MM711 V1 – V8 Eight universal analog ports for connecting analog telephones or trunks. MM712 V1 –...
-
Page 14: General Grounding Requirements
Ground To assure safe installation and operation, carefully read all requirements, recommendations, and instructions. Pay special attention to all WARNING, and DANGER statements. WARNING: System grounding must comply with the general rules for grounding provided in WARNING: Article 250 of the National Electrical Code (NEC), National Fire Protection Agency (NFPA) 70, or the applicable electrical code in the country of installation. -
Page 15: Ground Block
Ground The customer needs to provide a means of connecting this Supplementary Ground Conductor to an approved ground according to Article 250 of the National Electrical Code (NEC). Ground block A ground block must be provided if multiple Communication Manager Branch G450 Media Gateway Media Gateways are being installed. - Page 16 Grounded Building Steel. The metal frame of the building where it is effectively grounded ● by one of the following grounds: acceptable metallic water pipe, concrete encased ground, or a ground ring. Acceptable Water Pipe. A metal underground water pipe, at least ½ in. (1.3 cm) in ●...
-
Page 17: Connecting The Safety Ground
Ground Connecting the safety ground Proper grounding of the Communication Manager Branch G450 Media Gateway Media Gateway installation safeguards the system, users, and service personnel by providing protection from lightning, power surges, AC mains faults, power crosses on central office trunks, and electrostatic discharge (ESD). - Page 18 If the ground block is not being used, attach the Supplementary Ground Conductor to ● an approved ground. Connect Connect your Communication Manager Branch to your telephone, computers, and ● network. See the enclosed Installation Poster for information. Connect your computer to the Services port on the Communication Manager Branch G450 ●...
-
Page 19: Device Manager Main Screen
Configure Figure 6: Device Manager opening screen The default user name is administrator ● The default password is password ● When Device Manager loads, you see one of three screens, according to the level of configuration you must do. If this screen opens... Level of configuration to do Branch Device Manager main screen. - Page 20 Figure 7: Device Manager Main screen Figure notes: 1. Navigation Pane 2. Main Menu The Navigation Pane on the left side of all screens contains a list of links to the screens for ● managed objects. The main menu is in the working pane on the right side of the main screen. The entries on ●...
- Page 21 Configure Figure 8: Profile-Based Setup Assistant home screen 1. Click Start to run the Profile-based Setup Assistant. - The Profile-Based Setup Assistant opens (the actual screen might differ from this one). Figure 9: Profile-Based Setup Assistant 2. Follow the steps shown in the navigation pane. 3.
- Page 22 Initial Setup Assistant Home Screen. The Initial Setup Assistant applies to Communication Manager Branch G450 Media Gateway solutions that require complete configuration. You only reach this Assistant if the platform was re-initialized. Check your network plan or see your IT professional for help if necessary. Figure 10: Initial Setup Assistant Home Screen Select either Install from Scratch:...
- Page 23 Configure Install from Profile: 1. Click Start. 2. The Install from Profile Assistant - Set Profile Restore Type screen opens. Figure 12: Install from Profile Set Profile Restore Type 3. Select the USB option or download a profile from an ftp site. - If you select the ftp option, enter the following parameters: - Remote filename.
- Page 24 22 Communication Manager Branch G450 Media Gateway Installation Quick Start...