Table of Contents
Advertisement
Advertisement
Table of Contents

Related Manuals for Ryobi RBV254O


Summary of Contents for Ryobi RBV254O
- Page 1 ORIGINAL INSTRUCTIONS Petrol Blower/ Vacuum RBV254O...
- Page 2 Important! It is essential that you read the instructions in this manual before assembling, operating, and maintaining the product. Subject to technical modification.
-
Page 3: Intended Use
Safety, performance, and dependability have poorly ventilated area. Breathing exhaust been given top priority in the design of your fumes can kill. petrol blower/vacuum. ■ Wear hearing protection at all times while operating the product. The product is noisy, INTENDED USE and permanent hearing injury may result if The petrol blower/vacuum is only intended precautions to limit your exposure, reduce... - Page 4 ■ Do not operate the product on a paved WARNING or gravel surface where ejected material Before using the product in vacuum mode, could cause injury. you must assemble the upper and lower ■ Before each use, always inspect the vacuum tubes together.
-
Page 5: Blower Safety Warnings
inspecting the product after striking a Flying debris could cause serious injury. – foreign object Make sure that the debris collector bag is in good condition and completely closed ■ Immediately stop the engine in an event before operating the product. of accident or breakdown. -
Page 6: Maintenance
remove all fuel that could become stale and ■ Stop the engine, allow the product to cool leave varnish and gum in the fuel system. down, and make sure all moving parts have come to a complete stop. Disconnect ■ If applicable, drain all lubricant from the the spark plug boot before conducting any engine into a container approved for... - Page 7 following: FEATURES ■ Injury caused by vibration. KNOW YOUR BLOWER/VACUUM Always use the right tool for the job. Use – See page 15. designated handles and restrict working time and exposure. The safe use of the product requires an understanding of the information on the ■...
-
Page 8: Vacuum Tubes
The vacuum tubes can be installed on the satisfactorily operated the product. blower/vacuum without using any tools. ■ If any parts are damaged or missing, ASSEMBLY please call your RYOBI service centre for assistance. UNPACKING The product requires assembly. WARNING ■... -
Page 9: Filling The Tank
A fire or explosion from petrol will burn you The mixture should be at a 50:1 ratio. and others. Always shut off engine before NOTE: We recommend you use RYOBI fuelling. Never add fuel to a machine with synthetic 2-stroke lubricant. Only use a quality a running or hot engine. -
Page 10: Using The Vacuum
throttle speed to do the job. This may also WARNING reduce vibration levels. Watch out for children, pets, open windows, ■ Conserve water by using power blowers or freshly washed cars, and blow debris instead of hoses for many lawn and safely away. -
Page 11: General Maintenance
from entering the engine. Contaminants in the GENERAL MAINTENANCE fuel can cause poor performance and damage CLEANING THE AIR FILTER to the engine. See page 33. The fuel filter is a non-serviceable item and, if needed, should be replaced by an authorised A wet or dirty air filter causes starting difficulty, service centre. -
Page 12: Symbols In This Manual
WARNING Indicates a potentially hazardous situation, Warning! Hot surface. which, if not avoided, could result in death or serious injury. CAUTION Indicates a potentially hazardous situation, To reduce the risk of injury or which, if not avoided, may result in minor or damage, avoid contact with moderate injury. - Page 14 UNPACKING RBV254O...
-
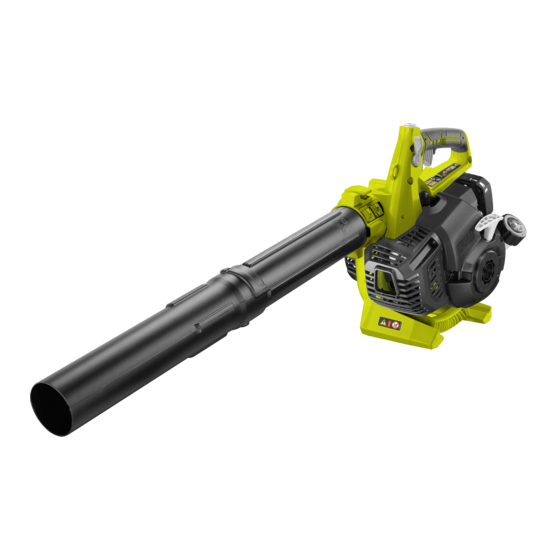
Page 15: Know Your Product
Know your product KNOW YOUR PRODUCT 1. Throttle lock 8. Vacuum bag 15. Sweeper nozzle 2. On/Off switch 9. Vacuum handle 16. Leaf nozzle 3. Throttle trigger 10. Spark plug 17. Vacuum inlet door 4. Handle 11. Vacuum bag adaptor 18. -
Page 16: Getting Started
GETTING STARTED (50 : 1) Pre-mix 2-stroke engine lubricant and unleaded petrol in a Wear full eye and ear protection, substantial footwear, and clean container approved for petrol at a 50:1 ratio. long trousers at all times while operating the product. Do not operate the product when barefoot or wearing open sandals. - Page 17 GETTING STARTED GETTING STARTED GETTING STARTED A. Hold the blower with the upper handle in your right hand. A. Assemble the vacuum tubes and vacuum bag. 1. Align raised tabs on upper blower tube with the slots on 1. Align raised tabs on upper blower tube with the slots on 1.
- Page 19 OVERVIEW Cold start engine Warm start engine E start cold engine p.21 p.24 p.25 E start warm engine Using the blower Using the vacuum p.27 p.29 p.30...
- Page 20 OVERVIEW OVERVIEW Replacing the spark plug Cleaning the air filter Cleaning the vacuum bag p.32 p.33 p.35 Cleaning the blower/vacuum Storing the blower/vacuum p.36 p.37...
-
Page 21: Operation
OPERATION STARTING A COLD ENGINE 1. Loosen the fuel cap slowly by turning it counterclockwise. Remove the fuel cap. Pour the fuel mixture carefully into the tank. Replace and tighten the fuel cap. 2. Press the primer bulb 8 times. 3. - Page 22 OPERATION 5. Pull the starter grip until the engine attempts to start. Do not pull the starter grip more than 4 times. 6. Set the choke lever to the “HALF“ choke position. 7. Squeeze the throttle trigger. Pull the starter grip until the engine attempts to start.
- Page 23 OPERATION 9. Set the choke lever to the “RUN” position. 10. To stop the engine, toggle the on/off switch to the “STOP” position.
-
Page 24: Starting A Warm Engine
OPERATION STARTING A WARM ENGINE 1. Set the choke lever to “RUN“ position. 2. Squeeze the throttle trigger. Pull the throttle lock backward. 3. Pull the starter grip until the engine attempts to start. Do not pull the starter grip more than 6 times. 4. - Page 25 OPERATION EASY START COLD ENGINE 1. Install the starter bit into the electrical starter with the triangle bit facing outside. Push the F/R button to the right until the triangle symbol ( ) shows on the F/R button. 2. Install the battery. An audible click is heard when the battery is secured to the electrical starter.
- Page 26 OPERATION 4. Set the choke lever to “FULL“ position. Squeeze the throttle trigger. Pull the throttle lock backward. 5. Hold the product with one hand and use your other hand to insert the starter drive shaft into the blower starter housing. Make sure the starter bit is properly engaged.
- Page 27 OPERATION EASY START WARM ENGINE 1. Install the starter bit into the electrical starter with the triangle bit facing outside. Push the F/R button to the right until the triangle symbol ( ) shows on the F/R button. 2. Install the battery. An audible click is heard when the battery is secured to the electrical starter.
- Page 28 OPERATION 4. Squeeze the throttle trigger. Pull the throttle lock backward. 5. Hold the product with one hand and use your other hand to insert the starter drive shaft into the blower starter housing. Make sure the starter bit is properly engaged.
- Page 29 OPERATION USING THE BLOWER 1. Align raised tabs on upper blower tube with the slots on blower housing outlet. Attach and tighten securely by turning clockwise until it clicks into place. 2a. Align raised tabs on upper blower tube with the slots on the leaf nozzle. Attach and tighten securely by turning clockwise until it clicks into place.
- Page 30 OPERATION USING THE VACUUM 1. Unzip the vacuum bag and place the adaptor inside. Push the vacuum bag adaptor through the opening opposite the zipper. The wider end of the adaptor will remain on the inside of the vacuum bag when installed properly.Twist to lock into place.
- Page 31 OPERATION 5. Align tabs on housing with the vacuum tube assembly. 6. Push the vacuum tube assembly onto the housing. Twist to lock into place. NOTE: Place the vacuum bag strap over your right shoulder. Hold the upper handle in your left hand and the vacuum handle in your right hand.
-
Page 32: Maintenance
MAINTENANCE REPLACING THE SPARK PLUG 1. To stop the engine, toggle the on/off switch to the “STOP” position. 2. Disconnect the spark plug boot from the spark plug. 3. Using a socket wrench, loosen the old spark plug by turning it counterclockwise. Remove the old spark plug and dispose properly. -
Page 33: Cleaning The Air Filter
MAINTENANCE CLEANING THE AIR FILTER 1. To stop the engine, toggle the on/off switch to the “STOP” position. 2. Press the air filter cover tab to open the air filter cover. Open the air filter cover. 3. Remove the air filter carefully and wash with warm, soapy water. - Page 34 MAINTENANCE 5. To reinstall the air filter cover, insert the tabs into the notches and lock into place. NOTE: Ensure the air filter is dry before installing. 6. Close the air filter cover. An audibe click is heard to ensure the cover is secured to the housing.
-
Page 35: Cleaning The Vacuum Bag
MAINTENANCE CLEANING THE VACUUM BAG 1. To stop the engine, toggle the on/off switch to the “STOP” position. 2. Press on the raised locking tab, twist the adaptor counterclockwise, and then remove the vacuum bag and adaptor from the blower housing outlet. 3. -
Page 36: Cleaning The Blower/Vac- Uum
MAINTENANCE CLEANING THE BLOWER/VAC- 1. To stop the engine, toggle the on/off switch to the “STOP” position. 2. Clean the blower/vacuum using a brush. WARNING: Avoid using solvents when cleaning plastic parts. Most plastics are susceptible to damage from various types of commercial solvents and may be damaged by their use. - Page 37 STORAGE STORAGE 1. To stop the engine, toggle the on/off switch to the “STOP” position. A1.Twist vacuum tube assembly counterclockwise to remove assembly. A2.Remove the vacuum tube assembly from the housing outlet. A3.Press on the raised locking tab, twist the adaptor counterclockwise, and then detach the vacuum bag adaptor from the housing.
- Page 38 STORAGE A4. Unzip the vacuum bag. Push the vacuum bag adaptor towards the opening. B1.To remove the leaf or sweeper nozzle, twist and remove the nozzle from the upper blower tube. B2.Press on the raised locking tab, twist the blower tube counterclockwise, and then detach the upper blower tube from the housing outlet.
- Page 39 STORAGE 3. Store blower/vacuum and its parts in a cool dry and well-ventilated place that is inaccessible to children.
-
Page 40: Product Specifications
PRODUCT SPECIFICATIONS WARNING The declared vibration value has been Blower/Vacuum measured with a standard test method Model RBV254O and may be used to compare one tool with Engine displacement 25.4 cc another. Rated power 0.80 kW The declared vibration value may be used in a preliminary assessment of exposure. - Page 43 Imported by: Techtronic Industries Australia Pty Ltd 31 Gilby Road, Mount Waverley, VIC 3149 Melbourne, Australia Techtronic Industries N.Z. Limited 2 Landing Drive, Mangere Auckland, 2022, New Zealand 961487048-01...