
Related Manuals for Kargo Master 4A95L


Summary of Contents for Kargo Master 4A95L
-
Page 1: Installation Guide
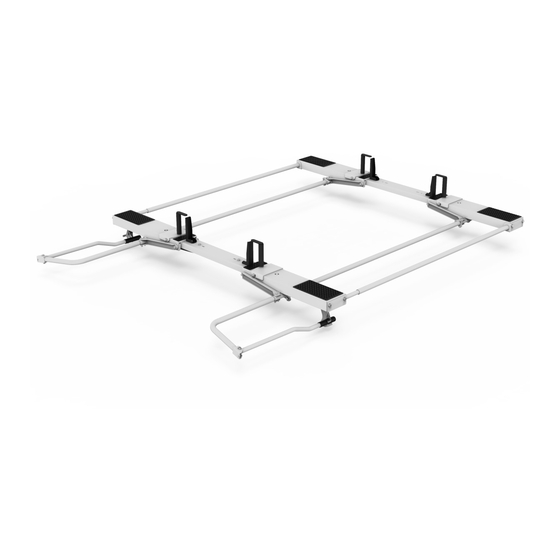
Installation Guide 4A95L Kargo Master Rancho Cordova, CA 95742 800-343-7486 CustomerService@KargoMaster.com DATE: ______________... -
Page 2: Table Of Contents
Installation Instructions – 4A95L *PLEASE READ ALL INSTRUCTIONS AND WARNINGS PRIOR TO ASSEMBLING, INSTALLING, AND USING THIS PRODUCT* Warning Always check for wires, fuel tanks and lines, brake lines and other important vehicle functionality items prior to drilling and installing all products. -
Page 3: Parts List
Installation Instructions – 4A95L Parts For Technical Support Call: 800-343-7486 Monday-Friday 7AM - 4 PM (PST) Page 2... - Page 4 Installation Instructions – 4A95L Parts Continued HARDWARE For Technical Support Call: 800-343-7486 Monday-Friday 7AM - 4 PM (PST) Page 3...
-
Page 5: Hardware List
Installation Instructions – 4A95L HARDWARE For Technical Support Call: 800-343-7486 Monday-Friday 7AM - 4 PM (PST) Page 4... -
Page 6: Step 1 Determine Bows
Installation Instructions – 4A95L Step 1 – Determine Bows • Determine front and rear bow. The triangular piece should be facing eachother on each bow. Front Bow Rear Bow For Technical Support Call: 800-343-7486 Monday-Friday 7AM - 4 PM (PST) -
Page 7: Step 2 Pan Mount
Installation Instructions – 4A95L Step 2 – Pan Mount • Be sure mount kit is installed on vehicle. • Set front and rear bow asm on mounting feet as shown. • Place a foam block from the packaging to hold the bow in the up position in order to access the mounting slots. -
Page 8: Step 4 Install Torque Tube
Installation Instructions – 4A95L Step 4 – Install Torque Tube • If EXT is needed, Assemble EXT to long torque tube. • If EXT is not needed, Only use long torque tube. • Bolt torque tube to front and rear bow using 1/4"-20 x 1” Hex Head bolt, two 1/4" flat washers and 1/4"-20 nyloc nut at each location. -
Page 9: Step 5 Install Cross Tube
Installation Instructions – 4A95L Step 5 – Install Cross Tube • Insert crosstube as shown. Bolt to the end of both pans using 3/8” x 3/4" Hex Head bolts, 3/8” flat washers and 3/8”nyloc nuts. • Repeat at front and rear on the ends of both bows. -
Page 10: Step 6 Install Latch
Installation Instructions – 4A95L Step 6 – Install Latch • Move rear pan assembly out of the way to expose the end of the crossmember. • Bolt latch assembly to end of crossmember using 5/16” x 1" carriage bolts, 5/16” flat washers and 5/16”nyloc nuts. -
Page 11: Step 7 Install Handle
Installation Instructions – 4A95L Step 7 – Install Handle • Place handle in orientaion shown. Attach handle to the rear pan using existing 5/16” hardware. • Repeat at both ends of rear bow. • Place BH-821 around tube connection. • TIGHTEN... -
Page 12: Step 8 Install Ladder Stops
Installation Instructions – 4A95L Step 8 – Ladder Stop • Attach ladder stop to both front and rear bow. Be sure the flange of the ladder stop is aligned with the cut out in the bows. • In the front... -
Page 13: Step 9 Assemble Ladder Hooks
Installation Instructions – 4A95L Step 9 – Assemble Ladder Hooks • Bolt ladder hook ASM to ladder hook weldment as shown. • Use 1/4" x 1" hex head and 1/4" flat washer. This can be adjusted later. • TIGHTEN Step 10 – Install Ladder Hooks •... - Page 14 Installation Instructions – 4A95L GO BACK AND TIGHTEN ALL BOLTS FROM PREVIOUS STEPS, BE SURE HARDWARE IN MOUNTING IS TIGHT. YOUR INSTALLATION IS NOW COMPLETE For Technical Support Call: 800-343-7486 Monday-Friday 7AM - 4 PM (PST) Page 13...