
Related Manuals for Philips HTR9900/12


Summary of Contents for Philips HTR9900/12
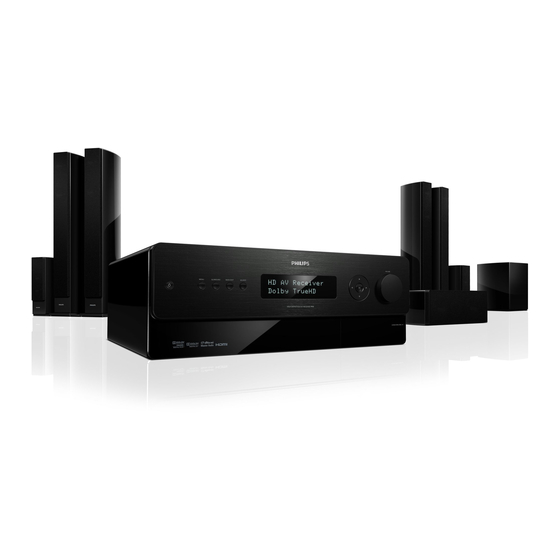
- Page 1 Register your product and get support at www.philips.com/welcome User Manual Mode d’emploi Manual del usuario Benutzerhandbuch Руководство пользователя HTR9900 AVR9900...
- Page 2 Italia DICHIARAZIONE DI CONFORMITA’ Si dichiara che l’apparecchio HTR9900, AVR9900 Philips risponde alle prescrizioni dell’art. 2 comma 1 del D.M. 28 Agosto 1995 n. 548. Fatto a Eindhoven Philips Consumer Electronics Philips, Glaslaan 25616 JB Eindhoven, Norge Typeskilt fi nnes på apparatens underside.
-
Page 3: Table Of Contents
Contents 1 Important Safety and important notice Recycle notice Trademark notice 2 Your product Product overview Remote control Front panel Rear panel 3 Connect Place the High Defi nition A/V Receiver 14 Connect speakers and subwoofer Connect radio antennas Connect power cord 4 Setup Subwoofer setup Speaker setup (SmartEQ) -
Page 4: Important
1 Important Safety and important notice Warning! • Risk of overheating! Never install the High Defi nition A/V Receiver in a confi ned space. Always leave a space of at least 4 inches around the High Defi nition A/V Receiver for ventilation. Ensure curtains or other objects never cover the ventilation slots on the High Defi... -
Page 5: Trademark Notice
Mains fuse (UK only) This High Defi nition A/V Receiver is fi tted with an approved moulded plug. Should it become necessary to replace the mains fuse, this must be replaced with a fuse of the same value as indicated on the plug (example 10A). Remove fuse cover and fuse. -
Page 6: Your Product
Turns on the High Defi nition A/V Receiver or turns it off to standby mode. BLU-PLAYER 2 • Turns on or turns off Philips Blu-Ray player to standby mode. SOURCE • Press this button for direct access to different source inputs selections. - Page 7 TONE • Toggle to select different tone control: activate or deactivate tone control, bass tone or treble tone. • Turns on or off tone control circuits or selects bass or treble tone. TEST TONE • Press this button for the test tone of each speaker only when in "Speaker Levels"...
-
Page 8: Front Panel
Front panel a b c d e f • Turns on the High Defi nition A/V Receiver or turn off to standby mode. SETUP / MENU • Accesses or exits the Main menu options. SURROUND • Toggle to select through the various listening mode options. -
Page 9: Rear Panel
CD or DVD players, HDTV or satellite tuners and other devices. Note • For Philips TV, connect it to the COAXIAL IN-TV. COAXIAL OUT OPTICAL OUT • Connect to the corresponding S/PDIF digital (coaxial/optical) input of a... - Page 10 HDMI MONITOR OUT • Connect the HDMI OUT to a HDTV or projector with HDMI input. HDMI connection provides the best video quality. COMPONENT VIDEO IN 1-2-3, COMPONENT MONITOR OUT • Connect the Component video inputs to Component Video outputs from compatible source devices, typically a DVD player and terrestrial or satellite HDTV tuner.
- Page 11 PRE-OUT • Connect the SW output to powered subwoofer. • The PRE-OUT makes it possible to use the High Defi nition A/V Receiver as a pre-amplifi er to external power amplifi ers for some or all channels. Connect FRONT L, FRONT R, CENTER, SURR R, SURR L, SURR-BL, SURR-BR and SUBW to the respective channel input of a power amplifi...
- Page 12 VIDEO-AUDIO IN 1, VIDEO-AUDIO OUT 1 • Connect VIDEO-AUDIO IN 1 to the analogue audio/video output port of a recording device such as a video cassette recorder, DVD recorder or to an outboard audio/video processor. • Connect VIDEO-AUDIO OUT 1 to the recording device’s corresponding analogue audio/video input port.
- Page 13 AC INPUT • The High Defi nition A/V Receiver comes supplied with a separate AC Mains cable. Before connecting the cable to a live wall socket, ensure that it is fi rmly connected to the High Defi nition A/V Receiver’s AC Mains input socket fi...
-
Page 14: Connect
3 Connect Make the following connections to use your High Defi nition A/V Receiver. Connect this High Defi nition A/V Receiver: • Speakers and subwoofer (only included for HTR9900) • Radio antenna • Power Connect other devices: • Different types of connectors may be used to connect this product to your TV and other audio/video devices (for example, cable box, recorder, blu-ray disc player) -
Page 15: Connect Speakers And Subwoofer
Connect speakers and subwoofer • Speakers and subwoofer are supplied with HTR9900 only Connect the speakers and subwoofer to the matching sockets on this High Defi nition A/V Receiver. Connect radio antennas Assemble the loop antenna Rotate the outer frame of the antenna. Insert the bottom edge of the outer frame into the groove on the stand. -
Page 16: Setup
4 Setup Subwoofer setup (For HTR9900 only) Fine-tune the subwoofer setting based on your listening preferences. Turn the subwoofer on with the POWER switch, Play music with bass content. Turn the OUTPUT LEVEL switch clockwise until you begin to hear the source. -
Page 17: Speaker Setup (Smarteq)
Speaker setup (SmartEQ) The SmartEQ feature uses a microphone, along with sophisticated digital electronics built into your High Defi nition A/V Receiver, to automatically setup and calibrate the High Defi nition A/V Receiver to the exact speakers and speaker placement of your own unique Home Theatre. -
Page 18: Navigate Through The Menu
After the measurements, the High Defi nition A/V Receiver calculates the ideal system response for your particular room and speaker setup. If some inconsistencies or discrepancies are detected during the setup, the process maybe interrupted or the problem is shown in the particular setup window. -
Page 19: Listening Mode Setup
Listening mode setup The High Defi nition A/V Receiver has various listening mode options and is mostly confi gurable. These are provided to reproduce a variety of sound effects depending upon the content of the source to be played. Use a combination of B and vV buttons to confi... - Page 20 • [Other] If [None] is selected above for any of the Dolby Digital 2 Channel, Dolby Digital Surround and DTS options or if the audio input is an analogue signal, this [Other] section will manage the default audio format as per the [Digital] or [Analog Audio] settings.
-
Page 21: Additional Information
[DTS Setup] Under this menu, the Centre Gain settings of DTS Neo:6 Music can be adjusted. DTS Setup : Neo:6 Music Center Gain : 0.2 [Center gain (0 to 0.5)] • – Adjust for better centre image in relation to the surround sound channels. - Page 22 recorded in Dolby Digital Surround EX. With this additional channel you will experience improved dynamics and a better sensation of movement within the sound fi eld. If media sources recorded in Dolby Digital EX are decoded with a Digital EX decoder, the format is detected automatically, and the Dolby Digital EX mode is selected.
- Page 23 [DTS+Neo:6™ Surround] - • applies the conventional 2-channel signals such as digital PCM or analogue stereo signals to the high precision digital matrix decoder used for DTS-ES Matrix 6.1 to achieve 6.1-channel surround playback. DTS Neo:6 surround includes two modes for selecting the optimum decoding of the signal sources: [Neo:6 Cinema]...
-
Page 24: Enjoy
5 Enjoy Select a play source Route the audio from other devices to this High Defi nition A/V Receiver to enjoy the audio play with multi-channel surround capabilities. You can choose to connect to analogue or digital input socket depending on the device capabilities. -
Page 25: Listen To Radio
Listen to radio The High Defi nition A/V Receiver’s internal AM/FM tuner offers very high quality sound from radio broadcasts. The reception and sound quality will always be dependent to a degree however on the type of antenna(s) used as well as proximity to the broadcast origin, geography and weather conditions. -
Page 26: Name A Radio Preset
Note • One can store the same channel in two preset locations - one with "FM STEREO ON" and another with "FM STEREO OFF". Name a radio preset You can assign an eight character 'User Name' to each radio preset, which will show in the front-panel readout whenever that preset is recalled. -
Page 27: Adjust Settings
6 Adjust settings Settings menu The Settings menu allows one to customise the High Defi nition A/V Receiver to the ancillary device used in one’s specifi c AV system. Unless your system exactly matches the factory defaults, you will need to use the Settings menu to confi... -
Page 28: Digital Audio
• [Name] A new Name maybe assigned to a Source label. For example, if your DVD player is attached to "Source 3", it is possible to rename "Source 3" to 'DVD Player'. 1) In order to rename the Source label, scroll to “Name”, press B and then vV to pick and select through the alphanumeric selections. -
Page 29: Speaker Setup
• [Video] A specifi c video input can be assigned a particular Source. The following are the assignable Video inputs: [HDMI Blu-ray Player/2/3/4] > [Component 1/2/3] > [S-Video 1/2/3/4] > [S-Video Front] > [Composite 1/2/3/4] > [Composite Front] If [Off] is selected, no video input signal is selected by the particular Source. - Page 30 [Speaker Confi guration] Speaker Configuration Front : S 80Hz Center : S 80Hz Surround : S 80Hz Back : S 80Hz Subwoofer : On Every surround-sound system requires “bass-management” to direct low frequency content from any or all channels to the speakers best able to reproduce it.
- Page 31 Setting speaker levels at test mode While at [Speaker Levels] menu, press the TEST TONE button activating the High Defi nition A/V Receiver’s Speaker Levels balancing test signal. You will hear a “surf” sound as you continue testing your speakers beginning with the Front Left.
-
Page 32: Trigger Setup
Trigger setup Settings menu Source setup Trigger out Speaker setup Delay Trigger setup Listening Mode setup Video setup Language setup The High Defi nition A/V Receiver features a confi gurable +12V DC Trigger Output that can be used to activate a device or system it is fed into. - Page 33 [Stereo] • - All output is directed to the front left/right channels. Low frequencies are directed by default to the subwoofer if one is present in the Speaker settings. Select “Stereo” when you wish to listen to a stereo (or monaural) production, such as music CD or FM broadcast, without surround enhancement.
-
Page 34: Video Setup
[Tone controls] Listening mode Pure tone Audio synchs Treble Tone controls Bass Settings menu Pure Tone allows you vary or completely bypass the tone control section of the High Defi nition A/V Receiver. [Off] is selected, the Tone Control • circuits are active. -
Page 35: Language Setup
• [Cross Color suppressor] – Remove cross colour artifacts that can occur when high-frequency luminance (brightness) signals are misinterpreted as chroma (colour) signals. This can cause unwanted fl ickering, fl ashing colours or rainbow patterns. Select [On] to turn on this feature; otherwise, select [Off]. -
Page 36: Troubleshooting
High Defi nition A/V Receiver and get support at www.philips.com/ welcome. If you contact Philips, you will be asked for the model and serial number of your High Defi nition A/V Receiver. The model number and serial number are on the back or bottom of this player. -
Page 37: Specifi Cations
8 Specifi cations Note • Specifi cation and design are subject to change without notice. • This High Defi nition A/V Receiver does not support Philips EasyLink. Accessories supplied • 1 AM loop antenna • 1 FM antenna cable •... - Page 38 • [Contrast] – Adjust bright areas (white level) of the picture. • [Color] – If brightness and contrast levels are set optimally, adjust the colour control to the level of your preference. • [MPEG Noise reduction] designed to address two specifi c types of video distortion - mosquito noise and blocking artifacts.
- Page 39 2009 © Philips Consumer Lifestyle All right reserved sgpjp-0904/12...