
Related Manuals for TEC FS-2600-1 SERIES


Summary of Contents for TEC FS-2600-1 SERIES
- Page 1 TEC Electronic Cash Register FS-2600-1 SERIES Owner’s Manual S/A Operators Guide S/A Manager's Guide M/S Level Operator's Guide M/S Level Manager's Guide...
- Page 2 “This Class A digital apparatus meets all requirements of the Canadian Interference-Causing Equipment Regulations.” “Cet appareil numénque de la classe A respecte toutes les exigences du Règlement sur le matériel brouilleur du Canada.” NOTICE WARNING Copyright © 1999 by TOSHIBA TEC CORPORATION All Rights Reserved 570 Ohito, Ohito-cho, Tagata-gun, Shizuoka-ken, JAPAN...
- Page 3 1. STAND-ALONE LEVEL OPERATOR’S GUIDE Table of Contents...
-
Page 5: Table Of Contents
Loan ... 9-3 Check Cashing (No-sale cashing of a non-cash media) ... 9-4 No-sale Exchange from Foreign Currency to Domestic Currency ... 9-4 No-sale Exchange from Domestic Currency to Foreign Currency ... 9-5 TOC 2 TABLE OF CONTENTS EO1-11138 FS-2600-1 SERIES Page... - Page 6 Percent Discount, Percent Charge ... 9-25 9.45 Non-add Number Print ... 9-26 9.46 Number-of-guests Entry ... 9-26 9.47 Function Key Entry ... 9-26 9.48 Tip Paid ... 9-27 9.49 Charge Tip ... 9-27 9.50 Received-on-Account ... 9-27 EO1-11138 TOC 3 FS-2600-1 SERIES...
- Page 7 CAUTION: 1. This manual may not be copied in whole or in part without prior written permission of TOSHIBA TEC. 2. The contents of this manual may be changed without notification. 3. Please refer to your local Authorized Service representative with regard to any queries you may have in this manual.
-
Page 9: Introduction
1. TO OUR CUSTOMERS INTRODUCTION Thank you for choosing the TEC electronic cash register FS-2600-1 series. This owner’s manual provides a de- scription of the functions and handling of this register and should be read carefully to ensure optimum per- formance. -
Page 10: Specification
2. SPECIFICATION SPECIFICATION 2.1.1 Software Item Capacity of Department Memory Capacity of Group Memory Capacity of Major Group Memory Capacity of Cashier Memory Capacity of Employee Memory Capacity of Customer File Table Capacity of PLU Memory Capacity of PLU Group Memory Unit Price Programmable 2.2.1 Hardware Item... -
Page 11: Hardware Option
A maximum of 2 remote drawers can be connected to the FS-2600 to realize the multi-drawer feature. Either the “multi- drawer feature controlled by a cashier” or “multi-drawer feature controlled by a currency” can be selected. Description EO1-11138 2.2 Hardware Option Source Contact your TOSHIBA TEC representative. -
Page 12: Appearance And Nomenclature
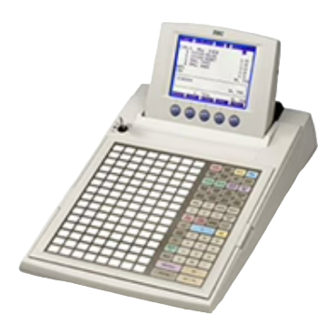
3. APPEARANCE AND NOMENCLATURE APPEARANCE AND NOMENCLATURE Front View Operator Display Keyboard Power Switch ... Insure that the power switch is in the OFF position before connecting AC power. 1. Do not try to force the display beyond its full opened position. 2. -
Page 13: Rear View
3. APPEARANCE AND NOMENCLATURE Rear View Secure the Cable Blind Plate with the attached Double Sems Screw. Refer to 1.2 Accessories (page 1-1). A maximum of 2 drawers can be connected. A scale can be connected by installing the IF-1650C (Hardware Option) The following printers can be connected to each port (COM 1 to COM 3;... -
Page 14: Mode Lock And Mode Selector Keys
4. MODE LOCK AND MODE SELECTOR KEYS MODE LOCK AND MODE SELECTOR KEYS Mode Lock Mode Selector Keys REG Key: MGR Key: The MGR Key is used by the store manager or a person authorized by the MA Key: The keys may be inserted or pulled out at the “LOCK” or “REG” position. In the OPERATOR’S GUIDE, functions and operations will be described within the range of the Mode Lock positions of LOCK and REG using the REG key. -
Page 15: Display
5. DISPLAY DISPLAY The FS-2600 is provided with the LCD operator display and the 7-segment customer display. Operator Display 5.1.1 Basic Screen (common to all the mode lock positions) ••••*•••• ••••*•••• ••••*•••• ••••*•••• ••••*•••• ••••*•••• ••••*•••• ••••*•••• Description of each Display Item Display Item Display Line 1 Mode Lock Position... - Page 16 5. DISPLAY Description of each Display Item (continued) Display Item Display Line 9 Printer Error Indicator 0 Print Data Reception Indicator A Sales Item Name Guidance Message B Quantity C Numeric Sales Total 5.1.2 Description of each Indicator ••••*•••• ••••*•••• ••••*•••• ••••*•••• Description of each Display Item Display Item 1 For Future Use...
-
Page 17: Customer Display
5. DISPLAY Description of each Display Item (continued) Display Item 7 Previous Screen 8 Continuation Screen Customer Display Description Displays the indicator “ ” when the menu has previous screens. (1 digit) Displays the indicator “ ” when the menu has continuation screens. -
Page 18: Keyboard
The following is the standard keyboard layout, which was initially set at the factory. This register is designed to be capable of programming most of the keys at the desired locations or adding keys. For details of the keyboard layout change, ask your TOSHIBA TEC representative. Keyboard Layout... -
Page 19: Functions Of Each Key
EO1-11138 6. KEYBOARD 6.2 Functions of Each Key Functions of Each Key... - Page 20 EO1-11138 6. KEYBOARD 6.2 Functions of Each Key...
- Page 21 EO1-11138 6. KEYBOARD 6.2 Functions of Each Key...
-
Page 22: Procedure Before Operation
7. PROCEDURE BEFORE OPERATION PROCEDURE BEFORE OPERATION 1. Unpack the accessories and the cash register from the carton. 2. Place the cash register at a proper location, referring to the Safety Precautions at the beginning of the Operator’s Guide. 3. Remove the tapes and seals for holding parts or protecting the cash registers surfaces. 4. -
Page 23: Cashier Signing Or Cashier Key Operations
8. CASHIER SIGNING OR CASHIER KEY OPERATIONS CASHIER SIGNING OR CASHIER KEY OPERATIONS The FS-2600 adopts one of the following cashier-identifying operations. • CODE ENTRY METHOD, using the [SERVER #] key. • CASHIER KEY METHOD, using [CLK] keys. Code Entry Method Each cashier will sign-ON, sign-OFF, sign-IN, and sign-OUT through the [SERVER #] key. -
Page 24: Cashier Key Method ([Clk] Keys)
8. CASHIER SIGNING OR CASHIER KEY OPERATIONS Sign-ON ... to be operated to start the job. Sign-OUT ... to be operated to leave the register for a while expecting to come back soon. Sign-IN... to be operated when the cashier comes back from a break declared by Sign-OUT. Sign-OFF ... -
Page 25: Training Mode Start And End
8. CASHIER SIGNING OR CASHIER KEY OPERATIONS Training Mode Start and End This section describes the training function provided for newly employed cashiers. After entering the training mode, a cashier may operate the same transaction entries as those in the REG mode. The data in the Training Mode is processed into the training cashier memory, therefore it will not affect any actual sales data in business. -
Page 26: Cashier Exclusive" Option
8. CASHIER SIGNING OR CASHIER KEY OPERATIONS “Cashier Exclusive” Option When the program option “Cashier Not exclusive” is selected: Every Cashier can access the other cashiers’guest order table accounts as well as his/her own. When the program option “Cashier Exclusive” is selected: Cashiers with the status “Own Tables only”... -
Page 27: Transaction Entries
9. TRANSACTION ENTRIES TRANSACTION ENTRIES When opening the cash drawer, be careful not to let the drawer hit any person. Condition Necessary to Start Transaction Entries Mode Lock: Insert the “REG” key and set it to the “REG” position. Cashier Sign-ON: If the [SERVER #] key is used for identifying a cashier, you must sign-ON or sign-IN. -
Page 28: Receipt-Issue/Non-Issue Selection
9. TRANSACTION ENTRIES Receipt-Issue/Non-issue Selection This operation determines whether or not the receipt is issued. Mode Lock may be in any position: Pressing the [SERVER #/RECEIPT] key without a prior numeric entry or NOTES: 1. The “R OFF” status at the starting of a transaction entry decides whether a receipt will be issued for the transaction or not. -
Page 29: Loan
9. TRANSACTION ENTRIES Max. 4 lines of Store Name/Message (REMARK 2 below) Max. 3 lines of Commercial Message Date (Month-Day-Year order in this sample) Day-of-Week Name of the cashier who is operating the register. NOTES: 1. A no-sale transaction after a non-add number print can be prohibited by the program option. -
Page 30: Check Cashing (No-Sale Cashing Of A Non-Cash Media)
9. TRANSACTION ENTRIES NOTE: A loan transaction after an Order Table No. entry is not possible. Check Cashing (No-sale cashing of a non-cash media) OPERATION (must be operated outside a sale) |Check Amount to be Cashed| [CHECK] Max. 8 digits 1 to 99999999 NOTES: 1. -
Page 31: No-Sale Exchange From Domestic Currency To Foreign Currency
9. TRANSACTION ENTRIES No-sale Exchange from Domestic Currency to Foreign Currency OPERATION (must be operated outside a sale) |Amount of Domestic Currency to be exchanged| [CUR 1] NOTES: 1. The [CUR 2] to [CUR 5] keys operate in the same way. 2. -
Page 32: Plu (Menu Item) Entry Through The Menu Window
9. TRANSACTION ENTRIES PLU (menu item) Entry through the Menu Window This register allows you to select and enter a PLU (menu item) through the Menu Window. OPERATION Through the [DISPLAY] key [DISPLAY] ... Displays the corresponding menu table window as follows. ([DISPLAY 1] to [DISPLAY 99]) Through the [PLU] key with the menu table programmed... -
Page 33: Repeat Entry
9. TRANSACTION ENTRIES NOTES: 1. While the menu window is displayed, operate as follows to cancel a PLU (menu item) already selected by the [SELECT] key. [SELECT] 2. While the menu window is displayed, you cannot perform the following sales transactions. •... -
Page 34: Set Menu Entry
9. TRANSACTION ENTRIES Preset-price Open Repeat • [PR OPEN] (or [OPEN]) |Preset-PLU Code| [PLU] |Quantity| [X] |Price| [AMT] • |Quantity| [X] [PR OPEN] (or [OPEN]) |Price| [PLU Preset-Code Key] of Preset-PLU NOTES: 1. Quantity ... Max. 3 integral + 3 decimal digits (Use the [ . ] key for entering decimal digits.) Price (Unit Price) ... -
Page 35: Modifier Entry
9. TRANSACTION ENTRIES 5. As for the Open Menu Table Type, if the quantity of sub menu items to be entered is programmed, the set menu entry is completed when the quantity of sub menu items reaches the programmed quantity. In this case, depressing the [END] key is unnecessary. 6. -
Page 36: Plu Code Shift Entry
9. TRANSACTION ENTRIES 9.15 PLU Code Shift Entry Depressing the [CODE SHIFT] key designates and enters a PLU item, adding the printed number (1 to 4) to an entered PLU code. OPERATION [CODE SHIFT 1] PLU Entry ... (To enter a PLU item of the entered code plus 1) [CODE SHIFT 2] PLU Entry ... -
Page 37: Combo (Combination) Sale Entry
9. TRANSACTION ENTRIES NOTE: A program option allows you to prohibit operating the [PRICE] key in the REG mode. 9.17 Combo (Combination) Sale Entry This operation is used to perform the special discount (%-, Dollar Discount, Free of Charge) to the PLU Entry on the basis of the Combo Table information. -
Page 38: Subtotal Read
9. TRANSACTION ENTRIES • Through Open-PLU: Place the item on the scale platter. |Open-PLU Code| [PLU] |Unit Price| [AMT] NOTE: When the PLU is programmed with a Tare Table No., the tare weight is automatically subtracted from the scaled weight, and thus only the net weight is processed. 9.18.2 Scale Entry by entering the Tare Table No. -
Page 39: Tray Total Read
9. TRANSACTION ENTRIES 9.19.2 Net Subtotal (tax not included) Depress the [ST] key any time during the sales transaction. The net sales subtotal (excluding tax) will be displayed. 9.19.3 Eat-in/Takeout Subtotal Depress the [EAT IN] or the [TAKEOUT] key before the sale transaction is finalized. The register calculates and displays the subtotal according to the programmed Eat-in/Takeout tax status. -
Page 40: Item Correct
9. TRANSACTION ENTRIES 9.21 Item Correct If you make an incorrect entry in the following sales transactions, depress the [ITEM CORR] key to delete the last entered item. OPERATION PLU ENTRY REPEAT ENTRY QUANTITY EXTENSION DOLLAR DISCOUNT PERCENT CHARGE/DISCOUNT RECEIVED-ON-ACCOUNT PAID-OUT NOTES: 1. -
Page 41: All Void
9. TRANSACTION ENTRIES 9.23 All Void When the current sales transaction now being entered must be canceled before the sale finalization, the All Void operation is effective. OPERATION Sale Item Entries [ALL VOID] NOTE: You cannot perform the All Void if the sales items of 31 or more have already been entered in the sales transaction. - Page 42 9. TRANSACTION ENTRIES To cancel the order table already reserved: |Order Table No. in reservation| [START CHECK] To enter order items for the reserved order table, or to enter additional order items for the order table in use: |Order Table No. in reservation or in use| [START CHECK] 9.24.2 Order Entry Control (Order Table No.
-
Page 43: Order Entry Control With Table No
9. TRANSACTION ENTRIES * REG * 02-06-1999 03:04 TABLE NO 1 PLU000001 1 PLU000010 SUBTL CASH CASH TOTAL DISP1 DISP2 DISP3 * REG * 02-06-1999 03:04 TABLE NO 1 PLU000001 1 PLU000010 SUBTL TOTAL DISP1 DISP2 DISP3 9.25 Order Entry Control with Table No. OPERATION (|Order Table No.| [START CHECK]) 1 to 999.9... -
Page 44: Temporary Release Of Order Table No. Entry Compulsion
9. TRANSACTION ENTRIES 9.26 Temporary Release of Order Table No. Entry Compulsion This operation releases one sales transaction from the compulsory status of the order table No. entry. It is effective only when the program option “Compulsion of the Order Table No. Entry” has been programmed. OPERATION (must be operated outside a sale) [PUB MODE]... -
Page 45: Guest Check Split
9. TRANSACTION ENTRIES NOTES: 1. As for the old order table, you can use reserved or opened one. As for the new order table, you can use reserved or unopened one. 2. When the register adopts the feature “Order Entry Control by automatic entry of the Order Table No.”, you cannot enter the new order table No. -
Page 46: Sale Finalization By Media Keys (Payment Of A Sale)
9. TRANSACTION ENTRIES 9.30 Sale Finalization by Media Keys (Payment of a Sale) OPERATION • |Order Table No.| [START CHECK] • |Order Table No.| [RECALL] • PLU (menu item) Entries NOTE: If the [TENDER UP] key is installed on the keyboard, the cash tendering operation corresponding to the sales total will be automatically performed by depressing its key. -
Page 47: Sale Paid In Foreign Currencies
9. TRANSACTION ENTRIES NOTE: If the PLU price level is programmed to each customer, the PLU (menu item) entry will be fixedly performed by the corresponding price level. In this case, using the [PRICE] key to change the level causes an error, and also the hourly range price level is ignored if programmed. -
Page 48: Tax Status Modification
9. TRANSACTION ENTRIES 9.34 Tax Status Modification Tax status of the PLU or required key is reversed: OPERATION Depress the [TX1/M] to [TX4/M] of which tax status is to be modified prior to or any time (before the final key at the latest) during the entry sequence of the following operations. -
Page 49: Tax Exemption
9. TRANSACTION ENTRIES 9.37 Tax Exemption OPERATION Selective Tax Exemption Examples) [TX1/M] [EX] [TX1/M] [TX2/M] [EX] [TX1/M] [TX2/M] [TX3/M] [EX] All Tax Exemption [EX] [TX1/M] [TX2/M] [TX3/M] [TX4/M] [EX] NOTE: If the inclusive-tax feature is selected to the [TX3/M] and [TX4/M] keys, the tax exemption of Tax 3 and Tax 4 is not allowed. -
Page 50: Plu Preset Price Read
9. TRANSACTION ENTRIES NOTE: Selective Itemizer Total Read after the order table No. entry is possible. 9.41 PLU Preset Price Read You can check the preset price of each PLU. OPERATION (Any time inside or outside a sale, but prohibited during a short-tendered condition.) [READ] ([PRICE]) for the shift of price level... -
Page 51: Dollar Discount
9. TRANSACTION ENTRIES 9.43 Dollar Discount OPERATION PLU item entry (for discount from an individual item) [ST] (for discount from the sale total) NOTES: 1. Discount from the sale total • An amount exceeding the sale total cannot be entered without the “Credit Balance”... -
Page 52: Non-Add Number Print
9. TRANSACTION ENTRIES 9.45 Non-add Number Print Non-add numbers can be entered for future reference, to indicate guest code, media checks, credit cards, etc. The entered numbers do not affect any sale total data. OPERATION (allowed any time during a sale or transaction) |Number| [#] Max. -
Page 53: Tip Paid
9. TRANSACTION ENTRIES 9.48 Tip Paid When a guest pays the tip by credit card, this operation can divide the tip and pay it to each cashier in cash. OPERATION (must be operated outside a sale) |Cashier Code| [TIP PAID] 9.49 Charge Tip OPERATION... -
Page 54: Paid-Out
9. TRANSACTION ENTRIES NOTES: 1. The media keys used for this operation must be programmed to allow received- on-account entries. 2. A received-on-account transaction after an order table No. entry is not possible. 9.51 Paid-Out A paid-out transaction is used when money is removed from the drawer without totaling to a sale. OPERATION (must be operated outside a sale) |Amount to be paid out| [PO]... -
Page 55: Rkp (Remote Kitchen Printer) Receipt Cut
9. TRANSACTION ENTRIES Pattern 2: To enter only the designated PLU items in the itemized mode PLU entries [INVERT] Issues an Itemized receipt for all the items entered here. Issues a Single/ Double receipt for each item entry. NOTES: 1. When the option “Itemized Print” is selected, the Print Mode Invert operation is not possible. -
Page 56: Rkp (Remote Kitchen Printer) Message Print
9. TRANSACTION ENTRIES 9.54 RKP (remote kitchen printer) Message Print This operation prints a message on the RKP. OPERATION [RKP Msg] ([RKP Msg 1] to [RKP Msg 10]) |Message No.| [RKP Msg #] 1 to 20 This operation is possible during a sales transaction. ex.) PLU Entry [RKP Msg]... -
Page 57: Check Print
9. TRANSACTION ENTRIES Case 2: When the option “Guest check is printed on the slip” has been selected: When a sale transaction is finalized by the media keys. A slip has already been placed on the slip table of the BRST-10 and the “SLIP”... -
Page 58: Receipt Post-Issue (Receipt Reprint & Guest Check Reprint)
9. TRANSACTION ENTRIES 2. A program option allows you to use a presentation as a real guest check. If so programmed, the header “PRESENTATION” is not printed. After issuing a guest check, only the sale finalization by the media keys is allowed for the order table No. Used as a presentation TABLE NO 3 11-24-1999 WED... -
Page 59: Server Transfer
9. TRANSACTION ENTRIES 9.57.2 Guest Check Reprint |Order Table No.| [START CHECK] 1 to 999.9 The following operation is allowed when the program option “Presentation is used as a real guest check” has been selected. |Order Table No.| [PRINT CHECK] 1 to 999.9 Programmable option: •... -
Page 60: Employee Clock-In/Clock-Out
9. TRANSACTION ENTRIES 9.59 Employee Clock-in/Clock-out This operation records working total hours of each employee. OPERATION (must be operated outside a sale) Clock-in [IN] |Employee No.| 1 to 9999 A menu window appears. * REG * 02-06-1999 03:04 CLOCK IN Pg up Pg dw Break-in... - Page 61 9. TRANSACTION ENTRIES Break-out [BREAK OUT] |Employee No.| Clock-out [OUT] |Employee No.| NOTES: 1. This operation is allowed only when the program options “Employee Management Adopted” and “Floating Cashier Adopted” have been selected. 2. Clock-in/clock-out entry is allowed up to three times in a day. 3.
-
Page 62: 10. Troubleshooting
If a problem not described here occurs, or a problem still exists after taking the following countermeasures, ask the store manager to contact your authorized TOSHIBA TEC representative for assistance. In this case, inform the store manager of your problem in detail. -
Page 63: Problems Concerning The Drawer
Action: Try to open the drawer by removing the foreign substance, using a ruler or something. If you are still unable to open the drawer ask the store manager to contact your authorized TOSHIBA TEC representative for assistance. Cause 2:... - Page 65 2. STAND-ALONE LEVEL MANAGER’S GUIDE Table of Contents...
- Page 67 Major Group Name Programming (Submode 14) ... 5-30 Customer File Table Setting (Submode 15) ... 5-31 Combination Report Table Programming (Submode 19) ... 5-32 PLU Stock Loading or Changing (Submode 24) ... 5-34 TOC 2 TABLE OF CONTENTS EO1-11138 FS-2600-1 SERIES Page...
- Page 68 Store/Register No. Setting ... 5-62 6. Verification of Programmed Data ... 6-1 How to verify a Programmed Data through the Operator Display ... 6-1 How to verify a Programmed Data through the Keyboard ... 6-2 TOC 1 EO1-11138 FS-2600-1 SERIES...
-
Page 69: Manager Intervention
[VOID] [PO] [MENU 1] to [MENU 5] [PRICE 1] to [PRICE 5] [EX] [ALL VOID] [NS] [RTR] Manager Intervention Required As for the key status change, ask your TOSHIBA TEC representative. 1.1 Items Programmed to Require Manager Intervention Reference EO1-11138... -
Page 70: Other Operations Requiring Manager Interventions
The procedure thereafter is the same as Steps 2) to 7) for the Items Programmed to Require Manager Intervention on the preceding page. Manager Intervention Required As for the status change, ask your TOSHIBA TEC representative. 1.2 Other Operations Requiring Manager Interventions Reference... - Page 71 1. MANAGER INTERVENTION Reference: For reading the high and low amount limits of each PLU: Chapter 6. VERIFICATION OF PROGRAMMED DATA (Amount limit of each PLU is restricted by the amount limit of its linked department.) For setting the item above: Chapter 5.
-
Page 72: Manager's Own Operations In "Mgr" Mode
2. MANAGER’S OWN OPERATIONS IN “MGR” MODE MANAGER’S OWN OPERATIONS IN “MGR” MODE The following are operations possible only in the “MGR” position of the Mode Lock, which are performed by the manager. Pick Up Operation This operation is used to collect money from a drawer, during the day, for banking purpose, etc. CONDITION Any time outside a sale, in a Signed-ON condition. -
Page 73: Enforced Clock-Out Of An Employee
2. MANAGER’S OWN OPERATIONS IN “MGR” MODE Enforced Clock-out of an Employee If an employee who once clocked in forgets to perform the clock-out operation, the manager can perform this operation. CONDITION In a Clock-IN and Signed-OFF condition OPERATION Mode Lock: MGR [OUT] |Employee No.| 1 to 9999... -
Page 74: Rkp Table Change
2. MANAGER’S OWN OPERATIONS IN “MGR” MODE NOTE: A program option allows you to perform this operation in the REG mode. RKP Table Change This operation changes an RKP (remote kitchen printer) on which the data is outputted. CONDITION Any time outside a sale OPERATION Mode Lock: MGR RKP Designation... -
Page 75: Operations In " - " Mode
3. OPERATIONS IN “ - ” MODE OPERATIONS IN When a cashier has entered some data in a guest order table buffer memory (started with an order table No. entry and ended with the [TOTAL] key) and then all the entries must be cancelled, you can quickly delete them in the - position of the Mode Lock instead of deleting items one by one using the [VOID] key. -
Page 76: Read (X) And Reset (Z) Reports
4. READ (X) AND RESET (Z) REPORTS READ (X) AND RESET (Z) REPORTS This chapter describes the operation to take each report and its contents. • A read (X) report allows you to read the totals but not clear the memory. After issuing a read report, only a header of its report is written into the electronic journal buffer memory. - Page 77 4. READ (X) AND RESET (Z) REPORTS Display Item 1 Navigation Key 1 COMB1 2 Navigation Key 2 COMB2 3 Navigation Key 3 COMB3 4 Navigation Key 4 5 Navigation Key 5 Example) If you want to issue the daily all cashiers read report, operate as follows. Select “1 X”...
- Page 78 4. READ (X) AND RESET (Z) REPORTS Select “4 CLERK” from the screen using the cursor key, then depress the [ENTER] key. The screen shown below appears. * X/GTX * 02-06-1999 03:04 1 ALL 2 INDIVIDUAL Please select operation by Enter key. Pg up Pg dw Enter...
- Page 79 4. READ (X) AND RESET (Z) REPORTS 4.1.2 How to Access a Report Item through the Keyboard You can directly access a report item you want to issue through a key operation on the keyboard. Daily Reports Report Name FINANCIAL READ AND RESET •...
- Page 80 4. READ (X) AND RESET (Z) REPORTS Daily Reports (Continued) Report Name PLU STOCK READ • Individual PLU Stock • Zone PLU Stock • All PLU Stock CUSTOMER FILE READ AND RESET • Individual File Read • Zone File Read •...
- Page 81 4. READ (X) AND RESET (Z) REPORTS Daily Reports (Continued) Report Name COMBO SALE READ AND RESET • Individual Combo Read • All Combo Read • All Combo Reset • All Combo Read (detail) • All Combo Reset (detail) HOURLY COMBO SALE READ AND RESET •...
- Page 82 4. READ (X) AND RESET (Z) REPORTS GT Reports -- to be taken on weekly or monthly basis -- Report Name FINANCIAL GT READ AND RESET • Financial GT Read • Financial GT Reset CASHIER GT READ AND RESET • All Cashier GT Read •...
-
Page 83: Time Edit For Employee Clock-In/Clock-Out
4. READ (X) AND RESET (Z) REPORTS Time Edit for Employee Clock-in/Clock-out This operation is used to edit the recorded time of an employee clock-in/clock-out and total break hours. CONDITION An employee of which recorded time is edited must be “Clock OUT”. Furthermore if the employee has a cashier code, “Sign OFF”... -
Page 84: Combination Reports
4. READ (X) AND RESET (Z) REPORTS Combination Reports You can issue a combination report which consists of a maximum of 5 reports selected from the list shown below, and you can program your own 3 combination reports. As for the programming, refer to the next chapter PROGRAMMING OPERATIONS. -
Page 85: General Notes On Report Takings
4. READ (X) AND RESET (Z) REPORTS General Notes on Report Takings 1. The cashier signed-OFF or signed-OUT condition is required for taking any X or Z reports in the Code Entry Method. (Otherwise, an error will result when the Mode Lock is turned to the “X” or “Z” position.) 2. -
Page 86: Periodic Report
4. READ (X) AND RESET (Z) REPORTS -- Continued -- CASH ID CHECK ID Chg ID MISC ID CPN ID CRT ID5 TIP PAID CORR VOID ALL VD -DP TL -SALE NOTE TXBL1 below TXBL2 TAX EX TAX1EX GUEST CUR1 CUR2 ITEM/CUS 3.85... - Page 87 4. READ (X) AND RESET (Z) REPORTS 4.5.2 Cashier Read or Reset Report (Daily or Periodic) Individual Cashier Read Report Sample 11-29-1999 X_CLERK 2CLDYER TAX1 TAX2 TAX5 CHG TIP DISC TOTAL OPEN TABLE CASH MISC CASH ID Chg ID MISC ID CPN ID TIP PAID ALL VD...
- Page 88 4. READ (X) AND RESET (Z) REPORTS 4.5.4 Department Group Read Report (Daily or Periodic) 11-29-1999 X_GROUP GP01 42.01% GP02 56.47% GP03 1.53% TOTAL MGP01 6.81% MGP02 35.20% MGP03 36.94% MGP04 19.53% MGP05 1.53% TOTAL 0239 4.5.5 Media Sales and In-drawer Total Read Report (Daily) 11-29-1999 X_MEDIA_ALL TOTAL...
- Page 89 4. READ (X) AND RESET (Z) REPORTS 4.5.6 Hourly Range Read or Reset Report (Daily) 11-29-1999 X_HOURLY 10:00TM 12:00TM 14:00TM 16:00TM 18:00TM 20:00TM 22:00TM 0238 4.5.7 Department Read or Reset Report (Daily or Periodic) 11-29-1999 X_DP_ALL DP01 2.86% DISC DP02 4.06% DISC DP03...
- Page 90 4. READ (X) AND RESET (Z) REPORTS 4.5.8 All Media Sales Total and Cash-in-Drawer Read Report (Daily) 11-29-1999 X_MEDIA TOTAL CASH ID 0227 4.5.9 PLU Read or Reset Report (Daily or Periodic) Individual PLU Read Report (Daily or Periodic) 11-29-1999 X_PLU_INDIV 000001 PLU000001...
- Page 91 4. READ (X) AND RESET (Z) REPORTS All PLU Read or Reset Report (Daily or Periodic) 11-29-1999 X_PLU_ALL 000001 PLU000001 000002 PLU000002 000003 PLU000003 000004 PLU000004 000005 PLU000005 TOTAL -TOTAL 0232 NOTE: All PLU Report can be programmed to not print items and price levels having zero totals. Zone PLU Read or Reset Report (Daily or Periodic) The format is the same as “All PLU Read or Reset Report”...
- Page 92 4. READ (X) AND RESET (Z) REPORTS 4.5.10 PLU Stock Read Report (Daily) Individual PLU Stock Read Report (Daily) 11-29-1999 X_STOCK_INDI 000007 PLU000007 0234 All PLU Stock Read Report (Daily) 11-29-1999 X_STOCK_ALL 000004 PLU000004 000005 PLU000005 000006 PLU000006 000007 PLU000007 000008 PLU000008 0236...
- Page 93 4. READ (X) AND RESET (Z) REPORTS All Customer File Read or Reset Report (Daily) 11-29-1999 X_CUST_ALL #000000000001 RENO #000000000002 SMITH 0246 Zone Customer File Read or Reset Report (Daily) The format is the same as “All Customer File Read or Reset Report” above. The only difference is that the Zone Read or Reset Report outputs the data of the customer files in the zone designated by the key operation to take the report.
- Page 94 4. READ (X) AND RESET (Z) REPORTS 4.5.13 Day Part Read or Reset Report (Daily) 11-29-1999 X_DAY_PART 10:00TM MGP01 MGP02 MGP03 MGP04 MGP05 14:00TM MGP01 MGP02 MGP03 MGP04 18:00TM MGP01 MGP02 MGP03 MGP04 0251 4.5.14 Check Track (Guest Order Table) with Sales Read or Reset Report (Daily) Individual Cashier Read Report Sample 11-29-1999 X_CT_W_INDI...
- Page 95 4. READ (X) AND RESET (Z) REPORTS 4.5.15 Check Track (Guest Order Table) without Sales Read Report (Daily) Individual Cashier Read Report Sample 11-29-1999 X_CT_WO_INDI 2CLDYER #003 #004 #015 TOTAL 0256 4.5.16 Combo Sales Read or Reset Report (Daily) Available only when the feature “Combo Sales” has been selected. Combo Sales Total Read or Reset Report (Daily) 11-29-1999 X_COMBO_SUM...
- Page 96 4. READ (X) AND RESET (Z) REPORTS Individual Combo Sale Read Report (Daily) 11-29-1999 X_COMBO_INDI COMBO1 COMBO TOTAL 0123 4.5.17 Hourly Range Combo Sales Read or Reset Report (Daily) Available only when the feature “Combo Sales” has been selected and also a combo sale table has been linked to each hourly range.
- Page 97 4. READ (X) AND RESET (Z) REPORTS 4.5.18 Employee Clock-in/Clock-out Read or Reset Report (Daily, Weekly or Periodic) 11-29-1999 X_EMPLOYEE 0001 JONES CASHIER CLOCK IN CLOCK OUT TOTAL BREAK TOTAL HOURS * * * * * * * * * * * * * * * * * * * * * * * * * * * * * * * * 12* * * * * * * * * * * * * * * * * * * * * * * * * * * * * * * *...
- Page 98 4. READ (X) AND RESET (Z) REPORTS 4.5.19 Electronic Journal Read or Reset Report (Daily) All Electronic Journal Read or Reset Report (Daily) 11-29-1999 X_EJ_ALL 11-29-1999 * * * * * CLOCK 0001 0066 11-29-1999 * * * * * CLOCK 0002 0067 11-29-1999...
- Page 99 4. READ (X) AND RESET (Z) REPORTS Electronic Journal (Clock-in & Clock-out/Date) Read Report (Daily) X_EJ_EMPLOYE Data regarding the employee clock-in/clock-out is printed. Electronic Journal (Transmission History) Read Report (Daily) X_EJ_HISTORY Data of the transmission history is printed. GT Reports The print form and items of a GT report are the same as those of its corresponding daily report, except the report header portion.
-
Page 100: Programming Operations
FS-2600 series ECR on the daily, weekly, or monthly basis. Usually, all the basic program data required for your store should have already been set before delivery of the product by your local TOSHIBA TEC representative. However, if it becomes necessary to change or add program data, please refer to this chapter. It is also recommended that you read the OPERATOR’S GUIDE as well as other chapters of the MANAGER’S GUIDE in order to thoroughly... -
Page 101: Character Entries
5. PROGRAMMING OPERATIONS • Day Part Setting (Submode 46) • Employee Table Setting (Submode 50) • Job Code/Working Hour Setting (Submode 51) • Tender Up Table Setting (Submode 52) • Display Menu Table Setting (Submode 53) • Printer Setting (Submode 71) Character Entries Two ways are available to enter characters for the various names and messages;... -
Page 102: Direct Character Entry Method
5. PROGRAMMING OPERATIONS NOTE: Characters corresponding to the following codes can be used only for display but not for print. 715, 1206, 1207, 1214, 1215, 1301, 1302, 1303, 1304, 1500, 1501, 1502, 1503, 1506, 1507, 1508, 1509, 1510, 1512, 1513, 1514, 1515, 1305 (applicable to the TM-300 only) How to Set a Character •... -
Page 103: Condition Required For Programming Operations
5. PROGRAMMING OPERATIONS Functions of Keys [DOUBLE] Used to enter all the characters of one line in double-size. Depress this key before all character entries. [DOUBLE SHIFT] Depress this key prior to a character entry, and it will be a double-sized character. The double-size modification using this key is effective for only one character to follow. -
Page 104: How To Access A Program Item
5. PROGRAMMING OPERATIONS Thus the condition “After ... Reset” indicates that all the sales data relating to the report data must be zero (except non-resettable memory data). Because of this “CONDITION” requirement, the report data will be protected from any inconsistencies of sales data entered in the period from a resetting of the report to another resetting of the same report next time. - Page 105 5. PROGRAMMING OPERATIONS Select “1 PROGRAMMING” from the initial screen using the cursor key, then depress the [ENTER] key. The program menu screen shown below appears. * SET * 02-06-1999 03:04 PROGRAMMING 0 MISC 1 STORE NAME 2 CASHIER 10 PRINT L NAME 3 DEPARTMENT 11 SYSTEM OP1 4 PLU...
-
Page 106: Store Name/Message, Commercial Message, Footer Logo Message Programming (Submode 1)
5. PROGRAMMING OPERATIONS 2. When you obtain an open-price PLU in the PLU Table Setting (Submode 4), depress the [OPEN] key before the [Enter] key depression in a step to input a PLU price. 3. If a journal printer is connected to the register, data you have just programmed will be printed on it. -
Page 107: Cashier Programming (Submode 2)
5. PROGRAMMING OPERATIONS ex.) To program the following draft on the first line of the store name/message area. R E S T A U R A N T Mode Lock: SET Enter 1, depress [X]. 1 [ST] RESTAURANT [DOUBLE] [SPACE] TEC [DOUBLE] [SPACE] 1343 [SPACE] PEACH [SPACE] DRIVE [ST] [AT/TL] Cashier Programming (Submode 2) •... - Page 108 1. The following table shows the Cashier Codes that can be entered. (The capacity is determined by the RAM Allocation Setting. ) However, the actual maximum number of the cashiers are preprogrammed. Therefore, ask your TOSHIBA TEC representative for further information. Code Entry Type [CLK] Key Type 2.
- Page 109 5. PROGRAMMING OPERATIONS ex.) To program the following to a cashier code 1. Cashier Code 1: Name: Status: Tip Rate: Mode Lock: SET Enter 2, depress [X]. 1 [NS] 1 [ST] JONES [ST] (2 [ST]) 5 [#] (3 [ST]) 3 [#] [AT/TL] •...
-
Page 110: Department Table Programming (Submode 3)
5. PROGRAMMING OPERATIONS Department Table Programming (Submode 3) • Programming CONDITION To change the Positive/Negative Status: After Department Daily & GT and PLU Daily & GT Reset To change any other programmed data or to program new departments: Any time outside a sale OPERATION Mode Lock: SET As for details of each Address,... - Page 111 5. PROGRAMMING OPERATIONS NOTES: 1. The “Address Nos” designation at the top after “3 [X]” can be skipped if not necessary. If entered, the designated Address (es) will be automatically accessed after the department designation. For example, if you enter |0204| [#] here (designate each address by entering a two-digit code; 01 for Address 1, 02 for Address 2, you will then enter: Dept Code + [DP#] key, Character Entries [ST] (“2 [ST]”...
- Page 112 5. PROGRAMMING OPERATIONS Address No. Major-Minor Grouping Method Example: (In this case, you should check the logical linkage between the Major Groups and Minor Groups.) Minor GP01 DP01 0101 Linked Group Code in setting “A” Grouping and “B” Grouping Method Example: (In this case, you may think that each department data are processed into max.
- Page 113 5. PROGRAMMING OPERATIONS Address No. Status 1 Selection • Enter the Status Codes 1 to 3 of which status must be set to ON. More than one code may be entered. Enter 0 when none of the statuses should be set to ON. Status Code NOTE:...
- Page 114 5. PROGRAMMING OPERATIONS Address No. High Amount Limit Enter a maximum of 7 digits to be set as the high amount to be locked out. ex.) To prohibit any amount equal to or larger than $40.00: 4000 [#] (Allows any amount equal to or smaller than $39.99.) NOTES: Low Amount Limit Enter a maximum of 7 digits to be set as the low amount limit.
- Page 115 5. PROGRAMMING OPERATIONS NOTE: You can use a maximum of 99 departments. The memories of the departments 1 to 30 have already been opened before delivery of the register. If you want to open a memory and use a department other than the departments 1 to 30, enter a department code you want to designate, then depress the [DP#] key in the key sequence of the Department Table Programming.
-
Page 116: Plu Table Programming (Submode 4)
5. PROGRAMMING OPERATIONS PLU Table Programming (Submode 4) This submode can be operated when new PLU items are to be added, PLU program data is to be changed, or PLUs are to be deleted. • Programming or Changing CONDITION To program new PLUs or to change any programmed contents of PLUs except the following case: Any time outside a sale... - Page 117 5. PROGRAMMING OPERATIONS NOTES: 1. The “Address Nos” designation at the top after “4 [X]” can be skipped if not necessary. If entered, the designated Address (es) will automatically be accessed after the PLU Code designation. 2. A maximum of 2500 PLUs are programmable (varies depending on the capacity and allocation of the RAM) .
- Page 118 5. PROGRAMMING OPERATIONS Address No. 5th Preset Price • For a preset PLU (preset-price PLU), enter a maximum of 6-digit price, and depress [#]. 1 to 999999 (result: $0.01 to $9999.99) • A zero-price ($0.00) may be preset by entering 0 in the above operation. •...
- Page 119 5. PROGRAMMING OPERATIONS Address No. Tax Status • Enter one-to four-digit Status Codes for applicable Tax. 0: Non-taxable 1: Tax 1 (Tax 1 taxable) 2: Tax 2 3: Tax 3 4: Tax 4 (More than one code can be entered for combining Tax 1 to Tax 4 taxable status. For example, enter 12 to select Tax 1 and Tax 2 taxable status.) NOTE: When a tax status has not been programmed to a PLU in this address, the tax status...
- Page 120 5. PROGRAMMING OPERATIONS Address No. Takeout Tax Status Setting This tax status is applied to a takeout transaction when the program option “Takeout feature” has been selected. (For an eat-in transaction, a tax status which has been programmed in Address 10 is applied.) •...
- Page 121 5. PROGRAMMING OPERATIONS ADDITIONAL NOTES If a PLU is linked to an Other Income Department, the PLU is automatically set as Other Income PLU. If a PLU is linked to a negative Department, the PLU is automatically set as negative PLU. Amount Limits (High Amount, Low Amount) of each open-price PLU will be determined by those of its link department.
- Page 122 5. PROGRAMMING OPERATIONS • Deletion CONDITION To delete a PLU with sales data of zero: Any time outside a sale To delete a PLU with sales data of not zero: After PLU Reset OPERATION Mode Lock: SET Individual PLU Deletion 4 [X] [ITEM CORR] Repeatable for other PLUs to be deleted.
-
Page 123: Time Setting Or Adjustment (Submode 5)
5. PROGRAMMING OPERATIONS Time Setting or Adjustment (Submode 5) CONDITION Any time outside a sale OPERATION Mode Lock: SET 5 [X] |Hour| |Minute| (0 to 23) (00 to 59) ex.) To set the time to “1:35 p.m. (13:35)”: Mode Lock to SET, enter 5, depress [X]. Enter 1335, depress [AT/TL]. -
Page 124: Date Setting Or Adjustment (Submode 6)
5. PROGRAMMING OPERATIONS Date Setting or Adjustment (Submode 6) CONDITION Any time outside a sale OPERATION Mode Lock: SET 6 [X] |Day-of-Week Code| 0: SUN (Sunday) 1: MON (Monday) 2: TUE (Tuesday) 3: WED (Wednesday) 4: THU (Thursday) 5: FRI (Friday) 6: SAT (Saturday) ex.) To set the date to Tuesday, 21st of December, 1999: Mode Lock: SET, enter 6, depress [X]... -
Page 125: Hourly Range Setting (Submode 7)
5. PROGRAMMING OPERATIONS Hourly Range Setting (Submode 7) A maximum of 48 hourly ranges can be set. You can obtain sales data by each hourly range, also you can designate a price level and a menu level for each day of the week. CONDITION After Hourly Range Reset and Combo Sale Hourly Range Reset... -
Page 126: Amount Limit Setting For Function Keys (Submode 8)
5. PROGRAMMING OPERATIONS ex.) To set the following to a hourly range 1. Hourly Range 1: Address 1 (Start Time): Address 2 (Sunday): Address 3 (Monday): Address 4 (Tuesday): Address 5 (Wednesday): Address 6 (Thursday): Address 7 (Friday): Address 8 (Saturday): Mode Lock: SET Enter 7, depress [X]. -
Page 127: Non-Taxable Amount Limit Setting (For Canada)/Gratuity Rate Setting (Submode 12)
5. PROGRAMMING OPERATIONS Item or Key to be applied Code [AT/TL] (Cash Tender) [CHECK] (Check Tender) [Chg] (Charge Tender) [MISC] (Misc. Tender) [CPN] (Media-Coupon Tender) [CREDIT 1] (Credit 1 Tender) [CREDIT 2] (Credit 2 Tender) ex.) To set a tender limit amount $100.00 on the [CHECK] key Mode Lock: SET Enter 8, depress [X]. -
Page 128: Minor Group Name Programming (Submode 13)
5. PROGRAMMING OPERATIONS ex.) To set the following • Non-taxable Amount Limit: $20.00 • Gratuity Rate: 5% Mode Lock: SET Enter 12, depress [X]. 1 [ST] 2000 [#] (2 [ST]) 5 [#] [AT/TL] Minor Group Name Programming (Submode 13) This programming is used to set each minor group name. Association among a department, a minor group and a major group should be set in the Department Table Programming (Submode 3). -
Page 129: Major Group Name Programming (Submode 14)
5. PROGRAMMING OPERATIONS Major Group Name Programming (Submode 14) This programming is used to set each major group name. Association among a department, a minor group and a major group should be set in the Department Table Programming (Submode 3). CONDITION Any time outside a sale OPERATION... -
Page 130: Customer File Table Setting (Submode 15)
5. PROGRAMMING OPERATIONS Customer File Table Setting (Submode 15) This programming is used to set a customer file table(customer code, customer name, limit amount and price level), which is used for the charge posting transaction. CONDITION Any time outside a sale OPERATION Mode Lock: SET Customer Card Reading through the MCR... -
Page 131: Combination Report Table Programming (Submode 19)
5. PROGRAMMING OPERATIONS Combination Report Table Programming (Submode 19) This programming is used to make a combination report table which is described in the section 4.3 Combination Reports on page 4-9. CONDITION Any time outside a sale OPERATION Mode Lock: SET 19 [X] |Table No.| [ST] 1 to 3... - Page 132 5. PROGRAMMING OPERATIONS Report Code Day Part Check Track with Sales Check Track without Sales Combo Sales Hourly Combo Sales Employee Clock-in/Clock-out Employee Clock-in/Clock-out (periodic) ex.) To program the following reports to a combination report table 1. • 3: Financial •...
-
Page 133: Plu Stock Loading Or Changing (Submode 24)
5. PROGRAMMING OPERATIONS PLU Stock Loading or Changing (Submode 24) This submode loads or changes the stock quantities of PLUs with the Stock-process status, as part of stock controls. The stock of a PLU may be entered initially in the PLU TABLE PROGRAMMING operation (Submode 4), and may be adjusted in this operation, from day to day, as the stock increases due to delivery from wholesalers, etc. -
Page 134: Tare Table And General Unit Weight Setting (Submode 26)
5. PROGRAMMING OPERATIONS Tare Table and General Unit Weight Setting (Submode 26) In the PLU Table Programming operation (Submode 4), some of Scale-compulsory PLUs may be set with a Tare Table No. The actual tare weight is set to each Tare Table here. Also, the General Unit Weight is set here so that the Unit Weight may be effective to scale items entered through departments or PLUs without any Individual Unit Weight designation. -
Page 135: Plu Preset-Code Key/Display Key Setting (Submode 27)
5. PROGRAMMING OPERATIONS PLU Preset-code Key/Display Key Setting (Submode 27) This programming is used to assign a PLU code to each PLU Preset-code key (SFKC 96), and also used to assign a display menu table No. to each display key (SFKC 210). You can assign a maximum of 5 different PLU codes or 5 different display menu table Nos. - Page 136 5. PROGRAMMING OPERATIONS REMARK: When a PLU code (display menu No.) is assigned to a PLU Preset-code Key (Display Key) on the ECR Keyboard in the operation on the preceding page, the Hardware Key Code which indicates the absolute location of the key will be printed to the left of the assigned PLU Code (display menu No.). The Hardware Key Codes of the ECR keyboard are shown below.
-
Page 137: Plu Group Name Programming (Submode 29)
5. PROGRAMMING OPERATIONS PLU Group Name Programming (Submode 29) This programming is used to set each PLU group name. Grouping of each PLU should be set in the PLU Table Programming (Submode 4). CONDITION Any time outside a sale OPERATION Mode Lock: SET 29 [X] |PLU Group Code| [ST]... -
Page 138: Rkp Message Programming (Submode 30)
5. PROGRAMMING OPERATIONS RKP Message Programming (Submode 30) This programming is used to set 20 RKP messages (a maximum of 20 characters x 2 lines for each), and also used to designate an RKP on which each message is outputted. If your printer is the TM-300, you can select a color for each message. -
Page 139: Display Message Programming (Submode 31)
5. PROGRAMMING OPERATIONS Display Message Programming (Submode 31) This programming is used to set a display message which is displayed in the 16-digit dot window provided to the customer display and the LCD operator display while the mode lock of the register is in “LOCK” position. A display message can be used for information, welcome greeting, etc. -
Page 140: Amount Limit Setting For The [Disc] Key (Submode 35)
5. PROGRAMMING OPERATIONS Amount Limit Setting for the [DISC] Key (Submode 35) This programming is used to set an amount limit for the [DISC] key. CONDITION Any time outside a sale OPERATION Mode Lock: SET 35 [X] 1 [ST] ex.) To set $5.00 as a limit amount Mode Lock: SET Enter 35, depress [X]. -
Page 141: Set Menu Table Programming (Submode 42)
5. PROGRAMMING OPERATIONS Set Menu Table Programming (Submode 42) This programming is used to set a Set Menu Table and their respective Sub Menu PLUs. If a PLU is programmed with a Set Menu Table No. (Address 12 of the PLU TABLE PROGRAMMING), the PLU will be a main menu PLU of the Set Menu Table. -
Page 142: Combo Sale Table Programming (Submode 43)
5. PROGRAMMING OPERATIONS • Deletion CONDITION Any time outside a sale OPERATION Mode Lock: SET 42 [X] [ITEM CORR] Repeatable for other tables to be deleted. Combo Sale Table Programming (Submode 43) This programming is used to set a combo sales table. •... - Page 143 5. PROGRAMMING OPERATIONS 43 [X] |Combo Table No.| [NS] 1 to 99 Submode No. As for details of each address, refer to the following page. Address 1: Combo Table Name 1 [ST] Address 2: Grouping Item 1 2 [ST] Address 3: Grouping Item Code 1 3 [ST] Address 4: Grouping Item 2 4 [ST]...
- Page 144 5. PROGRAMMING OPERATIONS Address No. 2,4,6,8,10,12 Grouping Item Enter 1 for a department item, 2 for a PLU item. Entry of “0” will be ignored. NOTE: Do not set a department together with a PLU which is linked to the department in the same combo sale table.
- Page 145 5. PROGRAMMING OPERATIONS Mode Lock: SET Enter 43, depress [X]. 1 [NS] 1 [ST] COMBO A [ST] (2 [ST]) 2 [#] (3 [ST]) 100 [#] (4 [ST]) 2 [#] (5 [ST]) 200 [#] (6 [ST]) 2 [#] (7 [ST]) 300 [#] 14 [ST] 10 [#] (15 [ST]) 1 [#] (16 [ST]) 1030 [#] (17 [ST]) 1400 [#] (18 [ST]) 1 [#] 20 [ST] 2 [#] [AT/TL] •...
-
Page 146: Guest Check Commercial Message Programming (Submode 45)
5. PROGRAMMING OPERATIONS Guest Check Commercial Message Programming (Submode 45) This programming is used to set a commercial message printed on a guest check. CONDITION Any time outside a sale OPERATION Mode Lock: SET 45 [X] |Line No.| [ST] 1 to 3 Character Entries max. -
Page 147: Day Part Setting (Submode 46)
5. PROGRAMMING OPERATIONS Day Part Setting (Submode 46) A maximum of 6 day parts can be set. You can obtain major group sales data by each day part. CONDITION After Day Part Reset OPERATION Mode Lock: SET 46 [X] |Hour| |Minute| [#] Enter the time that ends each day part, in the 24- hour system. -
Page 148: Employee Table Setting (Submode 50)
5. PROGRAMMING OPERATIONS Employee Table Setting (Submode 50) This programming is used to assign a cashier code and a job code to each employee. CONDITION After Employee Clock-in/Clock-out Daily and GT Reset OPERATION Mode Lock: SET 50 [X] |Employee Code| [NS] 1 to 9999 Submode No. -
Page 149: Job Code/Working Hours Setting (Submode 51)
5. PROGRAMMING OPERATIONS Mode Lock: SET Enter 50, depress [X]. 1 [NS] 1 [ST] JONES [ST] (2 [ST]) 1 [#] (3 [ST]) 010203 [#] [AT/TL] • Deletion CONDITION After Employee Clock-in/Clock-out Daily and GT Reset OPERATION Mode Lock: SET 50 [X] [ITEM CORR] Repeatable for another employee to be deleted. - Page 150 5. PROGRAMMING OPERATIONS Guest Card Reading through the MCR 51 [X] |Job Code| [NS] 1 to 10 Submode No. 11 [NS] Address No. Job Status Select one status from the following. 0: Normal 1: Chief Cashier 2: Server 3: ECR Operation Prohibited Address No.
-
Page 151: Tender Up Table Setting (Submode 52)
5. PROGRAMMING OPERATIONS Job Code 2: Job Code Address Address 1 (Job Name): Address 2 (Job Status): Working Hour Address Address 1 (Daily Regular Working Hour): Address 2 (Weekly Regular Working Hour): Address 3 (Time Unit): Mode Lock: SET Enter 51, depress [X]. 1 [NS] 1 [ST] CASHIER [ST] (2 [ST]) 0 [#] 11 [NS] 1 [ST] 7 [#] (2 [ST]) 35 [#] (3 [ST]) 0 [#] 2 [NS] 1 [ST] COOK [ST] (2 [ST]) 3 [#] 11 [NS] 1 [ST] 9 [#] (2 [ST]) 45 [#] (3 [ST]) 0 [#] [AT/TL] Tender Up Table Setting (Submode 52) -
Page 152: Display Menu Table Setting (Submode 53)
5. PROGRAMMING OPERATIONS ex.) To set the following tender up table. $50.00, $100.00, $150.00, $200.00 Mode Lock: SET Enter 52, depress [X]. 5000 [#] 10000 [#] 15000 [#] 20000 [#] [AT/TL] NOTES: 1. A tender up amount should be set from a smaller to a larger. 2. - Page 153 5. PROGRAMMING OPERATIONS ex.) To set the following PLU items in a display menu table No. 1. PLU Codes 100, 105, 110, 115 Mode Lock: SET Enter 53, depress [X]. 1 [NS] 1 [ST] 100 [PLU] 105 [PLU] 110 [PLU] 115 [PLU] [#] [AT/TL] NOTE: Depressing the [SELECT] key in a sales transaction causes an error if the corresponding display menu table has the “Select Prohibited”...
-
Page 154: Plu Preset Price Setting Or Changing (Submode 60)
5. PROGRAMMING OPERATIONS PLU Preset Price Setting or Changing (Submode 60) This programming is used to set or change each PLU price. CONDITION Any time outside a sale OPERATION Mode Lock: SET 60 [X] |PLU Code| [PLU] Max. 6 digits [MENU 1 to 5] |Price Level| [ST] 1 to 5... -
Page 155: Printer Table Setting (Submode 71)
5. PROGRAMMING OPERATIONS Printer Table Setting (Submode 71) This programming is used to set a printer table. You can set two printer tables. CONDITION Any time outside a sale OPERATION Mode Lock: SET Address 1: Destination of Output (Printer Table 1) 71 [X] 1 [NS] Address 2: Connection Status (Printer Table 1) - Page 156 5. PROGRAMMING OPERATIONS Address No. 1, 3 Destination of Output Destination of data output is as follows. 1: Receipt 2: RKP 1 3: RKP 2 Terminal ID/Port No. Enter a 2-digit terminal ID No. and a 1-digit port No. NOTE: If your system is the standalone system, enter only a 1-digit port No.
-
Page 157: And %- Preset Rate Setting
5. PROGRAMMING OPERATIONS NOTE: A connection status of each RKP can also be changed by an operation in the MGR mode. For details, refer to the section 2.5 RKP Table Change on page 2-3 of the manager’s guide. %+ and %- Preset Rate Setting A preset rate may be set on each of the [%+] and [%-] keys, one independent rate for each key. -
Page 158: Preset Rate Setting For Selective Itemizers (Si1 And Si2)
5. PROGRAMMING OPERATIONS ex.) To set 10% on [%+] Key: Mode Lock: SET Enter 10, depress [%+]. To reset the rate once set: Enter 0, depress the required % key. (Then the % key will always require a manual rate entry in sale entries.) Preset Rate Setting for Selective Itemizers (SI1 and SI2) If any of [ST1/TL] (or [SI/TL]) and [SI2/TL] keys are installed on the keyboard, a preset rate may be programmed on each key. - Page 159 5. PROGRAMMING OPERATIONS NOTES: 1. Whether the calculated amount by the preset SI % rate affects (i.e. add to or subtract from) the sale total is determined by a program option. 2. To reset the rate once set, enter 0 as the rate. (Then the rate is regarded as 100% if the option “Non-affect”...
-
Page 160: Foreign Currency Exchange Rate Setting
5. PROGRAMMING OPERATIONS Example 2) With option “SI Special Discount”: Key Operation in REG Mode 1 [PLU] (SI-net) 2 [PLU] (non-SI) 3 [PLU] (SI-net) [SI/TL] (10% is preset) [AT/TL] On depressing [SI/TL], “-0.30” (which is 10% discount from the total amount of PLU 1 + PLU 3 items) is displayed and printed, and that amount is subtracted from the sale total. -
Page 161: Store/Register No. Setting
5. PROGRAMMING OPERATIONS ex.) To set the rate on the preceding page for the [CUR 1] key. Mode Lock: SET 1 [ . ] 4 [CUR 1] Enter 0 to reset an exchange rate once set. You cannot use a foreign currency key of which the rate is 0. Store/Register No. -
Page 162: Verification Of Programmed Data
6. VERIFICATION OF PROGRAMMED DATA VERIFICATION OF PROGRAMMED DATA You can verify each data programmed in the preceding chapter. Two mode lock positions are available to verify the data; SET and X. Also two ways are available to access a programmed data you want to verify; through the operator display and through the keyboard. -
Page 163: How To Verify A Programmed Data Through The Keyboard
6. VERIFICATION OF PROGRAMMED DATA How to verify a Programmed Data through the Keyboard You can directly access an item you want to verify through a key operation on the keyboard while the mode lock position is in “SET” or “X”. To read out the data of programming operations with a Submode No., first enter “1,”... - Page 165 EO1-11109 MA-1650-3 SERIES 3. M/S LEVEL OPERATOR’S GUIDE Table of Contents...
- Page 167 EO1-11138 FS-2600-1 SERIES TABLE OF CONTENTS Page 1. SYSTEM CONFIGURATION ... 1-1 2. ADDITIONAL FUNCTION KEY AND REGISTERING PROCEDURE ... 2-1...
-
Page 169: System Configuration
1. SYSTEM CONFIGURATION SYSTEM CONFIGURATION Making the most of the functions of the previously described FS-2600 standalone, the FS-2600 can be developed into a master-satellite system. By connecting a PC, the system can also be expanded to a transaction data capture system. Operational functions on each terminal ECR basically stay the same as on a standalone ECR, except those deleted, changed, or added for this M/S system use which are described later. - Page 170 2. ADDITIONAL FUNCTION KEY AND REGISTERING PROCEDURE ADDITIONAL FUNCTION KEY AND REGISTERING PROCEDURE The following is the key that can be installed on the Master Terminal and Back up Master of an in-line system, in addition to the standalone specifications, and the registering procedure using the key. RTR (Register-to-Register) DECLARATION Key ([RTR]) By depressing the [RTR] key on the Master Terminal, various in-line jobs (DLLs, Consolidated Read/Reset Report takings, etc.) can be performed.
- Page 171 2. ADDITIONAL FUNCTION KEY AND REGISTERING PROCEDURE PROCEDURE ON A MASTER TERMINAL FOR RTR DECLARATION CANCEL Mode Lock: SET, X, Z or MGR/RTR Declaration is ON Depress [RTR]. NOTE: If the RTR declaration cancel is performed while a backup error flag is ON, a copy process of a backup data will be automatically performed regardless of a program option.
- Page 173 4. M/S LEVEL MANAGER’S GUIDE Table of Contents...
- Page 175 Error Display ... 10-1 10.3 Error Canceling Process ... 10-2 11. OTHER OPERATIONS RELATING TO IN-LINE SERVICE ... 11-1 11.1 Suspending ... 11-1 11.2 Retry ... 11-1 11.3 Incomplete Ending ... 11-1 11.4 Cancel ... 11-1 TABLE OF CONTENTS EO1-11138 FS-2600-1 SERIES Page...
-
Page 177: Operations Before In-Line Service
1. OPERATIONS BEFORE IN-LINE SERVICE OPERATIONS BEFORE IN-LINE SERVICE Before entering in-line service operations (In-line Report takings, DLLs, etc.), the following operations are available if necessary. Terminal Open Check This operation sends a dummy text to those terminals set in the Terminal Connection Table (Submode 69), and prints out the Register Nos. -
Page 178: Terminal Designation
1. OPERATIONS BEFORE IN-LINE SERVICE Terminal Designation This operation can be performed before any in-line service operation. When this operation is skipped, no specific terminals are designated, i.e., the in-line service operations will be performed to all the terminals. CONDITION Any time outside a sale (operable on the Master Terminal) OPERATION Mode Lock: SET, X or Z (depending on the in-line service operations to follow) and RTR... -
Page 179: Terminal Condition Check
1. OPERATIONS BEFORE IN-LINE SERVICE Terminal Condition Check This operation checks the condition of the designated terminals, and prints out the status responded from the terminals. CONDITION Any time outside a sale (operable on Master Terminal) OPERATION Mode Lock: X and RTR Declaration ON Through the Operator Display Select “5 OTHERS”. -
Page 180: Printer Condition Check
1. OPERATIONS BEFORE IN-LINE SERVICE Printer Condition Check This operation checks the conditions of the printers connected to each terminal. CONDITION Any time outside a sale (operable on each terminal) OPERATION Mode Lock: X Through the Operator Display Select “5 OTHERS”. * X/GTX * 02-06-1999 03:04 PROGRAM READ E-JOURNAL... -
Page 181: Read And Reset Reports
2. READ AND RESET REPORTS READ AND RESET REPORTS Terminal Reports Since most reports are taken as in-line reports on the Master Terminal, some of the reports which are available on the individual standalone ECR basis cannot be taken on Master or Satellite ECRs of the in-line system. The following are the reports which are listed in the MANAGER’S GUIDE for the standalone level but cannot be taken on any ECRs of the in-line system. - Page 182 2. READ AND RESET REPORTS The key operation for each In-line Report is the same as the corresponding terminal report available on the standalone ECR. However, the key operation can be executed only on the Master Terminal while the [RTR] key is turned on.
- Page 183 2. READ AND RESET REPORTS Report Name COMBINATION REPORTS • Combination 1 Read: • Combination 2 Read: • Combination 3 Read: • Combination 1 Reset: • Combination 2 Reset: • Combination 3 Reset: FINANCIAL REPORTS • Financial Read: • Financial Reset: CASHIER REPORTS (for the Floating Cashier feature) •...
- Page 184 2. READ AND RESET REPORTS TABLE OF IN-LINE REPORT OPERATIONS (continued) Report Name HOURLY RANGE REPORTS • Hourly Read (Daily only) • Hourly Reset (Daily only) DEPARTMENT REPORTS • All Department Read: • All Department Reset: ALL MEDIA SALES TOTAL AND CASH-IN- DRAWER READ (Daily only) PLU REPORTS •...
- Page 185 2. READ AND RESET REPORTS TABLE OF IN-LINE REPORT OPERATIONS (continued) Report Name DAY PART REPORTS (Daily only) • Day Part Read • Day Part Reset CHECK TRACK (Guest Order Table) WITH SALES REPORTS (Daily only) • Individual Cashier Read •...
- Page 186 2. READ AND RESET REPORTS PROCESS REPORTS AND BASE REPORT DATA The following table shows which process reports are available after which report data collections. Reports Collection Required before Process Report takings (CONSOLIDATION MEMORY CAPTURE: NOTE 1) Any of the following PLU reports (NOTE2) All PLU Read Daily Zone PLU Read Daily All PLU Reset Daily...
- Page 187 2. READ AND RESET REPORTS The print format of each report is basically the same as the format of the corresponding standalone terminal report except that some indications are additionally printed as in-line operation job IDs. 12-25-1999 **************************************** #111101 #222202 #999909 **************************************** #555505...
-
Page 188: Operations After In-Line Report Taking
2. READ AND RESET REPORTS Operations after In-line report Taking The following operations are available after taking in-line reports. 2.3.1 Consolidated report Data Read (Reprint) This operation issues the report data which is remaining in the Consolidation Memory of the Master Terminal. OPERATION ON MASTER TERMINAL: Mode Lock: X/RTR Declaration: ON 90 [AT/TL] When no consolidated data is remaining in the memory, this read operation is not possible. -
Page 189: Programming Operations
3. PROGRAMMING OPERATIONS PROGRAMMING OPERATIONS The system should be programmed fully by your local TOSHIBA TEC representative at the time of delivery according to the user’s requirements so that daily operations can immediately start. However, some data must be added or changed daily or in a longer period. Since the volume of programming contents for the system is too large, this chapter and the following two chapters are provided as guide lines of the user’s daily programming and... -
Page 190: Programming Operations Added For In-Line Terminals
3. PROGRAMMING OPERATIONS Submode PLU Group Name Programming RKP Message Programming Display Message Programming Amount Limit Setting for the [DISC] Key Set Menu Table Programming Combo Sale Table Programming Guest Check Commercial Message Programming Day Part Setting Employee Table Setting Job Code/Working Hour Setting Tender Up Table Setting Display Menu Table Setting... - Page 191 3. PROGRAMMING OPERATIONS Through the Keyboard 69 [X] |In-line ID No.| [ST] 1 to 16 (NOTES 1 & 2 below) Repeat for other terminals to be connected, including the Master Terminal itself. ex.) To set the following. Master Terminal ID No. 1 Satellite Terminal ID No.
- Page 192 3. PROGRAMMING OPERATIONS 3.2.2 Terminal ID Setting (Submode 77) This submode is available for in-line terminals (including the master and backup master terminals) . It must be operated separately on each terminal since the Terminal ID should vary from terminal to terminal. The data set in this submode is used as the in-line address of the terminal for in-line service operations.
-
Page 193: Verification Of Programmed Data Related To In-Line Specifications
3. PROGRAMMING OPERATIONS Verification of Programmed Data Related to In-line Specifications The programmed data related to in-line specifications can be read for verification purposes. CONDITION Anytime outside a sale (Sign OFF required under Cashier Signing Method) OPERATION Mode Lock: X or SET (RTR Declaration is unnecessary on the Master Terminal.) •... -
Page 194: Dll (Down-Line-Loading) Operations
If any other DLLs not introduced in this and next chapters are required, ask your TOSHIBA TEC representative. Please also note that Terminal Designation (see Chapter 1) can be operated prior to a specific DLL operation, to designate Satellite Terminals that receive the DLL. -
Page 195: Print Format Of Dll Operations
4. DLL (Down-Line-Loading) OPERATIONS NOTE: DLL is possible only when the non-floating cashier feature is used. CONDITION Terminals including the Master: Any time outside a sale (Sign OFF condition is necessary for the Code Entry Method) OPERATION Satellite Terminals: Master Terminal: Through the Operator Display Select “3 PROGRAM DLL”. -
Page 196: Plu Maintenance
5. PLU MAINTENANCE PLU MAINTENANCE In this chapter, adding, changing, or deleting operations related to PLU Table program data are described. These are operated on the Master Terminal only. All of these operations are loaded into Satellite Terminals at the same time. - Page 197 5. PLU MAINTENANCE Through the Keyboard 63 [X] Submode No. Operation procedure surrounded by this line is the same Repeat for any as the address within operation in the same PLU Submode 4. by re-entry for correction. Repeat for other PLUs.
-
Page 198: Plu Price Change With Dll (Submode 73)
5. PLU MAINTENANCE Deletion CONDITION The sales data of the required PLUs are zero and all terminals are outside a sale, programming, or report taking operations. OPERATION Mode Lock: SET and RTR Declaration is ON 63 [X] [ITEM CORR] Repeatable for other PLUs to be deleted. NOTES: 1. -
Page 199: Inquiry
6. INQUIRY INQUIRY In the master-satellite system, the data files regarding the following inquiries between the master terminal and each satellite terminal are maintained in the master terminal center file. Each time an item regarding the data files are performed on each satellite terminal, the master terminal searches and checks the corresponding file and responds to the inquiring terminal by sending a result. -
Page 200: Backup Function
7. BACKUP FUNCTION BACKUP FUNCTION (ONLY WHEN THE BACKUP MASTER IS CONNECTED) Function • By connecting the backup master terminal (BM) , the various files stored in the master terminal (M) can be backed up. • The terminal assigned to ID No. 2 will function as a backup master terminal (BM) . By programming ID No. - Page 201 7. BACKUP FUNCTION Procedure 1) Changing Program Data (DLL from the PC) • When various center files from the PC are received via DLL, the master terminal (M) backs up program data and sales data of the backup master terminal (BM) automatically and sends the result to the PC. 2) Changing Program Data (Operated on the Master Terminal) •...
- Page 202 7. BACKUP FUNCTION • While the backup error flag is on, the following operation is performed. The master terminal (M) gives a short beep at the timing when the long receipt is printed to warn that a backup error has occurred. •...
-
Page 203: Data Capture Funciton
8. DATA CAPTURE FUNCITON DATA CAPTURE FUNCTION Function To make it possible to transfer data to the PC, the details of registration jobs performed on each terminal are pooled in the master terminal (M) as transaction data. Buffering Transaction Data When a terminal performs the finalize operation,transaction data entered in registrations is sent to the master terminal (M). -
Page 204: Master And Backup Master Alternation
9. MASTER AND BACKUP MASTER ALTERNATION MASTER AND BACKUP MASTER ALTERNATION The Backup Master Terminal can be changed to be used as the Master Terminal for an accident that the Master Terminal becomes down, etc. And the Master Terminal can be changed to be used as the Backup Master when it comes back from repair, etc. -
Page 205: 10. Transmission Error
10. TRANSMISSION ERROR 10. TRANSMISSION ERROR When a terminal makes an inquiry but a communication error occurs for some reason and the inquiry to the other station is not possible, the message “IRC CONNECT ERR” is displayed on that terminal and operation is stopped. -
Page 206: Error Canceling Process
10. TRANSMISSION ERROR 10.3 Error Canceling Process There are two error-canceling processes in accordance with the inquiring job contents. Type 1: Depressing the [C] key will return to the status before the inquiry. Applicable Jobs: • Check Track Occupy Declaration •... -
Page 207: 11. Other Operations Relating To In-Line Service
11. OTHER OPERATIONS RELATING TO IN-LINE SERVICE 11. OTHER OPERATIONS RELATING TO IN-LINE SERVICE The following are other operations relating to in-line service operations. 11.1 Suspending This is to be operated for the purpose of suspending an in-line service being executed, when any terminals remain unserviced, and of going on to a “RETRY”, “INCOMPLETE ENDING”, or “CANCEL”...