
Related Manuals for Siemens FC361 Series


Summary of Contents for Siemens FC361 Series
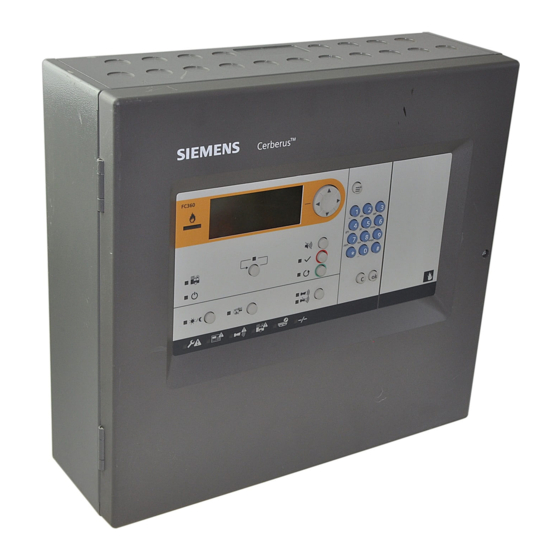
- Page 1 FC361-xx Fire control panel Technical Manual Building Technologies A6V10421795_en--_g 2016-11-18 Control Products and Systems...
- Page 2 Issued by: Siemens Switzerland Ltd. Building Technologies Division International Headquarters Gubelstrasse 22 CH-6301 Zug Tel. +41 41 724-2424 www.siemens.com/buildingtechnologies Edition: 2016-11-18 Document ID: A6V10421795_en--_g © Siemens Switzerland Ltd, 2015 2 | 124 Building Technologies A6V10421795_en--_g Fire safety 2016-11-18...
-
Page 3: Table Of Contents
Table of Contents About this document ................... 7 Applicable documents ..................9 Download center ................... 10 Abbreviations ....................10 History of changes..................11 Safety ....................... 13 Intended use ....................13 Safety instructions ..................13 Safety regulations for the method of operation ..........14 Release notes .................... - Page 4 5.11 Accessories ....................44 5.11.1 Key switch (FCA3601-Z1) / Key switch (Nordic) (FCA3603-Z1) ... 44 5.11.2 Evacuation module (NL) (FTO3601-H1) ........45 5.11.3 LED indicator (16 zones) (FTO3602-Z1) ........46 5.11.4 Output card (4M) (FCA3602-Z1) ............ 47 5.11.5 RS232 module ................50 5.11.6 Event printer (Optional) ..............
- Page 5 Detector line ....................84 8.4.1 Restart ................... 84 8.4.2 Power off ..................84 8.4.3 Read in ................... 85 8.4.4 Maintenance .................. 86 8.4.5 Auto configuration ................89 8.4.6 View / Locate ................. 90 8.4.7 Reset detection module ..............92 Calibrate output card (4M) ................93 Reset alarm counter ..................
- Page 6 Appendix C: Flash file behaviors .............. 116 Appendix D: Default setting for panel/devices .......... 117 Appendix E: Switch mains to AC 115 V ............ 121 Index ........................ 122 6 | 124 Building Technologies A6V10421795_en--_g Fire safety 2016-11-18...
-
Page 7: About This Document
About this document Applicable documents 1 About this document ● Specialist electrical engineering knowledge is required for installation. ● Only an expert is permitted to carry out installation work. Incorrect installation can take safety devices out of operation unbeknown to a layperson. - Page 8 About this document Applicable documents Document identification The document ID is structured as follows: A6Vxxxxxxxx_aaAA_vv A6Vxxxxxxxx_--AA_vv A6Vxxxxxxxx_aa--_vv A6Vxxxxxxxx_----_vv ID coding Description A6Vxxxxxxx STEP-ID generated by the STEP system Separator Language abbreviation in accordance with ISO 639-1 Country abbreviation in accordance with ISO-3166-1 Multilingual or international Document version, single or double digit: a, b, …z;...
-
Page 9: Applicable Documents
About this document Applicable documents Conventions for text marking Markups Special markups are shown in this document as follows: ⊳ Requirement for a behavior instruction Behavior instruction with at least two operation sequences – Version, option, or detailed information for a behavior instruction ⇨... -
Page 10: Download Center
You can download various types of documents, such as data sheets, installation instructions, and license texts via the following Internet address: http://siemens.com/bt/download Enter the document ID in the 'Find by keyword' input box. You will also find information about search variants and links to mobile applications (apps) for various systems on the home page. -
Page 11: History Of Changes
About this document History of changes 1.4 History of changes The reference document's version applies to all languages into which the reference document is translated. The first edition of a language version or a country variant may, for example, be version 'd' instead of 'a' if the reference document is already this version. - Page 12 About this document History of changes The table below shows the published language versions and country variants with the corresponding modification index: Modification index en_-- de_-- fr_-- it_-- es_-- published no publication with this modification index 12 | 124 Building Technologies A6V10421795_en--_g Fire safety 2016-11-18...
-
Page 13: Safety
Safety Intended use 2 Safety 2.1 Intended use The panel is intended to be mounted in a building to detect, evaluate and alarm in the event of fire, together with C-NET detector line. 2.2 Safety instructions The safety notices must be observed in order to protect people and property. The safety notices in this document contain the following elements: ●... -
Page 14: Safety Regulations For The Method Of Operation
2.3 Safety regulations for the method of operation National standards, regulations and legislation Siemens products are developed and produced in compliance with the relevant European and international safety standards. Should additional national or local safety standards or legislation concerning the planning, assembly, installation,... - Page 15 Modifications to the system design and the products Modifications to the system and to individual products may lead to faults, malfunctioning and safety risks. Written confirmation must be obtained from Siemens and the corresponding safety bodies for modifications or additions. Modules and spare parts ●...
-
Page 16: Release Notes
Disregard of the safety regulations Before they are delivered, Siemens products are tested to ensure they function correctly when used properly. Siemens disclaims all liability for damage or injuries caused by the incorrect application of the instructions or the disregard of danger warnings contained in the documentation. -
Page 17: Cyber Security Disclaimer
Safety Cyber security disclaimer 2.5 Cyber security disclaimer Products, solutions and services from Siemens include security functions to ensure the secure operation of building automation and control, fire safety, security management, and physical security systems. The security functions on these products, solutions and services are important components of a comprehensive security concept. -
Page 18: System Description
System description System overview 3 System description 3.1 System overview The panel is a compact panel with an integrated operating unit for processing signals from FD720 devices. See list of compatibility A6V10882301 in chapter 'Applicable documents [➙ 9]'. The panel is operated as standalone control panel. The panel supports operation of the C-NET detector line in a loop or stub. -
Page 19: Features
System description Features 3.2 Features System ● Monitors detector and sounder lines ● Up to 126 addresses per loop ● LCD with 7 lines, max. 21 characters per line ● Up to 2000 events can be stored in history log with date and time stamp ●... -
Page 20: Panel Types
System description Panel types 3.3 Panel types Overview of panels and options FC361-ZZ FC361-ZA batteries max. 2x 12 Ah batteries max. 2x 25 Ah without LED indicator without LED indicator FC361-YZ FC361-YA batteries max. 2x 12 Ah batteries max. 2x 25 Ah with LED indicator (16 zones) with LED indicator (16 zones) More options... -
Page 21: Technical Data
System description Technical data 3.4 Technical data Information on approvals, CE marking, and the relevant EU directives for this device (these devices) is available in the following document(s); see chapter 'Applicable documents': ● Document A6V10419665 3.4.1 General data Detector line Number of detector lines 1 loop or 2 stubs Number of addresses... -
Page 22: Electrical Data
System description Technical data 3.4.2 Electrical data Rating detector line Operating voltage DC 12…33 V Operating current Max. 0.5 A Line resistance / capacitance Max. 240 Ω / Max. 500 nF Monitored for earth fault Monitored for open / short circuit Sounders on mainboard Voltage / current DC 24 V / 0.5 A... -
Page 23: Mechanical Data
System description Technical data Batteries Operating time Up to 72 h Battery capacity 2x 12 V, 7 Ah / 12 Ah / 25 Ah, sealed lead acid Voltage DC 20.5…28.6 V Charging current Max. 1.6 A Load resistance R Max. 1 Ω imax Each sounder has an output current of max. -
Page 24: Structure
System description Structure 3.5 Structure The figure below shows the structure of the panel with open front cover. Figure 2: Structure of FC360 panel Power supply Batteries Mainboard Optional output card (4M) RS232 module PMI board Space for options (e.g. Evacuation module (NL), LED indicator (16 zones), key switch) Mains fuse holder 24 | 124... -
Page 25: Options With Requirements
Options with requirements 4 Options with requirements The following options with requirements as defined in EN 54-2/A1 are available. The table below explains how to realize these options in the panel. The relevant sections according to EN 54-2/A1 are specified in the left column of the table. -
Page 26: Installation
Installation Instruction 5 Installation 5.1 Instruction WARNING Voltage Electric shock ● Installation work may only be undertaken by qualified staff and when the system is de-energized. NOTICE Electrostatics Damage to electronics ● Suitable protective measures must be taken when working with electronics modules. - Page 27 Installation Instruction Figure 3: Mounting the panel Recommended display height approx. 1.6 to 1.7 m Panel width: 402 mm Distance from door of at least one door leaf in width Panel height: 372 mm 27 | 124 A6V10421795_en--_g Building Technologies Fire safety 2016-11-18...
-
Page 28: Surface Mounting
Installation Surface mounting 5.2 Surface mounting Steps: 1. Define the mounting location. 2. Open the door of the panel using a screw driver. 3. Break out the required cable entries (A). – Screw cable glands (B) for all open entries. The cable glands are not included. -
Page 29: Power Supply - Mains Voltage
Installation Power supply - mains voltage 5.3 Power supply - mains voltage WARNING Electrical voltage! Electric shock Before connecting the mains voltage ensure that power is not switched on and is locked to prevent it from being switched on. 1. Insert the mains cable (1) into the housing from the top right side. Use mains cable with cross section of 3*1.5 mm up to 3*2.5 mm 2. -
Page 30: Battery
Battery capacity determines charging current. The charging current must be taken into account when calculating the power supply. ● Battery dimensions determines the housing type. The fire control panel is approved with the batteries listed above, use only Siemens provided batteries. 30 | 124 Building Technologies A6V10421795_en--_g Fire safety... -
Page 31: Connection Overview
Installation Connection overview 5.5 Connection overview The picture below shows the overview of the panel connection. Figure 7: Connection overview of FC360 panel Resistor 2.2 kΩ Relay Output module FCA1209-Z1 Connection of sounder lines Aux. power supply DC 24 V / 0.2 A Configurable IO, default setting as 'Input' Configurable IO, default setting as 'Unmonitored output' Output relay, default setting as 'RT fire'... -
Page 32: C-Net Detector Line
Installation C-NET detector line 5.6 C-NET detector line Up to 126 devices, such as automatic fire detectors (e.g. smoke or heat detectors), manual call points, I/O modules and other C-NET components, can be connected to the C-NET detector line. The connection for the C-NET detector line is on the main board. Most line devices, such as fire detectors, are supplied directly by C-NET with the required operating voltage. -
Page 33: Connectable C-Net Devices
Installation C-NET detector line 5.6.1 Connectable C-NET devices The table below contains a list of all devices which can be connected to the C-NET detector line. It also highlights the devices with an alarm indicator (AI) and to the devices an external alarm indicator (EAI) or a sounder base (DBS720) can be connected. - Page 34 Installation C-NET detector line Device type Type Description AI Ext. AI DBS720 DBS729 Sounder beacon interbase – – – Base DB721 Detector base with loop contact – Operation and FT2010 Floor repeater terminal (FRT) – – indication FT2011 Floor repeater display (FRD) –...
-
Page 35: C-Net Topology
Installation C-NET detector line 5.6.2 C-NET topology Permissible topology for the C-NET The C-NET can be wired in the topology shown below. Regardless of the topology (loop, stub or loop with sub-stub), the C-NET system limits, such as length, cable resistance etc., must be observed. -
Page 36: Wiring On C-Net Devices
Installation C-NET detector line 5.6.3 Wiring on C-NET devices The connection terminals for the loop (detector line, C-NET) are on the main board. The position is shown as below. LOOP1 Figure 9: Position of C-NET detector line terminal Each C-NET device has the terminals for directly connecting the C-NET wire. Loop wiring Connection terminal Detector base and sounder base... - Page 37 Installation C-NET detector line Stub wiring Figure 10: Stub connection of C-NET detector line When using shielded connection cables: Cable shielding must be connected to the panel’s earth terminal. Max. 32 devices may be connected to a single stub as per EN 54-2. 37 | 124 A6V10421795_en--_g Building Technologies...
-
Page 38: Sounder
Installation Sounder 5.7 Sounder The panel mainboard has two sounder lines. They are monitored from the terminal to the EOL for open and short circuits. Application: Sounder control Technical: ● Current of each sounder line: max. 0.5 A @ DC 24 V ●... -
Page 39: Inputs / Outputs
Installation Inputs / outputs 5.8 Inputs / outputs The panel mainboard has four configurable inputs / outputs. Each one can be configured as an input or output. The default settings are: ● IO1 / IO2: input ● IO3 / IO4: output Figure 12: Connection of configurable IOs 1 Configured as input (Connect to '0V' and IO) 2 Configured as output (Connect to '24V' and IO) - Page 40 Installation Inputs / outputs Mode Functionality Initiate extra PSU Activates external PSU fault as long as the input is fault closed. Dialer (RT Fire Activates RT fire device fault as long as the input is Device) Fault closed. The ‘RT Fire Fault’ LED and the ‘General Fault’ LED are Initiate fire brigade is Generates an ‘Fire brigade is called’...
-
Page 41: Relay
Installation Relay 5.9 Relay The panel mainboard has three relay outputs used for controlling without line monitoring. They can be freely configured as: ● RT fire ● RT fault ● Fire control ● Fire alarm The default settings are: ● Relay 1: RT fire ●... -
Page 42: Terminals And Switches
Installation Terminals and switches 5.10 Terminals and switches The picture below shows the position of terminals and switches. Figure 14: Position of terminals and switches Terminals Description Sounder lines Supply output (24 V) X6…X9 Configurable inputs / outputs X11…X13 Relay outputs Loop1 (C-NET detector line) Connection to PMI board Connection to output card (4M) - Page 43 Installation Terminals and switches X22 Pin assignment Description Message input from the power supply: Battery fault Message input from the power supply: Mains fault Supply input from the power supply (+) Supply input from the power supply (+) Supply input from the power supply (-) Supply input from the power supply (-) S1: Reset key for panel Operation...
-
Page 44: Accessories
Installation Accessories 5.11 Accessories 5.11.1 Key switch (FCA3601-Z1) / Key switch (Nordic) (FCA3603-Z1) FCA3603-Z1 FCA3601-Z1 Figure 15: Installation of key switch Function: The key switches directly enable access level 2 operations. Installation: Detailed information on installation is available in document A6V10431013. See chapter 'Applicable documents [➙... -
Page 45: Evacuation Module (Nl) (Fto3601-H1)
Installation Accessories 5.11.2 Evacuation module (NL) (FTO3601-H1) FTO3601-H1 Figure 16: Installation of evacuation module (NL) Function: The evacuation module (NL) provides the Dutch special function. It activates the EVAC zone by pressing the <START> button twice and deactivates the EVAC zone by pressing the <STOP>... -
Page 46: Led Indicator (16 Zones) (Fto3602-Z1)
Installation Accessories 5.11.3 LED indicator (16 zones) (FTO3602-Z1) FTO3602-Z1 Figure 18: Installation of LED indicator (16 zones) Function: The LED indicator (16 zones) shows the actual alarm status of each section (max. 16 sections of a panel). ● Flashing LED indicates first section in alarm. ●... -
Page 47: Output Card (4M) (Fca3602-Z1)
Installation Accessories 5.11.4 Output card (4M) (FCA3602-Z1) FCA3602-Z1 Figure 19: Installation of output card (4M) Figure 20: Connection overview of output card (4M) Figure 21: Connection of internal power Function: The output card (4M) has four monitored outputs: OUT1…OUT4. The default settings for the outputs are: ●... - Page 48 Installation Accessories Installation: WARNING Electrical voltage Before installation with output card (4M): ● Switch off the panel’s power supply. ● Disconnect power cable at the terminal '20-30V' on the output card (4M) Detailed information on installation is available in document A6V10431015. See chapter 'Applicable documents [➙...
- Page 49 Installation Accessories The table below can be used for this check, they display the maximum values. Details must be calculated individually. Imax R Line [Ω] @ Umin = 16 V 0.1 A 0…74.3 0.2 A 0…34.1 0.4 A 0…14 0.6 A 0…7.2 0.8 A 0…3.9...
-
Page 50: Rs232 Module
Installation Accessories 5.11.5 RS232 module The RS232 module (FCA2001-A1) is used to connect an event printer. Installation: Figure 23: Installation of RS232 1 RS232 module 2 X10, slot for connection of the modules 1. Insert the module into the slot X10. 2. -
Page 51: Event Printer (Optional)
Installation Accessories 5.11.6 Event printer (Optional) The RS232 module connects one external printer Fujitsu DL3750+ to the panel. Detailed information on the printer is available on the CD supplied with the printer. Connection: Precondition: RS232 module is installed. See chapter 'RS232 module [➙ 50]'. The picture below shows the connection between printer and panel. -
Page 52: Spare Parts
Installation Spare Parts 5.12 Spare Parts 5.12.1 Mainboard FCM3601-Z1 The mainboard FCM3601-Z1 is already mounted in the fire control panel in the factory and only has to be replaced in the event of a repair. Figure 24: Installation of mainboard Threaded bolts 6 screws Mainboard FCM3601-Z1... - Page 53 6. Check firmware version to be sure the latest version is installed. It is an integral part of the ‘FC360 Desktop Editor’ which can be downloaded from www.siemens.com/cerberus-fit 7. Restore configuration to panel if you have it on PC. Otherwise you have to execute auto configure detector line and configure the system manually.
-
Page 54: Door Incl. Pmi Fhd3601-Z1
Installation Spare Parts 5.12.2 Door incl. PMI FHD3601-Z1 The door incl. PMI FHD3601-Z1 is already mounted in the fire control panel in the factory and only has to be replaced in the event of a repair. Figure 25: Installation of door incl. PMI Figure 26: Details view of installation Bolt Bolt pin... -
Page 55: Function Overview
Function overview Access levels 6 Function overview 6.1 Access levels The panel is protected against unauthorized operation by access levels. The authorization passwords for access level 2, access level 3 and access level 3.1 can be changed either directly on panel or with 'FC360 Panel Configurator'. -
Page 56: Led Indicators
Function overview LED indicators 6.2 LED indicators FC360 13 14 15 16 Description Color Status Function Alarm The panel is in 'Alarm' condition. More alarm Flashing More than two alarm events happen. Fire brigade Depends on the configuration: Option 1: Fire brigade was called. Option 2: RT fire output relay is activated. -
Page 57: Keys
Function overview Keys 6.3 Keys FC360 Description Function More Alarm Moves to the next 'fire alarm' event when the 'More Alarm' LED is flashing. Manned / Unmanned Switches between 'Manned' / 'Unmanned'. Alarm Delay Off Stops the 'Alarm delay time'. The panel generates directly a global alarm. Silence Silences the sounders in the event of alarm. -
Page 58: Lcd
Function overview 6.4 LCD The LCD is divided into 3 areas. 1: Title This line displays the title of the view window. 2: View window This window displays the menu list, event list or its property. '▼': Indicates that there are other items below the bottom item. (the bottom item is NOT the last item.) '▲': Indicates that there are other items above the top item. -
Page 59: Operating Menu Overview
Function overview Operating menu overview 6.5 Operating menu overview Access level 1: 'Lamp test activation possible at access level I' function can be configured by 'FC360 Panel Configurator'. The default setting is unavailable at access level 1. Access level 2: The highlighted items differ from access level 1. - Page 60 Function overview Operating menu overview Access level 3: The highlighted items differ from access level 1 and access level 2. Refer to the access level 1 and access level 2 for description of the other items. 60 | 124 Building Technologies A6V10421795_en--_g Fire safety 2016-11-18...
-
Page 61: Entry Of Numbers And Letters
Function overview Entry of numbers and letters 6.6 Entry of numbers and letters Numerals Press desired numeral to enter it. Letters Use the numeral keys to enter letters. Press the numeral key with the desired letter (displayed at the lower left corner of key), all included letters (upper case and lower case) and the numeral are displayed in order. -
Page 62: Event Views
Function overview Event views 6.7 Event views FC361-xx fire control panel displays different event views with different formats. The picture below is the event views format: Description Samples Series number of the event / total number of the events Event type Alarms Access level Series number of the event... -
Page 63: Sample Of Fault View
Function overview Event views 6.7.2 Sample of Fault view 1/1 ① Faults② L3 ③ 001 ④ Manual alarm⑤ Zone 3 ⑥ Meeting room 808 ⑦ floor ⑧ Section 1 ⑨ 12-09-2015 08:08:08 ⑩ 1: Add 003/ 004A08B0 ⑪ 6.7.3 Sample of Isolation view 1/1 ①... -
Page 64: Operation
Operation Alarm procedure in unmanned mode 7 Operation This chapter describes detailed operation workflow on important fire detection system functions. 7.1 Alarm procedure in unmanned mode ● Display provides fire information. See chapter 'Event views [➙ 62]'. ● Immediate activation of panel states 'Any Fire' and 'Global Alarm'. ●... - Page 65 Operation Alarm procedure in unmanned mode MINOR INCIDENT: No fire alarm Press <Reset> to return into normal operation. (Access level 2 password is required.) If fire brigade was called automatically (i.e. RT fire), inform the fire brigade about the actual situation. The fire alarm reoccurs if any device remains in fire condition.
-
Page 66: Alarm Procedure In Manned Mode
Operation Alarm procedure in manned mode 7.2 Alarm procedure in manned mode ● Display provides fire information. See chapter 'Event views [➙ 62]'. ● Immediate activation of panel states 'Any Fire'. In the event of an automatic fire alarm in manned mode, the attendance check countdown T1 starts if AVC is on. -
Page 67: Procedure In Case Of Fault
Operation Procedure in case of fault MINOR INCIDENT: No fire alarm Press <Reset> to return into normal operation. (Access level 2 password is required.) Check and ensure that the fire brigade was not called accidently The fire alarm reoccurs if any device remains in fire condition. 7.3 Procedure in case of fault A fault event is displayed on LCD if a fault occurs. -
Page 68: Access Level 1
Operation Access level 1 7.4 Access level 1 These functions are available without a password. 7.4.1 System status The fire detection system evaluates received signals and indicates them as events. There are the following event categories: ● Alarm ● Fault ●... -
Page 69: Login
Operation Access level 1 7.4.2 Login The 'Login' function is used to access higher levels using a password. The password entry window displays automatically if you require a higher access level operate on the PMI. The picture below shows the password entry window. Login Password: (4 digits) 1. -
Page 70: Query Alarm Count
Operation Access level 1 7.4.3 Query alarm count The panel counts all alarm events. The total number of alarm events is displayed by querying alarm count. 1. Press on the keypad. a The 'Main menu' window is open. 2. Select 'Query alarm counter' and press a The total number of alarm events is indicated. -
Page 71: Access Level 2
Operation Access level 2 7.5 Access level 2 These functions are available with an access level 2 password. 7.5.1 Isolation The 'Isolation' function is used to enable / disable section, zone, device, sounders, RT output, control output. In certain situations, e.g. maintenance or decoration etc., you can disable parts of a building to avoid false alarms or fault messages. - Page 72 Operation Access level 2 3. Select 'Isolation' and press , the 'Isolation' window is open. Isolation 1 - Detection 2 - Sounders 3 - RT outputs 4 - Fire control 5 - Control output 4. Select 'Detection' and press , the 'Detection' window is open. Isolation- Detection 1 - Section 2 - Zone...
-
Page 73: Test
Operation Access level 2 7.5.2 Test 7.5.2.1 Detection test This function sets a section or a zone to 'Test' mode. The panel provides two kinds of test modes: ● Silent: All sounders remain silent in fire alarm condition during testing. Only the LCD screen displays the test event. - Page 74 Operation Access level 2 4. Select 'Detection test' and press , the 'Detection test' window is open. Test - Detection test 1 - Silent 2 - Audible 5. Select one item, e.g. 'Silent' and press , a list of all sections is displayed. Detection test - Silent 01 Section 1(OFF) 02 Section 2(OFF)
- Page 75 Operation Access level 2 7.5.2.2 Lamp test The lamp test checks the following functions: ● LEDs ● Buzzer ● 1. Press on the keypad, the 'Main menu' window is open. Main menu 1 - System status 2 - Operation 3 - Event memory 4 - Login 7 - Logout 8 - Query alarm counter...
-
Page 76: Event Memory
Operation Access level 2 7.5.3 Event memory 7.5.3.1 Event log All events that happened in the fire detection system are stored in the event memory. There are 8 event categories: ● Alarm ● Fault ● Technical ● Isolation ● Test ●... - Page 77 Operation Access level 2 3. Select 'Event log' and press , the 'Event log' window is open. Event log 1 - Show log 2 - Advanced 4. Select 'Show log' and press , all events stored in the event memory are displayed.
- Page 78 Operation Access level 2 3. Select 'Event log' and press , the 'Event log' window is open. Event log 1 - Show log 2 - Advanced 4. Select 'Advanced' and press , the 'Advanced' window is open. Advanced Type: Start time: 08-01-2015 End time: 08-01-2015...
-
Page 79: Logout
Operation Access level 2 7.5.4 Logout The 'Logout' function returns to access level 1 from access level 2 or 3. 1. Press on the keypad, the 'Main menu' window is open. Main menu 1 - System status 2 - Operation 3 - Event memory 4 - Login 7 - Logout... -
Page 80: Access Level 3
Operation Access level 3 7.6 Access level 3 This function is available with access level 3 password. 7.6.1 Test log The 'Test log' function deletes all test log on the panel. 1. Press on the keypad, the 'Main menu' window is open. Main menu 1 - System status 2 - Operation... -
Page 81: Engineering
Engineering Set date & time 8 Engineering All 'Engineering' functions request access level 3 password. 8.1 Set date & time The 'Set date & time' function adjusts date and time. In countries with central European summer time (CEST), the system clock automatically switches between daylight savings time and regular time. -
Page 82: Edit Zone And Section Name
Engineering Edit zone and section name 8.2 Edit zone and section name The 'Edit name' function is used to edit the name of a zone or a section. The new name is shown when the zone or the section is reaccessed. 1. -
Page 83: Change Password
Engineering Change password 8.3 Change password The 'Passwords' function is used to change the password for access level 2, access level 3 and access level 3.1. 1. Press on the keypad. a The 'Main menu' window is open. 2. Select 'Engineering' and press a The 'Engineering' window is open. -
Page 84: Detector Line
Engineering Detector line 8.4 Detector line 8.4.1 Restart The 'Restart' function is used to restart a detector line. 1. Press on the keypad. a The 'Main menu' window is open. 2. Select 'Engineering' and press a The 'Engineering' window is open. 3. -
Page 85: Read In
Engineering Detector line 8.4.3 Read in The 'Read in' operation must be executed after performing one of the following actions: ● Change topology of detector line, e.g. merge two stubs into one loop. ● Add new device(s). 1. Press on the keypad. a The 'Main menu' window is open. -
Page 86: Maintenance
Engineering Detector line 8.4.4 Maintenance 8.4.4.1 Remove a device The device must be uninstalled with the base (if necessary) if it needs to be removed from the system. Reconnect the wires of the detector line, then operate on PMI as outlined below. The device is deleted from the system. w A device is removed and a 'Missing device' fault is reported in fault view. - Page 87 Engineering Detector line 8.4.4.2 Accept replaced devices If several devices of the detector line need to be replaced, power off the line first and then uninstall the old devices. Replace the new devices with the same type and then operate on PMI as per the procedure below. The new devices inherit all features and parameters settings from the old devices.
- Page 88 Engineering Detector line 8.4.4.3 Replace and test a detector If a detector needs to be replaced with the same type, set the detector to replace mode on the PMI as per the procedure below. 1. Press on the keypad. a The 'Main menu' window is open. 2.
-
Page 89: Auto Configuration
Engineering Detector line 8.4.5 Auto configuration The 'Auto configuration' function is used to commission a newly installed panel immediately. NOTICE Overwrite the old configuration The old configuration is overwritten. ● Save the old configuration before executing auto configuration. w The detector line is powered off. Refer to chapter 'Power off [➙ 84]'. 1. -
Page 90: View / Locate
Engineering Detector line 8.4.6 View / Locate 8.4.6.1 View sections / zones The 'View section / zones' function is used to view all sections, zones and devices that are connected to the panel. 1. Press on the keypad. a The 'Main menu' window is open. 2. - Page 91 Engineering Detector line 8.4.6.2 Locate devices The 'Locate devices' function is used to find a device on site. 1. Press on the keypad. a The 'Main menu' window is open. 2. Select 'Engineering' and press a The 'Engineering' window is open. 3.
-
Page 92: Reset Detection Module
Engineering Detector line 8.4.6.3 View type A dependency The 'View typeA dependency' function is used to view all devices which have type A dependency activated. 1. Press on the keypad. a The 'Main menu' window is open. 2. Select 'Engineering' and press a The 'Engineering' window is open. -
Page 93: Calibrate Output Card (4M)
Engineering Calibrate output card (4M) 8.5 Calibrate output card (4M) The transmission paths must be calibrated per EN 54-13. The 'Calibrate 4M card line’ function is used to calibrate the line on output card (4M). Line calibration is needed to achieve supervision. The line resistance is indicated for calculation resulting from the calibration. -
Page 94: Reset Alarm Counter
Engineering Reset alarm counter 8.6 Reset alarm counter The 'Alarm counter reset' function is used to reset the alarm counter to '0'. 1. Press on the keypad. a The 'Main menu' window is open. 2. Select 'Engineering' and press a The 'Engineering' window is open. 3. -
Page 95: Configuration Tools
Update firmware ● Modify configuration file ‘FC360 Desktop Editor' is available at www.siemens.com/buildingtechnologies/Cerberus-fit. ‘FC360 Panel Configurator' is integrated in the panel. Detailed information about tools operation is available in document A6V10450595. See chapter 'Applicable documents [➙ 9]'. 8.8.1 Connect PC to panel A PC is required for most commissioning, maintenance and repair work. -
Page 96: Commissioning
Commissioning Install and check the detector line 9 Commissioning This chapter describes initial commissioning of the fire control panel FC361-xx. 9.1 Install and check the detector line Install devices Before inserting or connecting a device, stick the ID number onto the layout plan. The adhesive strip with the ID number can be found on the bottom of the device. -
Page 97: Install Panel
Commissioning Install panel 9.2 Install panel w The fire control panel FC361-xx is mounted. 1. Insert the cables for the detector lines and the mains supply into the panel and connect them to the panel. Refer to chapter 'Power supply - mains voltage [➙... -
Page 98: Configure The System Manually
1. Connect PC to the panel. Refer to chapter 'Connect PC to panel [➙ 95]'. 2. Open a web browser. 3. Enter web address with 'fc360.siemens.com' and press <Enter>. a 'FC360 Panel Configurator' is open. 4. Enter access level 3 password to login to level 3. - Page 99 Commissioning General commissioning steps Modify using 'FC360 Desktop Editor' 1. Connect the panel to the PC installed with 'FC360 Desktop Editor'. 2. Backup configuration to PC first. Refer to chapter 'Backup configuration to PC [➙ 104]'. 3. Open 'FC360 Desktop Editor'. 4.
-
Page 100: Function Test
Commissioning General commissioning steps 9.4.3 Function test WARNING Alarming and RT transmission are activated during testing. You must do the follow: ● Inform fire brigade. ● Inform owner of the building. 1. Execute lamp test. Refer to chapter 'Lamp test [➙ 75]'. 2. -
Page 101: Set Windows Firewall
Activate the firewall after the firmware update. Windows 7 There are different ways of adjusting the firewall rules in Windows 7. The following settings apply for Siemens PCs which use group guidelines controlled by the domain. Set the following for the Windows 7 firewall: w You have administrator rights on your PC. - Page 102 Set Windows firewall 6. Click 'Next >' to confirm and enter the program path to 'WebEngineeringServer.exe'. – Example: D:\Program Files\Siemens\Offline Web Tool\offline_server\api\thrift\WebEngineeringServer.exe 7. Click 'Next >' to confirm and then confirm the default setting 'Allow the connection' in the next step ('Action').
-
Page 103: Update Firmware
Commissioning Update firmware 9.6 Update firmware WARNING Fire detection installation is deactivated during the firmware update Fire may spread unhindered. ● Supervision by people is required. ● Re-activate the fire detection installation as soon as possible. When the panel firmware is updated, the firmware of output card (4M) (if installed) and the detection module are also updated automatically. -
Page 104: Backup Configuration To Pc
1. Connect PC to the panel. Refer to chapter 'Connect PC to panel [➙ 95]'. 2. Open a web browser. 3. Enter web address with 'fc360.siemens.com' and press <enter>. a 'FC360 Panel Configurator' is open. 4. Enter access level 3 password to login to level 3 on panel. -
Page 105: Backup Test Report To Pc
9.10 Backup test report to PC 1. Connect PC to the panel. Refer to chapter 'Connect PC to panel [➙ 95]'. 2. Open a web browser. 3. Enter web address with 'fc360.siemens.com' and press <enter>. a 'FC360 Panel Configurator' is open. 4. Click 'Administration' tab. -
Page 106: Maintenance
Maintenance General 10 Maintenance 10.1 General Regular maintenance of the system is necessary to ensure the reliable operation. The panel has a reminder function that can inform you of imminent maintenance. When the service reminder is displayed, regular maintenance by the service technician is required. -
Page 107: Function Test
Maintenance Function test 10.3 Function test The following schedule is recommended for the function test. However, local regulations have priority. Function Activity Interval (years) Detector line Activate all automatic detectors and all manual call points. Activate a detector or manual call point per line Check all detectors and manual call points for dirt and check that usage is in accordance with regulations. -
Page 108: Device Test
Maintenance Device test 10.4 Device test Smoke detector 1. Enable test mode for the line. 2. Place detector tester RE6 on detector head. 3. Release test gas. 4. Remove detector tester. 5. Confirm the alarm was triggered. Alarm indicator is flashing. 6. -
Page 109: Trouble Shooting
Trouble shooting Fault message indication 11 Trouble shooting 11.1 Fault message indication No. Description Cause Action General The system has a Check whether another fault LED is fault fault. flashing, if not: ● Check the display ● Check whether the fault control input is activated. -
Page 110: Accessories
Trouble shooting Accessories 11.3 Accessories Description Cause / Action DC 24 V too low Check voltage input '24V' on the output card FCA3602- Outputs from output Check the cable connection and output line. card (4M) indicates a fault EVAC fault Check the cable connection. -
Page 111: Components And Spare Parts
Components and spare parts 12 Components and spare parts Components Type Part no. Designation FC361-ZZ S54433-C112-A1 Fire control panel (1L, Compact) FC361-ZA S54433-C111-A1 Fire control panel (1L, Comfort) FC361-YZ S54433-C110-A1 Fire control panel (1L, Compact, LED) FC361-YA S54433-C109-A1 Fire control panel (1L, Comfort, LED) Accessories Type Part no. -
Page 112: Environmental Protection And Disposal
Environmental protection and disposal 13 Environmental protection and disposal This device is manufactured using materials and procedures which comply with current environmental protection standards as best as possible. More specifically, the following measures have been undertaken: ● Use of reusable materials ●... -
Page 113: Appendix A: Alarm Verification Concept (Avc)
Appendix A: Alarm Verification Concept (AVC) 14 Appendix A: Alarm Verification Concept (AVC) The 'Alarm Verification Concept' serves the purpose of delayed alarm transmission and takes into account the interaction of the operating personnel in the alarming sequence. Operating personnel are able to examine the indicated fire location in the event of a fire alarm. - Page 114 Appendix A: Alarm Verification Concept (AVC) Alarm verification proceeds as follows: ● An alarm event activates local alarming and starts the time T1 for attendance check. ● Operating personnel acknowledges alarm event on the panel prior to the expiry of T1. Acknowledging normally silences local alarming. If there is no acknowledgement, global alarming is activated after T1 expires.
-
Page 115: Appendix B: Zone Type List
Appendix B: Zone type list 15 Appendix B: Zone type list Up to 200 zones can be assigned to 1…17 sections. Two kinds of sections are available as below: ● Section (T1): used for technical zones ● Section (1…16): used for alarm events Zone type Parameters Values... -
Page 116: Appendix C: Flash File Behaviors
Appendix C: Flash file behaviors 16 Appendix C: Flash file behaviors Actions Effects Alarm Counter Configuration Event Memory PMI Status Password of File 'FC360 Panel Configurator' Update firmware Unchanged Unchanged Unchanged Unchanged Unchanged Download an existing Unchanged Modified Unchanged Unchanged Unchanged configuration file Download a new created... -
Page 117: Appendix D: Default Setting For Panel/Devices
Appendix D: Default setting for panel/devices 17 Appendix D: Default setting for panel/devices Panel site information: Items Default settings Name Site Installer name Siemens Contact tel. Service reminder enable Timed channel active 23:00:00 Timed channel inactive 23:00:15 Addressable sounders tone 1... - Page 118 Appendix D: Default setting for panel/devices Special panel settings Items Default settings MCP broken glass message Sounder outputs activation via silence/resound button Resound sounders on new alarm Lamp test activation possible at access level I Acknowledge used as silence Acknowledge availability at access level I Block ackn./reset if RT is active RT Fire LED activated by RT fire...
- Page 119 Appendix D: Default setting for panel/devices Manual call points parameters Devices Attach AI FDM221 FDM223 FDM224 FDM225 FDM226 FDM231 Input parameters of input modules / I/O modules Devices Short circuit monitoring Inversion enabled FDCI221 Normal FDCI222 Normal FDCIO221 Normal FDCIO222 Normal FDCIO224 Normal...
- Page 120 Appendix D: Default setting for panel/devices Sounder bases / sounders parameters Devices Volume Silent sounder DBS721 High DBS728 High DBS729 High FDS221 High FDS229 High 120 | 124 Building Technologies A6V10421795_en--_g Fire safety 2016-11-18...
-
Page 121: Appendix E: Switch Mains To Ac 115 V
Appendix E: Switch mains to AC 115 V 18 Appendix E: Switch mains to AC 115 V 1. Remove power supply FP2015-A1 from the panel and open it. 2. Move the jumper from X12 to X11 on the PCB board. Jumper X12 for AC 230 V Jumper X11... -
Page 122: Index
Index / Index LCD test .............. 75 Accept replaced devices ........87 LEDs test ............. 75 Access levels ............55 Line separator ............. 32 Acknowledge ............57 Login ..............69 Alarm count ............70 Alarm Delay Off ........... 57 Alarm Verification Concept ......... 113 Manned / Unmanned ........... - Page 123 Index / Topology............. 35 Semi flush mounting ........... 26 Set date & time ........... 81 Wiring ..............35 Silence / Resound ..........57 C-NET devices ..........36 Spare Parts ............52 Event printer ............. 51 Surface mounting ..........26 Inputs on mainboard ......... 39 Switch mains .............
- Page 124 Issued by © Siemens Switzerland Ltd, 2015 Siemens Switzerland Ltd Technical specifications and availability subject to change without notice. Building Technologies Division International Headquarters Gubelstrasse 22 CH-6301 Zug +41 41-724 24 24 www.siemens.com/buildingtechnologies Document ID: A6V10421795_en--_g Edition: 2016-11-18...