
Related Manuals for Olivetti Fax-Lab 200


Summary of Contents for Olivetti Fax-Lab 200
- Page 1 Fax-Lab 200/Fax-Lab 200P Fax-Lab 250/Fax-Lab 250P INSTRUCTIONS cover ENG.p65 11/09/01, 15.48...
- Page 2 PUBLISHED BY: Editors: Olivetti I- Jet S.p.A. Olivetti Tecnost, S.p.A. Località Le Vieux Direzione @ Home/Office 11020 ARNAD (Italy) Via Jervis, 77 - 10015 IVREA (Italy) Copyright © 2001, Olivetti All rights reserved The manufacturer reserves the right to make any changes to the machine described in this manual, at any time, and without prior warning.
- Page 3 UICK GUIDE This chapter contains a simplified description of the installation, transmission, reception and copying procedures. For more detailed instructions, see the relevant sections. NSTALLATION For further details, see the "Preliminary operations" chapter. 1 2 3 4 5 6 7 8 9 0 1 2 3 4 5 6 7 8 9 0 1 2 3 4 5 6 7 8 9 0 1 2 1 2 3 4 5 6 7 8 9 0 1 2 3 4 5 6 7 8 9 0 1 2 3 4 5 6 7 8 9 0 1 2 1 2 3 4 5 6 7 8 9 1 2 3 4 5 6 7 8 9 0 1 2 3 4 5 6 7 8 9 0 1 2 3 4 5 6 7 8 9 0 1 2 1 2 3 4 5 6 7 8 9 0 1 2 3 4 5 6 7 8 9 0 1 2 3 4 5 6 7 8 9 0 1 2 1 2 3 4 5 6 7 8 9 1 2 3 4 5 6 7 8 9 0 1 2 3 4 5 6 7 8 9 0 1 2 3 4 5 6 7 8 9 0 1 2 1 2 3 4 5 6 7 8 9 0 1 2 3 4 5 6 7 8 9 0 1 2 3 4 5 6 7 8 9 0 1 2 1 2 3 4 5 6 7 8 9 1 2 3 4 5 6 7 8 9 0 1 2 3 4 5 6 7 8 9 0 1 2 3 4 5 6 7 8 9 0 1 2 1 2 3 4 5 6 7 8 9 0 1 2 3 4 5 6 7 8 9 0 1 2 3 4 5 6 7 8 9 0 1 2 1 2 3 4 5 6 7 8 9...
- Page 4 UICK GUIDE RANSMISSION For further details, see "To send a document" in the "Basic transmission and reception operations" chapter. 1 2 3 4 5 6 7 8 9 0 1 2 3 4 5 6 7 8 9 0 1 2 3 4 5 6 7 8 9 0 1 2 1 2 3 4 5 6 7 8 9 0 1 2 3 4 5 6 7 8 9 0 1 2 3 4 5 6 7 8 9 0 1 2 1 2 3 4 1 2 3 4 5 6 7 8 9 0 1 2 3 4 5 6 7 8 9 0 1 2 3 4 5 6 7 8 9 0 1 2 1 2 3 4 5 6 7 8 9 0 1 2 3 4 5 6 7 8 9 0 1 2 3 4 5 6 7 8 9 0 1 2 1 2 3 4 1 2 3 4 5 6 7 8 9 0 1 2 3 4 5 6 7 8 9 0 1 2 3 4 5 6 7 8 9 0 1 2 1 2 3 4 5 6 7 8 9 0 1 2 3 4 5 6 7 8 9 0 1 2 3 4 5 6 7 8 9 0 1 2 1 2 3 4 1 2 3 4 5 6 7 8 9 0 1 2 3 4 5 6 7 8 9 0 1 2 3 4 5 6 7 8 9 0 1 2 1 2 3 4 5 6 7 8 9 0 1 2 3 4 5 6 7 8 9 0 1 2 3 4 5 6 7 8 9 0 1 2 1 2 3 4...
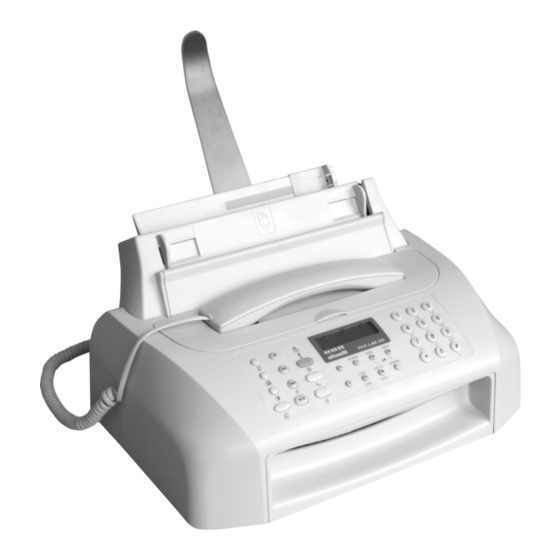
- Page 5 OMPONENTS The figure shows the external and internal parts common to the four models of fax machine. The second row of keys shown on the left- hand side of the console is only present on models with a built-in telephone answering device. The parallel interface is only present on the multifunctional models.
- Page 6 ONSOLE The figure shows the operator console of the models with a built-in TAD. The keys on the second row on the left and the LED concern the telephone answering device and are described in the relevant section. EDUCTION KEY Reduces or enlarges the docu- ments to be copied (only with the document inserted in the...
- Page 7 ONSOLE ONTRAST KEY OOK KEY TOP KEY AST TX PAUSE KEY Adjusts the contrast of the documents to be sent Accesses the line: it is Unloads a document from the ADF. When pressed twice, (only with the document inserted in the ADF). equivalent to lifting the redials the last fax number Turns off the "...
-
Page 8: Table Of Contents
ABLE OF CONTENTS INTRODUCTION MORE SOPHISTICATED OPERATIONS OTHER USEFUL RECEPTION SETTINGS ......... 26 PRELIMINARY OPERATIONS OTHER USEFUL TRANSMISSION SETTINGS ......27 TO CONNECT IT TO THE TELEPHONE LINE ......2 TO CHANGE THE DATE AND TIME AND THE INSTALLATION PARAMETERS ........... 28 TO CONNECT THE TELEPHONE HANDSET ...... -
Page 9: Introduction
NTRODUCTION BOUT THE INSTALLATION AND SETUP ONSULTING THE MANUAL PARAMETERS This manual describes four models of fax machine: the base model, the model with a built-in telephone answering device, and then As the country default values for each installation and setup param- the multifunctional models (base model and model with built- eter may change due to certification requirements or specific custom- in telephone answering device) which can be connected to a... -
Page 10: Preliminary Operations
RELIMINARY OPERATIONS If you cannot connect the additional device directly into the "TEL" O CONNECT IT TO THE TELEPHONE LINE socket, use the relevant adapter (which varies from one country to another). As the connection to the telephone line of the fax machine, ex- If the system to which the fax machine is connected is a system with ternal answering machine, additional telephone or other devices several sockets in series, you must connect the fax machine to... - Page 11 CONNECTION ALL SOCKETS FOR CONNECTION TO TELEPHONE LINE Connection sockets LINE DDITIONAL TELEPHONE OR OTHER DEVICES CONNECTION GERMANY ALL SOCKETS FOR CONNECTION TO TELEPHONE LINE Connection sockets LINE DDITIONAL TELEPHONE OR OTHER DEVICES THER DEVICES CONNECTION AUSTRIA ALL SOCKETS FOR CONNECTION TO TELEPHONE LINE Connection sockets LINE DDITIONAL TELEPHONE OR...
-
Page 12: To Connect The Telephone Handset
O ADD PAPER O CONNECT THE TELEPHONE HANDSET 1. Insert the connector of the handset cable into the socket marked with the symbol on the fax machine. 2. Place the handset in its seat. O CONNECT IT TO THE POWER SUPPLY n o t E 1. -
Page 13: To Set It Up For The First Time
The display shows the message: AUTOMATIC RX 00 25-07-01 11:23 • On the other hand, if there are any interruptions or white lines present, set 0 to clean the nozzles again: if the new print test continues to be unsatisfactory, repeat the procedure an- other time. - Page 14 To select the print format The display shows the country it was set up for. In this case: U.K. If the print format set on the fax machine does not corre- spond to the print format you intend to use, press the |/} If the country displayed is not the desired one, press |/} to keys until the display shows the desired paper format "LET- change it.
- Page 15 For example, to enter the name "LARA": • Set the output mode (area code or flash) to access the public telephone network from the private telephone net- Until you have selected the letter "L". work. • Set the same dialling mode (tone or pulse) as the one Until you have selected the letter "A".
- Page 16 To set the number of rings Enter the name that identifies the area code or the name of Press |/} to view the other available values: "01", "02", the alternative telephone operator and then press the "04" and "08". key. The display shows: TYPE PREFIX: To confirm your choice.
-
Page 17: Basic Transmission And Reception Operations
ASIC TRANSMISSION AND RECEPTION OPERATIONS Now that your fax machine has a name and number, you can use it to: O PLACE THE DOCUMENT IN THE ADF • send documents (also in broadcast mode, from the memory, or by polling) Place the document, without forcing, on the automatic document feeder (ADF) with the side to be sent face down and then fit the cheeks •... - Page 18 n o t e If your correspondent’s fax machine is set up for auto- matic reception, you will hear the fax machine signal. If you have entered any incorrect digits: position the cursor, If it is set up for manual reception, the correspondent using the |/} keys, to the incorrect digit and overwrite it with himself will answer so you can ask him to press the start the correct one;...
- Page 19 If you want, change the contrast and resolution values as Overwrite with the new time and then confirm the setting by described previously. pressing the key or confirm the existing time by press- Until the display shows: DELAYED TX ing the key.
-
Page 20: To Receive
O RECEIVE The fax machine prompt you to enter another number: TYPE FAX NUMBER You can set up the fax machine to receive the documents NUM/ sent by your correspondents in four separate modes, If you want to send the document to more than one corre- that you may access by pressing the key. -
Page 21: To Set One-Touch And Speed Dialling
For the models with a built-in telephone answering Dial your correspondent’s fax number (max. 52 digits) di- device, see the relevant section. rectly on the numeric keypad. If you connect an external telephone answering de- vice, make sure that the number of rings after which the If there are any incorrect numbers, position the cursor on answering device is activated is less than the one set on the incorrect number using the |/} keys and overwrite it... - Page 22 At this point, as the other information remains unchanged, O CHANGE DELETE A ONE TOUCH DIALLING KEY OR SPEED press the key to return the fax machine to its initial DIALLING CODE standby status. Follow the one-touch dialling or speed dialling procedure To associate a telephone number only without hav- until the display shows: ing to store a fax number first:...
-
Page 23: To Print Reports And Lists
• Activity report: contains information about the last 32 transac- The display shows: tions carried out (transmission and reception operations), which the fax machine keeps in its memory and is printed automati- FAX CALL cally after the thirty-second transaction or on request. CODE OR <... - Page 24 O ENABLE DISABLE THE AUTOMATIC PRINTING OF THE • Received Id Number (and, sometimes, name) of theselected correspondent. This number BROADCAST TRANSMISSION REPORT corresponds to the number you dialled, only if the correspondent set his own fax number correctly. Otherwise, it may be dif- ferent or not be present at all.
- Page 25 O PRINT THE SETUP PARAMETERS AND THE ONE TOUCH To confirm your choice. DIALLING AND SPEED DIALLING SETTINGS Having printed the report, the fax machine automatically returns to its initial standby status. n o t e Until the display shows: FAX SET-UP If you chose "PRINT OUT:EXIT", press the key to...
-
Page 26: To Make A Call
O MAKE A CALL When you engage the line by lifting the telephone handset, you O TELEPHONE BY RUNNING A SEARCH IN may use all the telephone functions available on ordinary telephones THE PHONE BOOK sold on the market. These also include the R function (REGISTER RECALL, activated by pressing the key) which provides access to the special serv- Do not place the document in the ADF. -
Page 27: To Make A Copy
O MAKE A COPY n o t E HAT DOCUMENTS CAN BE COPIED If you want to abort the copy in progress, press the twice: the first time to unload the document from the ADF and Before making a copy, make sure that the document respects the the second time to return the fax machine to the initial stand- characteristics described in "What documents may be used", by mode. -
Page 28: The Telephone Answering Device
HE TELEPHONE ANSWERING DEVICE If you have purchased the model of fax equipped with an integrated To start recording personal memos. telephone answering device you can perform the same functions as those performed by external telephone answering devices. To move, while playing messages and memos, to the start You can therefore: of the next message or memo. -
Page 29: Outgoing Messages
The display shows: • To actually transfer the new messages, you must: PLAY UNLOCK • have set up the telephone answering device correctly (see "To transfer messages and memos to a remote telephone" To return the fax machine to the initial stand-by mode. later in this chapter). -
Page 30: Messages
Lift the handset. The display shows: Press the key or press the key and lift the REC.MEMO MSG? handset to listen to message 1 recorded previously. The display shows: PLAYING To start recording. The display shows: RECORDING 29 When it gets to the end of the message, the fax machine automatically prepares to record a new OUTGOING MES- SAGE 1. -
Page 31: Listened To
Having played back the last message, the fax machine emits two O TRANSFER MESSAGES AND MEMOS TO A short beeps and returns automatically to the initial stand-by mode. REMOTE TELEPHONE (MESSAGES) indicator LED stops blinking and will remain on steady. If you wish, you can program the TAD to call you on a remote telephone at a given time to let you listen to any new messages received. -
Page 32: Telephone
O OPERATE THE TELEPHONE ANSWERING PECIAL FUNCTIONS OF THE TELEPHONE DEVICE FROM A REMOTE LOCATION ANSWERING DEVICE You can set up the TAD for the following special functions: You can operate the TAD not only directly using specific keys on the •... -
Page 33: To Print The Tad Configuration Parameters
2 Monday, Tuesday, ecc. Indicates the day on which the Press the key and then the key until the display message was received. shows: 3 0/12 AM o Pm Indicates the time at which the ANNOUNCE ONLY message was received (from 0 to 12 plus the abbreviation AM or PM). -
Page 34: More Sophisticated Operations
ORE SOPHISTICATED OPERATIONS N O T E THER USEFUL RECEPTION SETTINGS If you choose the " SURPLUS:AUTO" setting, the fax ma- chine will print the surplus text on another sheet providing the surplus exceeds 12 mm. O REDUCE THE PRINTING AREA OF A DOCUMENT RECEIVED If you choose the "SURPLUS:ON"... -
Page 35: Other Useful Transmission Settings
THER USEFUL TRANSMISSION SETTINGS O HEAR THE LINE SIGNALS The fax machine is set up so that you can hear the dialling O CHANGE THE POSITION OF YOUR NAME AND FAX tones during the dialling phases as well as the connec- tion signals exchanged between your fax machine and NUMBER your correspondent’s fax machine. -
Page 36: To Change The Date And Time And The Installation Parameters
O REDUCE THE TRANSMISSION SPEED O ENABLE DISABLE ECM The fax machine (model with built-in TAD) transmits regu- The ECM (Error Correction Mode) is a system for cor- larly at a speed of 14400 bps (bits per second). A trans- recting the errors caused by interference on the line. - Page 37 Until the display shows: The display shows: STATION NAME DD/MM/YY HH:MM 25-07-01 11:23 The display shows the name set previously, for example: TYPE YOUR NAME Enter the new date and time (e.g. 26-07-01; 12:00). As LARA each digit is entered, the cursor will move to the next one. DD/MM/YY HH:MM Overwrite with the new name...
- Page 38 The display shows the line to which the fax machine was set The display shows the line to which the fax machine was set to be connected, for example: to be connected, for example: PUBL.LINE (PSTN) PUBL.LINE (PSTN) Press the |/} keys to set the connection to "private". Until the display shows: From here on, proceed as described in "To set it up for REMOTE START:ON...
- Page 39 It depends on the value you selected when setting up the O CHANGE THE NUMBER OF RINGS fax machine. Press the |/} keys to select the other option. This function is only enabled in some countries. From here on, proceed as described in "To set it up for If set in PHONE/FAX RX or TAD/FAX RX reception mode, the first time", section "Preliminary operations".
-
Page 40: Sending/Receiving A Document In Polling Mode
O MAKE A TRANSMISSION REQUEST POLLING RECEPTION O CHANGE THE SILENCE LAPSE This function is only enabled in some countries. Arrange with your correspondent the time at which you intend to make the transmission request so that he has time Remember that if the silence lapse set on the external to put the document to be sent in his fax machine. - Page 41 O PREPARE THE DOCUMENT FOR TRANSMISSION POLLING TRANSMISSION Place the document in the ADF. The display shows the default contrast and resolution values: NORMAL and (standard), respectively. Until the display shows: POLLING TX Press the key twice. The second line of the display shows: "POLLING TX SET".
-
Page 42: Troubleshooting Guide
ROUBLESHOOTING GUIDE OR MINOR PROBLEMS HAT HAPPENS IF THERE IS A POWER FAILURE The list below may be used as a guide to the solution of minor prob- lems. In the case of a power failure, the fax machine keeps the following data in the memory: the date and time, the numbers set for one-touch and speed dialling and the reports. -
Page 43: Error Codes
RROR CODES The error codes printed both on the transmission report and the activity report consist of two digits indicating the cause of the error. To save space, the two-digit code without any message is printed on the activity report. CODE MESSAGE CAUSE OF ERROR... -
Page 44: Signals And Messages
COPY INTERRUPTED IGNALS AND MESSAGES • You aborted the copy operation by pressing the key. Any problems that may arise are generally indicated by acoustic • An error occurred during the document copying phase, prevent- signals (accompanied, in some cases, by visual signals: error ing it from being printed: check the type of fault on the display and LED "... - Page 45 RX IN MEMORY LINE ON HOLD, PRESS HOLD Reception continues in the memory because an error occurred dur- You have put a telephone call on hold by pressing the key : ing the reception of a document, preventing it from being printed: check the type of fault on the lower line of the display and correct it.
-
Page 46: Maintenance Operations
AINTENANCE OPERATIONS At this point, the fax machine automatically cleans the O REPLACE THE PRINT HEAD print head and tests the nozzles, printing out the result of the diagnostic test. Examine the diagnostic test result with reference to "To install the print head", section "Prelimi- nary operations". -
Page 47: To Clean The Electrical Contacts Of The Print Head
Remove the print head and clean the electrical contacts O CLEAN THE NOZZLES OF THE PRINT HEAD both on the print head and on the print head carriage, see "To clean the electrical contacts of the print head", N O T E below. -
Page 48: To Clean The Optical Reader
O CLEAN THE OPTICAL READER O REMOVE JAMMED DOCUMENTS AND SHEETS OF PRINTING PAPER Dust accumulating on the glass surface of the optical reader may cause problems in the scanning of documents. To avoid these prob- During transmission or copying, a document could get jammed lems, the glass should be cleaned every now and again as follows: (this condition is signalled by the display showing the message: "RE- With the fax machine disconnected from the power socket:... -
Page 49: Technical Data
ECHNICAL DATA ENERAL CHARACTERISTICS ECEPTION CHARACTERISTICS Model ......Desktop transceiver Printing system .... Printing on plain paper, bubble ink jet printer Display ......LCD 16 + 16 char. Max. printing width 208 mm Capacity memory ..(*) 21 pages Printing paper ........A4 (210 x 297 mm) Dimensions ............ -
Page 50: To Use It As A Printer
O USE IT AS A PRINTER n o t e If you have purchased the multifunctional model of fax machine, you can also use it as a printer but you must first connect it to a PC If the operating system installed on your computer is Windows 95 and install the relevant software. -
Page 51: Accessing The On-Line Documentation
CCESSING THE ON LINE DOCUMENTATION The installation procedure loads not only the printer driver but also on-line documentation files that provide more information about its characteristics and the printing functions. In Windows 95/98/ME To access the on-line documentation, click on one of the three icons in the Linkfax group under the Programs item on the Start menu. -
Page 52: Index
NDEX Acoustic signals 37 Line characteristics ADF 9 private line 7 ASF 4 public line 7 Automatic redial 10 to change the type of connection to the line 29 Line signals 27 Lists list of installation parameters 17 Buzzer volume 27 one-touch dialling and speed dialling settings 17 setup parameters 17 Connection... - Page 53 Print head cleaning the print head and testing the nozzles 38 nozzle cleaning and testing procedure 5 Technical data to clean the electrical contacts 39 characteristics of optical reader 41 to clean the nozzles of the print head 39 communication characteristics 41 to install the print head 4 environmental conditions 41 to replace the print head 38...
- Page 54 Monochrome print head part numbers Single-block print head: P/N 84431 W (FPJ 20) Single-block print head with pigmented ink: P/N B0042 C (FPJ 22) Colour print head part numbers Single-block print head: P/N 84436 G (FPJ 26)
- Page 55 237991 R...