Table of Contents
Advertisement
Advertisement
Table of Contents

Related Manuals for Zeiss Axio Zoom.V16


Summary of Contents for Zeiss Axio Zoom.V16
- Page 3 You have purchased a high quality product from Zeiss. Before using the instrument the first time, please read this operating manual in order to maintain the high quality of the instrument and ensure reliable work with it for a long time.
- Page 4 Persons in contravention of this copyright shall be liable to pay compensation for damages. All rights reserved in the event of a patent grant or registration of a utility patent. Published by: Carl Zeiss Microscopy GmbH Carl-Zeiss-Promenade 10 07745 Jena, Germany microscopy@zeiss.com www.zeiss.com/microscopy...
-
Page 5: Table Of Contents
CONTENTS Axio Zoom.V16 Carl Zeiss CONTENTS Page INTRODUCTION ......................7 General information ....................... 7 Notes on instrument safety .................... 8 Notes on warranty ....................... 11 DESCRIPTION ......................11 Proper use of zoom microscopes .................. 11 Microscope systems ..................... 12 Mechanical interfaces ....................12 Technical data...................... - Page 6 CONTENTS Carl Zeiss Axio Zoom.V16 STOP button ......................... 43 Adjusting the range of travel of the motorized focusing drive ........44 Settings ........................45 4.7.1 Basic microscope settings ....................45 4.7.2 Setting the reflected light illumination ................47 4.7.3 Setting the transmitted light illumination ............... 55 CLEANING, MAINTENANCE AND SERVICE..............
-
Page 7: Introduction
Carl Zeiss INTRODUCTION General information Axio Zoom.V16 microscopes have been designed, manufactured and tested in compliance with DIN EN 61010-1 (IEC 61010-1) and IEC 61010-2-101 Safety requirements for electrical equipment for measurement, control and laboratory use. The instruments meet the requirements of EC Directive IvDD 98/79/EC (In vitro diagnostic medical devices);... -
Page 8: Notes On Instrument Safety
Failure to comply with this shall also render any warranty claims invalid. Set-up and operation of the Axio Zoom.V16 in conjunction with the SYCOP 3 control panel and respective EMS 3 controller are described in a separate operating manual (Order No. 435611- 9010-701, English edition). - Page 9 INTRODUCTION Axio Zoom.V16 Notes on instrument safety Carl Zeiss On microscopes with motorized focusing drive there is a risk of pinching fingers in the working area when lowering the body of the microscope. − Do not reach into the work area or beneath the motorized focusing drive during lowering.
- Page 10 INTRODUCTION Carl Zeiss Notes on instrument safety Axio Zoom.V16 Dust and dirt may impair the instrument’s performance. The instrument must therefore be protected as far as possible from such influences and covered with the dust cover when not in use. Always check whether the instrument is switched off before you cover it. Broad temperature fluctuations, direct sunlight and vibrations should be avoided.
-
Page 11: Notes On Warranty
Transmitted light: - Brightfield - Brightfield out on these microscopes. Repairs are only to be performed by Carl Zeiss service staff or personnel - Dark field - Dark field specifically authorized by Carl Zeiss. In the event of a problem with the instrument occurring, please... -
Page 12: Microscope Systems
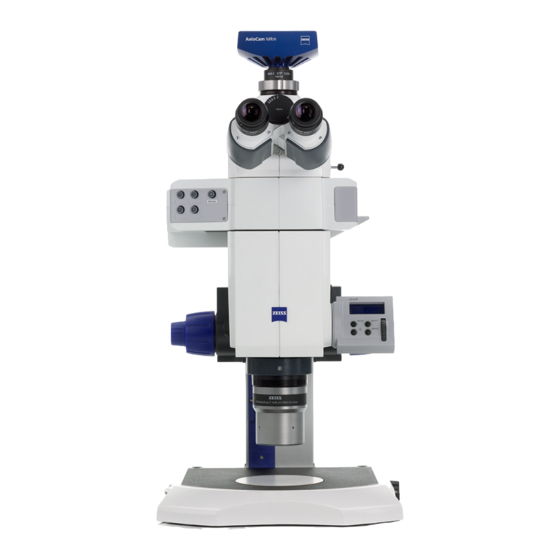
Carl Zeiss Microscope systems Axio Zoom.V16 Microscope systems Mechanical interfaces Axio Zoom.V16 microscope with coarse/fine drive A Microscope body (Axio Zoom.V16) with control unit (HIP) B Binocular photo tube C Eyepiece D Objective Intermediate tube G Camera adapter with microscope camera (AxioCam) -
Page 13: Technical Data
Base 300 for reflected light ........5.2 kg Bracket S with seat d=76 mm ....... 0.6 kg PlanApo objective 1.0x/0.25 ......... 1.7 kg Total weight ............≥ 22 kg Axio Zoom.V16 with focus motor and transmitted light (example) Weight Dimensions Microscope body V16 ........... 2.7 kg Binocular ergo phototube Z ........ - Page 14 DESCRIPTION Carl Zeiss Technical data Axio Zoom.V16 Ambient conditions Storage (in packaging) Permissible ambient temperature ..................+10 to +40 °C Permissible relative humidity ............max. 75 % at +35 °C (non-condensing) Transport (in packaging): Permissible ambient temperature ..................-40 to +70°C Operation Permissible ambient temperature ..................
- Page 15 DESCRIPTION Axio Zoom.V16 Technical data Carl Zeiss Focusing drive Movement range ........................340 mm Maximum sample height (including stage and a parfocalized objective) with the use of: Nosepiece ......................... 200 mm Carrier with 76 mm holder, bottom ................... 205 mm Carrier with 76 mm holder, top ..................
- Page 16 DESCRIPTION Carl Zeiss Technical data Axio Zoom.V16 Optical data for Axio Zoom.V16 … with eyepiece … with eyepiece PL 10x/23 Br. Foc PL 16x/16 Br. Foc O b j ec ti v e… for large and bright object for high resolution...
-
Page 17: Set-Up
(see Section 4.6, page44). Provide sufficient space for setting up the add-on units (required bench area is approx. W x D: 800× 800 mm). The Axio Zoom.V16 is normally delivered together with the required tools and optional accessories in several packages. •... -
Page 18: Installing Stand Components
SET-UP Carl Zeiss Installing stand components Axio Zoom.V16 Installing stand components To avoid damage to the motorized focusing drive (e.g. focus motor with profile column 490 mm Fig. 5A), it should only be set down on the back of the column (Fig. 5/a) using sufficiently high supporting blocks (Fig. - Page 19 SET-UP Axio Zoom.V16 Installing stand components Carl Zeiss • Set the column of the focusing drive on the provided mounting face of the stand base and secure with four hexagon socket screws (SW 8) from below. The stand base 450 (Fig. 5/10) has two mounting faces for the focusing drive. The mounting face on the right-hand side is only used for the motor focus with profile column 490 mm (Fig.
-
Page 20: Mounting The Microscope
SET-UP Carl Zeiss Mounting the microscope Axio Zoom.V16 Mounting the microscope Fig. 6 Mounting the microscope All grub screws (SW 3) for fixing components should be unscrewed until they no longer project into the inside diameter of the mount. •... - Page 21 SET-UP Axio Zoom.V16 Mounting the microscope Carl Zeiss • Screw the objective (Fig. 6/10) counterclockwise into the body of the microscope until it engages. Screw a second objective (Fig. 6/11) into the nosepiece as required. • Insert the tubes (Fig. 6/1, 2, 3) or intermediate tubes (Fig. 6/5) with dovetail mount into the body of the microscope and hand-tighten it with a socket head screw (Fig.
-
Page 22: Inserting Eyepieces
In eyepiece W-PL 10x/23 Br. foc. (455043-0000-000) and E-PL 10x/20 Br. foc. (444132-9902-000) the eyepiece reticles (Fig. 7/3) have been glued to screw-in mounts for easy replacement (Fig. 7/4). Complete mounts with reticles adhered can be ordered directly from Zeiss. 435080-9030-701... -
Page 23: Installing And Connecting The Human Interface Panel (Hip)
SET-UP Axio Zoom.V16 Installing and connecting the human interface panel (HIP) Carl Zeiss Installing and connecting the human interface panel (HIP) The HIP can be swiveled by about 30° around its longitudinal axis to achieve a convenient viewing angle. Be sure not to exceed the stated swivel range. Forcible twisting may result in damage to the device. -
Page 24: Mounting And Connecting Manual Rotary Control (Marc)
SET-UP Carl Zeiss Mounting and connecting Manual Rotary Control (MaRC) Axio Zoom.V16 Mounting and connecting Manual Rotary Control (MaRC) MaRC is a component used to control the focus motor, and may be mounted either directly on the focusing drive (Fig. 9/1) or as a table-top version with table-top base (Fig. 10/1) independently of the microscope. - Page 25 SET-UP Axio Zoom.V16 Mounting and connecting Manual Rotary Control (MaRC) Carl Zeiss • Attach the mounting plate (Fig. 9/2) with a screw (Fig. 9/6) securely to the flange of the focusing drive (Fig. 9/1) (or microscope body). The screw must be inserted into the left hole of the mounting plate.
-
Page 26: Mounting The Stages
SET-UP Carl Zeiss Mounting the stages Axio Zoom.V16 Mounting the stages Remove the shipping braces from the stages before assembly. 3.7.1 Adapter ring for stand base 450 When using stand base 450 it must be ensured that adapter ring (Fig. 12/3) has been mounted for holding stages. -
Page 27: Stages With An 84 Mm Mounting Face
SET-UP Axio Zoom.V16 Mounting the stages Carl Zeiss 3.7.3 Stages with an 84 mm mounting face Stages with an 84 mm mounting diameter must be attached to the stand base with the aid of adapter 84/120 or 84+120 (see Section 3.7.2). -
Page 28: Mounting The Reflected Light Illumination
SET-UP Carl Zeiss Mounting the reflected light illumination Axio Zoom.V16 Mounting the reflected light illumination Depending on the application, different reflected light illumination units are used. The required mounting faces are provided on the microscope. 3.8.1 Mounting on the objective (∅ 66 mm) - Page 29 SET-UP Axio Zoom.V16 Mounting the reflected light illumination Carl Zeiss Depending on the objective used, the following light-conducting rods should be employed: Objective Light-conducting rod PlanApo Z 0.5x none PlanApo Z 1.0x 51 mm Apo Z 1.5x 51 mm PlanNeoFluar 1.0x 13 mm PlanNeoFluar 2.3x...
-
Page 30: Attachment With Carrier And Holder (M8 Tapped Hole)
SET-UP Carl Zeiss Mounting the reflected light illumination Axio Zoom.V16 3.8.2 Attachment with carrier and holder (M8 tapped hole) The following reflected light illuminators are attached with M8 tapped holes: Flexible light guide with focusing attachment − Surface light −... -
Page 31: Mounting Transmitted Light Unit S
SET-UP Axio Zoom.V16 Mounting transmitted light unit S or … (Option) Carl Zeiss Mounting transmitted light unit S • Remove the base insert plate (Fig. 20/3). To do this loosen the short socket head screws (Fig. 20/2), lift the insert plate (use recessed grip on the right edge of stand base (Fig. 20/5) for the purpose) and lift securely with both hands. - Page 32 SET-UP Carl Zeiss Mounting transmitted light unit S or … (Option) Axio Zoom.V16 Changing insert plate 450 CAUTION! Risk of pinching fingers! When inserting or removing the ferromagnetic insert plate 450 or the heatable ferromagnetic insert plate 450, use the supplied flat plastic material to avoid pinching fingers.
-
Page 33: Inserting The Visiled Transmitted Light Unit H
SET-UP Axio Zoom.V16 Inserting the VisiLED transmitted light unit H Carl Zeiss 3.10 Inserting the VisiLED transmitted light unit H Stand base 450 • Detach the base insert plate (Fig. 21/3) from the stand base 450 (Fig. 21/6). To do this loosen the short socket head screws (Fig. - Page 34 SET-UP Carl Zeiss Inserting the VisiLED transmitted light unit H Axio Zoom.V16 Base 300 for reflected light • If necessary, remove the glass plate (Fig. 22/1) from the base 300 for reflected light • Insert the VisiLED transmitted light unit H (Fig. 22/3) into the base 300 (Fig.
-
Page 35: Installing The Camera Adapter
1. Switch on the microscope and illumination. Microscope cameras (e.g. AxioCam of Carl Zeiss), customary SLR cameras (Single Lens Reflex; 35 mm film or digital) or compact digital cameras may be mounted to the camera port. -
Page 36: Making Electrical Connections
In the absence of the motorized focusing drive (focus motor) each electronic CAN component can be operated with a separate PSU. In this case, the body of the Axio Zoom.V16 microscope must be connected directly to the mains via the plug-in power supply. -
Page 37: Operation
OPERATION Axio Zoom.V16 Human interface panel control unit (HIP) Carl Zeiss OPERATION Human interface panel control unit (HIP) The microscope is controlled and configured using the HIP control unit. One HIP controls the motorized zoom (Fig. 2/A or Fig. 3/A, page 12) in the body of the microscope, the other HIP or a MaRC control unit (Fig. -
Page 38: Menu Guidance In Setting Mode
OPERATION Carl Zeiss Human interface panel control unit (HIP) Axio Zoom.V16 Zoom control unit Focus control unit Knurled wheel Knurled wheel with pushbutton function − set a higher zoom value − Move microscope upwards (focusing) − set a lower zoom value −... - Page 39 OPERATION Axio Zoom.V16 Human interface panel control unit (HIP) Carl Zeiss • Press the Mode button briefly several times to select the desired parameter • To change a parameter value, move the knurled wheel up or down ( ) until the desired value is displayed, e.g.
-
Page 40: Manual Rotary Control (Marc) Unit
OPERATION Carl Zeiss Manual rotary control (MaRC) unit Axio Zoom.V16 Manual rotary control (MaRC) unit The MaRC unit is used to operate the focus motor and zoom functions of the microscope. Only motor focus 2 (435401-9902-000) and 3 (435403-9000-000, 435401-9902-000) can be controlled, not motor focus 1 (435401-0000-000). -
Page 41: Control Of The Focus Motor By Coarse And Fine Drive
OPERATION Axio Zoom.V16 Manual rotary control (MaRC) unit Carl Zeiss 4.2.2 Control of the focus motor by coarse and fine drive The focus motor can be controlled quickly or slowly by turning the coarse (Fig. 27/8) and fine drive (Fig. 27/9). -
Page 42: Saving A Focus Position
OPERATION Carl Zeiss Switching on Axio Zoom.V16 4.2.6 Saving a focus position The current focus position will be stored when key 3 (Fig. 27/3) is pressed for between 2 and 5 seconds. The green LED (Fig. 27/6) will briefly light up and one short beep tone on the motorized focusing system issued to indicate completion of the storing process after 2 seconds. -
Page 43: Stop Button
OPERATION Axio Zoom.V16 STOP button Carl Zeiss STOP button The STOP button is for instantaneous deactivation of a moving motorized focusing drive to prevent collision with the stage or a specimen on the latter. • Press the STOP button (Fig. 28/1) to switch off the focusing drive. -
Page 44: Adjusting The Range Of Travel Of The Motorized Focusing Drive
Carl Zeiss Adjusting the range of travel of the motorized focusing drive Axio Zoom.V16 Adjusting the range of travel of the motorized focusing drive After installing and switching on for the first time the lower limit switch (Fig. 29/2) in the column (Fig. -
Page 45: Settings
OPERATION Axio Zoom.V16 Settings Carl Zeiss Settings 4.7.1 Basic microscope settings Prior to operating the motorized focusing drive for the first time ensure that the lower mechanical end stop (Fig. 30/6) has been adjusted (see Section 4.6, page 44). The microscope is connected and switched on. - Page 46 OPERATION Carl Zeiss Settings Axio Zoom.V16 Now set the minimum zoom again and correct for any existing image blurring by separately turning the diopter-setting rings of the focusing eyepieces to compensate for defective vision. Once the microscope has been adjusted in this way, the image will remain focused throughout the entire zoom range.
-
Page 47: Setting The Reflected Light Illumination
OPERATION Axio Zoom.V16 Settings Carl Zeiss 4.7.2 Setting the reflected light illumination Different settings are required, depending on the reflected light illumination used: Fiber-optic slit-ring illuminator (Fig. 33/1) − Illumination: oblique 360° reflected light − Application: shadow-free illumination of large fields, in particular in high-contrast samples −... - Page 48 − The object area is free of disturbing cables or light guides. − The polarization filter set is unsuitable. Light-conducting rod Light-conducting rod Spacer M62 Axio Zoom.V16 objective 13 mm 51 mm d = 66 mm x 16 mm PlanApo Z 0.5x PlanApo Z 1.0x...
- Page 49 OPERATION Axio Zoom.V16 Settings Carl Zeiss LED ring illuminator (Fig. 35/1) − Illumination: oblique reflected light with various illumination modes by light segmentation: • shadow-free ring illumination, • low-shadow half-ring illumination • 90° spot illumination • 2-point and 4-point illumination −...
- Page 50 OPERATION Carl Zeiss Settings Axio Zoom.V16 Fiber-optic ring illuminator and LED ring illuminator reflected light darkfield (Fig. 37/1) − Illumination: all-side reflected light darkfield − Application: Observation of flat, shiny objects Highlighting of finest surface structures − Assembly: Insert the spacer onto the objective as necessary and secure.
- Page 51 OPERATION Axio Zoom.V16 Settings Carl Zeiss Flexible light guide (Fig. 39/1 and Fig. 40/1) with focusing attachment (Fig. 39/2 or Fig. 40/2) − Illumination: oblique reflected light spot illumination − Application: Observation of spatial objects with selective shadow effect. three-...
- Page 52 OPERATION Carl Zeiss Settings Axio Zoom.V16 Swan neck light guide (Fig. 41/1) with two focusing attachments (Fig. 41/2) − Illumination: variable oblique reflected light illumination (both sides) − Application: Observation of spatial objects with selective shadow effect. three- dimensionality object strongly highlighted, while avoiding dark drop shadows.
- Page 53 OPERATION Axio Zoom.V16 Settings Carl Zeiss Fiber-optic surface light (Fig. 43/2) − Illumination: diffuse lateral oblique illumination − Application: low-reflex illumination of shiny three-dimensional objects if the diffuser cannot be used. Suitable for Axio Zoom objectives with a working distance of 10 mm and more.
- Page 54 OPERATION Carl Zeiss Settings Axio Zoom.V16 General remark • Adjust the controller for VisiLED. For adjustment of the illumination intensity on the fiber-optic cold light source or control of the LED lights please refer to and heed the separate operating manuals for cold light sources and LED illumination! The LED illumination is LED Class 1 equipment.
-
Page 55: Setting The Transmitted Light Illumination
OPERATION Axio Zoom.V16 Settings Carl Zeiss 4.7.3 Setting transmitted light illumination Transmitted light illuminator S The transmitted light illuminator S is connected and switched on. • For low levels of magnification insert the ∅ 84 mm opal glass plate. •... - Page 56 OPERATION Carl Zeiss Settings Axio Zoom.V16 Adjusting transillumination base 300 The transillumination base is connected. • Switch on using the rotary knob (Fig. 47/1) and regulate illumination intensity. The blue power indicator lights up when switched on. • Select the desired illumination method using the setting wheel (Fig.
-
Page 57: Cleaning, Maintenance And Service
CLEANING, maintenance and service Axio Zoom.V16 Care Carl Zeiss CLEANING, MAINTENANCE AND SERVICE Care The only care required for equipment is as follows: The instruments are not equipped with any special devices for protection against substances that are corrosive, potentially infectious, toxic or radioactive, or other substances that could be hazardous to health. -
Page 58: Maintenance
CLEANING, maintenance and service Carl Zeiss Maintenance Axio Zoom.V16 Maintenance 5.2.1 Safety inspections When the motorized focusing drive is lowered there is the risk of pinching fingers in the working area. Perform regular checks of the travel range of the motorized focusing drive to ensure that the limit switches are working properly in accordance with Section 4.6, page 44. -
Page 59: Wearing Parts
To ensure optimum setting and trouble-free function of your microscope over a longer period of time, we recommend that you enter into a service/maintenance agreement with Carl Zeiss. For subsequent orders or when service is required, please get in touch with your local Carl Zeiss representative. -
Page 60: Disposal Of The Product
WEEE Directive 2002/96/EC and in compliance with the national laws in force. Please contact your Carl Zeiss dealership or customer service organization if you need more information on disposal and recycling. -
Page 61: Annex
ANNEX Axio Zoom.V16 List of abbreviations Carl Zeiss ANNEX List of abbreviations Brightfield suitable for spectacle wearers Data bus (controller area network) Cold light Darkfield German industrial standard EMS 3 Electronic module stereo microscope, Version 3 European standard Ergo Ergonomic... -
Page 62: Troubleshooting
ANNEX Carl Zeiss Troubleshooting Axio Zoom.V16 Troubleshooting Error description Error cause Remedy Microscope cannot be switched on Mains supply interrupted. STOP Check and restore mains supply at the HIP button pressed Unlock the STOP button by pulling out. No image visible in eyepieces... -
Page 63: List Of Figures
Carl Zeiss List of figures Fig. 1 Warning and information labels on the device ..............10 Fig. 2 Axio Zoom.V16 with coarse/fine drive ................12 Fig. 3 Axio Zoom.V16 with focus motor ..................12 Fig. 4 Mechanical interfaces ....................... 12 Fig. - Page 64 ANNEX Carl Zeiss List of figures Axio Zoom.V16 Fig. 43 Surface light M8 ....................... 53 Fig. 44 Line light S ........................53 Fig. 45 Lighting control ......................... 55 Fig. 46 Adjusting the illumination of the transmitted light illuminator S .......... 55 Fig.
-
Page 65: Index
ANNEX Axio Zoom.V16 Index Carl Zeiss Index Inspections ............ 58 Interface 60 ..........35 Adjusting the focusing drive ......44 Interface 60N ..........35 Ambient conditions ........14 Interfaces ............12 Ambient temperature ........14 Intermediate tube .......... 12 Annex ............61 Articulated arm .......... - Page 66 ANNEX Carl Zeiss Index Axio Zoom.V16 Reflected light illumination ....12, 28, 47 Relocation of the device ........ 58 Table-top base ..........25 Ring illuminator ........49, 50 Technical data ..........13 Risk of pinching fingers ......9, 43 Torque ............19 Transillumination base 300 ......56 Transmitted light ..........11...