Table of Contents
Advertisement
20-162
PRO-162 2,000-Channel
Handheld
Trunking Scanner
Contents
Thank you for purchasing your RadioShack 2000-Channel Handheld Trunking Scanner
from RadioShack.
Your handheld scanner is one of a new generation of scanners designed to track
Motorola® Type I, Type II, hybrid analog systems, (such as Smartnet® and Privacy Plus®)
plus M/A-COM EDACS® and EF Johnson LTR. Those systems are extensively used in
many 800 MHz, 900 MHz, and UHF communication systems.
• scanner
• antenna
• belt clip (2) screws
• user's guide
• quick start guide
• preprogrammed frequency guide
Hypersearch, Hyperscan, and Adaptaplug are trademarks used by RadioShack
Corporation.
Motorola, Smartnet, and Privacy Plus are registered trademarks of Motorola Inc.
EDACS is a registered trademark of MA-COM Inc.
LTR is a registered trademark of EF Johnson.
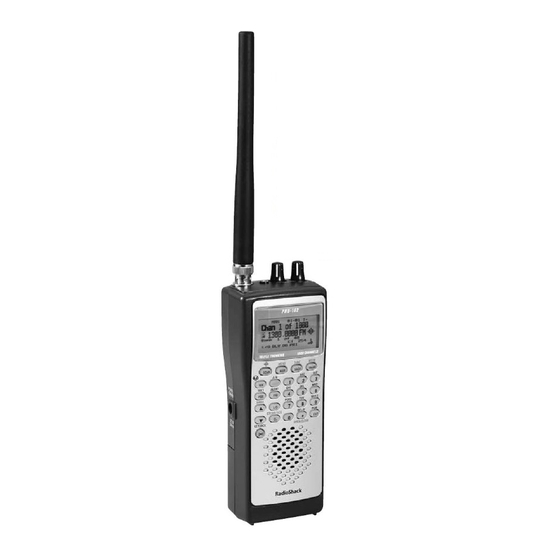
The Basics
your scanner's features
— scans the stored channels and scans an active ID while trunking , or turn Signal Stalker Ⅰ on and
SCAN /
off.
MAN(Manual)/MENU — manually enter a channel; enter the menu mode.
SRCH(Search)/TUNE— start a chain search, start a service search. search a specified frequency range; enter
the fine tune mode.
TRUNK/MODE — enter the Talk Group ID program mode; select the modulation for trunking system.
WX/
— starts weather search; activates Skywarn function.
PSE(Pause)/TEXT — stops and resumes searching; change from Program mode to Program Text Tag mode.
BANK — enter the select bank menu.
—Search and scan up and down a selected frequency range; selects options during programming;
changes the ID location number while trunking.
FUNC(Function)/A/a — let you use to various functions by pressing this key in combination with other keys; let
you use to switch the small letter and capital letter.
PRI (Priority)/ALERT— sets and turns the priority function on or off; SAME weather alert on and off.
L/O — lockout selected channels or skip specified frequencies during a search; lock out a selected ID while
trunking.
CL/CTCSS/DCS — Press CL to clear an entry; let use to turn on and off the CTCSS/DCS.
1
Advertisement
Table of Contents

Related Manuals for Radio Shack PRO-162


Summary of Contents for Radio Shack PRO-162
- Page 1 20-162 PRO-162 2,000-Channel Handheld Trunking Scanner Contents Thank you for purchasing your RadioShack 2000-Channel Handheld Trunking Scanner from RadioShack. Your handheld scanner is one of a new generation of scanners designed to track Motorola® Type I, Type II, hybrid analog systems, (such as Smartnet® and Privacy Plus®) plus M/A-COM EDACS®...
-
Page 2: Supplying Power To Your Scanner
ENT/PGM (Program) — programs frequencies into channels. 1-9/WXYZ, 0 — input a number or characters. •/DELAY — enter a decimal point, space, or programs delay time for the selected channel/search bank, or enters a hyphen (in trunking ID setting). Programs a 2-second delay for a selected channel or service; programs a 2-second delay while trunking. - Page 3 Use a Phillips-head screwdriver and the supplied screws to attach the clip to the scanner. transferring data to or from another scanner or pc You can transfer the programmed data to and from another PRO-162 scanner using a connecting cable which has 1/8-inch phone plugs on both ends (not supplied). Connect the cable between each scanner’s PC/IF jacks.
-
Page 4: Understanding Banks
A frequency, expressed in kHz or MHz, is the tuning location of a station. To find active frequencies, you use the search function. Besides searching within a selected frequency ran ge, you can also search your scanner’s service banks. Service banks are preset groups of frequencies categorized by the type of services that use those frequencies. - Page 5 3. Press MAN. 4. Press FUNC, then press /BANK or (Press FUNC, then press ) to advance the channel with 0 MHz in next bank (or previous bank). • If the channel with 0MHz is not, the first channel of the bank is selected. •...
-
Page 6: Text Input Chart
5. You can store same as channel text tag. text input chart User can use the number keypad on scanner to enter text by referring to the alphabet printed on each number key. When user presses the number key in the text entry field, the scanner displays the first alphabet printed on the number key. - Page 7 4. Press FUNC, and then press CL/CTCSS/DCS to put the scanner in program CTCSS/DCS mode. 5. Press ? or ? to select a CTCSS/DCS code. CTCSS/DCS code flashes. The CTCSS/DCS code is changed below: NO TONE -> CT 67.0 -> ... -> CT 254.1 -> DCS 023 -> ... -> DCS 754 -> CODE SRCH ->...
-
Page 8: Copying/Moving A Frequency
copying/moving a frequency If you want to copy/move a frequency to a channel, follow the steps below: 1. Press ENT/PGM to put the scanner in programming mode. Enter the channel which contains the frequency you want to copy or move. 2. -
Page 9: Starting Chain Search
216.0000 -224.9950 225.0000 -399.9875 12.5 400.0000 -512.0000 6.25 764.0000 -775.9875 12.5 794.0000 -805.9875 12.5 806.0000 -956.0000 12.5 1240.0000-1300.0000 12.5 starting chain search 1. Press SRCH. SRCH appears. 2. Press 0 – 9 to enable or disable the search bank number being searched. Note: At least one bank needs to be entered. -
Page 10: Service Bank Search
input chart”). 6. Press ENT/PGM to store the search bank text tag. fine tune You can search up or down from the currently displayed frequency using fine tune. TUNE appears during searching. Press FUNC, and then press SRCH when the frequency you want to start from appears. Or, enter the frequency you want to start from using the number keys in search pause mode, then press FUNC, and then SRCH. -
Page 11: Scanning The Stored Channels
times and does not search. • If you select more than 200 frequencies to skip, “L/O List Full!” appears. • Press select a skipped frequency while PAUSE appears. L/O appears when you select a skipped frequency. scanning the stored channels To begin scanning channels, press SCAN/ . -
Page 12: Turning Channel-Storage Banks On And Off
DLY appears and the scanner automatically adds a 2-second delay to every frequency it stops on in that band. Signal Stalker I also has a delay feature. It’s delay time is 10 seconds. turning channel-storage banks on and off You can turn each channel-storage bank on and off. When you turn off a bank, the scanner does not scan any of the 50 channels in that bank. -
Page 13: Using The Keylock
PC/IF on the side of the scanner. 3. Install the software to your computer and run the program. 4. To set up the program, click on Tools, select Configuration, and select PRO-162 (if necessary). 5. Turn the scanner on. The scanner automatically goes into the wired programming mode. -
Page 14: Using The Auto Backlight Display
PRO-162 to another PRO-162 or PRO-433 using an optional interface cable and software. 1. Make sure the scanners are turned off and then plug the cable into each scanner’s PC/IF jack. 2. Turn on both scanners. “Clone Mode [ENT] to send” appears. -
Page 15: Turning The Battery Save Function Off/On
scanner’s key tone off or on: 1. Press FUNC, and then press MENU. 2. Repeatedly press to display Key Tone, then press ENT/PGM. 3. Repeatedly press to select OFF or ON, then press ENT/PGM. 4. Press L/O to exit the menu mode, or press CL to back to a previous menu. turning the battery save function off/on When the scanner is set to receive (monitor) a manually selected channel and it is not actively scanning, using the battery save feature conserves energy. -
Page 16: Receiving Nwr-Same And Weather Alert Signals
receiving nwr-same and weather alert signals In 1994, the National Oceanic and Aerospace Administration (NOAA) began broadcasting alerts that include digitally encoded data. Specific Area Message Encoding (SAME) includes information which identifies the severity of the alert. While this scanner does not encode specific geographical data, it does detect SAME signals and decode the alert level. -
Page 17: About Skywarn
itself into FIPS programming mode. If the scanner is set to alert for all FIPS, ALLFIPS appears on the display. If the scanner is set to alert only the area you have programmed, 1 of the FEPS memory number and FIPS code appears. 2. -
Page 18: Signal Stalker I
Signal Stalker I Your scanner’s Signal Stalker I feature lets you set the scanner so it detects and then displays the frequency of a nearby strong radio transmission. You can set the scanner so Signal Stalker I works “in the background” while you are scanning other frequencies; turn off normal scanning while Signal Stalker I works;... -
Page 19: Using Signal Stalker I
You can lock out the log channels like normal channels. Set Logging to ON to scan the log channels along with the normal channels. If you do not want to scan the channels, set it to OFF. The scanner stores signals found by the Signal Stalker I even the Logging function is OFF. The frequencies in the log channels are deleted when the scanner is turned off. -
Page 20: Trunking Operation
When the scanner finds a frequency, it sounds the alert you specified in “Setting the Signal Stalker I Options”, and Signal found! appears. Press any key to confirm the displayed frequency. Press to resume scanning. To turn on Signal Stalker I and turn off normal scanning, turn Only Mode of Signal Stalker I options to on. - Page 21 4. Press to select the next channel in the bank. 5. Repeat from step 2 until you enter all the desired frequencies in that bank. Notes: • If you enter an invalid frequency (outside the selected range), the scanner beeps, then Invalid Freq.
-
Page 22: Searching A Trunked Bank
frequency and Offset channel. • MOT 800, MOT 800 CUSTOM require programming of fleet map. • EDCS, LT require programming of frequencies in exact order and location. 3. Press ENT/PGM to go to Program Talk Group ID Mode. searching a trunked bank Once the data channel is acquired, the scanner begins a trunk scan. -
Page 23: Turning The Status Bit Ignore (S-Bit) On Or Off
4. Repeatedly press to select Set C-Ch only , and press ENT/PGM. 5. Repeatedly press to select Standard or Splinter before you begin to Control Channel Trunk. OFF: Control channel only mode is deactivate. Standard: The frequency plan in Standard is 851.0125 MHz. Splinter: The frequency plan in Standard is 851.0000 MHz. - Page 24 EDACS (Ed) talk group ID range search When your scanner searches EDACS (Ed) talk group IDs, the scanner can search within a range you set for agency or fleet listings. For example, if you want to search within the 01 agency, while in trucking pause mode press 0, 1, •...
-
Page 25: Using Trunk Scanning Scan Delay
Hold down L/O while searching until you hear two short beeps. You can check all locked out IDs. Hold down L/O while you are reviewing all locked out IDs. The scanner beeps twice. All locked out IDs in a bank are unlocked. Press SCAN to resume the search. Or follow these steps to unlocking all Talk Group IDs. -
Page 26: Motorola Talk Groups
Note: If one or more of the IDs you stored are incorrect, Invalid ID appears and the scanner beeps several times. To correct the entry, delete at least one of the incorrect IDs. Motorola talk groups To enter a Type 2 Talk Group ID: 1. -
Page 27: Ltr Talk Groups
1. Enter the agency number you want to store. Press •/DELAY to enter the dash. 2. Press ENT/PGM. Or you can program all the talk group numbers for one fleet of an agency. 3. Enter the agency number. 4. Press •/DELAY to enter the dash. 5. -
Page 28: Scanning Type I And Hybrid Trunked Systems
out talk group IDs”. scanning type I and hybrid trunked systems Your scanner is preset to scan Type II system IDs. When you scan trunked frequencies, each Type II user ID you see appears as an even number without a dash (example 2160). Your scanner can also scan Type I trunked systems. -
Page 29: Selecting A Preset Fleet Map
(S12) (S12) (S12) selecting a preset fleet map 1. Press FUNC, then press MENU to open menu mode. 2. Select the “Trunk Option” - “Select Bank” - “Select Trunk Sys”. 3. Repeatedly press to select MOT 800 or MOT 800 CUSTOM system, and press ENT/PGM. -
Page 30: Programming A Hybrid System
S-14, you would not see another prompt because S-14 uses all available blocks. programming a hybrid system A hybrid system is simply a Type I system with some of its blocks designated as Type II blocks. To program a hybrid system, follow the steps listed in “Programming a Fleet Map.” However, if you want a block to be Type II, instead of pressing to select the size block (Step 6), enter size code S-0 instead. -
Page 31: Frequently Asked Questions
4. Repeatedly press to select Set End Code, and press ENT/PGM. 5. Repeatedly press to select Yes or Ignore, and press ENT/PGM. Note: If you set the squelch so you hear a hissing sound, the scanner will remain on the voice channel, even when a disconnect tone is transmitted or there is no signal at all. - Page 32 systems” and “programming a fleet map”). Why isn’t my scanner acquiring a data channel? SQUELCH is not correctly adjusted for trunk scanning. Adjust squelch for trunk scanning. See “setting squelch for the trunking mode”. Why is the frequency used for the data channel missing? Press SCAN to search for the data channel (see “programming trunked frequencies”).
-
Page 33: Scanning Legally
scanning legally Your scanner covers frequencies used by many different groups including police and fire departments, ambulance services, government agencies, private companies, amateur radio services, military operations, pager services, and wireline (telephone and telegraph) service providers. It is legal to listen to almost every tra nsmission your scanner can receive. However, there are some transmissions you should never intentionally listen to. - Page 34 894.0125-956.0000 (in 12.5 kHz steps) 1240.0000-1300.0000 (in 12.5 kHz steps) Number of Banks ........40 Sensitivity (AM/FM): FM ....20 dB S/N at 3 kHz deviation 28.0000-54.0000 .......0.4µV 137.0000-174.0000 .......0.5µV 216.0000-224.9950 .......0.5µV 400.0000-512.0000 .......0.5µV 764.0000-775.9875 .......0.5µV 794.0000-823.9875 .......0.5µV 849.0125-868.9875 .......0.5µV 894.0125-956.0000 .......0.5µV 1240.0000-1300.0000...
- Page 35 This product is warranted by RadioShack against manufacturing defects in material and workmanship under normal use for one (1) year from the date of purchase from RadioShack company -owned stores and authorized RadioShack franchisees and dealers. For complete warranty details and exclusions, check with your local RadioShack store.