Advertisement
Table of Contents
- 1 Foot Control Use
- 2 Setting Spool Pins
- 3 Adjust the Presser Foot Lever
- 4 Check Your Needle
- 5 Fabric, Needle, Thread and Stitch Length Chart
- 6 To Change Your Needle
- 7 To Remove the Bobbin Case from the Machine
- 8 Reverse Stitch Control
- 9 Straight Stitch
- 10 Topstitching
- 11 Darning
- 12 Straight Stretch
- Download this manual
Advertisement
Table of Contents

Related Manuals for Kenmore KENMORE 385.128418


Summary of Contents for Kenmore KENMORE 385.128418
- Page 1 OWNER'S MANUAL SEA/RS SEWING MACHINE MODI...
- Page 2 This wiff hetp you servtce expense for conditions beyond our control. _salways available at your nearest Sears Retail Store. machine or need parts and service, always mention the model number and serial number and seria! number plate,...
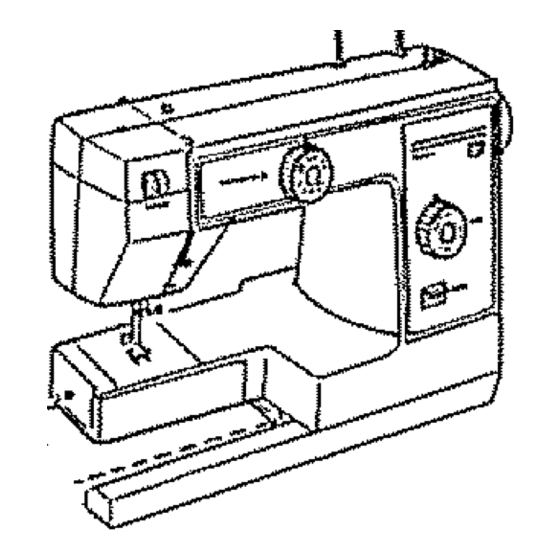
- Page 3 KNOW YOUR MACHINE SECTION A Portable Case or Cabinet is Available Locate and Identify the Parts ... Identify the Accessories ... SECTION PREPARE YOUR MACHINE FOR SEWING Set Up the Machine • Plug in the Machme and Switch on the Power •...
- Page 4 A full line of sewing cabinets is available at your nearest Sears retail store through general •catalog, Another option , , , buy a Carrying Case , , , then your Kenmore goes anywhere, can be stored any- where. : Locate and identify theParts...
- Page 5 Cover Thread Spool Pins Clutch Knob Hand W heel L_ght end Power Switch Plug Connector FOOt Control Accessory Thread Guide Bobbin Presser Foot Lever Free Arm Nomenclature Plate Thread Gupde Thread Guide Straight Needle Clamp stitch foot footSatm stitch " _'_.,,,,,Lint brush Buttonhole...
-
Page 6: Foot Control Use
• Plug in the Machine and Switch on the Power Power supply Plug Power switch supply Machine socket Machine plug NOTE: Before inserting plug into your machine, sure power switch OFF, Check your outlet to be sure )t isa 110to Volt AC outlet. -
Page 7: Setting Spool Pins
Setting Spool Pins Adjust Spool tell pOSitiOn Presser toot _--_'_; lever Spool Pins are packed in accessory box. your Screw thread spool pins pface securely with a screw driver, remova_ Position spool pin felts as shown in iflustra- ptace heavy fabrics tion. - Page 8 ¸, _, i_Z_':i_!i_i_!_:: _i_y'_'_,i'_}_i_:_;!,:_!_.:_i_::j_:_ _<_?_'_:AI_'!_;_I!I_!_?_:;',!<_:_,_L _ Free-Arm Sewing (Continued) Your sewing machine can do free arm sewing. This feature makes sewing easy for: tacking reinforce pockets, stitching belt foops and waistline on ready- legs, or any circular made homemade garments...
- Page 9 ThePresser feetare animportant feature o fthismachine. Youneed toknow what Change the Presser Foot Use the correct presser foot stitch wish sew. Consult practical Stitch Chart pages detailed directions sewing with various presser feet. To change the various presser feet, raise the presser bar to its highest...
- Page 10 Presser Foot Types (Continued} Buttonhole Guide Foot Buttonhole guide _'oot Use this foot buttonholes. It is marked to measure your buttonholes accurately, Uses: Buttonhole making {see p.3__55) Zipper Foot Zipper foot This foot can be set to sew on each side of your zipper.
-
Page 11: Check Your Needle
Yourchoice o fneedle and thread depends onthefabric youare sewing. tnyourneedle case, youwillfindthefollowing c olor-coded Blue (11)... forstretch f abrics Orange (11)... for lightweight fabrics Red (14)... formedium ormedium-heavy Purple ( 16) ... for medium-heavy topstitching onthese fabrics (Thisneedle hasa larger thread holefor thicker t opstitch_ng Green ( 18) ... -
Page 12: Fabric, Needle, Thread And Stitch Length Chart
Fabric, Needle, Thread and Stitch Length Chart NEEDLE FABRIC SIZE COLOR Lightweight: Batrste= Dimity, Chiffon. 11-ORANGE Silks, Fine Lace, Organza, Crepe, Taffeta. Voile, Organdy Medium Weight: Cotton, Cotton B_ends, Percale, Gingham, 14-RED Shantung, Pique, Seersucker. Satm. Knits. Vinyl Suitings. Linen, Wool Crepe. -
Page 13: To Remove The Bobbin Case From The Machine
:: Prepare the Bobbin: To Remove the Bobbin Case from the Machine remove bobbin Remove extension table from tie, pull open machine pulling it to the left, Open shuttle cover Pull bobbin pulling down the embossed part on shuttle. the left side of the cover. Raise needle to its highest position... - Page 14 ,_ i !P_are ith_ ¸ g ob_niliCo.ti._ed _i_! __, !_i!i;!i:_!_i:_i;i_ : ; _ <': _:," _ _i!_;i !:_i _ :!i!;:_:_:i _ :_:- • i i _'!'i i_I ! i: :! :: _ x: ; Wind the Bobbin (Continued) Draw thread from spool through bobbin...
- Page 15 Insert the Bobbin into the Bobbin Case Place bobbin bobbin case Pull thread through as shown, making sure thread leeds clock- wlse coming from bobbin as shown..J Pull thread under tension slot of case Holding case into spring and through the opening as shown...
- Page 16 Thread Your Needle The numbered steps below Dotted lines show places where tight. Raise thread take-up ]ever to its highest position hand wheel toward you. Raise presser foot lever, Place spool on spool pin as shown, with thread coming from the back of the spool follow...
- Page 17 Pick Up Your Bobbin Thread Raise needle ® and rotate one complete tf you cannot Draw thread down into Is needle threaded thread guide, Is thread Pul! the thread to the left and slip Are 3 to 4 inches of thread it through the thread guide,...
- Page 18 side of fabric koose__.% thread thread For Straight Stitch ideal straight stitch will have threads locked between fabric, as shown above, magnified to show detail. If you look at the stitch, front and back, will gaps, that each stitch is smooth and even, Choose the Correct The best tension...
- Page 19 For Zigzag Stitch In the correct zigzag stitch, the bobbin threads will not show on the top side fabric and the top threads will show slightly on the below for the correct appearance. To match this appearance, tension. Top tension Top tension Tdo Tight Too Loose...
- Page 20 Setting mark stitch selector control only stitch determines stitch select, length of the also regulates stitch width The higher regular zigzag rick rack stretch stitch. stitches. 0 means no feed. different types stitches designated by color. Straight, Zigzag Utility Stitches are orange.
- Page 21 Nowthatyouarefamiliar w iththecontrols o nyourmachine and withtheaccessories Kenmore sewing machine_ Below are some g ood habits t o follow each t _me y ousitdown to sew; 1. Inspect theneedle. It should bestraight, properly s etand sharp onthepoint._tshould bethecorrect size forthefabric andthread being u sed. Donotbe afraid to change yourneedle frequently.
- Page 22 Stitch Stitch Selector Foot STRAIGHT Straight Zigzag STRAIGHT Straight STRETCH Zigzag ZIGZAG Zigzag RICK-RACK Zigzag STR ETCH THREE-STEP Zigzag ZIGZAG Other Thread Stitch Attach. Needle Tension Length Check Darning 6~t2 Regurar saems_ z_ppers, topstitchlng, Chert prate mvtslble Check S • Usa on knits Chart for toPstitehlng.
- Page 23 Stitch Stitch Selector Foot i ... SMOCKING Zigzag STITCH BLIND STITCH BLIND STITCH (STRETCH) OVERCAST Zigzag STRETCH <, SHELL Zigzag STITCH Other Needle Thread Stitch Attach. Tension Length Check 1 _ 4 Use m smock;ng Chart Use tot Check 1 _4 8~24 Chart overcasting_...
- Page 24 Stitch Stitch Foot Selector SERGING Zigzag Zigzag STITCHING > ELASTIC Zigzag STRETCH > > BUTTONHOLE Buttonhole SATIN STITCH Satin Other Thread Stitch Needle Attach. Tension Length Blue (11) Check 1 -- 4 Use for Chart Check Use paper Use for applying underneath Chart Check...
- Page 25 = Straight Stitch Set the Machine Stitch length controf 6 to 12 Top thread [enslon 2 to control Raise the presser Raise position. Place a stitching Straight toot Zigzag foot needle common). Draw back and lower the presser Press the foot Hold guide that it feeds naturally.
- Page 26 • Use the Darning Plate Topstitching Top thread tension Sometimes when sew, want control 2 to 6 to control the fabr=c youse_f. The Darning Plate covers the feed dogs so that they do not touch the fabric. To Put on the Darning Plate: Stratght toot NOTE:...
- Page 27 Darning: Set the Machine Stich selector thread tension Stitch length control 'i to 4 number to adjust) (not necessary Here's How footNO presser (see p.24). Remove presser Darning plate embroidery Draw fabric by holding stitch start darning. Lower speed. Move the fabric you have covered Turn...
- Page 28 Basic Zigzag SettheMachine Stitch selector Stitch _ength Top thread tension 6 to 24 control 2 to 5 The Stitch and Its Uses zigzag stitch is one of the most common and most versatile stitches your machine. It can be a utility stitch sewing buttons,...
- Page 29 Satin Stitch Set the Machine Stitch selector Stitch tength Blue zo n e <::_ Top thread tension control 1 to 4 The Stitch and Its Uses The Satin stitch is a versatile and often used decorative stitch, but it can also be used to overcast a raw edge (for ex- ample,...
- Page 30 Applique Set thaMachine Stitch se{ector Stitch length Blue Zone'C_to Top thread tension control I to 4 Baste joiner) applique Stitch around sure Satin st{tch toot edge of the applique. When sewing down into foot and pivot or left. Bar Tacking Set the Machine Top thread tension control...
- Page 31 Sew a Button Set _he Machine Sli"_eh selector 2" thread _ens}on Stitch length control ! to 4 number to adjust) (not necessary Use the darmng plate for button Set the pattern A_ign the both Zigzag foot hole of the button Lower Darning #fate...
- Page 32 Overcasting Stitch Set the Machine Stitch selector Stitch length Top thread tension 12 to 24 Helpful Hints Start overcasting corner right at the edge, the fabric Zigzag foot tangled. The Stitch and its Uses This zigzag variation is very useful garment construction and in finishing...
- Page 33 _-:': -¸ -,'_: Zigzag Stitches (Continued) Three-Step Zigzag Set the Machine Stitch selector Stitch {ength Top thread tension Blue Zone<::r'_ta 24 control I to _4 Seam Finishing Place the fabric so that the edge will the right hand side of the presser foot. Zigzag toot Guide stitches fall at the edge of the fabric.
- Page 34 = Overcast Stretch Stitching Sat the Machine St=tch selector Stitch length Top thread tension Here's How ° ° Place the raw control I to 4 __,x the LEFT Stitch so the needle Zigzag _oot just short Or, place your seam, then after, Raw or worn...
- Page 35 Blind Hemming Set the Machine Top thread tension control _ to 4 Stitch length Heavy Weight _-. Fabric 8 to 24 There are two wider and will "gwe" Finish _Zigzag Measure, NOTE: For light weight Set the Machine Fold the material Stitch selector blind hem) of the finished...
- Page 36 Set the Machine Stitch selector Stitch length thread tension control I to 4 Lace adds blouses pillows when trimmed Turn raw edge of fabric 1/2" Place stitch using stretch Trim excess fabric a fanclfu], feminine touch lingerie, Table linens become more elegant with...
- Page 37 Buttonholes Set the Machine 2[-J_ Stitch length Blue Zone _::_ 1. a. Carefully Top _hread tension comrol "_to 5 length b. Change foot. Insert foot ._ButtOnhole guide foot ing running Adjusting the Stitch Density Depending upon your fabric or your preference buttonholes, alter...
- Page 38 B tto. Co.ti.. d 5. a. Set the stitch 4. a. Set the stitch selector at _:_, b. Sew 4 to 6 stitches. b, Sew until the buttonhole. c, Stop sewing at the right stitch. Stop sewing at the right selector at [_3 6.
- Page 39 Sewin a ZiPper Sat the Machine Stitch setec_or ot fabric Stitch _ength Top thread tension control 3 to 6 Fabric Preparation: right gether and sew to the end of the zip- opening, Zipper toot the stitches. zipper length at "6" at "3 "', Zipper t 18"}...
- Page 40 Machine Z_PPER FOOT" zipper" "cording", at any Sears retait store, 14. Stop about 2" from the top of the side of the zip- zipper, foot on the Lower the needle into...
- Page 41 Sheii Stitching Set the Machine Stitch selector Stitch lenglh 12 to 24 Top thread tension Here's How contro{ 3 to 9 For best effect- -set Zigzag foot --allow If you space the rows 1/2" The Stitch and Its Uses can sew Shell The Shell Stitch is formed...
- Page 42 Set the Machine Stitch selector Top thread tension control "i _o 4 Zigzag foot Choose this garments, Mark match center Place under foot sure the elastic Set the Machine "Fop thread tension _ to 4 control Zigzag foot stitch to attach elastic the elastic into...
- Page 43 t :Do PROBLEM incorrect Improper Loose upper thread Irregular Stitches Pulling Loose presser foot. Unevenly Nicks Pulling Incorrect Breaking Needle Incorrect Loose presser foot. Upper Bunching of Thread under Incorrect Using two different Bent Puckering Loose presser foot. Fabric PROBABLE CAUSE size needle.
- Page 44 PROBLEM Incorrect Certain Bent or blunt Skipping Stitches incorrect Tight Starting Improper Tight Incorrect Breaking Upper Thread Sharp eye in needle. Nicks Nicks Breaking Bobbin Thread Improper Lint Darning Stitch Fabric not Moving Thread Thread Machine Jamming Knocking Noise Lint PROBABLE CAUSE size needle.
- Page 45 To insure that The feed iscaught, Check and clean those areas about if you sew frequently, Clean the Feed Dogs Unplug the machine and open the face cover. light bulb will CAUTION! HOT. Protect your fingers when FoIIow these direction: handle Using Push...
- Page 46 = Clean the Shuttle Race ThJs area must be kept free of dust, lint and occasional about every three months. Center shuttle ever case To Clean the Shuttle Area: To Replace Raise needle highest Position point and remove the bobbin case.
- Page 47 In case machine One or two drops of oil is sufficient. Remove excess oil, otherwise Sears retail store. • Oil under the Top Cover Remove top cover plate to oil points indicated loosen...
- Page 48 Oil the Underside !, i I¸¸¸ _ ii_i_iiiii _, i_ _'_!,_i_i_iil Oil the underside at least once a year. Tilt machine head back and remove bottom covers. Oil points indicated on underside of machine. To remove bottom covers, remove screws (A), (B) and (C) as shown.
- Page 49 PARTSLIST Aii parts listed herein may be ordered from any Sears, Roebuck and Co. store or service center. WHEN ORDERING INFORMATION: 1. PART NUMBER 3. MODEL NUMBER If the parts you need are not stocked locally, transmitted to a Sears Repair Parts Distribution Ref.
-
Page 50: Reverse Stitch Control
Appliqueing 20, 28 Bar tacking 20, 28 Base ... Basic zigzag ... 20, 26 Blind hemming 21, 33 Bobbin ... 11_13,47 Bobbin case ... 11, t3, 44,47 Bobbin thread 15_16 Bobbin winding 11_12 Box stitching 22, 40 Buttonhole 22, 35_36 Buttonhole guide foot 3, 8, 22, 35, 36, 47... - Page 51 IS AVAILABLE CENTER/DEPARTMENT IN THE UNITED This warranty gives you specific legal r_ghts, and you SEARS, ROEBUCK WARRANTY MACHINE HEAD Sears will, free of charge, repair defects in material head. EQUIPMENT OF SEWING MACHINE Sears will, free of charge, repair...
- Page 52 _imply contact you call or visit. The model number of your Sewing Machine will be shown on your nomenclature plate on the back of your Sewing Machine. See page 3 for location. WHEN ORDERING REPAIR PARTS, ALWAYS...