Dometic 9100 Installaiton Instructions
Power channel, led tube
Hide thumbs
Also See for 9100:
- User manual ,
- Installation manual (16 pages) ,
- Operation instructions manual (11 pages)
Table of Contents
Advertisement
REVISION E
Form No. 3316039.000 1/18
(French 3316040.000_E)
©2018 Dometic Corporation
LaGrange, IN 46761
POWER CHANNEL AWNING
LED TUBE AWNING
8956(X)(X)1.4(X)0(#) BASEMENT
8956(X)(X)2.4(X)0(#) STANDARD
8956(X)(X)3.4(X)0(#) REDUCED PITCH
8957(X)(X)1.4(X)0(#) BASEMENT
8957(X)(X)2.4(X)0(#) STANDARD
8957(X)(X)3.4(X)0(#) REDUCED PITCH
FABRIC ROLLER TUBE ASSEMBLY
91XFFLL.000(#)T
6XXFFLL.000(#)Z
Read these instructions carefully. These
instructions MUST stay with this product.
USA
SERVICE OFFICE
Dometic Corporation
1120 North Main Street
Elkhart, IN 46514
RECORD THIS INFORMATION FOR FUTURE
REFERENCE:
FRTA Model Number
FRTA Serial Number
Hardware Model Number
Hardware Serial Number
Date Purchased
Retailer / Qualified Installer
9100
HARDWARE
FRTA
601FFLL.000(#)
SERVICE CENTER &
DEALER LOCATIONS
Please Visit:
www.eDometic.com
Advertisement
Table of Contents

Related Manuals for Dometic 9100


Summary of Contents for Dometic 9100
- Page 1 Read these instructions carefully. These instructions MUST stay with this product. REVISION E SERVICE CENTER & DEALER LOCATIONS Form No. 3316039.000 1/18 SERVICE OFFICE Dometic Corporation Please Visit: (French 3316040.000_E) 1120 North Main Street www.eDometic.com ©2018 Dometic Corporation Elkhart, IN 46514 LaGrange, IN 46761...
-
Page 2: Table Of Contents
Use these instructions to ensure correct installation and function of product. Dometic Corporation reserves the right to modify appearances and specifications without notice. TABLE OF CONTENTS INTRODUCTION ..................................2 DOCUMENT SYMBOLS ................................2... -
Page 3: Important Safety Instructions
IMPORTANT SAFETY INSTRUCTIONS This manual has safety information and instructions to help T he installation MUST comply with all ap- you eliminate or reduce the risk of accidents and injuries. plicable local and national codes, including the latest edition of the following standards: Recognize Safety Information U.S.A. -
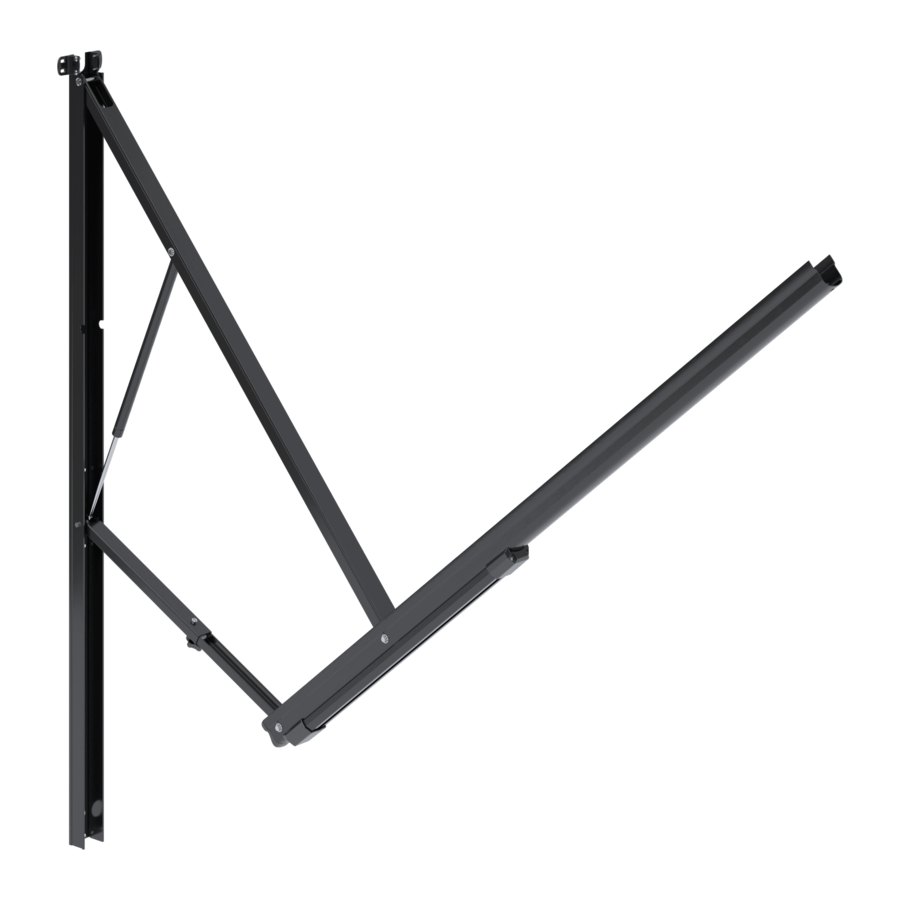
Page 4: Specifications
SPECIFICATIONS Hardware Dimensions (Back Channel) Door Clearance W iring harness location may be at top or bot- Minimum distances between awning rail and entry tom depending on awning model. door: FIG. 1 Top Wiring Harness Notch 8956(X)(X)1.4(X)0(#) 12″ 8956(X)(X)2.4(X)0(#) 7″... -
Page 5: Prepare For Installation
PREPARE FOR INSTALLATION Door Roller And Edge Guard (Optional) Prepare Awning Rail And Insert Fabric Do NOT allow corner of entry door Make sure awning rail is parallel to to contact awning fabric. Otherwise, premature RV floor, and is NOT warped or curved before in- wear or tearing of awning fabric could occur. - Page 6 PREPARE FOR INSTALLATION FIG. 9 FIG. 6 Top Casting Top Mounting Bracket FRTA Back Channel 1/4″ - 20 x 3/4″ Hex Head Screw Front Channel FIG. 7 Groove in Top Casting must slide over tongue in Main Arm Groove Tongue 4.
-
Page 7: Determine Awning Location
PREPARE FOR INSTALLATION 6. IMPACT OR PINCH HAZARD. 2. Make sure arm assemblies do not restrict use Do NOT remove cotter pin from torsion rod (at of doors, windows, slideout rooms, etc. See end cap) until BOTH top castings are secured to (FIG. -
Page 8: Install Electrical Kits
4. Make appropriate wiring connections inside RV. Install (Fixed / Wired) Awning Switch W iring connections to awning (through U se correct (Dometic Corporation approved) outside RV wall) will be made later. momentary switch, or electronic control See instructions included with your Do- switch with motor overload protection. -
Page 9: Install Awning
INSTALL ELECTRICAL KITS A lternatively, a (3 A) in-line fuse may be 4. Make appropriate wiring connections inside RV. used between positive (+) 12 Vdc power W iring connections to awning (through supply ( RED wire) and LED switch. outside RV wall) will be made later. -
Page 10: Attach Top Mounting Brackets
INSTALL AWNING Attach Top Mounting Brackets 6. Drill (1) 5/8″ diameter hole at marked TOP wiring hole location and through outside wall of RV. 1. W hen awning is in predetermined location, S kip this step if wiring will pass through place top mounting brackets (with arm assem- RV wall at BOTTOM of RH back channel. -
Page 11: Attach Back Channels
INSTALL AWNING ther have a notch at top, or a hole near FIG. 15 Awning Rail bottom for wiring to pass through RV wall. a. If wiring will pass through RV wall at TOP of back channel, skip to step (4). b. -
Page 12: Electrical Connections To Awning
Otherwise, See instructions included with your damage to unit could occur. Dometic Corporation switch kit for ad- ● ALWAYS seal wiring against weather and mois- ditional wiring instructions. ture where wiring enters the RV’s walls, roof , or b. -
Page 13: Complete Back Channel Installation
INSTALL AWNING Complete Back Channel Installation FIG. 20 1. W ith power applied to awning, close awning (ful- ly retract) to verify hardware is nesting correctly. See “Close Awning” in Operating Instructions. 2. PINCH HAZARD. Maintain a horizontal distance of at least 16″ between fully open awning and any permanent object. -
Page 14: Secure Awning Fabric To Awning Rail
INSTALL AWNING Secure Awning Fabric To Awning Rail FIG. 21 #6 x 7/16″ 1. W ith power applied to awning, open and close TEK Screw awning four or five times to allow natural self adjustment of awning fabric. See Operating In- Awning Rail structions.