Roland CD-2e Owner's Manual
Sd/cd recorder
Hide thumbs
Also See for CD-2e:
- Manual book (20 pages) ,
- Features manual (8 pages) ,
- Brochure & specs (5 pages)
Table of Contents
Advertisement
Quick Links
Owner's Manual
Before using this unit, carefully read the sections entitled: "USING THE UNIT
SAFELY" and "IMPORTANT NOTES" (Page 8–10; Page 11–13). These sections
provide important information concerning the proper operation of the unit.
Additionally, in order to feel assured that you have gained a good grasp of
every feature provided by your new unit, Owner's Manual should be read in
its entirety. The manual should be saved and kept on hand as a convenient
reference.
Copyright © 2007 ROLAND CORPORATION
All rights reserved. No part of this publication may be reproduced in any form
without the written permission of ROLAND CORPORATION.
Roland International Web Site: http://www.Roland.com/
☞
Selecting English, German, French, Italian, Spanish, or Japanese as the operating language.
Page 97
Advertisement
Table of Contents

Related Manuals for Roland CD-2e


Summary of Contents for Roland CD-2e
- Page 1 Copyright © 2007 ROLAND CORPORATION All rights reserved. No part of this publication may be reproduced in any form without the written permission of ROLAND CORPORATION. Roland International Web Site: http://www.Roland.com/ ☞ Selecting English, German, French, Italian, Spanish, or Japanese as the operating language.
- Page 2 IMPORTANT: THE WIRES IN THIS MAINS LEAD ARE COLOURED IN ACCORDANCE WITH THE FOLLOWING CODE. BLUE: NEUTRAL BROWN: LIVE As the colours of the wires in the mains lead of this apparatus may not correspond with the coloured markings identifying the terminals in your plug, proceed as follows: The wire which is coloured BLUE must be connected to the terminal which is marked with the letter N or coloured BLACK.
- Page 3 Check the Included Items The CD-2e includes the following items. Please take a moment to confirm that all of these items have been included with the CD-2e. If you find that any item is missing, contact the nearest authorized Roland distributor in your country.
-
Page 4: Table Of Contents
Table of Contents USING THE UNIT SAFELY ... 8 Checking IMPORTANT NOTES... 11 Panel Descriptions ... 14 Preparations Media Usable for Recording ... 20 Turning the Power On and Off... 21 Using the Dedicated AC Adaptor ... 21 Using Batteries... 22 Preparing an SD Memory Card ... - Page 5 Advanced Uses Appendices Selecting Songs from an SD Memory Card to Create a CD... 79 Making a CD-R/RW Disc for Playback on Another CD Player (Finalize)... 83 Creating a Duplicate of an Original Music CD (Backup)... 84 Moving a Song... 87 Dividing a Track ...
- Page 6 Automatically start new songs at silent spaces when recording from a cassette or MD ● Automatically start recording when a performance begins ● Let the CD-2e adjust the input level ● Sound a count before recording begins ● Record your vocal along with karaoke backing ●...
- Page 7 ● Make a duplicate of an original music CD you created ● Complete a CD Others ● Use the CD-2e where there’s no AC power ● Extend battery life ● Connect speakers to listen ● Restore the CD-2e to its factory-set condition ●...
-
Page 8: Using The Unit Safely
Do not attempt to repair the unit, or replace parts within it (except when this manual provides specific instructions directing you to do so). Refer all servicing to your retailer, the nearest Roland Service Center, or an authorized Roland distributor, as listed on the “Information” page. - Page 9 ● Immediately turn the power off, remove the AC adaptor from the outlet, and request servicing by your retailer, the nearest Roland Service Center, or an authorized Roland distributor, as listed on the “Information” page when: ❍ The AC adaptor, the power-supply cord, or the plug has been damaged;...
- Page 10 USING THE UNIT SAFELY (continued) 111: Selection ● If used improperly, batteries may explode or leak and cause damage or injury. In the interest of safety, please read and observe the following precautions (Page 22, 29). ❍ Carefully follow the installation instructions for batteries, and make sure you observe the correct polarity.
-
Page 11: Important Notes
CD-R/RW disc. ● Unfortunately, it may be impossible to restore the contents of data that was stored on an SD memory card or CD-R/RW disc once it has been lost. Roland Corporation assumes no liability concerning such loss of data. ●... - Page 12 IMPORTANT NOTES (continued) Handling SD memory cards ● Do not remove the SD memory card while the CD-2e is powered up. Doing so may damage the data stored on the SD memory card. ● Carefully insert the SD memory card all the way in—until it is firmly in place.
-
Page 13: About The License Agreement
About the License Agreement ● The CD-2e’s CD-writing functionality, and its backing-up functionality are designed to allow you to reproduce material to which you have copyright, or material which the copyright owner has granted you permission to copy. -
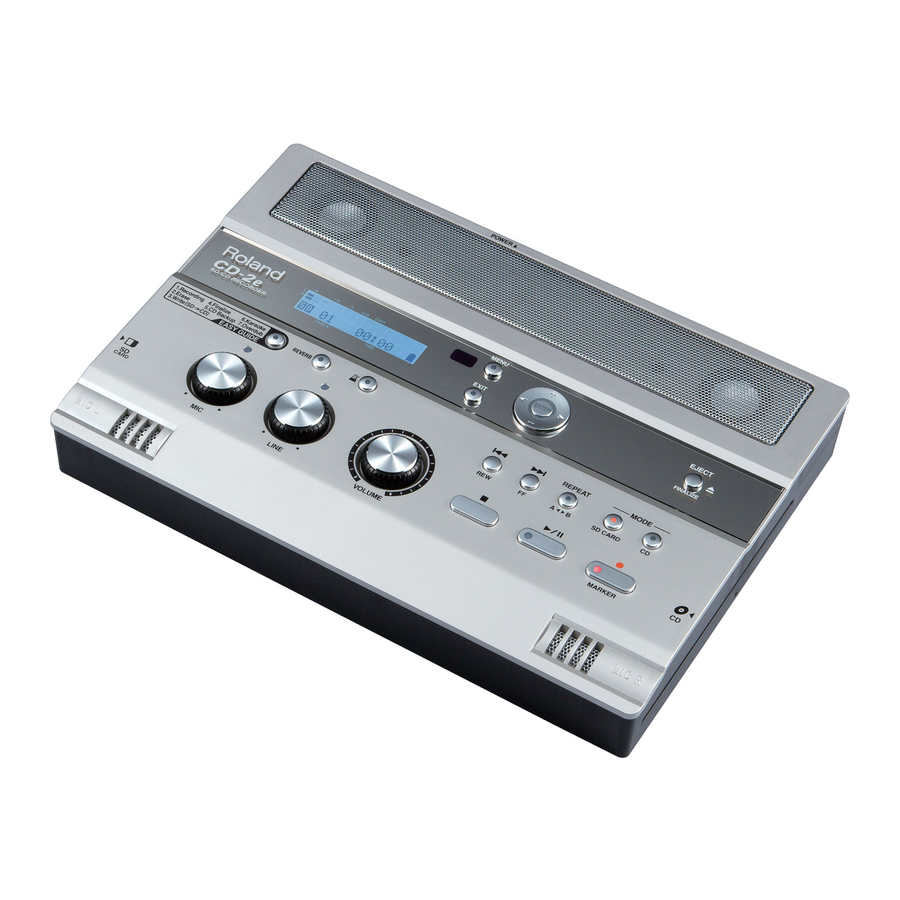
Page 14: Panel Descriptions
Panel Descriptions Top Panel fig.unit01-e.eps MIC L/MIC R This is a stereo pair of mics built into the CD-2e. You can use these mics to record. ☞ “Recording with the Internal Mics” (Page 36) [MIC] Knob This adjusts the input level of the internal mics and the EXT MIC jack. - Page 15 ● the display. [MENU] Button This button accesses the menu screen. Here you can make settings for recording/playback, and settings for the CD-2e itself. ☞ “Menu Operations” (Page 31) Function Button This button is used mainly to perform menu operations.
- Page 16 Displayed during one-track repeat playback. ☞ Page 65 Displayed during all-track repeat playback. ☞ Page 65 Displayed during A-B repeat playback. ☞ Page 66 This is shown if the CD-2e is running on batteries. It indicates the remaining battery power.
- Page 17 When the unit is grounded, a slight hum may occur, depending on the particulars of your installation. If you are unsure of the connection method, contact the nearest Roland Service Center, or an authorized Roland distributor, as listed on the “Information” page Unsuitable places for connection ●...
- Page 18 Battery Cover ☞ “Using Batteries” (Page 22) Battery Compartment Install batteries here if you want to operate the CD-2e on batteries. If you’re using the dedicated AC adaptor, it’s not necessary to install batteries. ☞ “Using Batteries” (Page 22) Note You must turn off the power before performing the following operations.
-
Page 19: Remote Control
Higher volume. Lower volume. Note The [VOLUME] knob of the CD-2e itself does not move when you adjust the volume from the remote control. This may cause the actual volume to no longer match the position of the [VOLUME] knob. - Page 20 * For a list of recommended CD-R/RW disc manufacturers, refer to “Recommended CD-R/RW Disc Manufacturers” (Page 123). * In order for a CD-R/RW disc recorded on the CD-2e to be playable on another CD player, an operation called “finalizing” (Page 83) must be performed on that disc.
-
Page 21: Turning The Power On And Off
Turning the Power On and Off You can operate the CD-2e either from a household electrical outlet or using six AA batteries (sold separately). Using the Dedicated AC Adaptor If you’re using the dedicated AC adaptor, batteries are not required. -
Page 22: Using Batteries
Turn the CD-2e upside down and remove the battery cover. * When turning the CD-2e upside down, place stacks of newspapers or magazines to support the four corners (or two sides) so that stress is not placed on the buttons or knobs, possibly damaging them. - Page 23 Don’t mix new batteries with partially-used batteries, and don’t mix batteries of differing types. ● If you won’t be using the CD-2e for an extended period of time, remove the batteries to prevent possible leaking damage. Turning the Power On and Off Sufficient capacity remaining.
-
Page 24: Preparing An Sd Memory Card
Here’s how to prepare an SD memory card for recording. For details on recommended SD memory cards, refer to “Recommended SD Memory Card” (Page 122). Inserting an SD Memory Card Insert the SD memory card into the SD card slot on the CD-2e’s side panel. Printed surface upward... - Page 25 SD memory card that has been used with a computer or digital camera, the screen may indicate “Unknown Format. Format?” In order to use this SD memory card with the CD-2e, you’ll need to format the card. Proceed as follows to format the card.
- Page 26 Preparing an SD Memory Card Removing an SD Memory Card Do not remove the SD memory card while the CD-2e is powered up. Doing so may damage the data stored on the SD memory card. Turn the power off Gently press the SD memory card inward, and then release your finger.
-
Page 27: Preparing A Cd
Do not use CDs that have a CD label or sticker affixed to them. You may be unable to remove the CD, or it may cause the CD-2e to malfunction. Insert the CD into the CD slot located on the side of the CD-2e. Insert the CD until it’s pulled in automatically. -
Page 28: Removing A Cd
If pressing the [EJECT( eject hole to forcibly eject the CD. * Before using the emergency eject hole to eject the CD, you must turn off the power of the CD-2e. Turn off the power. Insert a thin wire (such as a straightened paper clip) into the emergency eject hole. -
Page 29: Preparing The Remote Control
Push it inward until it clicks into place. Using the Remote Control Point the remote control toward the CD-2e’s sensor, and operate it within the specified operating range. When the remote sensor detects a remote control operation, the [ENTER] button will blink. - Page 30 Preparing the Remote Control Disabling remote control operation If you want to prevent inadvertent operation of the remote control, you can disable remote operation. Press the [MENU] button to access the menu screen, and choose “Remote Control.” Use the [+] [-] buttons to turn the remote control operation on/off. fig.menu-remote02.eps Value On (factory setting)
-
Page 31: Menu Operations
CD-2e itself. You can’t access the menu screen during recording-standby mode or recording. Also, there are some settings that cannot be made while the CD-2e is running on batteries or is playing back. -
Page 32: List Of Settings
List of Settings * The default value (factory setting) is printed in bold characters. * The ✓ symbol in the “Battery” or “Playback” column indicates a setting that can be made while the CD-2e is running on batteries or playing back. - Page 33 Category Setting (details) SD CARD Overdub SD→SD? (Records another performance or vocal onto a song you recorded on an SD memory card.) Format? (Formats the SD memory card.) Card Info (Displays information about the SD memory card.) CD-R/RW Erase Last? (Deletes the last song from the CD-RW disc.) CD Erase All? (Deletes all songs from the CD-RW disc.)
-
Page 34: About Easy Guide
About Easy Guide Easy Guide is a convenient function that lets you operate the CD-2e simply by following the on-screen instructions without having to open the owner’s manual. Press the [EASY GUIDE] button. fig.guide01-e.eps Use the [ operation guide. fig.menu02.eps Easy Guide is available for the following seven operations. -
Page 35: Before You Start Recording
Minimum Recording Time for One Track Each track on a music CD must be at least four seconds long. Since the CD-2e creates music CDs from the songs you record, it does not allow you to record a track that’s less than four seconds long. -
Page 36: Recording Acoustic Instruments Or Vocals
* Use the [VOLUME] knob to adjust the headphone volume. fig.connect-headphone-e.eps Type of plug that can be connected Stereo mini type On the CD-2e’s side panel, set the [MIC SELECT] switch to the “INT” (internal mic) position. fig.rec-intmic01.eps ☞ Page 21, 22) fig.selectCD-e.eps... - Page 37 Adjust the input level of the internal mics. On the CD-2e’s left side, set the [MIC LEVEL] switch to its “MANUAL” position. fig.rec-intmic02.eps Turn the [MIC] knob to adjust the input level of the internal mics. Adjust the loudness of the sound you’re recording. Since you’re not using the line input, turn the [LINE] knob all the way to the left (off).
- Page 38 ● Depending on where the CD-2e is positioned in relation to the sound source, the recorded sound may not be evenly distributed between the left and right speakers. In such cases, you can adjust the left/right volume balance of the internal mics and record your performance again.
- Page 39 Page 24) Set the audio source to “SD.” Press the [SD CARD] button so it’s lit. fig.selectCD-e.eps Connect your mic to the EXT MIC jack located on the CD-2e’s side panel. fig.connect-extmic-e.eps Type of plug that can be connected Phone plug When connecting one mic (monaural) Connect the mic to the L/MONO jack.
- Page 40 [VOLUME] knob all the way down or set the [SPEAKER] switch located on the side of the CD-2e to its “OFF” position, so no sound will be produced. Use headphones if you want to monitor the sound that’s being recorded.
- Page 41 If you’ve finished recording a CD-R/RW disc and would like to play that disc on another ● CD player, you’ll need to execute the “Finalize” operation. You can finalize the CD-R/RW disc when ejecting it. For details, refer to “Making a CD-R/RW Disc for Playback on Another CD Player (Finalize)”...
-
Page 42: Recording An Electronic Instrument
Press the [SD CARD] button so it’s lit. Connect the CD-2e’s LINE IN jacks to your electronic instrument (digital piano, keyboard, etc.). Use audio cables to connect the CD-2e’s LINE IN jacks to the output jacks of your electronic musical instrument. fig.connect-piano-e.eps... - Page 43 If you’ve finished recording a CD-R/RW disc and would like to play that disc on another CD player, you’ll need to execute the “Finalize” operation. You can finalize the CD-R/RW disc when ejecting it. For details, refer to “Making a CD-R/RW Disc for Playback on Another CD Player (Finalize)”...
-
Page 44: Recording A Cassette Or Md
Press the [SD CARD] button so it’s lit. Connect your audio device (e.g., cassette deck) to the CD-2e’s LINE IN jacks. Use audio cables to connect the CD-2e’s LINE IN jacks to the output jacks of your audio device (e.g., cassette deck). fig.connect-record-e.eps... - Page 45 If you’ve finished recording a CD-R/RW disc and would like to play that disc on another CD player, you’ll need to execute the “Finalize” operation. You can finalize the CD-R/RW disc when ejecting it. For details, refer to “Making a CD-R/RW Disc for Playback on Another CD Player (Finalize)”...
-
Page 46: Recording Karaoke
SD memory card (i.e., overdubbing that adds your voice or performance to a song from CD). The CD-2e provides a Center Cancel function, which lets you use a commercial CD as a simple karaoke source. For details, refer to “Enjoying Simple Karaoke (Center Cancel)” (Page 64). - Page 47 [VOLUME] knob all the way down or set the [SPEAKER] switch located on the side of the CD-2e to the “OFF” position, so no sound will be produced. Use headphones if you want to monitor the sound that’s being recorded.
- Page 48 Recording Karaoke (continued) Press the [ The music CD track you selected in Step 4- memory card begins simultaneously. Record your vocal or instrumental performance. fig.overdub-CD03-e.eps Remote control When CD playback stops at the end of the song, recording will also end automatically. If you want to stop recording in the middle of the song, press the [ The recorded song will be added to the end of the SD memory card.
-
Page 49: Layering Your Performance Onto An Sd Memory Card Song And Recording It
Layering Your Performance onto an SD Memory Card Song and Recording It Here’s how you can play back a recorded performance from an SD memory card, add a vocal or a performance of another instrument, and re-record the combined result onto the SD memory card (overdubbing a vocal or other performance onto an SD memory card song). - Page 50 Press the [MENU] button to access the menu screen. Use the [ fig.menu-overdubSD-SD-e.eps Press the [ENTER] button to confirm your choice. The CD-2e will be in recording-standby mode. fig.overdub-SD02-e.eps Song to record (Play)] button to play back the SD memory card.
- Page 51 Layering Your Performance onto an SD Memory Card Song and Recording It Press the [ (Play)] button to begin recording. When the SD memory card song you selected in Step 4- on the SD memory card will begin simultaneously. Start your performance. fig.overdub-SD03.eps Remote control Press the [...
-
Page 52: Convenient Functions For Recording
Convenient Functions for Recording Automatically Starting Recording When Audio is Detected When the CD-2e is in recording-standby mode and it detects audio input that exceeds the specified level, recording will start automatically. Press the [MENU] button to access the menu screen, and choose “Auto Rec Start.”... - Page 53 Blinking Start performing. When the CD-2e detects audio, recording will begin automatically. * In order to avoid losing any audio at the beginning of the performance, recording will actually begin up to 0.5 seconds earlier than the point at which audio exceeding the specified level is detected.
-
Page 54: Assigning Song Numbers While Recording (Marker)
Convenient Functions for Recording Assigning Song Numbers While Recording (Marker) During recording, you can assign a song number so that the subsequent material will be recorded as the next song. You can assign song numbers in the following three ways. Assigning song numbers Press the [ Automatically assign song numbers at fixed intervals... - Page 55 Automatically Assigning a Song Number at Fixed Intervals When making a long recording such as a lecture, you can automatically assign track numbers at fixed time intervals to divide the recording into tracks. If you’ve assigned track numbers, it will be easier to find a desired location in the recording. Specify how the song numbers will be assigned.
- Page 56 Convenient Functions for Recording Assigning Track Numbers When Silence is Detected If a period of silence lasting longer than one second is detected during recording, recording will automatically pause. Then, when audio exceeding the specified level is subsequently detected, a song number will be assigned and recording will automatically resume.
-
Page 57: Preventing Loud Sounds From Distorting (Limiter)
Preventing Loud Sounds from Distorting (Limiter) This function automatically adjusts the input level so that the audio will not distort even when unexpectedly loud sounds are received while recording. Press the [MENU] button to access the menu screen, and choose “Limiter.”... -
Page 58: Inserting A Count Before Recording Begins (Count-In)
Convenient Functions for Recording Inserting a Count before Recording Begins (Count-in) You can sound a count before recording begins. Hearing a count can help you practice the timing or tempo of your performance before you actually start recording. Press the [ fig.countin01-e.eps Specify the sound, tempo, and time signature of the count. - Page 59 If you’ve specified a count-in, the procedure for starting to record will be as follows. Press the [ (Record)] button. The CD-2e will be in recording-standby mode. fig.autorec01-e.eps Press the [ (Play)] button. The specified number of counts will be sounded, and then recording will begin.
-
Page 60: Listening To A Cd/ Listening To An Sd Memory Card
Listening to a CD/ Listening to an SD Memory Card * In order to play a CD, you’ll need to use the dedicated AC adaptor, which was included with the CD-2e. Listening to a CD Turn on the power. Insert the CD. - Page 61 Press the [ENTER] button to confirm your choice. Explanation The Resume function will be off. The Resume function will be on. The CD-2e will remember the position at which playback was stopped. (Stop)] button to halt playback, you can press the [...
-
Page 62: Convenient Functions For Playback
Convenient Functions for Playback Changing the Key of the Playback This adjusts the key (pitch) of the playback sound in semitone steps. This can be useful in situations like the following. You want to practice flute along with an accompaniment CD that was created for alto ●... -
Page 63: Making Fine Adjustments To The Playback Pitch (Pitch)
Making Fine Adjustments to the Playback Pitch (Pitch) This adjusts the pitch of the playback sound in one-cent steps. One cent is 1/100th of a semitone. Sometimes when you are practicing your instrument along with a CD, you may have difficulty because the CD playback is pitched slightly different than your instrument. -
Page 64: Enjoying Simple Karaoke (Center Cancel)
Convenient Functions for Playback Enjoying Simple Karaoke (Center Cancel) This function cancels the portion of the sound that is heard in the center of its stereo image, such as the main vocal or lead guitar, making it less audible. This lets you use a commercially available CD as a simple karaoke source, giving you an easy way to enjoy karaoke or to practice singing or playing an instrument. -
Page 65: Repeatedly Playing Tracks (1 Track/All Repeat)
Repeatedly Playing Tracks (1 Track/All Repeat) You can have a favorite track (or all tracks) play back repeatedly. Press the [MENU] button to access the menu screen, and choose “Repeat.” Use the [+] [-] buttons to change the Repeat Playback setting. fig.menu-repeat02-e.eps Value Explanation... -
Page 66: A-B Repeat Playback
Convenient Functions for Playback A-B Repeat Playback You can have a specified section play back repeatedly. Repeatedly listening to a section of a song is convenient when you’re practicing your instrument along with the song, or learning the song by ear. During playback, press the [REPEAT] button at the point where you want Repeat Play to start. -
Page 67: Slowing Down Or Speeding Up Playback
Slowing Down or Speeding Up Playback You can make the playback speed slower or faster. Changing the playback speed will not affect the pitch. This is useful when you are learning a song by ear and want to hear it slowly, or if you want to quickly listen to a song that you recorded. -
Page 68: Adding Reverberation (Reverb)
Convenient Functions for Playback Adding Reverberation (Reverb) This function adds reverberation (reverb) to the audio played back from an SD memory card or CD, creating the impression that the performance is occurring in a concert hall or other real-world acoustic environment. Use the [REVERB] button to select the depth of reverb. -
Page 69: Muting The Sound Of The Speakers
Muting the Sound of the Speakers If you don’t want sound to be heard from the speakers, set the [SPEAKER] switch located on the rear of the CD-2e to its “OFF” position. fig.speaker.eps Important Even if the [SPEAKER] switch is in the “ON” position (so that sound is produced), sound will not be heard from the speakers during recording-standby mode or during recording. -
Page 70: Deleting Songs From An Sd Memory Card
Deleting Songs from an SD Memory Card Deleting Songs Individually Here’s how to delete a single, selected song. When you delete a song, subsequent songs will be moved forward, incrementing their song numbers. fig.SDedit-erase-e.eps Insert the SD memory card that you want to edit, and press the [SD CARD] button. -
Page 71: Erasing All Tracks
Erasing All Tracks Here’s how to delete all songs from the SD memory card. Insert the SD memory card that you want to edit. Press the [MENU] button to access the menu screen, and choose “SD Erase All?” If you’re sure you want to proceed, press the [ENTER] button. fig.SDeraseall-mssg01-e.eps If you’re still sure you want to proceed, press the [ENTER] button. - Page 72 Deleting Songs from an SD Memory Card Deleting an Unwanted Region at the Beginning of the Song (Trim In) If you start recording slightly ahead of the beginning of the performance so as to avoid missing anything, there will be some unwanted silence at the beginning of the song. You can delete this unwanted silence so that you will hear sound as soon as the song starts playing.
- Page 73 Press the [ENTER] button. If you’re sure you want to proceed, press the [ENTER] button. (If you decide to cancel, press the [EXIT] button.) fig.trimin-mssg-e.eps The display will show “Processing...”, and the unwanted beginning of the song will be deleted. When the deletion is completed, you’re returned to the audio source screen. Note The deleted region cannot be recovered.
-
Page 74: Deleting An Unwanted Region At The End Of The Song (Trim Out)
Deleting Songs from an SD Memory Card Deleting an Unwanted Region at the End of the Song (Trim Out) If you stop recording slightly after the end of the performance so as to avoid missing anything, there will be some unwanted silence at the end of the song. You can delete this unwanted silence so that the song contains only the performance itself. - Page 75 Press the [ENTER] button. If you’re sure you want to proceed, press the [ENTER] button. (If you decide to cancel, press the [EXIT] button.) fig.trimout-mssg-e.eps The display will show “Processing...”, and the unwanted end of the song will be deleted. When the deletion is completed, you’re returned to the audio source screen.
-
Page 76: Erasing Tracks From A Cd-Rw Disc
Erasing Tracks from a CD-RW Disc Deleting One Song at a Time (Only the Last Song) Here’s how to erase the last track recorded on a CD-RW disc. * In order to perform this operation, you’ll need the included, dedicated AC adaptor. Insert the CD-RW disc that you want to edit. -
Page 77: Erasing All Tracks
Erasing All Tracks Here’s how to erase all tracks from the CD-RW disc. * In order to perform this operation, you’ll need the included, dedicated AC adaptor. Insert the CD-RW disc that you want to edit. Press the [MENU] button to access the menu screen, and choose “CD Erase All?”... -
Page 78: Removing Finalization
Erasing Tracks from a CD-RW Disc Removing Finalization You can remove finalization from a CD-RW disc (Page 83) so that the disc can once again be used for recording.Removing finalization will not erase the recorded tracks. * In order to perform this operation, you’ll need the included, dedicated AC adaptor. Insert the CD-RW disc that you want to edit, and press the [CD] button. - Page 79 Press the [MENU] button to access the menu screen, and choose “Write (SD→CD)?” When you see this screen, insert a blank or un-finalized CD-R/RW disc. fig.writeCD-mssg01-e.eps The CD-2e asks whether you want to write all of the songs. If you want to write all songs Press the [ENTER] button. Proceed to Select the song that you want to write to the CD-R/RW disc.
-
Page 80: Selecting Songs From An Sd Memory Card To Create A Cd
CD is now ready. (continued) ☞ “Removing Finalization” (Page 78) “Making a CD-R/RW Disc for Playback on Another CD Player (Finalize)” (Page 83) fig.writeCD-mssg04-e.eps Indicates the progress relative to the total number of songs Indicates the progress for each song Your music If you selected Finalize “No”... - Page 81 Important ● We cannot guarantee that a music CD created on the CD-2e will play on all CD players. Depending on your CD player’s support for CD-R/RW discs, music CDs you create may not play correctly. ●...
- Page 82 Requirements for songs (files) that can be recognized Even if a song was recorded with a recording mode of “WAV 16-bit” and a sampling frequency of “44.1 kHz,” the CD-2e will not recognize it unless it satisfies the following conditions.
-
Page 83: Making A Cd-R/Rw Disc For Playback On Another Cd Player (Finalize)
Finalization is the process of writing final information (the number of songs, the song numbers, the playback times, etc.) to a CD-R/RW disc. When you “finalize” a CD-R/RW disc that was recorded or written by the CD-2e, that disc will be playable as a music CD in another CD player. - Page 84 Creating a Duplicate of an Original Music CD Here’s how to back up an original music CD you created, making an identical copy of your original music CD. * In order to perform this operation, you’ll need the included, dedicated AC adaptor. Workflow to Back up CDs When copying a music CD, the CD tracks are stored temporarily on an SD memory card.
-
Page 85: Creating A Duplicate Of An Original Music Cd (Backup)
The display will show “Processing...”, and the backup will begin. When the backup is finished, the CD-R/RW disc will be ejected. The CD-2e asks whether you want to create another identical CD. fig.CDbackup-mssg04-e.eps If you want to create another identical CD Press the [ENTER] button. - Page 86 Creating a Duplicate of an Original Music CD (Backup) If the screen shows “Tr ##/xx Tr. Are You Sure?” (Step 3) The music CD’s tracks will be written as far as the free space on the SD memory card allows. This means that if the SD memory card contains less free space than the amount of data from the music CD, you won’t be able to record all of the tracks.
-
Page 87: Moving A Song
Moving a Song This operation moves a song by changing the order of the songs. fig.SDedit-move-e.eps Insert the SD memory card that you want to edit, and press the [SD CARD] button. SD becomes the audio source. Use the [ Press the [MENU] button to access the menu screen, and choose “Move?”... -
Page 88: Dividing A Track
Dividing a Track This operation divides a song into two songs. Insert the SD memory card that you want to edit, and press the [SD CARD] button. SD becomes the audio source. Use the [ Press the [MENU] button to access the menu screen, and choose “Divide?” Press the [ fig.menu-divide02-e.eps Number of the track you’re editing... - Page 89 If you’re sure you want to proceed, press the [ENTER] button. (If you decide to cancel, press the [EXIT] button.) fig.divide-mssg-e.eps The display will show “Processing...”, and the song will be divided. When the division is completed, you’re returned to the audio source screen. Important ●...
-
Page 90: Joining Songs
Joining Songs This operation join two songs, making them into a single song. The song will be joined with the following song. fig.SDedit-combine-e.eps Insert the SD memory card that you want to edit, and press the [SD CARD] button. SD becomes the audio source. Use the [ This song will be joined with the song that follows it. -
Page 91: Maximizing The Volume Of A Song
Maximizing the Volume of a Song This operation raises the volume of the entire song as high as possible without causing the sound to distort. If the sound was recorded at too low a level, you can use this to increase the volume. -
Page 92: Viewing The Remaining Recording/Playback Time
Viewing the Remaining Recording/Playback Time Here’s how to switch the time information shown in the screen. You can view the remaining time that can be recorded on an SD memory card or CD-R/RW disc, or the time remaining in a song. fig.display-e.eps Press the [ENTER] button to switch between the available choices for the time indicator, as follows. -
Page 93: Viewing Information About An Sd Memory Card
Viewing Information about an SD Memory Card Here’s how to view information such as the capacity of an SD memory card and the remaining time for recording. Press the [MENU] button to access the menu screen, and choose “Card Info.” View the information. -
Page 94: Viewing Information About A Cd-R/Rw Disc
Viewing Information about a CD-R/RW Disc Here’s how to view information such as the capacity of a CD-R/RW disc and the remaining time for recording. Press the [MENU] button to access the menu screen, and choose “Disc Info.” View the information. fig.menu-CDinfo02-e.eps Press the [EXIT] button twice. -
Page 95: Adjusting The Readability Of The Screen (Contrast)
Adjusting the Readability of the Screen (Contrast) Depending on the temperature or other conditions, the characters in the screen may become difficult to read. In such cases, you can adjust the contrast for best readability. Press the [MENU] button to access the menu screen, and choose “Contrast.”... -
Page 96: Automatically Dimming The Screen (Backlight Timer)
* This setting is effective only when the CD-2e is running on batteries. The screen will not dim if you’re using the dedicated AC adaptor (Page 21). -
Page 97: Changing The Screen Display Language
Changing the Screen Display Language You can switch the screen display between various languages. You can choose from English, Japanese, Spanish, German, French, and Italian. Turn off the power. Refer to the table below, and while holding down the button that corresponds to the desired screen display language, turn on the power. -
Page 98: Sounding The Metronome
Sounding the Metronome The CD-2e has built-in metronome—a convenient feature for practicing an instrument. Press the [ fig.metro-indicator-e.eps If the metronome is on, the [ metronome’s indicator will start blinking on the beat. When you press the [ (unlit). Setting the sound. - Page 99 Specifying which beats are emphasized. Value 4 (factory setting) (a quarter-note) will be counted as one beat. * If you’ve selected “Voice” as the “Sound” setting, there will be no accent on the strong beats. Press the [EXIT] button twice. You’re returned to the audio source screen.
-
Page 100: Tuning Your Instrument (Tuner Function)
You can tune your instrument using the chromatic tuner function, which detects the name of the note in semitone steps. Set the [MIC SELECT] switch located on the side of the CD-2e to the “INT” (internal mic) position. This allows you to tune by inputting the sound of your instrument via the internal mic. -
Page 101: Changing The Tuner's Reference Pitch
● If you don’t want to hear sound while you’re tuning, you can turn down the [VOLUME] knob or set the [SPEAKER] switch located on the back of the CD-2e to the “OFF” position so that the sound is muted. -
Page 102: Listening To A Guide Tone While Tuning
Tuning Your Instrument (Tuner Function) Listening to a Guide Tone While Tuning As a tuning aid, you can have the CD-2e sound a guide tone from the internal speakers. Press the [MENU] button to access the menu screen, and choose “Tuner/ Tone?”... - Page 103 This operation returns all settings you’ve made in the menus to their factory-set condition (Factory Reset). If the CD-2e does not operate as you expect even when you follow the steps in this manual, you may wish to execute the Initialize operation.
-
Page 104: Formatting An Sd Memory Card
Formatting an SD Memory Card If an SD memory card has been used on a computer or other device, and any data remains on that SD memory card, there will be correspondingly less available recording time. By formatting the SD memory card, you can erase all data from the card, ensuring that the full capacity of the card will be available for recording. -
Page 105: Adjusting The Left/Right Volume Balance Of The Internal Mics
In such cases, you can adjust the left/right volume balance of the internal mics to compensate for the position in which the CD-2e is placed. On the side panel of the CD-2e, set the [MIC SELECT] switch to the “INT” (internal mic) position. -
Page 106: Reversing The Stereo Field Of The Internal Mics
Reversing the Stereo Field of the Internal Mics When using the internal mics (Page 36), the sound from the mic at the left side of the CD-2e will be recorded on the left channel (L), and the sound from the right mic will be recorded on the right channel (R). - Page 107 Here’s how to exchange the right and left channels of the internal mics. Press the [MENU] button to access the menu screen, and choose “INT MIC Exchange.” Use the [+] [-] buttons to change the setting, specifying whether you want the left and right channels to be exchanged for the internal mics.
-
Page 108: Connecting External Speakers
You can connect external speakers to the LINE OUT jack and use them to listen to playback from the CD-2e or the sound received at its inputs. If you connect the LINE OUT jack to the input jack of your digital piano, you’ll be able to listen to the sound using the built-in speakers of your digital piano. - Page 109 LINE OUT jack. Value Explanation Mix (factory setting) The audio of all sources is mixed and output. The audio from the EXT MIC jacks or the CD-2e’s internal mics is output. LINE The audio from the LINE IN jacks is output. SD/CD The audio from the SD memory card or CD is output.
-
Page 110: Troubleshooting
➔ Readjust the display contrast. If you’re using batteries, the Backlight Timer setting will dim the screen when you haven’t operated the CD-2e for a specified length of time. ➔ Turn the Backlight Timer “Off.”... - Page 111 Problems with the Sound Problem ● No sound Could the connections be incorrect? ➔ Make the correct connections. ● Could the power on the connected equipment (mic, digital piano, etc.) be switched off? ➔ Turn on the power. ● Could the volume of the connected device be turned down? ➔...
- Page 112 Could you be using a connection cable that contains an internal resistor? ➔ Use a connection cable—such as one from the Roland PCS series— that does not contain an internal resistor. Could the external mic’s sensitivity be set to “Low”? ➔...
- Page 113 CD-Related Problems Problem ● Can’t insert a CD Could you be using batteries? If you’re operating the CD-2e on batteries, no CD-related operations can be performed. ➔ Use the dedicated AC adaptor. ● Normal playback does Is the audio source set to “CD”? not work ➔...
- Page 114 Execute the Finalize operation. Is your CD player able to play back CD-R or CD-RW discs? ➔ If your CD player does not support CD-R or CD-RW discs, they may not play back correctly. Is the CD-2e powered up? ➔...
- Page 115 Could the SD memory card be of a capacity that is not supported? not detected ➔ Check the capacity of the SD memory card, and use a card of a capacity supported by the CD-2e. ● Is the SD memory card inserted all the way into the slot? ➔...
- Page 116 Troubleshooting (continued) SD Memory Card-Related Problems Problem ● Insufficient playback volume ● Can’t record ● ● ● (continued) Cause and Action Could the SD memory card playback level be turned down? ➔ Use SD/CD Level to raise the playback level. Is the SD memory card inserted all the way into the slot? ➔...
-
Page 117: Messages
The disc is an inappropriate type for the operation Improper Disc you’re attempting to perform. Improper File This song cannot be edited on the CD-2e. When joining songs, you selected the last song in Last SD Track the SD memory card. The songs cannot be joined because there’s no following song. - Page 118 The disc cannot be used with the CD-2e. Unknown Disc Unsupported SD The CD-2e is unable to use this SD memory card. You attempted to perform a CD-related operation Use AC Adaptor without using the dedicated AC adaptor.
-
Page 119: Setting Items In Easy Guide
Setting Items in Easy Guide This section explains items that you can set in the screens appearing in Easy Guide. 1. Recording Displayed screen 2. Erase Displayed screen Explanation Select the media to be used for recording. CD-R/RW Choose this if you’re recording on a CD-R/RW disc. SD Card Choose this if you’re recording on an SD memory card. - Page 120 Setting Items in Easy Guide (continued) 3. Write (SD→CD) Displayed screen 6. Karaoke Displayed screen 7. Overdub Displayed screen Explanation Select whether or not the disc is to be finalized once writing is complete. When writing has been completed, the disc will be finalized to complete your music CD.
-
Page 121: Specifications
Specifications Tracks Sampling Rate Signal Processing Recording Mode Recording Media Recording Time (unit: min) CD-R or CD-RW disc Recorder Part Recording Songs Audio Input Audio Output Frequency Response Nominal Input Level Input/Output (variable) Nominal Output Level Input Impedance Output Impedance Recommended Load Impedance Display... -
Page 122: Recommended Sd Memory Card
As such, be advised that the listed SD memory cards may not be available outside of Japan. * Refer to the Roland website for details on the SD memory cards that can be used with the CD-2e. Up-to-date information about cards that are known to work are provided on the website. -
Page 123: Recommended Cd-R/Rw Disc Manufacturers
Recommended CD-R/RW Disc Manufacturers Roland recommends CD-R/RW discs made by the following manufacturers, which have been confirmed to work with the CD-2e. CD-R Discs Recommended Manufacturers TAIYO YUDEN Co.,Ltd. Mitsubishi Chemical Corp. Hitachi Maxell, Ltd. TDK Corp. Imation Corp. * Although all of the discs above functioned properly in our tests, there may be cases in which they will not operate correctly. -
Page 124: Index
Index Numerics 1 Track Repeat ... 65 Adjusting the readability of the screen ... 95 All Repeat ... 65 Auto Level ... 38 Auto Marker ... 55, 56 Auto Marker Lvl ... 56 Auto Marker Time ... 55 Auto Rec Start ... 52 Automatically recording ... - Page 125 Guide tone ... 102 Information CD-R/RW disc ... 94 SD memory card ... 93 Input Level External mics ... 40 Internal mics ... 37 LINE IN jacks ... 42, 44 Inserting CD ... 27 SD memory card ... 24 INT MIC Balance ... 105 INT MIC Exchange ...
- Page 126 Index (continued) R-09 ... 82 Recommended manufacturers CD-R/RW disc ... 123 SD memory card ... 122 Recording Adjusting the input level automatically ... 38 Maximum recording times ... 35 Overdubbing ... 46, 49 Recording a Cassette or MD ... 44 Recording an electronic instrument ...
- Page 127 ...MEMO...
- Page 128 ...MEMO...
-
Page 129: Information
Information Information When you need repair service, call your nearest Roland Service Center or authorized Roland distributor in your country as shown below. AFRICA PHILIPPINES G.A. Yupangco & Co. Inc. 339 Gil J. Puyat Avenue EGYPT Makati, Metro Manila 1200,... - Page 130 For EU Countries For China...
- Page 131 Apparatus containing Lithium batteries ADVARSEL! Lithiumbatteri - Eksplosionsfare ved fejlagtig håndtering. Udskiftning må kun ske med batteri af samme fabrikat og type. Levér det brugte batteri tilbage til leverandøren. ADVARSEL Eksplosjonsfare ved feilaktig skifte av batteri. Benytt samme batteritype eller en tilsvarende type anbefalt av apparatfabrikanten.
- Page 132 About the License Agreement ● The CD-2e’s CD-writing functionality, and its backing-up functionality are designed to allow you to reproduce material to which you have copyright, or material which the copyright owner has granted you permission to copy. Accordingly, reproduction of Music CD or other copyrighted material without permission of the copyright owner...