
Related Manuals for Radio Shack PRO-528


Summary of Contents for Radio Shack PRO-528
- Page 1 20-528 PRO-528 1,000-Channel Handheld Trunking Scanner Please read this user’s guide before installing, setting up and using your new product www.radioshack.com...
- Page 2 Thank you for purchasing your RadioShack 1000-Channel Handheld Trunking Scanner from RadioShack. Your handheld scanner is one of a new generation of scanners designed to track Motorola® Type I, Type II, hybrid analog systems, (such as Smartnet® and Privacy Plus®) plus M/A-COM EDACS®...
-
Page 3: Table Of Contents
Beyond the Basics copying/moving a frequency searching for and temporarily storing... - Page 4 off/on...
- Page 5 Signal Stalker I trunking operation setting the scanner to the trunking mode simultaneous trunking setting squelch for the trunking mode programming trunked frequencies searching a trunked bank turning a trunked bank on or off skipping a trunked bank turning the status bit ignore...
- Page 6 Base and Offset frequencies turning the Motorola disconnect tone detect function On/Off frequently asked questions My scanner is on but will not scan, why? Why won’t my scanner work at all? Why doesn’t my keypad work? Why is...
- Page 7 Why am I missing replies to conversations? How do I reset my scanner? FCC notice scanning legally care service and repair specifi cations Hypersearch, Hyperscan, and Adaptaplug are trademarks used by RadioShack Corporation. Motorola, Smartnet, and Privacy Plus are registered trademarks of Motorla Inc.
-
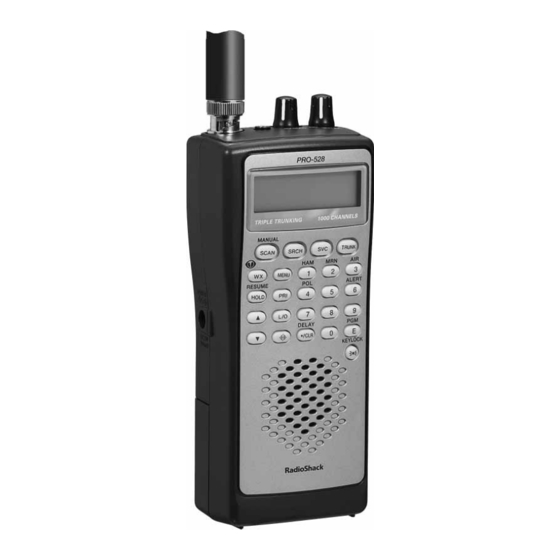
Page 8: The Basics
SCAN/MANUAL — scans the stored channels and scan lists, or manually enter a channel or frequency. Manually stores talk group IDs in scan lists SRCH (search) — start a chain search, search a specifi ed frequency range , or... - Page 9 — starts weather search; activates Skywarn function. HOLD/RESUME — Stops and resumes searching. —Search and scan up and down a selected frequency range; selects options during programming; changes the ID location number while trunking. The Basics...
- Page 10 MENU — enter the menu mode. PRI (Priority) — sets and turns the priority function on or off. L/O — lockout selected channels or skip specifi ed frequencies during a search; lock out a selected ID while trunking. — turn Signal Stalker I on and off.
- Page 11 1/HAM — select the HAM band in service mode. 2/MRN (Marine) — select the marine band in service mode. 3/AIR — select the air band in service mode. 4/POL — select the police band in service mode. 6/ALERT — turns NWR - SAME weather alert on and off.
- Page 12 0-9 — input a number or characters. •/CLR/DELAY — enter a decimal point, space, or programs delay time for the selected channel/ search bank, or enters a hyphen (in trunking ID setting). Press CLR to clear an entry. Programs a 2- second delay for a selected channel or service;...
- Page 13 PC/IF — connect an optional PC interface cable here to use the scanner with your computer. VOLUME — turn the scanner on or off and adjust the volume. SQUELCH — adjust the squelch. The Basics POWER DC 9V — connect an external power source here (not included).
-
Page 14: Supplying Power To Your Scanner
9V DC and delivers at least 300mA. Its center tip must be set to positive and its plug must fi t the scanner’s DC 9V 300mA jack. Using an adapter that does not meet these specifi cations could damage the scanner or the adapter. -
Page 15: Battery Cautions
• When the battery icon and the scanner beeps every 15 seconds, replace all four batteries. • Always dispose of old batteries promptly and properly. Do not bury or burn them. -
Page 16: Connecting The Antenna
• Always connect the AC adapter to the scanner before you connect it to AC power. When you fi nish, disconnect the adapter from AC power before you disconnect it from the scanner. connecting the antenna Attach the supplied antenna to the... -
Page 17: Listening Safely
If you use an earphone or headphones with your scanner, be very careful. Do not listen to a continuous broadcast. Even though some earphones/headphones let you hear some outside sounds when listening at normal volume levels, they still can present a traffi... -
Page 18: Transferring Data To Or From Another Scanner Or Pc
You can transfer the programmed data to and from another PRO-528 scanner using a connecting cable which has 1/8-inch phone plugs on both ends (not supplied). Connect the cable between each scanner’s PC/IF jacks. -
Page 19: Understanding Banks
The scanner is preprogrammed with all the frequencies allocated to the ham, marine, aircraft, and police (fi re/emergency) services. This helps you quickly fi nd active frequencies instead of doing a chain search (see “service bank search”). -
Page 20: Channel Storage Banks
fi rst channel in bank 1), and program the fi re department frequencies starting with Channel 101 (the fi rst channel in bank 2). turning on the scanner and setting squelch Note: Make sure the scanner’s antenna is connected before you turn Notes it on. -
Page 21: Storing Known Frequencies Into Channels
Notes trunked frequencies.” Follow these steps to store frequencies into channels. 1. Press E/PGM to put the scanner in programming mode. PGM appears. 2. Use the number keys to enter the channel number you want to assign to a frequency. -
Page 22: Beyond The Basics
For example, if you enter 151.473 (MHz), your scanner accepts it as 151.475. • After a transmission, the scanner automatically pauses for 2 seconds on this channel before proceeding to the next active transmission. -
Page 23: Searching For And Temporarily Storing Active Frequencies
2. Press E/PGM. 3. Press and hold E/PGM during program mode. Scanner displays the copy/move menu. 4. Press function, then press E/PGM to decide on copy or move. 5. Select the bank where you want to copy or move the frequency. The smallest empty channel number and “000.0000”... -
Page 24: Chain Search
(see “delay”). • While doing a chain, direct, or Notes service bank search, press MENU if you want the scanner to skip data signals (such as fax or modem signals) and search only for audio (voice) signals to enter the menu mode and turn Data Skip Option to off (see “skipping data signals”). -
Page 25: Starting Chain Search
If you disable all the banks, Notes the error tone beeps. 3. Press to search down or 4. When the scanner stops on a transmission, quickly press HOLD/ RESUME to stop searching to listen to the transmission. HOLD appears. 216.0000 –... -
Page 26: Storing Found Frequencies During Chain Search
Beyond the Basics 5. To release the hold and continue searching, press HOLD/RESUME. Note: To step through the Notes frequencies while HOLD appears, press storing found frequencies during chain search You can store frequencies you fi nd in chain search mode or chain search hold mode. 1. -
Page 27: Direct Search
Error. Notes Press •/CLR /DELAY. service bank search You can search for ham, marine, aircraft, or police (fi re/emergency) transmissions without knowing the specifi c frequencies used in your area. The scanner is to change the frequency... -
Page 28: Weather Search
Beyond the Basics preprogrammed with all the frequencies allocated to these services. To use this feature, press SVC. The current service symbol appears and the scanner starts searching. To select a different service bank, press 1/HAM, 2/MRN, 3/AIR or 4/POL. - Page 29 Stalker I. The scanner stores the frequency in memory and automatically resumes the search. To clear a single frequency from skip memory so the scanner stops on it during a chain, direct and service search and Signal Stalker I: 1. Press HOLD/RESUME to stop the search.
-
Page 30: Scanning The Stored Channels
MANUAL. The scanner scans through all non-locked channels in the activated banks. (See “locking out channels” and “turning channel-storage banks on and off”). When the scanner fi nds a transmission, it stops on it. When the transmission ends, the scanner resumes scanning. -
Page 31: Manually Selecting A Channel
• To listen to a weak or distant station, turn SQUELCH counterclockwise. • To ensure proper scanning, adjust SQUELCH until the audio mutes • To scan in the trunk scanning mode, see “trunking operation.” manually selecting a channel You can continuously monitor a single channel without scanning. -
Page 32: Special Features
• To turn off the 2-second delay, press •/CLR /DELAY while the scanner is monitoring a channel, scanning, or searching. DLY disappears. • To turn on the 2-second delay to a channel again, select the channel and press •/CLR /DELAY. -
Page 33: Turning Channel-Storage Banks On And Off
You can turn each channel-storage bank on and off. When you turn off a bank, the scanner does not scan any of the 100 channels in that bank. While scanning, press the number key that corresponds to the bank you want to turn on or off. -
Page 34: Priority
You can program one stored channel in each bank as a priority channel. If the priority feature is turned on, as the scanner scans the bank, it checks that bank’s priority channel for activity every 2 seconds. -
Page 35: Using The Keylock
“locking out channels.” using the keylock To protect the scanner from accidental program changes, turn on the keylock feature. When the scanner is locked, the only controls that operate are SCAN/ MANUAL, HOLD/RESUME and KEYLOCK. To turn on the keylock, hold down /KEYLOCK until appears. -
Page 36: Wired Programming
PC for more than 20 Notes seconds, T-Err appears and wired programming stops. 1. Make sure your scanner is turned off. 2. Connect the interface cable to your computer and then connect the other end of the cable to PC/IF on the side of the scanner. -
Page 37: Cloning Your Scanner
You can clone all the frequencies, trunking talk groups, and fl eet maps programmed in your PRO-528 to another PRO-528 or PRO- 433 using an optional interface cable and software. 1. Make sure the scanners are turned off and then plug the cable into each scanner’s PC/IF jack. -
Page 38: Using The Display Backlight
To turn off the light sooner, press again. using the auto backlight display You can set the scanner so the auto backlight turns on for about 5 seconds when the scanner receives signals. .The display lights for 15... -
Page 39: Search Speeds
The scanner has two search speeds. Normal Search (90 steps/second ) Hypersearch (270 steps/second) turning the keytone off/on Each time you press any of the scanner’s keys, the scanner sounds a tone. To turn the scanner’s key tone off or on: 1. Press MENU. -
Page 40: Turning The Battery Save Function Off/On
Beyond the Basics 4. Press MENU to exit the menu mode. turning the battery save function off/on When the scanner is set to receive (monitor) a manually selected channel, and it is not actively scanning, using the battery save feature conserves energy. -
Page 41: Receiving Nwr-Same And Weather Alert Signals
While this scanner does not encode specifi c geographical data, it does detect SAME signals and decode the alert level. The scanner displays this data as codes corresponding to the levels of severity (L1, L2, and L3). to display... -
Page 42: Turning On The Digital Weather Alert Feature
The scanner remains on the weather channel and the audio turns on so you can hear the weather broadcast. The scanner displays one of the following codes to indicate the alert level . L1: Warning L2: Watch L3: Advisory... -
Page 43: Programming A Fips Code
fi rst digit will be 0 for all subdivisions in the county and each subdivision will be labeled 1-9. To program your scanner to alert you when the weather service issues an alert, you must set the scanner to the alert mode, and then leave the scanner monitoring the weather service. -
Page 44: Programming Fips
------ appears. If an invalid value has been inputted, the FIPS code is cleared. 5. To set the scanner so it alerts you when you receive any FIPS code, press to move ALLFIPS. Then press E/ PGM. Then go to WX hold mode. -
Page 45: Skywarn
Skywarn frequency for your area into Channel 1000. If no frequency is programmed in the last channel, No Prog appears and the scanner sounds an error tone. about Skywarn Skywarn is an organized group of trained weather observers. - Page 46 Beyond the Basics • Lightning (cloud-to-cloud and especially cloud-to-ground) • Wall clouds seen in severe thunderstorms (which spawn tornadoes) • Severe lowering of a wall cloud • Turbulence in a wall cloud • Funnel clouds • Tornadoes • High water areas •...
-
Page 47: Signal Stalker I
Signal Stalker I Your scanner’ s Signal Stalker I feature lets you set the scanner so it detects and then displays the frequency of a nearby strong radio transmission. You can set the scanner so Signal Stalker I works “in the background”... -
Page 48: Setting The Signal Stalker I Options
• S-S.Int: Lets you select the Signal Stalker I voice interrupt settings. While the Signal Stalker I is on and the scanner is receiving an audio signal (voice) in normal scanning, the scanner checks the Signal Stalker I every 2 seconds and the audio signal breaks at that moment. - Page 49 ON. • S-S.LOG: Lets you select the Signal Stalker I logging setting. When the scanner fi nds a strong signal, it automatically saves the signal to one of 10 log channels. If the scanner fi nds a new frequency after...
- Page 50 If you do not want to scan the channels, set it to OFF. The scanner stores signals found by the Signal Stalker I even the S-S.LOG function is OFF. The frequencies in the log channels are deleted when the scanner is turned off.
-
Page 51: Using Signal Stalker I
2 seconds, the scanner searches for frequencies in the range you specifi ed in “Setting the Signal Stalker I Options.” When the scanner fi nds a frequency, it sounds the alert you specifi ed in “Setting the Signal Stalker I Options”, and Found fl... -
Page 52: Setting The Scanner To The Trunking Mode
The scanner allows you to track up to 10 systems at a time. You can trunk scan or search and scan conventional frequencies at the same time. You can also program conventional frequencies in the same bank as trunking systems. -
Page 53: Programming Trunked Frequencies
If it is set too high, it could prevent your scanner from locking on the control channel reliably. If it is set too low, it will slightly delay fi nding the control channel. The best setting is the same as for conventional reception and is critical for monitoring trunked systems. - Page 54 E2 – Hi E2 – UHF Ed – SCt 3. Prog F appears, then press E/PGM. The scanner automatically selects the fi rst channel in the selected bank. 4. Use the number keys to enter a valid frequency within the trunk system, then press E/PGM.
- Page 55 (LCN) order. • If you try to enter a duplicate frequency in a bank, the scanner beeps and the channel which was previously stored appears 5. Press channel in the bank and repeat Step 4 to enter frequencies in that bank.
-
Page 56: Mode
See “scanning the talk group ID lists”. While scanning conventional frequencies, follow the steps below to switch to the trunk mode after the scanner fi nds the data channel. 1. Press TRUNK. The scanner begins scanning both trunking and conventional banks. -
Page 57: Turning A Trunked Bank On Or Off
Hint: While searching, you may not know exactly to whom the talk group IDs are assigned until you listen awhile. To locate talk group ID lists for your local police, fi re, and other agencies, refer to frequency guides available at your local RadioShack store or on internet sites such as www.trunkscanner.com. -
Page 58: Skipping A Trunked Bank
16-bit code) are the status bits. In some systems, status bits identify special situations (such as an emergency status). Your scanner is preset to assume that the status bits in a talk group ID are set to 0 and ignores them. For example, when... -
Page 59: Identifying A Trunked Frequency
ON or you will miss some transmissions. Follow these steps to turn status bit ignore on or off. 1. Set the scanner to conventional programming mode and then press TRUNK. 2. Select the bank. 3. Repeatedly press Motorola Type, then press E/PGM. -
Page 60: Selecting The Edacs (Ed) Talk Group Id Format
Beyond the Basics selecting the EDACS (Ed) talk group ID format Your scanner can also enter or display EDACS (Ed) talk groups in decimal format (0-2047). 1. Select the trunking programming mode and the bank you want to change. 2. Press then press E/PGM. -
Page 61: Using Hold To Monitor An Active Talk Group Id
HOLD to monitor an active talk group ID Follow these steps to stop scanning and searching and keep the scanner tuned to a desired ID. 1. Press HOLD/RESUME. HOLD appears and the scanner stays on the current ID. -
Page 62: Unlocking A Single Talk Group Id
Hold down L/O while searching until you hear two short beeps. You can check all locked out IDs. Hold down L/O while you are reviewing all locked out IDs. The scanner beeps twice. All locked out IDs in a to choose Id Lout, and... -
Page 63: Using Trunk Scanning Scan Delay
Sometimes a user might pause before replying to a transmission. You can set the scanner to hold on an ID for 2 seconds to wait for a reply. That way, the scanner continues to monitor the ID for 2 seconds after the transmission stops before resuming scanning. -
Page 64: Using Talk Group Id Lists
ID lists When you program trunked frequencies into a bank (see “programming trunked frequencies”), your scanner sets up ten scan lists for that one bank in which you can store your favorite IDs. Each list can contain up to 10 IDs, for a total of 100 IDs for each trunk scanning bank. -
Page 65: Motorola Talk Groups
2. Use then press E/PGM. 3. Use press E/PGM. 4. Press location. 5. Enter the talk group IDs for each trunk system. Motorola talk groups To enter a Type 2 Talk Group ID: 1. Enter the ID you want to store by using the keypad. -
Page 66: Edacs (Ed) Talk Groups
Beyond the Basics EDACS (Ed) talk groups To enter a full EDACS ID: 1. Enter the Agency number. 2. Press •/CLR/DELAY to enter the dash. 3. Enter the fl eet number and subfl eet number. 4. Press E/PGM. entering EDACS partial talk groups You can enter partial group numbers in an EDACS talk group. -
Page 67: Ltr Talk Groups
5. Enter the fl eet number. 6. Press E/PGM. Remember the AFS format allows you to enter full or partial EDACS IDs for powerful fl exibility in all modes. The scanner defaults to AFS talk group displays for EDACS only. LTR talk groups Users on an LTR system are assigned to specifi... -
Page 68: Scanning The Talk Group Id Lists
Note: If one or more of the IDs you stored are incorrect, Error fl ashes twice and the scanner beeps several Notes times, then the scan list numbers appear at the top of the display. To correct the entry, delete at least one of the incorrect IDs. -
Page 69: Priority Talk Group Id Scanning
ID scanning You can assign a priority to a favorite ID so during scanning the scanner checks that ID more frequently than the others in the list. Each of the ten memory locations reserved for storing lists (see “using talk group ID... -
Page 70: Scanning Type I And Hybrid Trunked Systems
Beyond the Basics scanning type I and hybrid trunked systems Your scanner is preset to scan Type II system IDs. When you scan trunked frequencies, each Type II user ID you see appears as an even number without a dash (example 2160). -
Page 71: Preset Fl Eet Maps Table
Select a size code for a block, then press SRCH and listen to the conversations. If you are receiving most of the replies, then you have probably selected the right size code and can program the next block of the map. There are 16 preset fl eet maps to choose from, and it is best to start with these when setting up a Type I or hybrid trunk scanning bank. - Page 72 Beyond the Basics E1P4 Size Block Code (S12) E1P7 Size Block Code E1P10 Size Block Code E1P5 Size Block Code (S12) E1P8 Size Block Code E1P11 Size Block Code E1P6 Size Block Code (S12) (S12) E1P9 Size Block Code E1P12 Size Block Code...
- Page 73 E1P13 Size Code Block E1P16 Size Code Block (S12) E1P14 Size Code Block (S12) E1P15 Size Code Block (S12...
-
Page 74: Selecting A Preset Fl Eet Map
Beyond the Basics selecting a preset fl eet map 1. Set the scanner for conventional scanning and press E/PGM, then press TRUNK to select the trunking programming mode and the bank you want to change. 2. Repeatedly press TYPE 1 SYSTEM (E1), then press E/ PGM. - Page 75 fl eet map. For example, if you assign Block 0 as S-12, the scanner prompts you for b2, the next block available, instead of b1. If to select...
-
Page 76: Programming A Hybrid System
To properly track Motorola VHF and UHF trunked systems, you must program the applicable base and offset frequencies for each system. For a list of these frequencies and other scanner information, go to www.trunkscanner.com and other similar frequency resources. 1. Select the trunking programming mode. - Page 77 3. Repeatedly press Motorola Type UHF, or VHF system, then press E/PGM. 4. Repeatedly press bASE, then press E/PGM. 5. Press the confi guration Block Number (1-3) . 6. Press the number keys to enter a new base frequency, then press E/PGM. 7.
-
Page 78: Turning The Motorola Disconnect Tone Detect Function On/Off
Beyond the Basics 11. Press •/CLR /DELAY. The scanner returns to the previous screen. Repeat steps 5 through 10 to program additional confi gurations. turning the Motorola disconnect tone detect function On/Off When the Motorola disconnect tone detect function is disabled, the scanner... - Page 79 Beyond the Basics Note: If you set the squelch so you hear a hissing sound, the scanner will remain on the voice channel, Notes even when a disconnect tone is transmitted or there is no signal at all.
-
Page 80: Frequently Asked Questions
Beyond the Basics frequently asked questions These suggestions might help you locate the problem. My scanner is on but will not scan, why? • SQUELCH is not adjusted correctly; adjust SQUELCH. • Only one channel or no channels are stored. -
Page 81: Why Doesn't My Keypad Work
Programming error: re-enter the frequency correctly, including the decimal point. Why won’t my scanner track a trunked system? The transmission might not use a system that can be tracked by your scanner. Scan another transmission. The data frequency is missing: see... -
Page 82: Why Isn't My Scanner Acquiring A Data Channel
Beyond the Basics “programming trunked frequencies.” The system you are trying to track is a Type I system, and the scanner is set to scan Type II systems. Set the scanner to receive Type I trunked frequencies. See “scanning type I and hybrid trunked systems”. -
Page 83: How Do I Reset My Scanner
Type II systems. Set the scanner to receive Type I trunked frequencies. See “scanning type I and hybrid trunked systems”. The selected fl eet map is incorrect. Try another preset fl eet map or program your own fl eet map (see “scanning type I and hybrid trunked systems”). -
Page 84: Fcc Notice
Beyond the Basics Follow these steps to restore the 150 preprogrammed frequencies stored in the private bank. 1. Make sure your scanner is turned off. 2. Press 3 and E/PGM simultaneously while turning on the scanner. After several seconds, the scanner restores the frequencies. -
Page 85: Scanning Legally
Beyond the Basics scanning legally Your scanner covers frequencies used by many different groups including police and fi re departments, ambulance services, government agencies, private companies, amateur radio services, military operations, pager services, and wireline (telephone and telegraph) service providers. It is legal to listen to almost every transmission your scanner can receive. -
Page 86: Care
We encourage responsible, legal scanner use. care Keep the scanner dry; if it gets wet, wipe it dry immediately. Use and store the scanner only in normal temperature environments. Handle the scanner carefully; do not drop it. -
Page 87: Specifi Cations
Beyond the Basics specifi cations Frequency Coverage: 29–54 MHz (in 5 kHz steps) 108–136.9875 MHz (in 12.5 kHz steps) 137–174 MHz (in 5 kHz steps) 216–224.995 MHz (in 5 kHz steps) 400–512 MHz (in 6.25 kHz steps) 806.0000–823.9875 MHz (in 12.5 kHz steps) 849.0125–868.9875 MHz (in 12.5 kHz steps) 894.0125–956.0000 MHz (in 12.5 kHz steps) 1240.0000–1300.0000 MHz (in 12.5 kHz... - Page 88 Beyond the Basics Operating Temperature: Normal ...–4° to 140°F (–20° to 60°C) Signal Stalker I ...14° to 140°F (–10° to 60°C) Scan Speed ... 90 Channels/Second Search Speed: Normal ... 90 Steps/Second Hypersearch ...270 Steps/Second Priority Sampling ... 2 Seconds Delay Time ...
- Page 89 Beyond the Basics Specifi cations are typical; individual units might vary. Specifi cations and depictions are subject to change and improvement without notice.
- Page 90 Beyond the Basics...
- Page 91 Beyond the Basics...
- Page 92 This product is warranted by RadioShack against manufacturing defects in material and workmanship under normal use for one (1) year from the date of purchase from RadioShack company-owned stores and authorized RadioShack franchisees and dealers. For complete warranty details and exclusions, check with your local RadioShack store.