Table of Contents
Advertisement
Advertisement
Table of Contents

Related Manuals for Avital 5303


Summary of Contents for Avital 5303
- Page 1 Model 5303 Owner's Guide © 2011 Directed Electronics, Vista, CA G5303L 2011-06...
-
Page 3: Table Of Contents
Contents What you get ....................3 Important information ..................3 Government Regulations and Safety information ...........3 System maintenance ..................4 Battery replacement ..................4 Your warranty...................5 Caution ....................5 LCD 2-way remote ....................6 Display icons....................6 Standard configuration ................8 Icon descriptions ..................11 LCD remote settings ..................14 Remote operation ....................16 Paging features ..................16 Warn away response description..............17... - Page 4 Diagnostics ....................35 Arming diagnostics .................35 Disarming diagnostics ................36 Code hopping ....................38 Owner recognition ..................39 Rapid resume logic ..................39 Power saver mode ..................40 Programming options ..................41 Security & convenience expansions ..............44 Government Regulations ..................46 Warning! Safety First ..................47 Limited lifetime consumer warranty ..............49 ©...
-
Page 5: What You Get
By carefully reading this Owner’s Guide prior to using your system, you will maximize the use of this system and its features. Please visit www.avital.com for general and additional guide information. Government Regulations and Safety information Read the Government Regulations and Warning! Safety First sections of this manual prior to operating this system. -
Page 6: System Maintenance
System maintenance The system requires no specifc maintenance beyond remote battery replacement. The remote is powered by a 1.5V AAA battery. The battery level indicator has three level indicators that serve as a visual indication of battery charge. When the battery reaches a low charge level that requires replacement, the remote generates a single notifcation chirp, and the battery level indicator flashes continuously. -
Page 7: Your Warranty
Your warranty Your Avital system comes with a warranty. Make sure you receive the warranty registration card and proof of purchase from your dealer indicating the product was installed by an authorized Directed dealer. Please validate it online at www.prodregister.com/directed or com- plete and return the warranty registration card. -
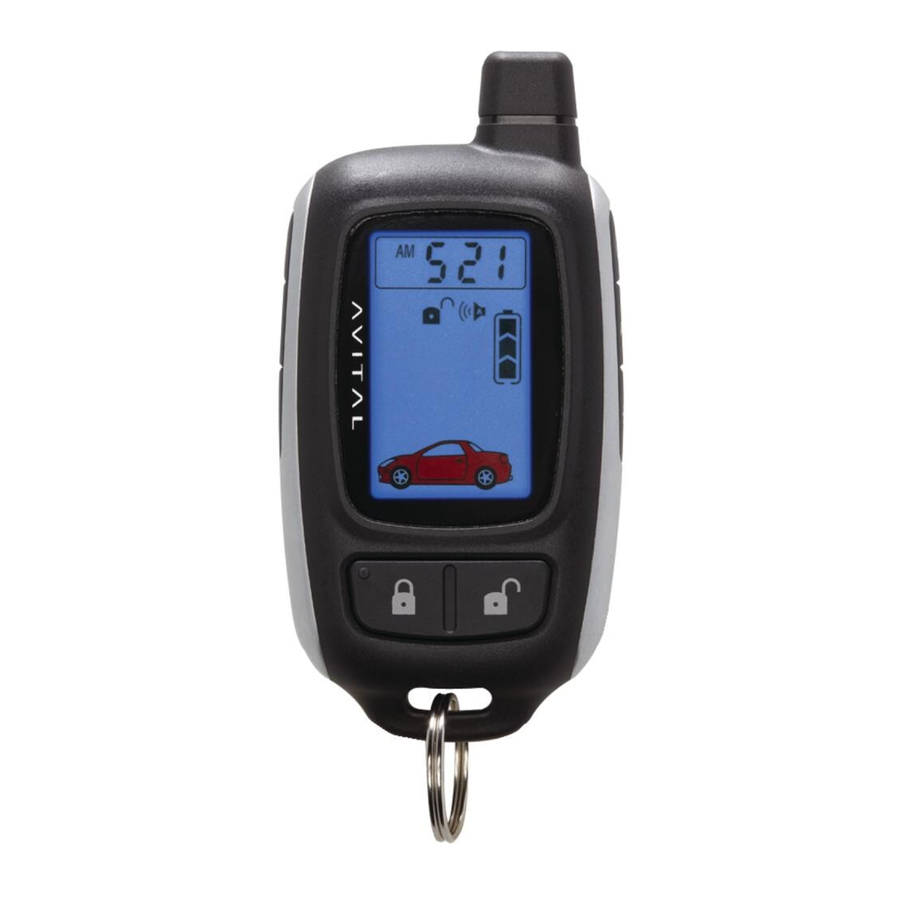
Page 8: Lcd 2-Way Remote
LCD 2-way remote Display icons © 2011 Directed Electronics. All rights reserved. - Page 9 Vehicle Interior Temperature Indicator Numeric Display AM/PM Indicator Alarm Clock Mode Indicator Timer Function Indicator Transmit Range Indicator Transmission Indication Vibrate/Beep Mode Indicator Power Saver Mode Indicator No Function No Function Vehicle Page Mode Indicator Full Trigger Shock Sensor Indicator Hood/Trunk Open or Trigger Indicator Parking Light Indicator Door Open or Trigger Indicator...
-
Page 10: Standard Configuration
The remote buttons are used to send commands to the system. The descriptions below are for standard confguration. Note: Button confgurations in this section also apply to the 1way re- mote control. Important: Substitute the icon for the icon when using the 1 - way remote control. - Page 11 Buttons An optional auxiliary convenience or expansion function that you have added to your system is activated by pressing these buttons simultaneously. ������� The auxiliary output controls __________________________. Buttons Timer mode is activated by pressing these buttons simultaneously. ������� Buttons �������...
- Page 12 Buttons When pressed simultaneously these buttons display the internal tem- perature of the vehicle on the LCD. ������� ����� ������� Button The LCD backlighting will turn on when pressed for less than one sec- ond; when held for more than fve seconds the remote will enter adjust- ment mode allowing the setting of the clock, timer mode, and audible melody selection.
-
Page 13: Icon Descriptions
Icon descriptions The vehicle interior temperature icon displays the temperature of the inside of the vehicle when prompted. The numeric display icon will show the hours and minutes. The AM/PM icon indicates the time before or after noon. The alarm clock mode icon indicates that the alarm clock mode is active. - Page 14 The vehicle page mode icon displays when the alarm module is paging the remote. Page mode is activated when the Valet switch in the vehicle is pressed and held for 4 seconds. The full trigger shock sensor icon indicates that the shock sensor has been triggered by a hard shock.
- Page 15 The silent arm/disarm icon appears when the system has been armed or disarmed in the silent mode. The full trigger alert icon illuminates when the security system has been triggered by a heavy impact, door trigger violation, optional sen- sor violation, or a hood/trunk trigger. The arm icon appears when the vehicle is armed and locked.
-
Page 16: Lcd Remote Settings
LCD remote settings Function Button (s) Icon Audio ������� Lamp On (10 sec) ������� Power Saver Mode Melody ������� Beep/Vibrate Mode 4 Vibrations/ 1 Beep ������� Time Adjust Mode 2 beeps ������� + for 5 secs. (hour)** ������� ������� Time Adjust Mode 1 Time*** (min) ** �������... - Page 17 Function Button (s) Icon Audio ������� 10 Min Parking Count Melody 1 Time Down Mode ������� 20 Min Parking Count Melody 2 Times Down Mode ������� 30 Min Parking Count Melody 3 Times Down Mode ������� 60 Min Parking Count Melody 4 Times Down Mode...
-
Page 18: Remote Operation
Remote operation The remote start system operates at 434 MHz and incorporates Direct- ed’s proprietary A.S.K. out-board two-way remote. The high frequency combined with Binary Data communication achieves superior range with two-way communication. Paging features The control module sends a page to the remote as confrmation of a received command, or alarm system status. -
Page 19: Warn Away Response Description
Warn away response description A Warn Away® Response consists of an alarm page along with the responses described below. • Shock Sensor - Light impacts to the vehicle will flash the vehicle lights and chirp the siren for a few seconds. •... -
Page 20: Setting The Clock
• Hood Trigger - Opening the hood will sound the siren, flash the lights for the programmed duration, and report Zone 1. • Trunk Trigger - Opening the trunk (if connected) will instantly sound the siren and flash the lights for the programmed duration and report Zone 4. -
Page 21: Temperature Check Mode
Temperature check mode This system will report the interior temperature of your vehicle with the press of three buttons. To activate the temperature display press simultaneously and then release. You will hear a melody and the interior temperature will appear on the LCD screen for fve seconds. -
Page 22: Using The System
Using the system Active arming You can arm the system by pressing of your transmitter for one second. When the system arms, you hear a short siren sound, or chirp, and see the parking lights flash once. If the power door locks are con- trolled by the system, the doors also lock. -
Page 23: Multi-Level Security Arming
When armed your vehicle is protected as follows: • Light impacts trigger the Warn Away signal. When triggered, the ® siren chirps and the parking lights flash for a few seconds. • Heavy impacts trip a Triggered Sequence. The sequence consists of the siren sounding continuously and the parking lights flashing for a pre-programmed period, which can range in duration from 1 to 180 seconds. -
Page 24: Arming While Driving
To select the security levels: Press once: The siren chirps once. The system is armed. Press a second time within fve seconds. The siren chirps twice followed by a long chirp. Zone 2 is now bypassed. ������� Press a third time within fve seconds: The siren chirps three times followed by a long chirp. -
Page 25: Disarming
Disarming To disarm the security system, press . You will hear two chirps, and the parking lights will flash twice. ������� If power locks are controlled by the system, the doors will also unlock. The siren chirping either four or fve times when disarming indicates Tamper Alert, which is described in the Diagnostics Section of this guide. -
Page 26: Disarming Without A Transmitter
Disarming without a transmitter If your remote transmitter is lost or damaged, you can manually disarm your vehicle security system. To disarm the system without a transmitter, you must have the vehicle’s ignition key and know where the Valet switch is located. Be sure to check with your installer at the time of installation for both the location and the preset response (1-5 presses) of the Valet switch. -
Page 27: Silent Mode
Silent mode To temporarily turn off the arm or disarm chirps use Silent Mode™. Press for less than one second before arming or disarming to elim- ������� inate confrmation chirp (s) for that one operation only. If you want arm/disarm chirps turned off permanently, your dealer can do this for you. -
Page 28: Valet Mode
Valet mode You can prevent your security system from automatically arming and triggering by using Valet® Mode. This is very useful when washing the vehicle or having it serviced. In Valet Mode, the security system will not arm, even with the remote transmitter, but all convenience functions (door locks, trunk release, etc.) will continue to work normally. -
Page 29: Remote Start
Remote start This feature allows you to remotely start and run your vehicle for a programmable period of time. This makes it possible to warm up the engine, as well as adjust the interior temperature of the vehicle with the climate control system. If interior heating or cooling is desired, the climate controls must be preset, and the fan blower must be set to the desired level prior to remote starting the vehicle. - Page 30 When you are ready to drive the vehicle: Insert the ignition key and turn it to the On position. Press the brake pedal. Note: If the brake pedal is pressed before the key is in the ON position, the engine will shut down. While the vehicle is running during remote start operation, the system monitors the vehicle and automatically shut downs the engine if the system receives any of the following:...
-
Page 31: Rear Defogger
Rear defogger To turn the rear defogger output OFF: • Simultaneously press & release the buttons on the ������� remote control. The lights will flash 2 times and the rear defogger output is no longer active when the vehicle is remote started. �������... -
Page 32: Valet Take-Over
Valet take-over The Valet Take-Over feature allows the vehicle to remain running after the key has been removed from the ignition. This feature is useful for occasions when you wish to exit and lock the vehicle for short periods of time, but would like to leave the motor running and the climate controls on. -
Page 33: Timer Mode
Timer mode When you activate timer mode the system automatically starts the vehicle every three hours for a maximum of 6 starts. The pre-programmed engine runtime is 12 minutes. • Press to activate timer mode. The parking lights flash four times, and after a 1 second delay, the engine starts. •... -
Page 34: Short-Run/Turbo
Short-run/turbo Short run turbo mode keeps the engine running after arriving at your destination for a programmable period of 1, 3, 5 or 10 minutes. This allows the system’s timer to conveniently cool down the turbo after you have left the vehicle. To activate: Park the vehicle and set the parking brake. -
Page 35: Starter-Anti-Grind Circuitry
Starter-anti-grind circuitry Whenever the vehicle is remote started, advanced anti-grind circuitry prevents the starter from engaging, even if the key is turned to the start position. This prevents damage to the starter motor if the key is turned to the start position during remote start operation. Important: The Fail Safe starter kill option must be in- stalled for this feature to work. -
Page 36: Nuisance Prevention Circuitry
Nuisance Prevention Circuitry Your system has Directed’s Nuisance Prevention Circuitry (NPC). It ® prevents annoying repetitive trigger sequences due to faulty door pin switches or environmental conditions such as thunder, jackhammers, airport noise, etc. Example: If the alarm triggers three times within a 60-minute period and each time the same sensor or switch triggers the alarm, NPC will interpret those triggers as false alarms. -
Page 37: Diagnostics
Diagnostics The microprocessor at the heart of your system is constantly monitoring all of the switches and sensors connected to it. It is designed to detect any faulty switches and sensors and prevents them from disabling the entire system. The microprocessor will also record and report any trig- gers that occurred during your absence. -
Page 38: Disarming Diagnostics
Disarming diagnostics Extra chirps that are heard when disarming the system are the Tamper Alert. If four chirps are heard when disarming the system, then the security system was triggered in your absence. If fve chirps are heard when disarming the system, a zone was triggered so many times that the Nuisance Protection Circuitry has bypassed that zone. - Page 39 Table of zones A zone is represented by the number of LED flashes used by the system to identify a particular type of input. Standard input assignments are listed in the following table, along with spaces to write in any optional sensors or switches that have been installed.
-
Page 40: Code Hopping
Code hopping The receiver and transmitters use a mathematical formula called an algorithm to change their code each time the transmitter is used. This technology has been developed to increase the security of the unit. The control unit knows what the next codes should be. This helps to keep the transmitter “in sync”... -
Page 41: Owner Recognition
Owner recognition Owner Recognition is a revolutionary feature available only from Di- rected. Using a Directed Bitwriter , hand-held programming tool, your ® dealer can program many of the system settings. The programmer makes it possible to program different settings for each transmitter that is used with the system. -
Page 42: Power Saver Mode
Power saver mode Your system will automatically enter Power Saver Mode while armed or in Valet Mode, after a period of time in which no operation has been performed. This lowers the current draw on the vehicle’s battery. Power Saver Mode takes over under the following conditions: •... -
Page 43: Programming Options
Programming options Programming options control your system’s normal, operational set-up. Most options do not require additional parts, but some may require installation labor. The following is a list of the programmable options, with the factory settings in Bold. • Active arming (transmitter only) or passive arming (automatic arm- ing 30 seconds after the last door has been closed). - Page 44 • Forced passive arming on or off. If your security system is pro- grammed for passive arming and the forced passive arming fea- ture has been programmed on, the system will passively arm after one hour, even if a protected entry has been left open. Forced passive arming ensures that the system will be armed if a door has accidentally been left ajar when leaving the vehicle.
- Page 45 • 12, 24, or 60 minute run time. your system can be programmed to allow the vehicle to run for 12, 24, or 60 minutes when remote started. Can be set up to minute increments by your installer. • 3, 6, 9, or 12 minute timer mode run time. Your system can be programmed to allow the vehicle to run for 3, 6, 9, or 12 minutes when remote started in timer mode.
-
Page 46: Security & Convenience Expansions
Security & convenience expansions Listed below are some of the many expansion options available. Please consult your dealer for a complete explanation of all the options avail- able to you. Audio Sensor: Metal on glass, glass cracking, and breaking glass produce distinctive acoustic signatures. The 506T audio sensor uses a microphone to pick up sounds, then analyzes them with propri- etary acoustic software to determine if the glass has been struck. -
Page 47: Patent Information
Patent Information This product is covered by one or more of the following United States patents: Vehicle Security Patents 5,467,070; 5,532,670; 5,534,845; 5,563,576; 5,646,591; 5,650,774; 5,673,017; 5,712,638; 5,872,519; 5,914,667; 5,952,933; 5,945,936; 5,990,786; 6,028,505; 6,452,484 Remote Start 5,349,931; 5,872,519; 5,914,667; 5,952,933; 5,945,936; 5,990,786;... -
Page 48: Government Regulations
Government Regulations This device complies with Part 15 of FCC rules. Operation is subject to the fol- lowing two conditions: (1) This device may not cause harmful interference, and (2) This device must accept any interference received, including interference that may cause undesirable operation. -
Page 49: Warning! Safety First
Warning! Safety First The following safety warnings must be observed at all times: Due to the complexity of this system, installation of this product must only be performed by an authorized Directed dealer. When properly installed, this system can start the vehicle via a com- mand signal from the remote control transmitter. - Page 50 After the remote start module has been installed, contact your autho- rized dealer to have him or her test the remote start module by perform- ing the Safety Check outlined in the product installation guide. If the vehicle starts when performing the Neutral Safety Shutdown Circuit test, the remote start unit has not been properly installed.
-
Page 51: Limited Lifetime Consumer Warranty
Limited lifetime consumer warranty Directed Electronics. (“Directed”) promises to the original purchaser to repair or replace (at Directed’s election) with a comparable reconditioned model any Directed unit (hereafter the “unit”), excluding without limitation the siren, the remote transmitters, the associated sensors and accessories, which proves to be defective in workmanship or material under reason- able use during the lifetime of the vehicle provided the following conditions are met: the unit was purchased from an authorized Directed dealer, the unit was professionally installed... - Page 52 IN THE EVENT OF A CLAIM OR A DISPUTE INVOLVING DIRECTED OR ITS SUBSIDIARY, THE VENUE SHALL BE SAN DIEGO COUNTY IN THE STATE OF CALIFORNIA. CALIFORNIA STATE LAWS AND APPLICABLE FEDERAL LAWS SHALL APPLY AND GOVERN THE DISPUTE. THE MAXIMUM RECOVERY UNDER ANY CLAIM AGAINST DIRECTED SHALL BE STRICTLY LIMITED TO THE AUTHORIZED DIRECTED DEALER’S PURCHASE PRICE OF THE UNIT.