Siemens HiPath 4000 Operating Instructions Manual
Hide thumbs
Also See for HiPath 4000:
- Operation manual (164 pages) ,
- Operating manual (134 pages) ,
- Operating instructions manual (133 pages)
Table of Contents
Advertisement
Advertisement
Table of Contents

Related Manuals for Siemens HiPath 4000


Summary of Contents for Siemens HiPath 4000
- Page 1 HiPath 4000 optiPoint 420 advance Operating Instructions...
-
Page 2: About These Operating Instructions
Important Notes Never operate the telephone in an environment where there is a risk of explosion. Only use Siemens accessories. The use of other manufacturers’ acces- sories may be dangerous and will render the warranty and approval null and void. -
Page 3: Table Of Contents
Contents Contents About these Operating Instructions ....2 Important Notes ......... . . 2 Labels . - Page 4 Contents Using the callback function ........25 Storing a callback request .
- Page 5 Overriding a colleague’s call (intrude) ..... . . 58 Using HiPath 4000 as an intercommunication system ... . . 59 System-wide voice calling .
- Page 6 Contents Private Sphere/Security ..... . .79 Activating/deactivating do not disturb ......79 Activating/deactivating stop voice calling .
- Page 7 Contents With automatic privacy configured ......98 Allow bridging ......... 98 Preventing bridging .
- Page 8 Contents Checking the telephone ..... .115 Checking its functionality........115 Checking the assignment of functions to keys .
-
Page 9: Basic Usage Instructions
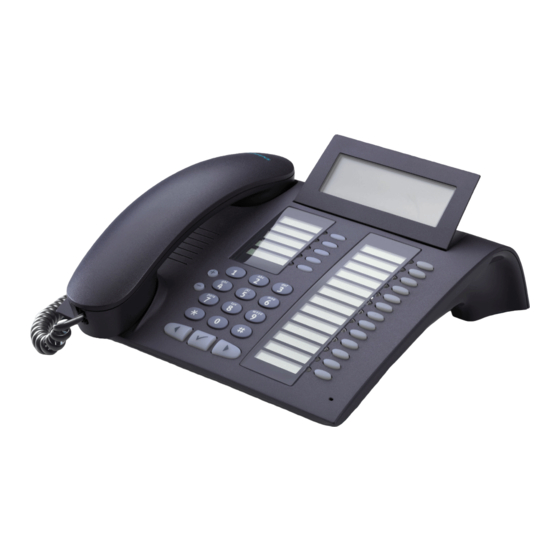
Basic Usage Instructions Basic Usage Instructions The optiPoint 420 advance control panel Speaker for open listening Grafic display Handset 4 lines each with 24 characters optiPoint SLK module Key fields with: – automatic Key inscription – Lamps (LEDs) – Function keys Dialing keypad Handsfree microphone Key for scrolling to functions... -
Page 10: How To Use This User Guide
Basic Usage Instructions Step by Step How to use this user guide The operating procedures are presented in a logical sequence in the colored column. The symbols used have the following meanings: Lift the handset. Replace the handset. Enter number or code. Press the setting keys on the telephone. -
Page 11: How To Activate Functions
Basic Usage Instructions Step by Step How to activate functions ... directly Certain functions can be selected directly in the idle state, for example: > < > Make your selection with and confirm it with Var. call forw. on? Other functions can be selected directly in certain call situations. -
Page 12: Which Functions Can Be Used
Basic Usage Instructions Step by Step Which functions can be used? Basic and enhanced functions You can use all of the communication platform’s basic and enhanced functions that are offered in the dialog on the display, in the service menu, in a main menu and on the function keys. -
Page 13: Optional Main Menu
Basic Usage Instructions Step by Step Optional main menu Your system administrator can provide a customized key to give you access to a main menu. On this main menu you can choose from the following options: Press the key. Main menu >... -
Page 14: Making Calls - Basic Functions
Making Calls – Basic Functions Step by Step Making Calls – Basic Functions Answering calls Answering a call with the handset The telephone rings. The caller is displayed. Lift the handset. Answering a call via the speaker key (speakerphone) The telephone rings. The caller is displayed. Press the key. -
Page 15: Switching To Speakerphone
Making Calls – Basic Functions Step by Step Switching to speakerphone Precondition: You are making a call with the handset. Press the speaker key and release, then put the hand- Speaker set down and continue the call. Switching to the handset Precondition: You are on the phone in speakerphone mode. -
Page 16: Dialing With The Handset On-Hook
Making Calls – Basic Functions Step by Step Dialing with the handset on-hook Internal: Enter the number. External: Enter the access code and the number. The called party answers. The call is on your speaker: Lift the handset. or If the handset is on-hook: handsfree conversing. The called party is busy or does not answer: Press the key. -
Page 17: Last Number Redial
Making Calls – Basic Functions Step by Step Last number redial If your telephone is configured for this type of redialing, each number dialed is saved for possible redialing. Press the key. The lamp lights up. Last no. redial Press the key. The lamp lights up. Speaker Lift the handset. -
Page 18: Transferring A Call
Making Calls – Basic Functions Step by Step Release the present call – return to the other call: > Select and confirm. Release and return? Setting up a conference call: Confirm. Conference? An alerting tone indicates that all three users have been interconnected to form a conference circuit. -
Page 19: Call Forwarding
Making Calls – Basic Functions Step by Step Call Forwarding Using call forwarding You can program two types of call forwarding: • Station fixed forwarding , and • station variable forwarding With station fixed forwarding you can program a for- warding destination that will remain valid until you change or delete it. -
Page 20: Station Fixed Forwarding
Making Calls – Basic Functions Step by Step Station fixed forwarding If you have programmed a forwarding destination for station fixed forwarding, you can activate and deacti- vate the forwarding facility either in the program/service menu or with a forwarding key configured by your ser- vice personnel. - Page 21 Making Calls – Basic Functions Step by Step > Select and confirm. Station fixed forwarding is deacti- Deactivate? vated. Output on first line display. Fixed forwarding off If station variable forwarding was previously pro- grammed and activated, it is deactivated and the for- warding destination is deleted.
-
Page 22: Station Variable Forwarding
Making Calls – Basic Functions Step by Step Station variable forwarding With station variable forwarding you can choose be- tween 6 different types of call forwarding: • Station variable unconditional/all forwarding – forwarding for internal calls only – forwarding for external calls only –... - Page 23 Making Calls – Basic Functions Step by Step Output on first line display. FWD-ALL-INT off Output on second line display. Next forwarding type? > To select the next station variable forwarding type. Output on first line display. FWD-ALL-EXT off Output on second line display. Next forwarding type? >...
- Page 24 Making Calls – Basic Functions Step by Step Activating station variable forwarding Station variable forwarding is automatically activated when the forwarding destination is programmed. Unconditional variable programming can also be activat- ed in the idle menu. > Select and confirm while the phone is idle. Var.
-
Page 25: Using The Callback Function
Making Calls – Basic Functions Step by Step Deactivating station variable forwarding in the idle menu You can also deactivate the following station variable forwarding types in the idle menu: • Station variable forwarding • Forwarding for internal and for external >... -
Page 26: Rejecting A Callback Request
Making Calls – Basic Functions Step by Step Rejecting a callback request The telephone rings. The Cancel Callback message in- forms you that this is a callback. Confirm. Cancel callback? or Let the telephone ring four times; do not answer the call. -
Page 27: Store Call Numbers And Sequences On The Key
Making Calls – Basic Functions Step by Step Store call numbers and sequences on the key A user can store access codes, PIN numbers and call numbers on a redial or destination dial key simulta- neously in a sequence, and then dial by simply pressing that key. - Page 28 Making Calls – Basic Functions Step by Step Precondition: You have created a "Destination dial number" Seite 74. Press key. The lamp lights up. program/service Confirm. Destinations? > Select and confirm. Repdial? poss. Has the destination dial number been created in the Level optiPoint SLK module, the level shift key pressed seve- ral times, in order to select the level (level 1...
- Page 29 Making Calls – Basic Functions Step by Step Store entry and determine inscription > Select and confirm. Your entries are saved. Save? Confirm. Use Destination Number? The entered destination number is displayed as a key in- scription. > Select and confirm. Use Destination Name? The name assigned to the destination number is dis- played as key inscription, if possible.
-
Page 30: Storing A Number For Redialing
Making Calls – Basic Functions Step by Step You can dial the saved telephone number or se- quences by pressing a single key page 31. The maximum number of characters in the destina- tion dial key is 22. Note: The length of a pause is 3 characters. Label the keys that have already been assigned page 117. -
Page 31: Dialing With Repertory Keys
If the handset is on-hook: handsfree conversing. Adopting changed key labelling If a station name is changed in the HiPath 4000 this data is not transferred to the repertory keys / DSS keys of optiPoint 420 and optiPoint SLK module automatically. -
Page 32: Telephone Settings
Making Calls – Basic Functions Step by Step Telephone settings Adjusting the ringer volume Press one of the keys when the telephone is idle. Confirm. Ringer volume? To increase/decrease the volume (1 ... 8): keep pressing the keys until the desired volume level has been reached. -
Page 33: Adapting The Speakerphone Function To The Acoustics Of Your Room
Making Calls – Basic Functions Step by Step Adapting the speakerphone function to the acoustics of your room To improve the clarity of voice transmission during speakerphone conversations, you can adapt the micro- phone sensitivity of your telephone to suit the acoustics of your room ("normal room"/"reverberating room"/ "soundproofed room"). -
Page 34: Selecting The Language For User Prompts (Displays)
Step by Step Selecting the language for user prompts (displays) Your HiPath 4000 system can be configured for up to five different languages. The first language pro- grammed is the default. If your telephone has a lan- guage key, you can program a different language. -
Page 35: Making Calls - Convenience Functions
Making Calls – Convenience Functions Step by Step Making Calls – Convenience Functions Answering Calls Group call and pickup If a member of a pickup group does not answer a call within 15 seconds (depending on the system), the other members of the team hear an alerting tone. -
Page 36: Taking A Call In A Hunt Group
Making Calls – Convenience Functions Step by Step Enter the station number of the telephone for which you wish to (or have been requested to) pick up the call. In this way you pick up the call. Having the number of the called station displayed If the number of the station for which you (as a member of a call pickup group) wish to pick up a call does not ap- pear on the display, you can enter the code for "Display... -
Page 37: Answering A Call On The Headset
Making Calls – Convenience Functions Step by Step Answering a call on the headset Precondition: The optiPoint 420 advance has a head- set connection. The headset is connected. The headset key has been configured. The lamp flashes when a call is received. Headset Press the key to answer the call. -
Page 38: Dialing/Making Calls
Making Calls – Convenience Functions Step by Step Dialing/Making Calls Using a call list (missed calls) If you cannot take an external and/or internal call, this unanswered call is entered in the call log (see also page 40). Your telephone can also be programmed to record answered and outgoing calls in the call log. - Page 39 Making Calls – Convenience Functions Step by Step Details of the caller are shown. 32456 Mueller V. Reason, date and time of the entry. occupied 25.10. 15.30 > In the case of several calls from the same caller the Output? number of calls is indicated.
-
Page 40: Missed Calls" Key
Making Calls – Convenience Functions Step by Step "Missed calls" key Precondition: Your service personnel has configured a call log and a key for "missed calls" (unanswered calls) for your telephone. The lamp lights up. You have unanswered calls. Press Missed calls the key. -
Page 41: Speed-Dial
Making Calls – Convenience Functions Step by Step You are now in the calls log and can check for instance Unanswered calls? "incoming calls" and "outgoing calls". Speed-dial Dialing with individual speed dialing numbers Short dial numbers can contain command or access code sequences, and they can be linked to other short dial numbers (For more information, see page 72). -
Page 42: Using The Mailbox
Making Calls – Convenience Functions Step by Step Extension The service personnel can program features on the short dial number, which, besides having a call number, can also contain additional access codes. Using the mailbox Callers who dialed your number during your absence can leave a reminder message in your mailbox. -
Page 43: Direct Call To A Colleague Via Loudspeaker (Voice Calling)
Direct call to a colleague via loudspeaker (voice calling) You can make a direct call to an internal HiPath 4000 user via the loudspeaker in his or her telephone. You can use the functions under "HiPath 4000 as an inter- communication system“... -
Page 44: During A Call
Making Calls – Convenience Functions Step by Step During a Call Using the call waiting function When you are expecting an important call, you should activate the call waiting function. A waiting call is sig- naled to you if you are on the phone. You can then either accept or disregard the waiting call. -
Page 45: Accept Service Menu-Controlled Second Call
Making Calls – Convenience Functions Step by Step Accept service menu-controlled second call Precondition: You are on the phone. A second call is ac- tivated. No "Accept call" or "Switch" key page 45 is programmed. A second call is shown on the display with name / tele- phone number and signalled through an alerting tone. -
Page 46: Re-Indication
Making Calls – Convenience Functions Step by Step Consultation You call a second user. The second user does not an- swer. Press the key to return to the waiting user or the waiting Switchover conference. Group call You are connected to a single user. A group call is sig- nalled. -
Page 47: Time Key
The time key does not have any effect in the Service Mode or during selection. The time data is communicat- ed exclusively by the HiPath 4000 system to which your optiPoint 420 is connected. -
Page 48: Station Controlled Conference
Making Calls – Convenience Functions Step by Step Station controlled conference In a station controlled conference you can include up to 8 internal and external users. Users with system tele- phones can execute or use all of the following func- tions. - Page 49 Making Calls – Convenience Functions Step by Step Starting a conference from a single call You want to set up a conference. You receive a call. You call another user. > Select and confirm. Start conference? Call the second user. Announce that a conference is to be set up.
-
Page 50: Expanding The Conference
Making Calls – Convenience Functions Step by Step Expanding the conference Any member of the system conference can expand the conference by • calling another user and adding this person to the conference • adding a user to the conference from a consultation call •... -
Page 51: Transferring The Conference
Making Calls – Convenience Functions Step by Step Accepting a waiting call and adding it to the confer- ence If you receive a waiting call during the conference (call waiting function is activated), you can add this user to the conference. An alerting tone is audible. -
Page 52: During The Conference
Making Calls – Convenience Functions Step by Step > Select and confirm. Transfer conference? You are disconnected from the conference. Replace the handset. During the conference You are taking part in a conference with 3 to 8 members and you wish to know about the other members or to disconnect a member. -
Page 53: Entering Commands With Tone Dialing (Dtmf Suffix Dialing)
Making Calls – Convenience Functions Step by Step The conference will be put on hold. The following mes- sage is displayed: 1st line: "Conference", 2nd line: "On hold". Press the line key on which the conference is being held Line - you are reconnected to the conference. -
Page 54: System-Wide Parking
Making Calls – Convenience Functions Step by Step System-wide parking On the HiPath 4000, you can park up to 10 internal and/ or external calls and take them at another telephone. There are two ways of parking a call: •... -
Page 55: Parking A Call Manually And Then Taking It At A Later Date
Making Calls – Convenience Functions Step by Step Parking a call manually and then taking it at a later date You can manually park a call to your telephone at a free parking position and take it at your telephone or another telephone at a later date. -
Page 56: Taking A Parked Call
Making Calls – Convenience Functions Step by Step Taking a parked call Via the keypad Lift the handset or use the speakerphone function (not available with optiPoint 420 economy). Enter the system code for "system parking" (if you have Enter the code! any problems ask the service personnel). -
Page 57: Parking Is Not Possible
Making Calls – Convenience Functions Step by Step Parking is not possible If all the parking positions or the selected parking posi- tion are occupied, or there is some other reason why parking is not possible, an acoustic warning and a visual warning are output. -
Page 58: If You Cannot Reach A Destination
Making Calls – Convenience Functions Step by Step If You Cannot Reach a Destination Camping on a colleague’s call Precondition: The internal party whom you have called is busy. You need to contact this person urgently. > Select, confirm and wait briefly. Camp-on? Your colleague hears the call waiting tone. -
Page 59: Using Hipath 4000 As An Intercommunication System
Step by Step Using HiPath 4000 as an intercommunication system You can voice call an internal HiPath 4000 user via the loudspeaker in his or her telephone to set up a connec- tion. You can also initiate voice calling from consultation. -
Page 60: System-Wide Voice Calling
Making Calls – Convenience Functions Step by Step System-wide voice calling From your telephone, you can voice call any internal user whose telephone provides the speakerphone function (not available with optiPoint 420 economy) or has a loudspeaker. Voice calling to a variable destination A destination subscriber is voice called via his internal call number. -
Page 61: Voice Calling In A Group
Making Calls – Convenience Functions Step by Step Voice calling to a fixed destination The system code-number for "voice calling" + the desti- nation call number is programmed onto a repertory key page 74. Press the programmed repertory key. A connection to the destination loudspeaker is immediately set up. - Page 62 Making Calls – Convenience Functions Step by Step A connection to the destination loudspeaker is set up immediately, if • there is no busy condition • the handset is cradled • and voice-calling protection has not been activated The called party accepts the voice call by lifting the handset.
-
Page 63: Announcement To All Members Of A Line Group
Making Calls – Convenience Functions Step by Step enter the speed dialing code for the group member in question. The destination telephone's loudspeaker and micro- phone are automatically activated. . Two-way voice calling to a fixed destination (on repertory key) The system code-number for "two-way voice calling in a group"... -
Page 64: Using Call Forwarding
Making Calls – Convenience Functions Step by Step If a group member lifts a handset, he or she is connect- ed to you and the announcement is terminated. If a group member presses the loudspeaker key or the relevant line key for the announcement, he or she is dis- connected from the announcement. -
Page 65: Call Forwarding Via Code Numbers
Making Calls – Convenience Functions Step by Step If you have set up station fixed or station variable call forwarding, and if the manually programmed forwarding destinations are not obtainable (for example, because they are busy), then calls are automatically forwarded to the system forwarding destinations. -
Page 66: Call-Forwarding Via Call-Forwarding Key
Making Calls – Convenience Functions Step by Step Programming and activating call-forwarding Lift the handset. Enter a code number, say *51, (ask the service person- nel). You will hear the dialing tone. Enter the code! Enter the number of the destination. Enter the terminating character. -
Page 67: Delayed Call-Forwarding
Making Calls – Convenience Functions Step by Step Switching off fixed call forwarding Press the key. The lamp goes out, call forwarding is Call forwarding switched off. Switching fixed call forwarding on again Press the key. The lamp lights up and call forwarding is Call forwarding switched on again (the forwarding destination must be programmed). -
Page 68: Forwarding Calls For A Different Terminal
Making Calls – Convenience Functions Step by Step Forwarding calls for a different terminal You can save, activate, check and deactivate call for- warding for another telephone, fax machine or PC from your own telephone. To do so, you need to know the PIN for this terminal or you must have the "Call forward- ing for remote terminal"... -
Page 69: Storing A Destination For Fax, Pc Or Busy/Activating Call Forwarding
Making Calls – Convenience Functions Step by Step Storing a destination for fax, PC or busy/ activating call forwarding Press the key. The lamp lights up. program/service Confirm. Destinations? > Select and confirm. Forward station no.? > Select and confirm. Forward other? Enter the code for the type of call forwarding required. -
Page 70: Checking/Deactivating Call Forwarding For Another Telephone
Making Calls – Convenience Functions Step by Step Checking/deactivating call forwarding for another telephone Press the key. The lamp lights up. program/service > Select and confirm. Feature settings? > Select and confirm. Forward station no.? Confirm. Call forw. - follow me? Enter the number of the other telephone. -
Page 71: Changing Call Forwarding For Another Terminal
Making Calls – Convenience Functions Step by Step Enter the code for the type of call forwarding required. The codes are defined by the service personnel. You can enter your call forwarding codes in the following ta- ble: example Interrogating forwarding for fax: Interrogating forwarding for PC: Interrogating forwarding for busy: Deactivating forwarding for fax:... -
Page 72: Saving Functions And Appointments
Saving Functions and Appointments Step by Step Saving Functions and Appoint- ments Saving individual speed dialing numbers You can save a number on each of digit keys 0 to 9 and then dial these numbers at the push of a button page 41. -
Page 73: Programming Short Dial
Saving Functions and Appointments Step by Step Example 3 As the number of characters for a short dial entry is lim- ited to 22, you can link two short dial numbers for a longer sequence. You can, for instance, program the server access and a code number on one short dial key, and then refer to a second short dial which contains for example, an LCR access code and the destination call... -
Page 74: Saving A Function On A Key
Saving Functions and Appointments Step by Step Saving a function on a key Press the key. The lamp lights up. program/service Enter the service code. > Select and confirm. Key function? Press the programmable function key. Switching levels in the optiPoint SLK module has no effect on storing a function. -
Page 75: Appointments Function
Saving Functions and Appointments Step by Step Appointments Function You can program a timed reminder on your telephone to remind yourself of an important meeting or appoint- ment, for example page 76. You must save the exact time at which you wish to receive the reminder. Re- minders can be set for the next 24-hour period. -
Page 76: Timed Reminders
Saving Functions and Appointments Step by Step Timed reminders Precondition: You have saved a timed reminder page 75. When the saved time has been reached: The telephone rings. Reminder: Lift the handset. The time of the reminder is displayed. Replace the handset. If you do not lift the handset, the telephone rings several more times and "Timed reminder"... -
Page 77: Making Project Calls
Making project calls Step by Step Making project calls External calls can be assigned to specific projects. Precondition: Project numbers (from 1 to 5) have been configured for specific projects and you have a code for the project in question. Setting up a project call Press the key. -
Page 78: Call Duration Display (Cost Display)
Making project calls Step by Step Call duration display (cost display) The call duration display is configured by the service personnel. The display shows either the duration of the call or the cost of the call. The display can be switched off. -
Page 79: Private Sphere/Security
The service personnel can also set up destinations for forwarding internal and external calls, such as to your mailbox. Precondition: The service personnel has enabled the do not disturb function for all HiPath 4000 users in your system. Press the key. The lamp lights up. program/service Enter the service code. -
Page 80: Activating/Deactivating Stop Voice Calling
Private Sphere/Security Step by Step Activating/deactivating stop voice calling You can prevent other persons from making direct calls to you. Any attempt to address you directly via the loud- speaker will be changed to a normal call. Press the key. The lamp lights up. program/service Enter the service code. -
Page 81: Malicious Call Holding
Private Sphere/Security Step by Step Malicious call holding You can trace a malicious external caller. The caller’s number can be registered during the call or for up to 30 seconds after the call. Do not replace the handset. Press the key. The lamp lights up. program/service Enter the service code. - Page 82 Remove the chip card again. When the telephone is disabled in this way, a special dial tone is audible when the handset is Insert lifted. Internally (within HiPath 4000), dialing is Chip card possible in the usual way. Enabling the telephone again: Press the key.
-
Page 83: Using Other Functions
Precondition: You have been assigned a PIN by the service personnel. You require an internal PIN for calls within your own HiPath 4000 system, while for calls in- volving other HiPath 4000 systems in the integrated network you require a network-wide PIN. -
Page 84: Deactivating Identification At The Other Telephone
Entering the PIN for another system HiPath 4000 area within the integrated network: Enter the 2-digit node code for your own HiPath 4000 system (ask the service personnel). Enter the code! Enter your own number and press the pound key. -
Page 85: Identification With The Chip Card
Chip card (optiPoint signature module). reader: Within your own HiPath 4000 (not used in US) system: Insert the chip card. All lamps light up briefly. Insert "ID card" and the number of the home station are indi- chip card cated on the display. -
Page 86: Shift Connection To Another Telephone
Using Other Functions Step by Step Shift connection to another telephone You can shift the connection of your optiPoint 420 along with all its functions and features to another optiPoint 420. The "home telephone" is deactivated and the "guest telephone" becomes "your" telephone. The original connection of your "guest telephone"... -
Page 87: Log Off Through The "Home Telephone
Using Other Functions Step by Step Log off through the "home telephone" If you have forgotten to log out of the "guest telephone", you can still log out through the "Home-Telephone". The following message is displayed: "Mobile forced logoff" "Cancel mobility?" Confirm. -
Page 88: Making Multiline Calls
Making multiline calls Step by Step Making multiline calls Using line keys Line keys are configured by the service personnel. The station number of each station user is assigned to a line and is the primary line of that team member. The same line is configured on the line keys of the other station users as a secondary line. -
Page 89: Preview
Making multiline calls Step by Step The different states of line key lamps The lamp is not lit – the line is free and can be used. Line The lamp is lit – line is busy. Line The lamp is flashing – a call is on the line: answer the Line call. -
Page 90: Taking Calls On Line Keys
Making multiline calls Step by Step Taking calls on line keys If several calls are received at the same time, you can take the calls in the order in which they are offered to you - or you can give priority to certain calls. Precondition: The service personnel has specified the sequence in which incoming calls are answered. -
Page 91: Activating/Deactivating Ringer
Making multiline calls Step by Step Activating/deactivating ringer When you are making a call on a line, you may be dis- turbed by the ringing signals for other incoming calls. If ringer cutoff has been configured, your telephone does not ring. Incoming calls are then signalled by the flash- ing of the line keys. -
Page 92: Dialing With Line Keys
Making multiline calls Step by Step Dialing with line keys Your telephone can be configured with either auto- matic or selectable line seizure. The service personnel specifies whether a line (and which line) is seized auto- matically when the handset is lifted or when speaker- phone (not available with optiPoint 420 economy) is ac- tivated. -
Page 93: Redialing On A Particular Line (Saved Numbers)
Making multiline calls Step by Step Redialing on a particular line (saved numbers) If this type of redialing is configured on your phone, you can save a number to be redialed later on a particular line page 95. The saved number can be dialed with the line key and the redial key. -
Page 94: Redialing On A Particular Line (Last Number Dialed)
Making multiline calls Step by Step Redialing on a particular line (last number dialed) If this type of redialing is configured on your phone, every last number dialed is automatically saved with the current line for redialing. Seizing the line for the desired last number dialed Lift the handset. -
Page 95: Storing A Number For "Redialing On A Particular Line
Making multiline calls Step by Step Storing a number for "Redialing on a particular line" Precondition: "Redialing with saved number" has been configured, not "Redialing with last number dialed". “ . Storing a selected number or the number of a caller You have called someone on a particular line and are still talking to them. -
Page 96: Answering A Callback Request
Making multiline calls Step by Step Answering a callback request The callback request is displayed. Meier Call TH 29.01 13:12 > Select and confirm. The person is called on this line. Output? Next entry There is more than one entry in the mailbox. >... -
Page 97: Identifying The Line Used
Making multiline calls Step by Step Identifying the line used If several lines are seized at the same time, you can find out which line you are conversing on. With the Show Used Line key configured: Press the key. Show used line Via the program/service key: Press the key. -
Page 98: Ending A Call On A Line Key
Making multiline calls Step by Step Ending a call on a line key Replace the handset. Press the key that is lit. Speaker Adding another party to a line (conference) Precondition: There is a call on one of the lines. The line key lamp is lit. -
Page 99: Preventing Bridging
Making multiline calls Step by Step > Select and confirm. More features? > Select and confirm. Privacy is off? Bridging is now permitted. Preventing bridging Even if the Privacy function has not been configured for your telephone, you can still prevent busy bridging. The Privacy function applies to the call in progress or to your next call. -
Page 100: Adding A Witness
Making multiline calls Step by Step Adding a witness During a call, a predefined subscriber can be requested to listen to the call as a "witness" by means of a special "Add witness key". The third party to the call is not in- formed that the "witness"... -
Page 101: Holding A Call On A Line Key And Retrieving It
Making multiline calls Step by Step Holding a call on a line key and retrieving it Precondition: You have taken a call on a line key page 90 or you are making a consultation call. Placing on hold: Press the key. Hold >... -
Page 102: Picking Up A Held Call
Making multiline calls Step by Step Picking up a held call A colleague in an open-plan office has put a call on hold on a line key and requests you (verbally) to take over the call. Your telephone does not have a key for this line. Lift the handset. -
Page 103: Storing And Activating A Station Fixed Call Forwarding Destination For A Line
Making multiline calls Step by Step Storing and activating a station fixed call forwarding destination for a line Precondition: The telephone is in the idle state. Press the line key for the required line. The lamp lights Line Press the key. The lamp lights up. program/service The settings for station fixed forwarding for every line are identical with the call forwarding function described... -
Page 104: Cancelling The Station Fixed Call Forwarding Destination
Making multiline calls Step by Step Cancelling the station fixed call forwarding destination Precondition: The telephone is in the idle state. A sta- tion fixed forwarding destination has been saved page 103. Only if it is not your primary line: Line Press the line key for the required line. -
Page 105: Call Switching
Making multiline calls Step by Step Call switching If you intend to leave your workplace for a while or if you don't want to be disturbed, you can activate call switch- ing to divert incoming calls on this line to a destination telephone. -
Page 106: Calling A Line Partner
Making multiline calls Step by Step Calling a line partner Look at the lamp signals on the direct call key! Lamp is dark – line partner is not telephoning: Press the direct call key, e.g. "Jones" Jones Lift the handset. or With the handset on-hook: handsfree speaking and open listening (with optiPoint 420 standard only). -
Page 107: Making Calls In An Executive/Secretary Team
Making calls in an executive/secretary team (not used in US) Step by Step Making calls in an executive/sec- retary team (not used in US) Each executive/secretary team is configured by the ser- vice personnel. An executive/secretary team can consist of a maximum of 4 executive telephones and 2 secretarial telephones. -
Page 108: Taking A Call For The Executive In The Secretary's Office
Making calls in an executive/secretary team (not used in US) Step by Step The procedure is the same for a direct call from the secretary’s office to the executive – with the executive DSS key. Taking a call for the executive in the secretary’s office When a call is received for the executive, the telephone rings in the secretary’s office. -
Page 109: Extending A Call To The Executive
Making calls in an executive/secretary team (not used in US) Step by Step Extending a call to the executive Precondition: You have taken a call for the executive in the secretary’s office. Press the DSS key for the executive. You are connected Executive to the executive. -
Page 110: Taking Calls For Other Executive/Secretary Teams
Making calls in an executive/secretary team (not used in US) Step by Step Press the flashing key. Call pickup Taking calls for other executive/ secretary teams If several executive/secretary teams have been config- ured, you can pick up calls for other teams. Lift the handset. -
Page 111: Activating/Deactivating Call Waiting For Executive
Making calls in an executive/secretary team (not used in US) Step by Step Activating/deactivating call waiting for executive As the executive, you can specify whether your calls are to be received in the secretary’s office while you are conducting a call. If you are making a call and at the same time expecting an important call, it is advisable to activate the call waiting function, for example. -
Page 112: Using The Call Signal Function
Making calls in an executive/secretary team (not used in US) Step by Step Using the call signal function If a call signal key has been configured on your execu- tive telephone you can generate a call signal on a partic- ular destination telephone (for example, in the secre- tary's office) by pressing this key. -
Page 113: Calling A Station Directly
Making calls in an executive/secretary team (not used in US) Step by Step Calling a station directly Precondition: DSS keys have been configured at your telephone page 116. The lamp statuses of direct station selection (DSS) keys The lamp is not lit – the user is not making a call. Jones The lamp is lit –... -
Page 114: Temporarity Removing Station From Hunt Group/ Adding Station To Hunt Group
Making calls in an executive/secretary team (not used in US) Step by Step Temporarity removing station from hunt group/ adding station to hunt group Precondition: A hunt group has been configured in the team. You can disconnect yourself from the hunt group at any time, for example, when you leave the office. -
Page 115: Checking The Telephone
Checking the telephone Step by Step Checking the telephone Checking its functionality You can test the functionality of your telephone. This in- cludes the following checks: • Are all the key lamps operating properly? • Is the display operating properly? •... -
Page 116: Checking The Assignment Of Functions To Keys
Checking the telephone Step by Step Checking the assignment of functions to keys You can check which functions have been pre-assigned to specific keys on your telephone. You can also check what you have saved on individual keys yourself. The fol- lowing types of key assignment are possible: •... -
Page 117: Labeling, Documentation And Accessories
Documentation You can find this user manual in the Internet in PDF format under http://www.siemens.com/hipath and on CD-ROM (ask the service personnel) in HTML and PDF format. To view and print the operating instructions in PDF format, you need a computer on which the free Adobe Acrobat Reader software package is in- stalled. -
Page 118: Advice For Users
Advice for users Advice for users Care of the telephone • Use either a damp cloth or an antistatic cloth to clean the telephone. Never use a dry cloth! • If the telephone needs to be cleaned thoroughly, use a neutral, diluted, surface-active cleaning agent. -
Page 119: Dealing With Error Messages On The Display
Advice for users Step by Step Dealing with error messages on the display Possible cause: Time exceeded Maximum input time exceeded. Handset not replaced. Possible response: Enter digits more quickly; avoid lengthy pauses be- tween keystrokes. Possible cause: Please try later System is overloaded, no lines free, queue is full. -
Page 120: Who To Contact If A Problem Occurs
Advice for users Step by Step Not authorized Possible cause: Not allowed a) Attempt to use a barred function. b) PIN entered incorrectly. Possible response: a) Contact the service personnel for authorization to ac- tivate this function. b) Enter the PIN correctly. Possible cause: Not available Number not entered completely, star or pound key not... -
Page 121: Index
Index Index fax messages ..........95 Fixed call forwarding ....... 103 Forwarding ..........19 Forwarding calls Add-on conference ........98 for lines ..........102 Angle of display .......... 33 Anrufliste abfragen ........... 38 Answering calls .......... 14 HTML format ..........117 Assigning available keys ...... - Page 122 Index Number label Taking over a call ..........117 Number suppression (executive/secretary) ......... 80 ......108 Open listening User Guide ..........15 Override security HTML format ........98 ........117 ordering ..........117 PDF format ..........117 Using the switchover button ....
-
Page 123: Important Functions At A Glance
Important functions at a glance Important functions at a glance Making a call: Either: + when the other party answers or speakerphone (not available with optiPoint 410 entry). Saved number redial: Save: Either: The connection has been made. Redial Or: Any number: program/service Redial New entry? - Page 124 Important functions at a glance Setting up a conference call: > First call + Start conference? Conference? > Add on to conference? Saving/activating variable call forwarding: > (destination) + Variable call forw.? Save? Checking call list: > Destinations? Call log? program/service >...
-
Page 125: Maximum Service Menu Functions Available
Maximum Service Menu functions available Maximum Service Menu functions available < > Press the "program/service" key. Use in order to select functions. Or use the service codes, e.g. 2 1 for "Second call on/off". 1 Destinations 1 Call forwarding 1 Station variable forwarding 2 Saving speed dialing number 2 Station fixed forwarding 3 Saving redial... - Page 126 © Siemens AG 2004 Information and Communication Networks Hofmannstr. 51 • D-81359 München The information provided in this document contains merely general de- scriptions or characteristics of performance which in case of actual use Ref. No.: A31003-H8400-B423-1-7619 do not always apply as described or which may change as a result of further development of the products.