Theben RAMSES 366/1 top2 Operating Instructions Manual
Digital clock thermostat
Hide thumbs
Also See for RAMSES 366/1 top2:
- Operating instructions manual (6 pages) ,
- Installation and operating instructions manual (24 pages)

Related Manuals for Theben RAMSES 366/1 top2


Summary of Contents for Theben RAMSES 366/1 top2
-
Page 1: Table Of Contents
307185 Digital clock thermostat RAMSES 366/1 top2 3660100 1. Basic safety information 2. Proper use Disposal 3. Installation and connection 5 Mounting the Digital clock thermostat Connecting the cable Disconnecting the cable 4. Device description Display & buttons... - Page 2 Operating instructions Overview of navigation menu 10 Initial operation 5. Settings and functions Set switching time Check/modify/delete switching time Request temperature program Set time / date MANUAL Setting manual or permanent switching Options Set external input Activating PIN code Type of control...
- Page 3 Wall compensation Using the OBELISK top2 memory card Resetting the clock thermostat 6. Technical data 7. Contact...
-
Page 4: Basic Safety Information
1. Basic safety information WARNING Danger of death through electric shock or fire! Installation should only be carried out by a ¾ ¾ professional electrician! • The device is designed for installation on DIN top hat rails (in accordance with EN 60715) •... -
Page 5: Installation And Connection
3. Installation and connection Mounting the Digital clock thermostat WARNING Danger of death through electric shock or fire! Installation should only be carried out by a ¾ ¾ professional electrician! click... - Page 6 Leitung 45° Federsteckklemme Federsteck- klemmen- öffner Prüfabgriff Speicherkarte OBELISK top2 (9070404) Mount on DIN top hat rails (as defined in EN 60715) † ¾ Switched voltage-free † ¾ Ensure device cannot be switched on † ¾ Check absence of voltage †...
-
Page 7: Connecting The Cable
Connecting the cable Wiring diagram Ext1 max. 50 m 1 2 3 Strip cable to 8 mm (max. 9) † ¾ Insert cable in the open DuoFix® plug-in terminal at 45° † ¾ L 2 cables per terminal position possible To open the DuoFix®... -
Page 8: Device Description
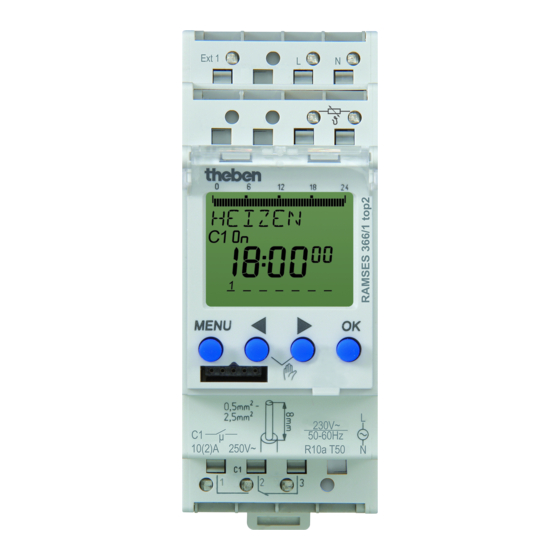
4. Device description Display & buttons Programmed Operating ON times mode: Frost Date display Channel status ON = On Time display OFF = Off Days of the Actual week from 1 temperature: to 7 Display of active keys with 20 °C relevant function MENU ... -
Page 9: Operating Instructions
Operating instructions 1. Read text line text/symbol represents query 2. Make a decision Modify/ Confirmation Change Press Press... -
Page 10: Overview Of Navigation Menu
Overview of navigation menu MENU PROGRAM TEMPERATURE TIME/DATE CHECK TIME MODIFY SET DATE CHECK MODIFY SU--WI DELETE FORM DATE FORM TIME OPTIONS MANUAL PERM EXT INPUT OVERRIDE TYPE OF CONTROL TIMER WALL COMP HOLIDAY ILLUMINATION LANGUAGE FACTORY SETTINGS INFO... -
Page 11: Initial Operation
Initial operation DEUTSCH ENGLISH FORM DATE YEAR ESPANOL MONTH FRANCAIS FORM TIME HOUR MINUTE SU-WI EUROPE 28 02 16 9:40 Set language, date, time as well as summer/winter time † ¾ (SU-WI) Press any button and display follows on screen (see figure) †... -
Page 12: Settings And Functions
5. Settings and functions Set switching time L Without programmed switching times, the clock thermos- tat permanently regulates to frostprotection temperature. Example: for comfort, decrease and frost temperature MENU PROGRAM FREI 42 CHECK COMFORT HOUR MODIFY REDUCED MINUTE DELETE Switching FROST time for MONDAY... - Page 13 Press MENU. TEMPERATURE is displayed. † ¾ Press u to select PROGRAM. † ¾ Confirm by pressing OK. NEW is displayed. † ¾ Confirm by pressing OK. COMFORT (u REDUCED/ u FROST) † ¾ is displayed. Confirm by pressing OK. HOUR is displayed. †...
-
Page 14: Check/Modify/Delete Switching Time
Check/modify/delete switching time MENU PROGRAM CHECK MODIFY MODIFY COMFORT HOUR DELETE REDUCED MODIFY MINUTE FROST SAVE Press MENU. TEMPERATURE is displayed. † ¾ Press u to select PROGRAM. † ¾ Confirm by pressing OK. NEW is displayed. † ¾ Press u to select CHECK/MODIFY or DELETE. †... -
Page 15: Request Temperature Program
Request temperature program For comfort, decrease and frost temperature MENU TEMPERATURE CHECK ACTUAL TEMP 20.0 °C MODIFY COMFORT 22.0 °C REDUCED 16.0 °C FROST °C Press MENU. TEMPERATURE is displayed. † ¾ Confirm by pressing OK. CHECK is displayed. † ¾... -
Page 16: Set Time / Date
Set time / date In the TIME/DATE menu, the submenus TIME, DATE, SU-WI (summer/winter rule), FORM DATE or FORM TIME can be entered/changed. Press MENU, select TIME/DATE with u and follow the indi- † ¾ cations on the display. MENU TIME/DATE TIME SET DATE... -
Page 17: Manual
MANUAL In the MANUAL menu, manual switch functions are applied. In the submenus PERM, OVERRIDE, TIMER or HOLIDAY, the manual switchings can be activated/programmed. Press MENU, use u to select MANUAL and follow the indica- † ¾ tions on the display MENU MANUAL PERM... -
Page 18: Setting Manual Or Permanent Switching
Setting manual or permanent switching Manual or permanent switching can be set via the menu in MANUAL or (in the automatic screen) by button combination (see picture). • Manual control: Reversing the channel status to the next automatic or programmed switching. •... -
Page 19: Options
Options In the OPTIONS menu; the submenus EXT INPUT, TYPE OF CONTROL, WALL COMP, LCD ILLUMINATION, LANGUAGE, PIN, FACTORY SETTINGS or INFO can be selected. Press MENU, use u to select OPTIONS and follow the inst- † ¾ ructions on the display. MENU OPTIONS EXT INPUT... -
Page 20: Set External Input
Set external input Via the EXT INPUT different functions can be set. • NOT ACTIVE: The external input has no function • PERM COMFORT: Comfort mode is permanently on REDUCED: Setback mode is permanently on FROST: Frost mode is permanently on •... -
Page 21: Activating Pin Code
Activating PIN code The PIN code is set in OPTIONS via the menu. L If you have forgotten your PIN, call the Theben Hotline. L Have the serial number ready. MENU OPTIONS EXT INPUT LANGUAGE NO PIN WITH PIN CURRENT... -
Page 22: Type Of Control
Type of control In the submenu TYPE OF CONTROL, the following settings can be selected: • NORMAL (e.g. radiator/convector) • UNDERFLOOR (inertial heating systems) • AIR HEATING (fast heating systems) • HYSTERESIS CONTROLLER (adjustable switch on/off hysteresis of ± 0.2 - 2.0 °C in 0.2 increments) Thus, the control behaviour can be adjusted to different types of heating MENU... -
Page 23: Wall Compensation
Wall compensation If the installation location is unfavourable, this may lead to variations in temperature between the detected and actual room temperature (+ if indication too low, – if indication too high). This can be corrected by using wall compensation. Press MENU, use u to select WALL COMP and follow the †... -
Page 24: Using The Obelisk Top2 Memory Card
Using the OBELISK top2 memory card Insert memory card in the clock thermostat † ¾ Read in/out saved switching times and device setups in † ¾ the time switch or start Obelisk program Remove memory card after copying etc. † ¾... -
Page 25: Resetting The Clock Thermostat
Starting OBELISK program Takes on the switching times that are programmed on the memory card. As soon as the memory card is removed, the switching times of the clock thermostat are re-activated. OBELISK COPY COPY CHECK RAMSES -> OBELISK -> OBELISK OBELISK OBELISK... -
Page 26: Technical Data
6. Technical data Operating voltage: 230V AC, +10 % / -15 % Frequency: 50–60 Hz Power consumption: 1,4 W Standby output: 1,36 W Switch output: switching of any phase is permitted Voltage at sensor input: Safety Extra-Low Voltage (SELV) approx. 3.5 V Contact: Changeover contact Contact gap:... -
Page 27: Contact
7. Contact Theben AG Hohenbergstr. 32 72401 Haigerloch GERMANY Tel. +49 7474 692-0 Fax +49 7474 692-150 Hotline Tel. +49 7474 692-369 hotline@theben.de Addresses, telephone numbers etc. www.theben.de...