Table of Contents
Advertisement
Quick Links
RAMSES 818 top
Ref. Nr. 818 0 032
Bedienungsanleitung
Uhrenthermostat
Operating instructions
Clock thermostat
Notice d´utlilisation
Thermostat à horloge
Gebruiksaanwijzing
Klokthermostaat
Istruzioni per l´uso
Cronotermostato
Instrucciones de uso
Termostato con reloj
1
17
31
45
59
73
RAM 811 top
TR 610 top
RAM 797 HF
RAM 622 top
RAM 382 A
Advertisement
Table of Contents

Related Manuals for Theben RAMSES 818 top


Summary of Contents for Theben RAMSES 818 top
-
Page 1: Description And Mounting
RAMSES 818 top Ref. Nr. 818 0 032 Bedienungsanleitung Uhrenthermostat Operating instructions Clock thermostat Notice d´utlilisation Thermostat à horloge Gebruiksaanwijzing Klokthermostaat Istruzioni per l´uso Cronotermostato Instrucciones de uso Termostato con reloj RAM 811 top TR 610 top RAM 797 HF... -
Page 2: Table Of Contents
Table of Contents Designated Use Table of Contents Designated Use ® Designated Use ....... . 17 The RAMSES ®... -
Page 3: Description And Mounting
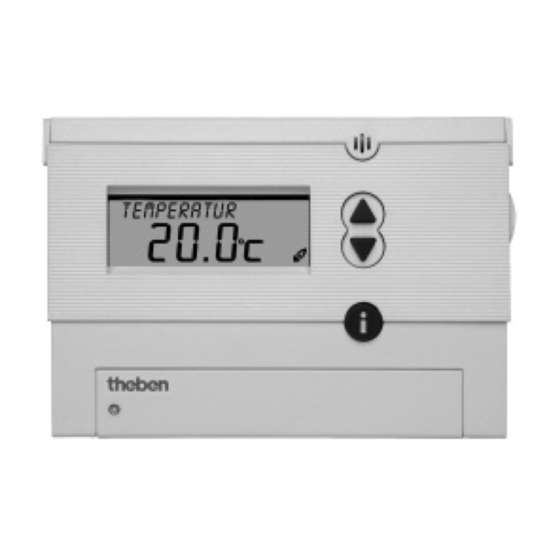
Description and Mounting Description and Mounting Device Overview Device Overview Hinged cover Icon bar for display of the Display of the day of week Display of the day of week programming level (rotary switch Icon bar for display of the (1 = Monday, 2 = Tuesday etc.) (1 = Monday, 2 = Tuesday etc.) position MENU) -
Page 4: Mounting And Electrical Connection
Mounting and Electrical Connection Mounting and Electrical Connection Heating cable test ® 3.2.2 Connection examples RAMSES 812 top Press the 'Info' key for approx. 4 secs. (with heating cable connec- Control of a motor ted) until Test Mode appears in the display. Test Mode remains dis- mixing valve played for 8 secs. -
Page 5: Installation And Operation
Installation and Operation Selecting the Language Installation and Operation Setting the Time / Date ® For installation of RAMSES For installation of RAMSES ® 818 top, follow the sections 811/812 top, follow the sections 4.1 to With the ESC button you can always return to the previous pro- 1. -
Page 6: Selecting The Temperature Profile
Selecting the Temperature Profile Checking Current Temperature 4.5.4 Permanent comfort 3. The display changes automatically to and Settings - lnfo Button Y e a r the date setting. The room temperature is permanently regulated to the programmed 4.4.1 Program P1 (fixed program) 2 0 0 2 With the lnfo button you can display the current floor tempera- comfort temperature. -
Page 7: Temporarily Changing The Target Temperature
Temporarily Changing the Target Early Cancellation, Check or Clearance of Early Cancellation, Check or Clearance of Set display type, (i.e. which information is shown in the dis- Temperature the Holiday Program the Holiday Program play, also see page 25). With this function, you can temporarily change the target temperatu- 3. -
Page 8: Party / Eco Program
Programming Party / Eco Program Party / Eco Program Programming With the “Party / Eco” function, you can cancel the temperature With the "Party / Eco" function, you can cancel the temperature profile Note: The P1 and P2 programs are fixed programs ex works, and Note: The P1 and P2 programs are fixed programs ex works, and profile of the set program for the next few hours (up to 23 hours of the set program for the next few hours (up to 23 hours and 50 min-... -
Page 9: Changing The Settings For Target Temperatures
4. After having set the antifreeze temperature, the setting of the tar- 5. The holiday program is now programmed and is activated at the 5. The holiday program is now programmed and is activated at the 4. After having set the antifreeze temperature, the setting of the tar- set start time. -
Page 10: Service Settings
5.3.2 Creating a new temperature profile P3 5.3.2 Creating a new temperature profile P3 3 sec. F r e e N e w M o - F r H O U R M I N U T E L o w e r 1 6 : 3 0 1 6 : 0 0 S a / S u... - Page 11 5.3.5 Displaying individual switch times and clearing them 5.3.5 Displaying individual switch times and clearing them back to back to 1. Displaying the switch 1. Displaying the switch no program stored in memory no program stored in memory times times P r o g r a m E m p t y see 5.3.1...
-
Page 12: Service Settings
Service Settings 5.4.2 Selecting the display type Service Settings 5.4.2 Selecting the display type 5.4.1 Overview “Service” menu 5.4.1 Overview "Service" menu D i s p l a y D i s p l a y Select the display type with the button ▲ or ▼. T A R G E T T E M P Select the display type with the button see 5.4.2... -
Page 13: Maintenance And Repair
5.4.3 Selecting the language 5.4.5 Adjusting the controller behaviour 5.4.3 Selecting the language Characteristics of the PD controller F r a n c a i s E n g l i s h back to back to With suitable heating systems the PD controller is characterized by D e u t s c h a short setting time, scarce maximum overshooting and therefore a L a n g u a g e... -
Page 14: Time/Date And Summer/Winter Time
Time/Date and Summer/Winter Time Time/Date and Summer/Winter Time 3 sec. E N D Setting the time and date: Setting the time and date: hour, minute, year, month, day. hour, minute, year, month, day. U S A / C A N Description see page 18. -
Page 15: Maintenance And Repair
Maintenance and Repair Maintenance and Repair Technical Data Technical Data RAMSES ® 818 top is maintenance-free. With the exception of a regular replacement of the batteries for the Control type: RS type 1B acc. to EN 60730-1:2001 Control type: RS type 2B acc. to EN 60730-1:1991 ®...