EverFocus EMV800 HD User Manual
8 / 12 channels mobile dvr
Hide thumbs
Also See for EMV800 HD:
- Quick installation manual (12 pages) ,
- Quick installation manual (9 pages) ,
- Quick installation manual (9 pages)

Related Manuals for EverFocus EMV800 HD


Summary of Contents for EverFocus EMV800 HD
- Page 1 EMV800 HD / EMV1200 HD 8 / 12 Channels Mobile DVR User’s Manual Copyright © EverFocus Electronics Corp. Release Date: September, 2016...
- Page 2 All rights reserved. No part of the contents of this manual may be reproduced or transmitted in any form or by any means without written permission of the EverFocus Electronics Corporation. Windows is a registered trademark of the Microsoft Corporation.
-
Page 3: Safety Precautions
Safety Precautions Refer all work related to the installation of this product to qualified service personnel or system installers. Do not block the ventilation openings or slots on the cover. Do not drop metallic parts through slots. This could permanently damage the appliance. Turn the power off immediately and contact qualified service personnel for service. - Page 4 Follow Instructions All operating and use instructions should be followed. Cleaning Unplug the unit from the outlet before cleaning. Do not use liquid cleaners, abrasive or aerosol cleaners. Use a damp cloth for cleaning. Attachments Do not use attachments not recommended by the product manufacturer as they may cause hazards.
- Page 5 This Product is RoHS compliant. Your EverFocus product is designed and manufactured with high quality materials and components which can be recycled and reused. This symbol means that electrical and...
-
Page 6: Table Of Contents
TABLE OF CONTENTS Introduction ........................1 Features .......................... 3 Packing List ........................4 Optional Accessories ....................... 4 Front Panel ........................5 Rear Panel ........................6 Getting Started ......................8 Installation ........................8 2.1.1 Mounting ........................9 Hard Disk Installation ....................12 SD Card Installation ....................... - Page 7 3.1.2 OSD Root Menu ......................42 3.1.3 Field Input Options....................42 General Operation ......................44 3.2.1 Login .......................... 44 3.2.2 Forget Your Password ....................45 3.2.3 Camera Selection ...................... 45 3.2.4 Audio Selection ......................46 OSD Root Menu ......................47 PTZ ..........................
- Page 8 Event ..........................78 6.3.1 Alarm ......................... 78 6.3.2 Video Loss ......................... 80 6.3.3 Motion........................82 6.3.4 GPS Event ........................85 6.3.5 G-Sensor Event ......................87 6.3.6 Other ......................... 89 Hard Disk ........................97 6.4.1 Disk ..........................97 6.4.2 SD Card ........................98 6.4.3 Lock/Format ......................
- Page 9 6.9.2 Log ........................... 140 Remote Access to the Mobile DVR................141 Accessing the Mobile DVR on the Network ..............141 Remote Live View ....................... 145 Menu Bar........................146 7.3.1 Camera ........................147 7.3.1.1 Basic Setting ....................147 7.3.1.2 Adjust Setting ....................149 7.3.2 Record ........................
- Page 10 7.3.8.3 User Group ........................195 7.3.8.4 User Management ......................197 7.3.8.5 I/O Control ........................199 7.3.8.6 EKB200 Setting ......................... 201 7.3.8.7 Miscellaneous ........................203 7.3.9 Information ......................204 7.3.9.1 System ..........................204 7.3.9.2 Log ............................205 7.3.10 Copy ........................206 7.3.11 Search ........................
-
Page 11: Introduction
The latest EverFocus digital video recorder generation is based on H.264 compression technology, resulting in enhanced recording capacity and improved network image transmission speed with high image quality. The EMV800 HD / EMV1200 HD can support 8 / 12 channels analog SD/HD cameras, delivering up to 1080p live view resolution. -
Page 12: System Diagram
*Analog SD/HD Camera 1 ~ 12 * This diagram uses EMV1200 HD as an example. The EMV800 HD has 8 video inputs and 8 audio inputs. ** The EMV800 HD / EMV1200 HD have 8 / 12 power output sets (+/-) respectively. Each power... -
Page 13: Features
EMV800 HD / EMV1200 HD Mobile DVR 1.1 Features • Supports analog SD / HD cameras • Up to 1080p resolution for recording * • Dual-stream from H.264 video compression • eZ.Controller function: Control camera OSD settings and PTZ operation directly from DVR •... -
Page 14: Packing List
• IR Remote Control (with two AAA batteries. See Note 4) x 1 • Power Harness Cable x 1 • Video Cable x 3 (EMV1200 HD); x2 (EMV800 HD) (see 2.4.2 Video Cable / Power-Out Cable) • Audio Cable x 1 (see 2.4.3 Audio Cable) •... -
Page 15: Front Panel
EMV800 HD / EMV1200 HD Mobile DVR 1.4 Front Panel EMV800 HD / EMV1200 HD No. Name Description Three USB2.0 ports for connecting to the USB storage device or USB2.0 Port mouse. HDD Drive Tray Install a 2.5” HDD for recording. -
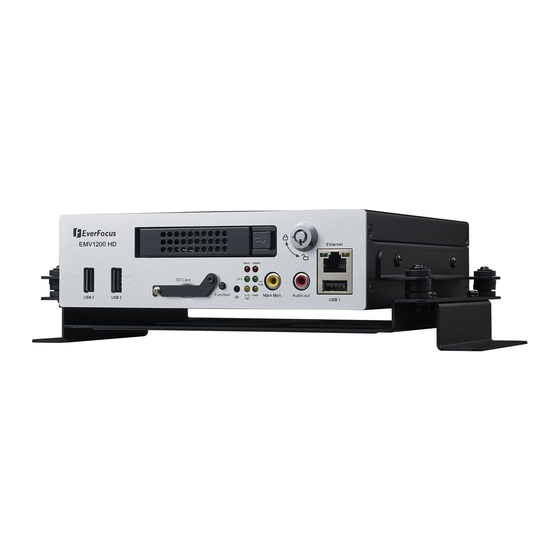
Page 16: Rear Panel
EMV800 HD / EMV1200 HD Mobile DVR RCA video output for connecting to a monitor for live view, playback and displaying OSD. Main Monitor Note this mobile DVR has three Main Monitor outputs (one on the front panel and the other two on the rear panel). All of the Main Monitor ports can be connected simultaneously. - Page 17 EMV800 HD / EMV1200 HD Mobile DVR VGA video output for connecting to the main monitor for live Main Monitor (VGA) view, playback and displaying OSD. D-Sub connector for connecting to the Alarm I/O, RS-232 (CAN D-Sub Connector bus) or RS-485 devices (such as analog PTZ cameras). For details, please refer to 2.4.4 D-Sub Cable.
-
Page 18: Getting Started
EMV800 HD / EMV1200 HD Mobile DVR Chapter 2. Getting Started 2.1 Installation Before installation, choose a location in the vehicle where it can: • Provide convenient access for installing or removing the hard disk • Allow air to flow around the fan vents. Inadequate or improper air flow can impede proper... -
Page 19: Mounting
EMV800 HD / EMV1200 HD Mobile DVR 2.1.1 Mounting You can use the provided mounting bracket in the package to mount the mobile DVR inside the vehicle. Two mounting types are available, Support-Mount and Suspend-Mount. Interface Interface Support-Mount Suspend-Mount If the mounting bracket you ordered is a Z-Type Bracket, both of the above two mounting types are supported. - Page 20 EMV800 HD / EMV1200 HD Mobile DVR Dimensions and Installation To install the mobile DVR onto a surface using Z-Type Brackets: With Z-Type Bracket 272mm/10.709" 1. Attach the supplied two Z-Type Brackets to the Fixing Bracket on the mobile DVR. Use the supplied four Short Screws with washers to screw the Z-Type Brackets to the Fixing Bracket.
- Page 21 EMV800 HD / EMV1200 HD Mobile DVR To install the mobile DVR onto a surface using Anti-Vibration Bracket: 229.6mm/9" 207.4mm/8.2" 178mm/7" The Anti-Vibration Bracket is already installed on the mobile DVR. Users need to prepare four screws to screw the mobile DVR onto a surface. The screw diameter on the Anti-Vibration...
-
Page 22: Hard Disk Installation
EMV800 HD / EMV1200 HD Mobile DVR 2.2 Hard Disk Installation The mobile DVRs supply with a 2.5” HDD tray for inserting a Hard Disk for video recordings. Please follow the steps below to install the Hard Disk. Note: The mobile DVR does not support hot swap for the hard disk. Ensure to power off the mobile DVR before removing the hard disk. - Page 23 EMV800 HD / EMV1200 HD Mobile DVR 4. Take out the supplied HDD screw pack inside the HDD Tray, insert a HDD in the HDD Tray and then screw the HDD to the tray with the supplied 8 screws. 5. Insert the HDD Tray into the drive bay and close the Locking Arm until you hear a click.
-
Page 24: Sd Card Installation
EMV800 HD / EMV1200 HD Mobile DVR 2.3 SD Card Installation The mobile DVRs provide SD card function for Alarm event backup recording. Please follow the steps below to install the SD Card. Up to 32 GB SD / SDHC cards are supported (see Appendix G Tested Card Brands). - Page 25 EMV800 HD / EMV1200 HD Mobile DVR After installing the SD Card, it’s recommended to enable the Record Overwrite function. The Record Overwrite function enables the mobile DVR to overwrite the recordings when the card space is full. If Record Overwrite is not enabled, the alarm event backup recording to the SD card will stop when card space is full.
-
Page 26: Vehicle Connection
EMV800 HD / EMV1200 HD Mobile DVR 2.4 Vehicle Connection The mobile DVR supports input power voltage between 9 VDC ~ 36 VDC. You can install the mobile DVR in all kinds of vehicles support the above power voltage. The diagrams below are examples to illustrate the connection inside car / truck with 12 VDC / 24 VDC. -
Page 27: Connecting To A Car With 12 Vdc
EMV800 HD / EMV1200 HD Mobile DVR 2.4.2 Connecting to a Car with 12 VDC Glove box (inside or underneath) Trunk Passenger seat (underneath) Driver seat (between the seat and side panel) EMV1200 HD (Rear Panel) IGN (Yellow) Power Harness Cable... -
Page 28: Basic Connection
EMV800 HD / EMV1200 HD Mobile DVR 2.5 Basic Connection After installing the mobile DVR in the vehicle, you can start connecting the mobile DVR to the external devices. The instructions below describe the basic connection to the mobile DVRs. For details on cable connections, please refer to the following sections. -
Page 29: Power Harness Cable
EMV800 HD / EMV1200 HD Mobile DVR 2.5.1 Power Harness Cable You can connect the mobile DVR to a power source between 9 VDC ~ 36 VDC. (The following figure uses EMV1200 HD as an example). EMV1200 HD (Rear Panel) -
Page 30: Video Cable / Power-Out Cable
EMV800 HD / EMV1200 HD Mobile DVR 2.5.2 Video Cable / Power-Out Cable The mobile DVRs have 1 / 2 / 3 Video In ports for connecting 4 / 8 / 12 analog cameras using the supplied Video Cables. (Note that HD-TVI / HD-CVI / HD-SDI cameras are not supported.) The Video Cables are all labeled with VIN 1~ VIN 4, and you can connect any Video Cable to any of the Video In ports on the mobile DVR. -
Page 31: Camera Connection
NTSC, the mobile DVR will configure itself to NTSC format. 2. For 1080p camera connection, up to 12 (EMV1200 HD) / 8 (EMV800 HD) 1080p cameras can be connected. If all channels are connected with 1080p cameras, the mobile DVR will display 12 (EMV1200 HD) / 8 (EMV800 HD) channels of 1080p live streams. - Page 32 EMV800 HD / EMV1200 HD Mobile DVR 1080p and 720p camera combination D1 and 1080p camera combination VIN 1 1080p Camera VIN 5 D1 Camera VIN 2 VIN 6 1080p Camera D1 Camera VIN 3 720p Camera VIN 7 1080p Camera...
-
Page 33: Recording Resolution Table
EMV800 HD / EMV1200 HD Mobile DVR Example C: If you connect a 720p camera to CH1 and a D1 camera to CH2, only 720p camera live view will display, and CH2 will have no live view but a status icon that indicates you to connect a 720p camera to this channel instead. - Page 34 1080pH/720p/D1 1080pH/720p/D1 Note: 1. For 1080p camera recordings, up to 4 1080p camera recordings are supported for EMV800 HD. 2. Resolution: 1080p: 1920x1080; 720p: 1280x720; D1: 704x480; 1080pH: 960x1080. 3. Main Stream frame rate: 1080p/1080pH: 15FPS; 720p/D1: 30FPS. 4. Sub Stream frame rate: 352x240: 30FPS; 176x120: 30FPS 5.
-
Page 35: Audio Cable
EMV800 HD / EMV1200 HD Mobile DVR 2.5.3 Audio Cable The mobile DVRs have 1 Audio In port for connecting 8 microphones using the supplied Audio Cable. The Audio Cable is labeled with AIN 1~ AIN 8. Microphones with a (built-in) amplifier and external power supply are required. -
Page 36: D-Sub Cable
EMV800 HD / EMV1200 HD Mobile DVR 2.5.4 D-Sub Cable You can connect the mobile DVR to the Alarm I/O, RS-232 (CAN bus) or RS-485 devices using the supplied D-Sub Cable. The mobile DVR provides 8 alarm inputs, 2 alarm outputs, 3 RS-232 and 1 RS-485 connections. -
Page 37: Monitor Connection
EMV800 HD / EMV1200 HD Mobile DVR 2.6 Monitor Connection The mobile DVRs have 3 Main Monitor ports and 1 Call Monitor port. You can connect the monitors to the BNC, VGA or RCA Main Monitor and BNC Call Monitor ports of the mobile DVR. -
Page 38: Accessing The Mobile Dvr
EMV800 HD / EMV1200 HD Mobile DVR Accessing the Mobile DVR You can look up the IP address and access the Web interface of the DVR using the IP Utility (IPU) program, which is included in the software CD. The IP Utility can also be downloaded from EverFocus’... - Page 39 EMV800 HD / EMV1200 HD Mobile DVR b. Type the Username and Password. Click the OK button, the status of the selected camera will display Login. Note: 1. The default user ID is admin and the default password is 11111111.
- Page 40 EMV800 HD / EMV1200 HD Mobile DVR 5. If you log in for the first time, follow the instruction steps on the interface to update the latest Plugin version (ePlayer). After reloading the webpage, the login window pops up again.
- Page 41 EMV800 HD / EMV1200 HD Mobile DVR If you encounter the following problem or still can’t access the remote Web interface, please see below: If the Error window appears, please be sure to close ALL the Web browser windows first then click Retry.
- Page 42 EMV800 HD / EMV1200 HD Mobile DVR If your PC or laptop is running with Windows, it’s required to run the browser as administrator when first entering the remote web page of the device. Go to C:\Program Files (x86)\Internet Explorer, right-click the browser and then click Run as administrator.
-
Page 43: Connecting The Mobile Dvr To The Network
Once you have a straight through cable plug one end into the LAN port on the back of the recorder and the other into the router. Log into the EverFocus mobile DVR menu and go to the Network Setting Menu. To let the router automatically assign an address: ... - Page 44 EMV800 HD / EMV1200 HD Mobile DVR To manually assign an address: Go to a computer connected on the same network as the mobile DVR. Click on the Start button and choose Run. If using Windows Vista, choose Search instead.
- Page 45 EMV800 HD / EMV1200 HD Mobile DVR To set the mobile DVR for Internet Connection through router: The next step is to open ports within your router. Log into the router using a PC and open the following ports.
-
Page 46: Direct High-Speed Connection
the recorder and the other into the high speed modem. Log into the EverFocus mobile DVR menu and go to the Network Setting Menu. Input the Static IP address, the Subnet Mask, and the Gateway that you obtained from ... -
Page 47: One-To-One Connection
mobile DVR and the other into the network card on the back of the computer. Log into the EverFocus mobile DVR menu and go to the Network Setting Menu. You must use the Static IP option for this type of connection. - Page 48 EMV800 HD / EMV1200 HD Mobile DVR Go to Start. Double-click on Control Panel. Click Network and Sharing Center. Click Local Area Connection. ...
- Page 49 EMV800 HD / EMV1200 HD Mobile DVR Click Properties. Click on Internet Protocol Version 4 (TCP/IPv4) and then click Properties. ...
- Page 50 EMV800 HD / EMV1200 HD Mobile DVR Select Use the following IP address. Assign an IP address of 192.168.1.2, a Subnet Mask of 255.255.255.0, and a Default Gateway of 192.168.1.1 and then click OK. Restart both of the computer and the mobile DVR.
-
Page 51: General Operation
EMV800 HD / EMV1200 HD Mobile DVR Chapter 3. General Operation There are two ways to control the OSD menu of the mobile DVRs: with a Mouse or the supplied handheld IR Remote Control. For details on the IR remote control, please refer to Appendix E, IR Remote Control. -
Page 52: Osd Root Menu
EMV800 HD / EMV1200 HD Mobile DVR 3.1.2 OSD Root Menu Right-click the mouse, the OSD Root Menu window appears. Click on any icon to enter to the setup menus. Click the button on the top-right corner or right-click to close the OSD Root Menu. - Page 53 EMV800 HD / EMV1200 HD Mobile DVR Drop-Down Box: Click on the down arrow to see all selections, then directly click on an option to select it. Check Box: Click on the box to enable it (checked) or disable it (unchecked).
-
Page 54: General Operation
EMV800 HD / EMV1200 HD Mobile DVR 3.2 General Operation 3.2.1 Login In order to access mobile DVRs, you may be prompted to log in for authority identification. To log in, follow the steps below: Right click on the screen to display the Root Menu. The following window appears. -
Page 55: Forget Your Password
1. If you forget your password, please email the Serial Number of the mobile DVR to ts@everfocus.com.tw , and then EverFocus will send you a verification code. 2. Input this verification code in the Password field of the Login window within 24 hours, and check the Verification Mode box. -
Page 56: Audio Selection
EMV800 HD / EMV1200 HD Mobile DVR 3.2.4 Audio Selection In order to utilize the audio function, please follow the instructions below before switching on the audio function. Note: The Audio function is unavailable for Germany. 1. Connect the audio source and/or audio output amplifier to the mobile DVR. -
Page 57: Osd Root Menu
EMV800 HD / EMV1200 HD Mobile DVR Chapter 4. OSD Root Menu Name Description Click to display the Playback Bar for viewing the recording videos. For Playback details, please refer to 5. Search and Playback. Click to display the PTZ Control Panel for controlling the connected PTZ cameras. - Page 58 EMV800 HD / EMV1200 HD Mobile DVR Click to display the Channel Changing Bar as shown below. To switch the selected camera to a specific channel, please refer to 4.3 Channel Switching. Change Channel Click to display system information icons or status icons on the live Display view screen.
-
Page 59: Ptz
EMV800 HD / EMV1200 HD Mobile DVR 4.1 PTZ You can use the PTZ Control Panel to control the connected PTZ cameras. To bring up the PTZ control panel, on the OSD Root Menu, click the PTZ button The following actions can be performed using the PTZ Control Panel: 1. - Page 60 EMV800 HD / EMV1200 HD Mobile DVR Everfocus and Pelco PTZ cameras. 11. To operate the Tour function: a. Click the Tour button. b. Click the desired Tour number. c. Click the Go button. 12. To remove a pre-configured Tour (if supported by the camera): a.
-
Page 61: Express Control Of Ptz
EMV800 HD / EMV1200 HD Mobile DVR 4.1.1 Express Control of PTZ If the PTZ Control Panel has first been opened and then hidden, the mouse can be used to control basic PTZ functions. Move your mouse cursor on the screen, the mouse cursor will turn into a control icon (direction, focus or zoom) in different areas of the screen. -
Page 62: Layout Switching
EMV800 HD / EMV1200 HD Mobile DVR 4.2 Layout Switching The mobile DVR have 7 screen division types available. The seven layouts are shown as below: To change layout, follow the steps below: 1. Right-click to bring up the OSD Root Menu. -
Page 63: Display
EMV800 HD / EMV1200 HD Mobile DVR 4.4 Display You can display system and camera status on the live view screen. Follow the steps below: 1. Click the Display button on the OSD Root Menu or press the Display button on the front panel to display the system and camera status. - Page 64 EMV800 HD / EMV1200 HD Mobile DVR 5. The following icons will be displayed at the bottom of the monitor to show the CAN bus status. To enable CAN bus status, please consult EverFocus for more details ts@everfocus.com.tw Turn Left...
-
Page 65: Sequence
EMV800 HD / EMV1200 HD Mobile DVR 4.5 Sequence The sequence function is used to display each channel in sequence mode. To enable this function: Click the Sequence button to enter the sequential switching mode. The mobile DVR will display one channel at a time in full screen. The channels will be displayed in the sequence and for the amount of time as configured in the System >... - Page 66 EMV800 HD / EMV1200 HD Mobile DVR Right-click the screen, the Zoom Bar appears in the middle of the screen. Click to zoom in the camera view up to 4X. Click the Logout button to log out the Zoom mode.
-
Page 67: Archiving The Recordings Or Log Data To The Usb Or Ftp
EMV800 HD / EMV1200 HD Mobile DVR 4.7 Archiving the Recordings or Log Data to the USB or FTP You can archive the recordings or log data (event and motion) to the USB storage device. On the OSD Root Menu, click the Copy icon , the following menu appears. - Page 68 EMV800 HD / EMV1200 HD Mobile DVR EFPlayer: Unzip the EFPlayer file and double-click to open it as below. The EFPlayer can only display up to 16 channels at one time. No. Name Function Description Shows the recording information of the device, including model...
- Page 69 EMV800 HD / EMV1200 HD Mobile DVR Click to take a snapshot of the channels displayed on the UI. You Snapshot can save the snapshot file to a desired location. Mute Click to mute; click again to turn off the mute function.
-
Page 70: Logout
EMV800 HD / EMV1200 HD Mobile DVR 4.8 Logout You can log out the mobile DVR by clicking the Exit icon on the OSD Root Menu to bring up the Logout Confirmation window. Click “Yes” when you are ready to logout of the system. You will need to login again before accessing the OSD Root Menu. -
Page 71: Temporarily Logout
EMV800 HD / EMV1200 HD Mobile DVR 4.8.1 Temporarily Logout You can temporarily log out the mobile DVR by clicking the Exit icon on the OSD Root Menu. This function is designed for use in conjunction with the Covert Camera function. Once you click the Exit icon, the camera streams will be hidden on the Live View / Sequence Mode. - Page 72 EMV800 HD / EMV1200 HD Mobile DVR 2. Select the cameras to be hidden once enabling the Temporarily Logout function and then check the Covert box (OSD Root Menu > System > Camera > Basic). 3. Click the Exit icon on the OSD Root Menu, the Logout menu appears.
-
Page 73: Search And Playback
EMV800 HD / EMV1200 HD Mobile DVR Chapter 5. Search and Playback You can use the Quick Playback function to play back the recordings start from the pre-configured time or use the Search functions to search for the desired recordings for playing back. -
Page 74: Playback Bar
EMV800 HD / EMV1200 HD Mobile DVR 5.2 Playback Bar The playback bar is the fastest way to show video from the exact time which users want to see. The playback bar allows users to see both a timeline and the current playback indicator. Users can then click the timeline to move the indicator to the desired position. - Page 75 EMV800 HD / EMV1200 HD Mobile DVR No. Name Description Click to play the recorded data forward. Click this button again to Play/Pause Pause the playback. Fast Forward Click to play the recorded data in fast forward. L1: Entire Time Bar scale is 30 days.
-
Page 76: Searching The Recordings For Playing Back
EMV800 HD / EMV1200 HD Mobile DVR 5.3 Searching the Recordings for Playing Back You can search the recordings for playing back by using the Search menu. On the left side of the Search menu, select Time Search, Event Search or Snapshot Search to enter to the setup menu. -
Page 77: Event Search
EMV800 HD / EMV1200 HD Mobile DVR 5.3.2 Event Search Start Date / End Date: Click to bring up the on-screen keyboard to select the start / end date. Start Time / End Time: Click to bring up the on-screen clock to select the start / end time. -
Page 78: Snapshot Search
EMV800 HD / EMV1200 HD Mobile DVR 5.3.3 Snapshot Search You can display video frames in snapshot and resume a video from where the snapshot has been set up. Search Date: Click to bring up the on-screen keyboard to select the date. - Page 79 EMV800 HD / EMV1200 HD Mobile DVR To resume the video: 1. Click the Search button, the search results are displayed in 16 screen division. In this picture, you can see the time layouts on the upper-left corner of each snapshot, which are set up with 5-minute interval.
-
Page 80: System
EMV800 HD / EMV1200 HD Mobile DVR Chapter 6. System The mobile DVRs can be configured through a series of menus on screen by using a Mouse or the supplied IR Remote Control. The following operations are examples of using a Mouse. This chapter describes the functions and options of the System Setting in the on-screen display (OSD) menus. - Page 81 EMV800 HD / EMV1200 HD Mobile DVR List of Configuration Options: Please find the topic of interest by referring to the section prefixed to each option. 6.1.1 Basic Setting 6.1 Camera 6.1.2 Adjust Setting 6.2.1 Record 6.2 Record 6.2.2 Playback 6.3.1 Alarm...
-
Page 82: Camera
EMV800 HD / EMV1200 HD Mobile DVR 6.1 Camera You can configure the settings for individual cameras. 6.1.1 Basic Setting Camera: Select a camera to be configured. Title: Click to bring up the on-screen keyboard for assigning a title for the selected camera. - Page 83 EMV800 HD / EMV1200 HD Mobile DVR Main / Sub Resolution: Select the most suitable resolution for the Main Stream and Sub Stream. If you connect eZ.HD cameras (1080p) to the MDVR, the main stream resolution option will display 1920x1080 only. If you connect eZ.HD cameras (720p) to the MDVR, the main stream resolution option will display 1280x720 only.
-
Page 84: Adjust Setting
EMV800 HD / EMV1200 HD Mobile DVR 6.1.2 Adjust Setting You can adjust the Brightness, Contrast and Color of the selected camera. Camera: Select a camera to adjust the following settings. Brightness: Move the bar to adjust the brightness. Contrast: Move the bar to adjust the contrast. -
Page 85: Ez Controller (Control Camera Osd Setting From Dvr End)
Diagram A below. It will take extra effort, time and people to adjust the camera. Now, EverFocus’ eZ.Controller allows users to control the camera OSD simply on the monitor at the DVR end as illustrated in Diagram Use eZ.Controller to Control Camera OSD... -
Page 86: Record & Playback
EMV800 HD / EMV1200 HD Mobile DVR 6.2 Record & Playback 6.2.1 Record You can configure the basic recording settings on the hard disk or SD card. Record Overwrite: Check the box to overwrite the hard disk / SD card when it is full. Note that unless this box is checked, or the mobile DVR will stop recording when the hard disk / SD card is full. -
Page 87: Playback
EMV800 HD / EMV1200 HD Mobile DVR 6.2.2 Playback You can set up the quick playback time on this page. For using this function, please refer to 5.1 Quick Playback. Quick Playback: Check the box to enable the Quick Playback function as described below. -
Page 88: Event
Network Alarm: Check the box to send out a network alarm to a client PC when an alarm event occurs. This feature works with EverFocus’ CMS software. You will need to configure the Alarm Server for the mobile DVR to send network alarms to the client PC (see 6.6.7 Alarm... - Page 89 EMV800 HD / EMV1200 HD Mobile DVR Auto Lock: Check the box and the events will be recorded in a write protected segment of the hard disk (will not be overwritten). The mobile DVR will lock a period of time when the alarm occurs.
-
Page 90: Video Loss
Network Alarm: Check the box to send out a network alarm to a client PC when video loss event occurs. This feature works with EverFocus’ CMS software. You will need to configure the Alarm Server for the mobile DVR to send network alarms to the client PC (see 6.6.7 Alarm Server). - Page 91 EMV800 HD / EMV1200 HD Mobile DVR Permanent: Alarm will remain active until the user presses the “Enter” key on the IR Remote Control or resets the alarm remotely. Transparent: Alarm output remains as long as the alarm input is active.
-
Page 92: Motion
Network Alarm: Check the box to send out a network alarm to a client PC when motion occurs. This feature works with EverFocus’ CMS software. You will need to configure the Alarm Server for the mobile DVR to send network alarms to the client PC (see 6.6.7 Alarm Server). - Page 93 EMV800 HD / EMV1200 HD Mobile DVR FTP Upload: Check the box to enable uploading recordings to the FTP server function. To setup the FTP server, please refer to 6.6.6 FTP. FTP Upload File Type: Select MP4 file type to upload videos to FTP server; select JPEG file type to upload snapshots to the FTP server.
- Page 94 EMV800 HD / EMV1200 HD Mobile DVR To Edit the Motion Grids: Click the Edit Motion Grid button, the Motion Setting menu appears. Click on the image and the grid will be displayed. To set up a motion area, drag a rectangle with your mouse (from top to bottom / upper- left to lower-right).
-
Page 95: Gps Event
Network Alarm: Check box to send out a network alarm to the client PC. This feature works with EverFocus’ CMS software. You will need to configure the Alarm Server for mobile DVR to send network alarms to the client PC (see 6.6.7 Alarm Server). - Page 96 EMV800 HD / EMV1200 HD Mobile DVR Trans+Timeout: Alarm output continues until event ends, then continues for the set time duration. Timeout Duration: The amount of time the buzzer sounds when GPS event occurs. 【GPS Fencing】: You can set up the geo-fencing event for alarm notification.
-
Page 97: G-Sensor Event
Network Alarm: Check box to send out a network alarm to the client PC. This feature works with EverFocus’ CMS software. You will need to configure the Alarm Server for mobile DVR to send network alarms to the client PC (see 6.6.7 Alarm Server). - Page 98 EMV800 HD / EMV1200 HD Mobile DVR Timeout: Alarm output lasts for the set time duration. Permanent: Alarm will be continuously active until user presses the “Enter” key or resets the alarm remotely. Transparent: Alarm output remains active until event ends.
-
Page 99: Other
Network Alarm: Check the box to send out a network alarm to a client PC when an alarm event occurs. This feature works with EverFocus’ CMS software. You will need to configure the Alarm Server for the mobile DVR to send network alarms to the client PC (see 6.6.7 Alarm Server). - Page 100 Network Alarm: Check the box to send out a network alarm to a client PC. This feature works with EverFocus’ CMS software. You will need to configure the Alarm Server for the mobile DVR to send network alarms to the client PC (see 6.6.7 Alarm Server).
- Page 101 Network Alarm: Check the box to send out a network alarm to a client PC when HD fails. This feature works with EverFocus’ CMS software. You will need to configure the Alarm Server for the mobile DVR to send network alarms to the client PC (see 6.6.7 Alarm Server).
- Page 102 Network Alarm: Check the box to send out a network alarm to a client PC when HD is full. This feature works with EverFocus’ CMS software. You will need to configure the Alarm Server for the mobile DVR to send network alarms to the client PC (see 6.6.7 Alarm Server).
- Page 103 Network Alarm: Check the box to send out a network alarm to a client PC when HD is off. This feature works with EverFocus’ CMS software. You will need to configure the Alarm Server for the mobile DVR to send network alarms to the client PC (see 6.6.7 Alarm Server).
- Page 104 Network Alarm: Check the box to send out a network alarm to a client PC when power has been restored. This feature works with EverFocus’ CMS software. You will need to configure the Alarm Server for the mobile DVR to send network alarms to the client PC (see 6.6.7 Alarm Server).
- Page 105 EMV800 HD / EMV1200 HD Mobile DVR 6.3.6.7 Network Loss Log: Check the box to record alarm events to log data. Buzzer: Check the box to enable buzzer when network is lost. Alarm Output: Select an alarm output number. When an alarm is triggered, the signal will be transmitted through the selected alarm output relay.
- Page 106 Network Alarm: Check the box to send out a network alarm to a client PC when HD is off. This feature works with EverFocus’ CMS software. You will need to configure the Alarm Server for the mobile DVR to send network alarms to the client PC (see 6.6.7 Alarm Server).
-
Page 107: Hard Disk
EMV800 HD / EMV1200 HD Mobile DVR 6.4 Hard Disk The Disk menu is used to review the mobile DVR’s hard drive settings and status. No value in this menu can be configured by the operator. 6.4.1 Disk Record Time (Start): Shows the earliest recording time of the mobile DVR. -
Page 108: Sd Card
5% of the card space will be reserved for system use. If you want to back up the recordings, you can use EverFocus EF Reader to remotely/locally back up the recordings from the SD card (see Appendix H Recording Backup through EF Reader). -
Page 109: Lock/Format
Format Disk: Click this button to format the whole HDD. WARNING: This will effectively ERASE the ENTIRE hard disk!! If you want to back up the recordings, you can use EverFocus EF Reader to remotely/locally back up the recordings from the hard disk (see Appendix H Recording Backup through EF Reader). -
Page 110: Display Setting
EMV800 HD / EMV1200 HD Mobile DVR 6.5 Display Setting You can configure the settings for displaying the camera / mobile DVR information on the live view image. You can also set up the sequencing order for the Main / Call monitor. -
Page 111: M/T Seq
EMV800 HD / EMV1200 HD Mobile DVR 6.5.2 M/T SEQ You can configure up to 20 steps of the sequencing order for the Main / Call monitor. The Sequence will repeat continuously from step 1 to step 20 until interrupted. -
Page 112: Network Settings
EMV800 HD / EMV1200 HD Mobile DVR 6.6 Network Settings The mobile DVR allows you to use a Web browser to remotely view and manage the system. You can also receive live video streaming from the mobile DVR using your smartphone. - Page 113 EMV800 HD / EMV1200 HD Mobile DVR IP address: Displays the mobile DVR’s current IPv4 IP Address. A static IP address must be set manually. If DHCP is selected, this value will be assigned automatically. Subnet Mask: Displays the subnet mask for your network so the mobile DVR will be recognized within the network.
- Page 114 EMV800 HD / EMV1200 HD Mobile DVR You can obtain the actual DNS IP from your Internet Service Provider (ISP); or, from a PC located on the same LAN as the mobile DVR, go to http://www.dnsserverlist.org/ to obtain a list of the IP addresses of their recommendation of the best servers to use for your location.
-
Page 115: Wireless
EMV800 HD / EMV1200 HD Mobile DVR 6.6.2 Wireless Wireless Mode: Two options are selectable: Static IP and DHCP. Static IP: User can set a fixed IP for network connection. DHCP: DHCP server in LAN will automatically assign an IP configuration for the network connection. - Page 116 EMV800 HD / EMV1200 HD Mobile DVR Change Channel: Select a wireless channel for the mobile DVR. It’s recommended to select Auto when there is more than one mobile DVR set up in the same wireless network environment. Security Mode: Select a wireless encryption protocol: WEP, WPA and WPA2.
-
Page 117: Mobile
EMV800 HD / EMV1200 HD Mobile DVR 6.6.3 Mobile After connecting the 3G / 4G Receiver to the mobile DVR, you have to set up the mobile settings for the mobile DVR to connect to the wireless network. Follow the steps below:... -
Page 118: Email
EMV800 HD / EMV1200 HD Mobile DVR 6.6.4 Email You can configure the Email settings for mobile DVR to send Email alert when an event occurs. SMTP Server: Assign the SMTP (e-mail) server’s name. Note that for more reliable email service, use the server’s IP address. -
Page 119: Ddns
EMV800 HD / EMV1200 HD Mobile DVR 6.6.5 DDNS DDNS (Dynamic Domain Name System) is a service used to map a domain name to the dynamic IP address of a network device. You can set up the DDNS service for remote access to the mobile DVR. - Page 120 Save: Click to save the settings. Note: 1. It is not necessary to append the HTTP port number to the DDNS name. The EverFocus DDNS server not only keeps track of your mobile DVR’s IP address, but also keeps track of the ports.
- Page 121 EMV800 HD / EMV1200 HD Mobile DVR To set up DDNS function: 1. In order to allow remote access to the MDVR from outside of the local network, enable either the Port Forwarding or DMZ function of your router. Please refer to the manual of...
- Page 122 If PPPoE is selected: Enter the User Name (e.g. xxxx@hinet.net) and Password provided by your ISP service provider. 3. On the DDNS setting page, register a free host name from EverFocus DDNS and then click the Save button. a. Select EverfocusDDNS from the DDNS Service drop-down list.
- Page 123 4. The DDNS setup is now complete. Open a browser and enter the domain name (http://[host name].everfocusddns.com) in the address field. The Web interface of the MDVR should be displayed. For example, if you’ve obtained the host name “HQtest” from EverFocus DDNS server, enter http://HQtest.everfocusddns.com in the address field of the browser.
- Page 124 EMV800 HD / EMV1200 HD Mobile DVR 6.6.5.2 www.dyndns.org DDNS Service: Select www.dyndns.org from the drop-down list. Host name: Host name created through the dyndns account. User name: User name of the dyndns account. Password: Password of the dyndns account.
-
Page 125: Ftp
EMV800 HD / EMV1200 HD Mobile DVR 6.6.6 Set up the FTP server settings to enable the FTP function. The function is for users to upload the alarm / motion recordings or snapshots from sub stream to the FTP server. You can choose to upload either the recordings or snapshots, please see 6.2.1 Alarm and 6.3.3 Motion. -
Page 126: Alarm Server
6.6.7 Alarm Server You can send out the alarm notifications to EverFocus’s CMS software. Please also consult the CMS’s user manual for network alarm settings. Server IP1~3: IP address of client PC. The network alarm can be transmitted to up to 3 addresses. -
Page 127: Remote/Mobile
EMV800 HD / EMV1200 HD Mobile DVR 6.6.8 Remote/Mobile You can configure the compression format for the sub-stream for mobile phone access. Select H.264 or MJPEG codec to enable the mobile phone access function. Note that if you also want to use the FTP function for uploading the recordings (MP4 video format), please select the H.264 codec. -
Page 128: Network Test
EMV800 HD / EMV1200 HD Mobile DVR 6.6.9 Network Test The Ping utility is useful in diagnosing connectivity problems by obtaining responses from nodes progressively farther along the network. DNS functionality can also be confirmed by entering a valid DNS name instead of an IP address. -
Page 129: Xfleet
EMV800 HD / EMV1200 HD Mobile DVR 6.6.10 Xfleet You can use EverFocus Xfleet system for fleet management. Xfleet is a Web-based fleet management system which integrates GPS positioning, 3G/4G mobile wireless communication and GIS (Geographic Information System) techniques, allowing users to easily track, monitor and manage any type of fleet vehicles on a Web browser anywhere and anytime. -
Page 130: Schedule Setting
EMV800 HD / EMV1200 HD Mobile DVR 6.7 Schedule Setting You can set up the recording schedule with the desired time, event types or FPS. 6.7.1 Express Setup You can set up a weekly recording schedule for the mobile DVR to automatically record videos. -
Page 131: Holidays
EMV800 HD / EMV1200 HD Mobile DVR 6.7.2 Holidays In addition to set up a weekly recording schedule, you can also set up a holiday recording schedule to automatically record videos on a specific day of the year. Date Type: Select Holiday or Others if you have configured the settings in 6.7.1 Express Setup. -
Page 132: Schedule
EMV800 HD / EMV1200 HD Mobile DVR 6.7.3 Schedule You can set up the camera recording mode by time of day on specific days of the week and/or holidays and other days. Please note that after the configuration, you have to check the Schedule Record box in the Record setting page to enable the schedule recording mode. - Page 133 TV standard in global setting, all the installed cameras, with an upper limit of 30 FPS (NTSC – 25 PAL) per individual camera (real time recording). Since EverFocus mobile DVRs have the capability to change the FPS rate in response to events, it may be advisable to reserve some recording capacity for event response.
- Page 134 EMV800 HD / EMV1200 HD Mobile DVR Event: Maximum desired frame rate in frames per second (FPS) for event recording; if more than one camera requires simultaneous event recording, the total for all cameras cannot exceed the maximum available FPS for the mobile DVR at the corresponding resolution setting, and the available FPS may be divided across the cameras responding to an event.
-
Page 135: System Setting
EMV800 HD / EMV1200 HD Mobile DVR 6.8 System Setting You can configure the general settings for the mobile DVR in this menu. 6.8.1 Date / Time You can set up the date and time for the mobile DVR. Note: Clicking Save at this page will disable the Daylight Saving function if this function has been enabled. - Page 136 EMV800 HD / EMV1200 HD Mobile DVR GPS: Select to synchronize the MDVR time with GPS time. For this function to work, a GPS antenna is required to connect to the MDVR to receive GPS signal. NTP Server: If NTP is selected from the Time Sync drop-down list above, you will have to further select a NTP Server.
-
Page 137: Daylight Saving
EMV800 HD / EMV1200 HD Mobile DVR 6.8.2 Daylight Saving You can configure the settings for mobile DVR to automatically adjust to daylight saving time. Note: If this page is grayed out, it means that you have enabled the Auto daylight saving function, please refer to 6.8.1 Date/Time. -
Page 138: User Group
EMV800 HD / EMV1200 HD Mobile DVR 6.8.3 User Group This setting page is used for configuring the privilege of the three access levels: Administrator, Manager and Operator. Check the boxes under an access level to enable the privileges of that access level. - Page 139 EMV800 HD / EMV1200 HD Mobile DVR Import Notes for Account Privilege Definition Users with the Administrator account have full privileges, so the checkboxes under the Administrator access level will always be grayed out. The Administrator can grant privileges to both the Manager and Operator while the Manager and Operator can also give certain privileges to the lower level accounts based on the following rules.
-
Page 140: User Management
EMV800 HD / EMV1200 HD Mobile DVR 6.8.4 User Management You can create multiple user accounts (max: 20 user accounts) with different privileges. The mobile DVR has default user accounts which you can choose to copy, edit, add or delete, and the default password is 11111111. - Page 141 EMV800 HD / EMV1200 HD Mobile DVR You can further configure each user account and its settings individually, see the steps below: 1. Click on a user account. 2. Click the Add, Copy or Edit button, and the following page appears.
-
Page 142: I/O Control
EMV800 HD / EMV1200 HD Mobile DVR 6.8.5 I/O Control The I/O Control setup menu is used to define the settings for controlling the mobile DVR through RS-485 / RS-232 communication protocol and for mobile DVR to control the connected PTZ cameras. Please note that the RS-232 port on the mobile DVR is currently reserved. - Page 143 RS-485 PTZ Protocol: Select PTZ protocol, choose from the following protocols: Transparent, Pelco_D, Pelco_P, Everfocus or Samsung. (Note: All cameras on the RS-485 bus must use the same protocol) 485 ID: This is the ID used by the EKB500 to send commands to the mobile DVR. On an RS-485 connection, every device (PTZ, mobile DVR and controller) must be assigned an unique ID number between 0 and 127.
-
Page 144: Ekb200 Setting
6.8.6 EKB200 Setting You can connect an EKB200, which is EverFocus’ USB keyboard, to the USB port on the DVR to control the Iris, focus or the pre-configured PTZ control functions of the connected cameras. For details on how to configure the PTZ control functions, including Preset Position, Auto Pan, Tour and Pattern, please refer to 4.1 PTZ. - Page 145 EMV800 HD / EMV1200 HD Mobile DVR 【Key No】 The control key number on the keyboard. 【Action】 Select an item from the drop-down list to define the function for each key on the keyboard. Set Preset: You can use the joystick on the keyboard to select a position and then press ...
-
Page 146: Miscellaneous
EMV800 HD / EMV1200 HD Mobile DVR 6.8.7 Miscellaneous You can upgrade the latest firmware, restore the factory default settings to the mobile DVR, upload / save the mobile DVR configuration settings from / to the USB or change the language in this setup menu. - Page 147 EMV800 HD / EMV1200 HD Mobile DVR Allowed Remote Reboot: Check the box to enable restarting the mobile DVR via the Network. Shutdown: Click the Shutdown button if you need to turn off the mobile DVR. When the message as below pops up on the screen, you can now turn off the mobile DVR.
-
Page 148: Information
EMV800 HD / EMV1200 HD Mobile DVR 6.9 Information You can see the mobile DVR information and Log data in this menu. Or export the log data to the USB storage device. 6.9.1 System In the System Menu, you can only see the information of the mobile DVR, Network or HDD. - Page 149 EMV800 HD / EMV1200 HD Mobile DVR Network ID: The ID number for EverFocus’ CMS as set up in the LAN menu. 【Status】 Disk: Displays the status of the internal hard disks. Normal hard disk operation is indicated by “OK”.
-
Page 150: Log
EMV800 HD / EMV1200 HD Mobile DVR 6.9.2 You can choose, display or export log data using this menu. Start Date / End Date: Click to bring up the on-screen keyboard to set up the start / end date. Start Time / End Time: Click to bring up the on-screen clock to set up the start / end time. -
Page 151: Remote Access To The Mobile Dvr
EMV800 HD / EMV1200 HD Mobile DVR Chapter 7. Remote Access to the Mobile DVR Accessing the Mobile DVR on the Network Follow the steps below to access the mobile DVR from a computer. Open an Internet Explorer window and in the address bar type the IP address. - Page 152 EMV800 HD / EMV1200 HD Mobile DVR If you log in for the first time, follow the instruction steps on the interface to update the latest Plugin version (ePlayer). After reloading the webpage, the login window pops up again. Type the user ID and password to log in again. By default, the user ID is admin and the password is 11111111.
- Page 153 EMV800 HD / EMV1200 HD Mobile DVR If you encounter the following problem or still can’t access the remote Web interface, please see below: If the Error window appears, please be sure to close ALL the Web browser windows first then click Retry.
- Page 154 EMV800 HD / EMV1200 HD Mobile DVR If your PC or laptop is running with Windows, it’s required to run the browser as administrator when first entering the remote web page of the device. Go to C:\Program Files (x86)\Internet Explorer, right-click the browser and then click Run as administrator.
-
Page 155: Remote Live View
EMV800 HD / EMV1200 HD Mobile DVR 7.2 Remote Live View No. Name Description Menu Bar For configuring the mobile DVR. Please refer to 7.3 Menu Bar. Layout Click to select a desired layout. Sub / Main Click to switch between the Main stream and Sub stream. -
Page 156: Menu Bar
EMV800 HD / EMV1200 HD Mobile DVR 7.3 Menu Bar No. Name Description Live View Click to display the live view window. Camera Click to configure the camera settings. Please refer to 7.3.1 Camera. Record Click to configure the record settings. Please refer to 7.3.2 Record. -
Page 157: Camera
EMV800 HD / EMV1200 HD Mobile DVR 7.3.1 Camera 7.3.1.1 Basic Setting Camera: Select a camera to be configured. Title: Click to bring up the on-screen keyboard for assigning a title for the selected camera. Each title supports up to 16 characters. - Page 158 EMV800 HD / EMV1200 HD Mobile DVR Main Stream Sub Stream eZ.HD Camera (1080p): 1920x1080 eZ.HD Camera (1080pH): 960x1080 * 352x240 / 176x120 eZ.HD Camera (720p): 1280x720 WD1 or D1 Camera: 960x480 / 704x480 / 352x240 * If you connect two eZ.HD cameras (1080p) to a pair of video inputs (say CH1 and CH2), both of the maximum live resolution will be displayed as 1080p;...
-
Page 159: Adjust Setting
EMV800 HD / EMV1200 HD Mobile DVR 7.3.1.2 Adjust Setting You can adjust the Brightness, Contrast and Color of the selected camera. Camera: Select a camera to adjust the following settings. Brightness: Move the bar to adjust the brightness. Contrast: Move the bar to adjust the contrast. - Page 160 Diagram A below. It will take extra effort, time and people to adjust the camera. Now, EverFocus’ eZ.Controller allows users to control the camera OSD simply on the monitor at the DVR end as illustrated in Diagram Use eZ.Controller to Control Camera OSD...
-
Page 161: Record
EMV800 HD / EMV1200 HD Mobile DVR 7.3.2 Record You can configure the basic recording settings. Record Overwrite: Check the box to overwrite the hard disk / SD card when it is full. Note that unless this box is checked, or the mobile DVR will stop recording when the hard disk / SD card is full. -
Page 162: Event
Network Alarm: Check the box to send out a network alarm to a client PC when an alarm event occurs. This feature works with EverFocus’ CMS software. You will need to configure the Alarm Server for the mobile DVR to send network alarms to the client PC (see 7.3.6.7 Alarm Server). - Page 163 EMV800 HD / EMV1200 HD Mobile DVR the recording process is done (the alarm events occurred during the SD card recording process will be ignored and not be recorded). Up to four alarm events can be simultaneously recorded if the alarms are triggered at the same time.
-
Page 164: Video Loss
Network Alarm: Check the box to send out a network alarm to a client PC when video loss event occurs. This feature works with EverFocus’ CMS software. You will need to configure the Alarm Server for the mobile DVR to send network alarms to the client PC (see 7.3.6.7 Alarm Server). -
Page 165: Motion
Network Alarm: Check the box to send out a network alarm to a client PC when motion occurs. This feature works with EverFocus’ CMS software. You will need to configure the Alarm Server for the mobile DVR to send network alarms to the client PC (see 7.3.6.7 Alarm Server). - Page 166 EMV800 HD / EMV1200 HD Mobile DVR Output Type: Select an output type when an alarm is triggered. Timeout: Select this option and then set up the Timeout Duration in the field below, the alarm output will last for the setup duration time (10 ~ 150 seconds).
- Page 167 EMV800 HD / EMV1200 HD Mobile DVR Click Set All to set all area for motion detection, the selected area will be highlighted in purple. Click Clear All to clear all the selected area. You can also customize the motion area by clicking on each grid. Or drag a rectangle with your mouse to enable (from top to bottom / upper-left to lower-right) or disable the motion area (from bottom to top / lower-right to upper-left).
-
Page 168: Gps Event
Network Alarm: Check box to send out a network alarm to the client PC. This feature works with EverFocus’ CMS software. You will need to configure the Alarm Server for mobile DVR to send network alarms to the client PC (see 7.3.6.7 Alarm Server). - Page 169 EMV800 HD / EMV1200 HD Mobile DVR GPS Border Type: Select Circle or Rectangle for the GPS border type. Coordinate Express: Select DMS to set up the latitude and longitude of the border in Degrees / Minutes / Seconds; or select Decimal Degrees to set up the border in decimal degrees.
-
Page 170: G-Sensor Event
Network Alarm: Check box to send out a network alarm to the client PC. This feature works with EverFocus’ CMS software. You will need to configure the Alarm Server for mobile DVR to send network alarms to the client PC (see 7.3.6.7 Alarm Server). -
Page 171: Other
Network Alarm: Check the box to send out a network alarm to a client PC when an alarm event occurs. This feature works with EverFocus’ CMS software. You will need to configure the Alarm Server for the mobile DVR to send network alarms to the client PC (see 7.3.6.7 Alarm Server). - Page 172 Network Alarm: Check the box to send out a network alarm to a client PC. This feature works with EverFocus’ CMS software. You will need to configure the Alarm Server for the mobile DVR to send network alarms to the client PC (see 7.3.6.7 Alarm Server).
- Page 173 Network Alarm: Check the box to send out a network alarm to a client PC when HD fails. This feature works with EverFocus’ CMS software. You will need to configure the Alarm Server for the mobile DVR to send network alarms to the client PC (see 7.3.6.7 Alarm Server).
- Page 174 Network Alarm: Check the box to send out a network alarm to a client PC when HD is full. This feature works with EverFocus’ CMS software. You will need to configure the Alarm Server for the mobile DVR to send network alarms to the client PC (see 7.3.6.7 Alarm Server).
- Page 175 Network Alarm: Check the box to send out a network alarm to a client PC when HD is off. This feature works with EverFocus’ CMS software. You will need to configure the Alarm Server for the mobile DVR to send network alarms to the client PC (see 7.3.6.7 Alarm Server).
- Page 176 Network Alarm: Check the box to send out a network alarm to a client PC when power has been restored. This feature works with EverFocus’ CMS software. You will need to configure the Alarm Server for the mobile DVR to send network alarms to the client PC (see 7.3.6.7 Alarm Server).
- Page 177 EMV800 HD / EMV1200 HD Mobile DVR Network Loss Log: Check the box to record alarm events to log data. Buzzer: Check the box to enable buzzer when network is lost. Alarm Output: Select an alarm output number. When an alarm is triggered, the signal will be transmitted through the selected alarm output relay.
- Page 178 Network Alarm: Check the box to send out a network alarm to a client PC when HD is off. This feature works with EverFocus’ CMS software. You will need to configure the Alarm Server for the mobile DVR to send network alarms to the client PC (see 7.3.6.7 Alarm Server).
-
Page 179: Disk
EMV800 HD / EMV1200 HD Mobile DVR 7.3.4 Disk The Disk menu is used to review the mobile DVR’s hard drive settings and status. No value in this menu can be configured by the operator. 7.3.4.1 Disk Record Time (Start): Shows the earliest recording time of the mobile DVR. -
Page 180: Lock/Format
EMV800 HD / EMV1200 HD Mobile DVR 7.3.4.2 Lock/Format You can control the percentage of the hard disk space reserved for Locked Event Recordings. You can also format the hard disk if necessary. Maximum Lock (%): Sets the maximum percentage of the hard disk space reserved for Locked Event Recordings. -
Page 181: Display Setting
EMV800 HD / EMV1200 HD Mobile DVR 7.3.5 Display Setting You can configure the settings for displaying the camera / mobile DVR information on the live view image. You can also set up the sequencing order for the Main / Call monitor. -
Page 182: M/T Seq
EMV800 HD / EMV1200 HD Mobile DVR 7.3.5.2 M/T SEQ You can configure up to 20 steps of the sequencing order for the Main / Call monitor. The Sequence will repeat continuously from step 1 to step 20 until interrupted. -
Page 183: Network
EMV800 HD / EMV1200 HD Mobile DVR 7.3.6 Network The mobile DVR allows you to use a Web browser to remotely view and manage the system. You can also receive live video streaming from the mobile DVR using your smartphone. - Page 184 EMV800 HD / EMV1200 HD Mobile DVR Gateway: Displays the gateway on your network for the mobile DVR to use when communicating with any devices not on the local network. If DHCP is selected, this value will be assigned automatically.
- Page 185 EMV800 HD / EMV1200 HD Mobile DVR 2. If you are connecting through a router, make sure that you have ‘opened up’ all the required network ports in the port forwarding section of your router’s setup options. That is, you have directed the router to send any incoming traffic using those IP ports to the LAN IP address of the mobile DVR.
-
Page 186: Wireless
EMV800 HD / EMV1200 HD Mobile DVR 7.3.6.2 Wireless Wireless Mode: Two options are selectable: Static IP and DHCP. Static IP: User can set a fixed IP for network connection. DHCP: DHCP server in LAN will automatically assign an IP for the network connection. -
Page 187: Mobile
EMV800 HD / EMV1200 HD Mobile DVR 7.3.6.3 Mobile After connecting the 3G / 4G Receiver to the mobile DVR, you have to set up the mobile settings for the mobile DVR to connect to the wireless network. Follow the steps below:... -
Page 188: Email
EMV800 HD / EMV1200 HD Mobile DVR 7.3.6.4 Email You can configure the Email settings for mobile DVR to send Email alert when an event occurs. SMTP Server: Assign the SMTP (e-mail) server’s name. Note that for more reliable email service, use the server’s IP address. -
Page 189: Ddns
EMV800 HD / EMV1200 HD Mobile DVR 7.3.6.5 DDNS DDNS (Dynamic Domain Name System) is a service used to map a domain name to the dynamic IP address of a network device. You can set up the DDNS service for remote access to the mobile DVR. - Page 190 EMV800 HD / EMV1200 HD Mobile DVR Note: 1. It is not necessary to append the HTTP port number to the DDNS name. The EverFocus DDNS server not only keeps track of your mobile DVR’s IP address, but also keeps track of the ports.
- Page 191 EMV800 HD / EMV1200 HD Mobile DVR To set up DDNS function: 1. In order to allow remote access to the MDVR from outside of the local network, enable either the Port Forwarding or DMZ function of your router. Please refer to the manual of...
- Page 192 If PPPoE is selected: Enter the User Name (e.g. xxxx@hinet.net) and Password provided by your ISP service provider. 3. On the DDNS setting page, register a free host name from EverFocus DDNS and then click the Save button. a. Select EverfocusDDNS from the DDNS Service drop-down list.
- Page 193 4. The DDNS setup is now complete. Open a browser and enter the domain name (http://[host name].everfocusddns.com) in the address field. The Web interface of the MDVR should be displayed. For example, if you’ve obtained the host name “HQtest” from EverFocus DDNS server, enter http://HQtest.everfocusddns.com in the address field of the browser.
-
Page 194: Ftp
EMV800 HD / EMV1200 HD Mobile DVR 7.3.6.6 FTP Set up the FTP server settings to enable the FTP function. The function is for users to upload the alarm / motion recordings or snapshots from sub stream to the FTP server. You can choose to upload either the recordings or snapshots, please see 7.3.2 Record and 7.3.3.3 Motion. -
Page 195: Alarm Server
EMV800 HD / EMV1200 HD Mobile DVR 7.3.6.7 Alarm Server You can send out the alarm notifications to EverFocus’s CMS software. Please also consult the CMS’s user manual for network alarm settings. Server IP1~3: IP address of client PC. The network alarm can be transmitted to up to 3 addresses. -
Page 196: Remote/Mobile
Select H.264 or MJPEG for remote or mobile viewing. Save: Click to save the settings. 7.3.6.9 Xfleet You can use EverFocus Xfleet system for fleet management. Xfleet is a Web-based fleet management system which integrates GPS positioning, 3G/4G mobile wireless communication and GIS (Geographic Information System) techniques, allowing users to easily track, monitor and manage any type of fleet vehicles on a Web browser anywhere and anytime. -
Page 197: Schedule
EMV800 HD / EMV1200 HD Mobile DVR 7.3.7 Schedule You can set up the recording schedule with the desired time, event types or FPS. 7.3.7.1 Express Setup You can set up a weekly recording schedule for the mobile DVR to automatically record videos. -
Page 198: Holiday
EMV800 HD / EMV1200 HD Mobile DVR 7.3.7.2 Holiday In addition to set up a weekly recording schedule, you can also set up a holiday recording schedule to automatically record videos on a specific day of the year. Date Type: Select Holiday or Others if you have configured the settings in 7.3.7.1 Express Setup. -
Page 199: Schedule
EMV800 HD / EMV1200 HD Mobile DVR 7.3.7.3 Schedule You can set up the camera recording mode by time of day on specific days of the week and/or holidays and other days. Please note that after the configuration, you have to check the Schedule Record box in the Record setting page to enable the schedule recording mode. - Page 200 TV standard in global setting, all the installed cameras, with an upper limit of 30 FPS (NTSC – 25 PAL) per individual camera (real time recording). Since EverFocus mobile DVRs have the capability to change the FPS rate in response to events, it may be advisable to reserve some recording capacity for event response.
- Page 201 EMV800 HD / EMV1200 HD Mobile DVR Event: Maximum desired frame rate in frames per second (FPS) for event recording; if more than one camera requires simultaneous event recording, the total for all cameras cannot exceed the maximum available FPS for the mobile DVR at the corresponding resolution setting, and the available FPS may be divided across the cameras responding to an event.
-
Page 202: System Setting
EMV800 HD / EMV1200 HD Mobile DVR 7.3.8 System Setting You can configure the general settings for the mobile DVR in this menu. 7.3.8.1 Date/Time You can set up the date and time for the mobile DVR. Note: Clicking Save at this page will disable the Daylight Saving function if this function has been enabled. - Page 203 EMV800 HD / EMV1200 HD Mobile DVR the NTP server in Taiwan. To find a compatible NTP address of the mobile DVR’s physical location, follow the steps below: a. Use a computer connected to the Network. b. Click Start > Run > type “command” and then click OK.
-
Page 204: Daylight Saving
EMV800 HD / EMV1200 HD Mobile DVR 7.3.8.2 Daylight Saving You can configure the settings for mobile DVR to automatically adjust to daylight saving time. Note: If this page is grayed out, it means that you have enabled the Auto daylight saving function, please refer to 7.3.8.1 Date/Time. -
Page 205: User Group
EMV800 HD / EMV1200 HD Mobile DVR 7.3.8.3 User Group This setting page is used for configuring the privilege of the three access levels: Administrator, Manager and Operator. Check the boxes under an access level to enable the privileges of that access level. - Page 206 EMV800 HD / EMV1200 HD Mobile DVR Account Viewing: • Administrator: The Administrator account has the privilege to view all the user accounts. Manager: The Manager account can only view its own and the Operator accounts. Operator: The Operator account can only view its own account.
-
Page 207: User Management
EMV800 HD / EMV1200 HD Mobile DVR 7.3.8.4 User Management You can create multiple user accounts (max: 20 user accounts) with different privileges. The mobile DVR has default user accounts which you can choose to copy, edit, add or delete, and the default password is 11111111. - Page 208 EMV800 HD / EMV1200 HD Mobile DVR You can further configure each user account and its settings individually, see the steps below: 1. Click on a user account. 2. Click the Add, Copy or Edit button, and the following page appears.
-
Page 209: I/O Control
Note: For details on the RS-232 related settings, please consult the Technical Support Department of EverFocus. RS-485 PTZ Protocol: Select PTZ protocol, choose from the following protocols: Transparent, Pelco_D, Pelco_P, Everfocus or Samsung. (Note: All cameras on the RS-485 bus must use the same protocol). - Page 210 EMV800 HD / EMV1200 HD Mobile DVR 485 ID: This is the ID used by the EKB500 to send commands to the mobile DVR. On an RS-485 connection, every device (PTZ, mobile DVR and controller) must be assigned an unique ID number between 0 and 127.
-
Page 211: Ekb200 Setting
EMV800 HD / EMV1200 HD Mobile DVR 7.3.8.6 EKB200 Setting You can connect an EKB200, which is EverFocus’ USB keyboard, to the USB port on the DVR to control the Iris, focus or the pre-configured PTZ control functions of the connected cameras. - Page 212 EMV800 HD / EMV1200 HD Mobile DVR 【Key No】 The control key number on the keyboard. 【Action】 Select an item from the drop-down list to define the function for each key on the keyboard. Set Preset: You can use the joystick on the keyboard to select a position and then press ...
-
Page 213: Miscellaneous
EMV800 HD / EMV1200 HD Mobile DVR 7.3.8.7 Miscellaneous You can upgrade the latest firmware, restore the factory default settings to the mobile DVR, upload / save the mobile DVR configuration settings from / to the USB or change the language in this setup menu. -
Page 214: Information
MAC 1 / MAC 2: Displays the MAC address of LAN 1 / LAN2. This option cannot be changed. mobile DVR Name: Displays the DDNS name if configured. Network ID: The ID number for EverFocus’ CMS as set up in the Alarm Server menu. 【Status】... -
Page 215: Log
EMV800 HD / EMV1200 HD Mobile DVR 7.3.9.2 Log You can choose, display or export log data using this menu. Start Date / End Date: Click to set up the start / end date. Start Time / End Time: Click to set up the start / end time. -
Page 216: Copy
EMV800 HD / EMV1200 HD Mobile DVR 7.3.10 Copy You can remotely archive the recordings to your computer. The archived recordings will be stored in .arv format. You can download EFPlayer through this menu to play back the recordings. On the Menu Bar, click the Copy icon , the following menu appears. - Page 217 EMV800 HD / EMV1200 HD Mobile DVR EFPlayer: Unzip the EFPlayer file and double-click to open it as below. The EFPlayer can only display up to 16 channels at one time. No. Name Function Description Shows the recording information of the device, including...
- Page 218 EMV800 HD / EMV1200 HD Mobile DVR : Click to pause play backing. Click to take a snapshot of the channels displayed on the UI. Snapshot You can save the snapshot file to a desired location. Mute Click to mute; click again to turn off the mute function.
-
Page 219: Search
EMV800 HD / EMV1200 HD Mobile DVR 7.3.11 Search You can search the recordings for playing back by using the Search menu. 7.3.11.1 Time Search Select the Start Date and Time and then click the Play button to start playing back. -
Page 220: Event Search
EMV800 HD / EMV1200 HD Mobile DVR 7.3.11.2 Event Search Select the Start/End Date/Time, select the desired cameras, select the desired event types and then click the Search button, the searched list appears. - Page 221 EMV800 HD / EMV1200 HD Mobile DVR To copy the selected event to your computer, select an event by clicking on the list and then click the Copy button. To play back an event, select an event by clicking on the list and then click the Play button, the Remote Playback Window appears.
-
Page 222: Ptz
You can use the PTZ Control Panel to control the connected PTZ cameras, to set Preset setting and to activate the configured PTZ settings. You can also connect to an EverFocus’ EKB200 keyboard to a computer to control the PTZ camera. - Page 223 EMV800 HD / EMV1200 HD Mobile DVR 8. Shortcut for Preset 1 ~ 9: a. Click digit 1 ~ 9 button without clicking any other buttons. b. The camera will seek that Preset Position. 9. To delete a Preset Position (if supported by the camera): a.
-
Page 224: Specifications
EMV800 HD / EMV1200 HD Mobile DVR Chapter 8. Specifications Model Name EMV1200 HD EMV800 HD 8 CH Number of Channels 12 CH Video Input Video Compression H.264 Audio Inputs Audio Outputs 1 (RCA) Main Monitor BNC x 1 / RCA x 1 / VGA x 1... - Page 225 Note: * For camera recording, EMV1200 HD supports recording up to 6 1080p cameras; EMV800 HD supports recording up to 4 1080p cameras. For 1080p camera connection, please refer to 2.5.2.1 Camera Connection in the User’s Manual.
-
Page 226: Troubleshooting
EMV800 HD / EMV1200 HD Mobile DVR Chapter 9. Troubleshooting If you have problems with the system, run through the following checklist to see if you can solve the problem. The mobile DVR will not go into record mode. ... -
Page 227: Appendix A: Network Overview
EMV800 HD / EMV1200 HD Mobile DVR Appendix Appendix A: Network Overview This chapter will give you a basic instruction on how to set up the mobile DVR for network connection. It is highly recommended that you have a working knowledge of what a network is and how it works. -
Page 228: Gateway Address
EMV800 HD / EMV1200 HD Mobile DVR Gateway Address Addressees are either local or remote. A gateway address is composed of four octets separated by decimal points. The gateway address is used to uniquely identify the device on the LAN that has access to the communications links connecting to other LANs, WANs and/or the Internet (access to the ‘remote’... - Page 229 This makes it much simpler to host a website, email server, or other type of server connection. Everfocus suggests using a static IP address. If this is not available, you will need to use a dynamic IP address. This is explained below.
- Page 230 EMV800 HD / EMV1200 HD Mobile DVR Pre-Installation EverFocus’ mobile DVR can operate using one of three types of networking connections. Simple One to One Connection: A simple one to one connection is the simplest type of network connection. It uses a cross-over cable to make a direct connection from one computer to another (or in this case a computer to a mobile DVR).
-
Page 231: Appendix B: Linksys & D-Link Port Forwarding
EMV800 HD / EMV1200 HD Mobile DVR Appendix Appendix B: Linksys & D-Link Port Forwarding Typical Linksys Port Forwarding This section will cover a few simple configurations for the Linksys router. This chapter is only to offer some help to the installer and end user. Please understand we DO NOT support this product and will not give tech support on it. - Page 232 EMV800 HD / EMV1200 HD Mobile DVR Click on the “Applications & Gaming” tab. Applications and Gaming allows you to set up public services on your network, such as web servers, ftp servers, e-mail servers, or other specialized Internet applications. (Some Internet applications may not require any forwarding) To forward a port, enter the information on each line for the criteria required.
- Page 233 EMV800 HD / EMV1200 HD Mobile DVR Typical D-Link Port Forwarding This section will cover a few simple configurations for the D-Link router. This chapter is only to offer some help to the installer and end user. Please understand we DO NOT support this product and will not give tech support on it.
- Page 234 EMV800 HD / EMV1200 HD Mobile DVR Click Virtual Servers on the left to bring up the following screen. Virtual Servers allows users who are connecting remotely to access services on the router’s Local Network. The functions of each field are described below.
-
Page 235: Appendix C: Timing Of Alarm Modes
EMV800 HD / EMV1200 HD Mobile DVR Appendix Appendix C: Timing of Alarm Modes Transparent Mode Input Event Alarm Duration Event = Reaction Duration of alarm input source (contact, system events...) Event : Resulting duration for this alarm mode, related to event record, alarm outputs, OSD... - Page 236 EMV800 HD / EMV1200 HD Mobile DVR Timeout Mode Input Event Alarm Duration Event Duration = Reaction Duration of alarm input source (contact, system events...) Event : Alarm duration for timeout, defined in the event setup menus Duration : Resulting duration for this alarm mode, related to event record, alarm outputs, OSD...
- Page 237 EMV800 HD / EMV1200 HD Mobile DVR Timeout Mode: Retrigger of Alarms Duration of alarm input source (contact, system events...) Event : Alarm duration for timeout, defined in the event setup menus Duration : Resulting duration for this alarm mode, related to event record, alarm outputs, OSD...
-
Page 238: Appendix D: Express Setup Recording Value Selection Rules
EMV800 HD / EMV1200 HD Mobile DVR Appendix Appendix D: Express Setup Recording Value Selection Rules Case 1: Record Mode: Normal + Event Record With: Recording days The mobile DVR will Auto adjust image Quality and Event frame rate to match the number of... - Page 239 EMV800 HD / EMV1200 HD Mobile DVR Case 3: Record Mode: Normal + Event or Event Only Record With: Preset Setting Mobile DVR will apply the settings in the table below to all cameras according to the Preset Settings. Preset Setting Option...
-
Page 240: Appendix E: Ir Remote Control
EMV800 HD / EMV1200 HD Mobile DVR Appendix Appendix E: IR Remote Control The IR remote control is an accessory to enhance the convenient operation of the mobile DVR. You can perform all the settings and operations from the remote control. The effective distance is up to 33 feet line of sight. -
Page 241: Appendix F: Rtsp Url Syntax
Appendix Appendix F: RTSP URL Syntax EverFocus provides 2 / 4 / 8 / 12 / 16 / 32 channels DVR, NVR or Mobile DVRs. The RTSP URL Syntax of EverFocus’ DVR, NVR and Mobile DVR are listed as below:... - Page 242 EMV800 HD / EMV1200 HD Mobile DVR 8CH DVR / NVR / MDVR: rtsp://[device-ip-address]/3GPP/[channel-number 0~7] * [device-ip-address] is the IP address of the DVR/NVR/MDVR Main Stream * [channel-number 0~7] is the channel number of the DVR/NVR/MDVR. 0 for channel 1, 1 for channel 2, and so on.
- Page 243 EMV800 HD / EMV1200 HD Mobile DVR 32CH DVR / NVR: rtsp://[device-ip-address]/3GPP/[channel-number 0~31] * [device-ip-address] is the IP address of the DVR/NVR Main Stream * [channel-number 0~31] is the channel number of the DVR/NVR. 0 for channel 1, 1 for channel 2, and so on.
-
Page 244: Appendix G: Tested Card Brands
Appendix G: Tested Card Brands The mobile DVRs support SD / SDHC card up to 32 GB. The following brands of the SD cards have been tested by EverFocus and are recommended to work with EverFocus mobile DVRs. Brand SanDisk... -
Page 245: Appendix H: Recording Backup Through Ef Reader
Appendix H: Recording Backup through EF Reader EverFocus EF Reader is an enhanced HDD reader enabling users to access HDDs / SD cards locally or remotely and further play back the recordings. Users granted with privileges are allowed to log in the EF reader and operate the specific functions. -
Page 246: Appendix I: Auto Hdd Retry Mechanism
EMV800 HD / EMV1200 HD Mobile DVR Appendix Appendix I: Auto HDD Retry Mechanism The eZ.HD DVR/MDVR features Auto HDD Retry mechanism, which is designed to automatically reboot to detect the installed HDDs when encounter HDD fail error. Note: The Auto HDD Retry mechanism will only activate when all of the HDDs installed in the DVR/MDVR are failed simultaneously. - Page 247 FAX: +81 3 5625 8189 sales@everfocus.com www.everfocus.co.jp info@everfocus.co.jp Ihr EverFocus Produkt wurde entwickelt Your EverFocus product is designed and und hergestellt mit qualitativ manufactured with high quality materials hochwertigen Materialien und and components which can be recycled Komponenten, die recycelt und wieder and reused.