Table of Contents
Advertisement
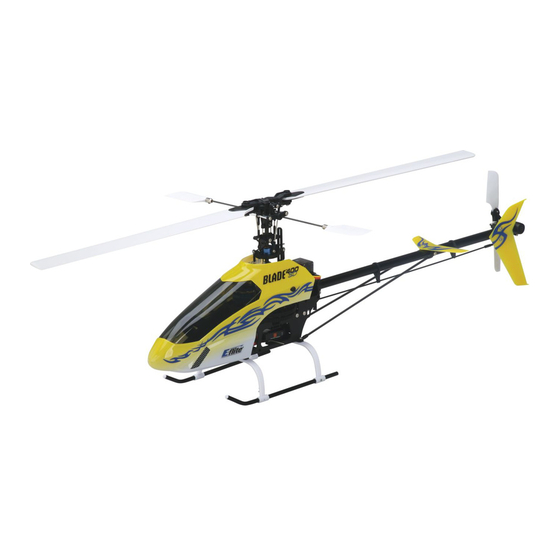
Specifications
Main Rotor Diameter ........................................................................................... 28.2 in (718mm)
Tail Rotor Diameter ................................................................................................ 5.3 in (135mm)
Height ................................................................................................................. 9.0 in (230mm)
Length ................................................................................................................ 25.6 in (650mm)
Weight without Battery ......................................................................... 18.0–18.5 oz (510–525 g)
Weight with Battery .............................................................................. 23.0–24.5 oz (650–695 g)
Motor ....................................................................... 420H brushless outrunner, 3800Kv (installed)
ESC ................................................................................................... 25-amp brushless (installed)
Battery ........................................................................ 3S 11.1V 1800–2200mAh Li-Po (required)
Charger ............................................................................... 3S 11.1V Li-Po Compatible (required)
Transmitter..................... 6+ channel with helicopter and 120-degree CCPM programming (required)
Receiver ............................................................................................. 6+ channel micro (required)
Servos .................................................................................. DS75H Digital Sub-Micro (4 installed)
Gyro ..................................................................................... G110 Micro Heading Lock (installed)
Advertisement
Table of Contents

Related Manuals for E-FLITE Blade 400 3D


Summary of Contents for E-FLITE Blade 400 3D
-
Page 1: Specifications
Specifications Main Rotor Diameter ................... 28.2 in (718mm) Tail Rotor Diameter ....................5.3 in (135mm) Height ......................... 9.0 in (230mm) Length ........................ 25.6 in (650mm) Weight without Battery ................. 18.0–18.5 oz (510–525 g) Weight with Battery ................23.0–24.5 oz (650–695 g) Motor ............... -
Page 2: Table Of Contents
Warranty Period ........................5 And although the Blade 400 3D PNP is almost-ready-to-fly right from the box, please take the time to Limited Warranty ........................5 read through this manual for tips on receiver installation, transmitter programming, adjustments and Damage Limits ......................... -
Page 3: Needed To Complete
Needed to Complete Warning The following items are required to complete your Blade 400 3D PNP: An RC helicopter is not a toy! If misused, it can cause serious bodily harm and damage to property. Fly only in open areas, preferably at AMA (Academy of Model Aeronautics) approved flying sites, •... -
Page 4: Safety Precautions
Law: These Terms are governed by Illinois law (without regard to conflict of law principals). United States: Electronics and engines requiring inspection or repair should be shipped to the following address: Safety Precautions Horizon Service Center This is a sophisticated hobby Product and not a toy. It must be operated with caution and common 4105 Fieldstone Road sense and requires some basic mechanical ability. -
Page 5: Additional Safety Precautions And Warnings
For JR and Spektrum Transmitters/Receivers ® ™ Additional Safety Precautions and Warnings Channel 1 (THRO) Electronic Speed Control (ESC) ‘throttle’ lead As the user of this product, you are solely responsible for operating it in a manner that does not endanger yourself and others or result in damage to the product or the property of others. -
Page 6: Transmitter Setup
Transmitter Setup o After connecting the wire leads to the receiver, remove the remaining paper backing from the A 6-channel or greater transmitter with helicopter and 120-degree CCPM programming is required. We recommend the use of a DSM equipped 2.4GHz transmitter such as the Spektrum DX6i, DX7 or JR two-sided tape on the receiver. - Page 7 Swashplate Mixing (SWASH MIX) Swashplate Mixing (SWASH MIX) AILE - 75% AILE + 65% ELEV - 75% ELEV + 65% PITC + 85% PIT. + 80% In the “Setup” list (SETUP LIST): throttle hold (THRO HOLD) Servo Reversing (REVERSE) HOLD Pos. AILE –...
-
Page 8: Installing The Flight Battery
Installing the Flight Battery AILE POS–1 + 15% + 15% Use the included hook and loop material for mounting the Li-Po battery. We suggest installing the ELEV POS–1 + 15% “loop” (fuzzy) material on the battery and the “hook” material on the battery support located at the + 15% front of the main frame. -
Page 9: Control Test
Control Test Then, plug the battery into the battery lead of the ESC. After programming your transmitter and installing the flight battery, it will be necessary to test the controls prior to servo arm and linkage adjustment, to ensure none of the servos, linkages or other parts were damaged during shipping and handling. -
Page 10: Servo Arm And Linkage Check And Adjustment
However, if you continue to encounter any problems relating to your Blade 400 3D responding properly to the transmitter, do not fly. Call With the stick pushed right, the swashplate will tilt to the right. - Page 11 If either servo arm is not level/horizontal, try to reposition the servo arm on the output shaft/gear of Swashplate the servo to find a position that is closer to level/horizontal. If it’s not possible to find a position for the After confirming that the servo arms for the CCPM servos are in their best possible neutral positions, servo arm that is exactly level/horizontal, or within at least a few degrees in either direction, use the it will be necessary to confirm that the swashplate is level and in the proper position to provide equal...
-
Page 12: Electronic Speed Control (Esc) Features, Arming And Motor Control Test
(measured from the outside/end of each plastic link) for each of the Blade 400 3D’s linkages. However, as previously noted, some of these lengths may need to be adjusted to achieve proper swashplate and rotor blade positioning. - Page 13 The following checklist includes the steps you must follow to ensure proper arming and operation of the battery used for the Blade 400 3D, you will not want the voltage of the battery to fall below 9V ESC (as well as proper operating direction of the motor and rotor blades): during flight.
-
Page 14: Gyro Initialization, Response Test And Adjustment
Confirm that the travel adjustment value for the throttle channel is set to 100% in the low position. Your Blade 400 3D model is equipped with an E-flite G110 Micro Heading Lock Gyro. This gyro offers an excellent blend of size, weight, features and performance. - Page 15 275Hz or higher. And although the DS75H rudder/tail servo installed on your Blade 400 3D model is a digital servo, it is not designed to accept a pulse • The G110 offers a Dual Mode and Remote Gain Adjustment feature. This, along with your rate of 275Hz.
-
Page 16: Understanding The Primary Flight Controls
This is accomplished by changing the pitch of the tail rotor blades. If you are not familiar with the primary flight controls of your Blade 400 3D, please take a few minutes to familiarize yourself with them before proceeding and before attempting your first flight. -
Page 17: Normal And Stunt Flight Modes
Normal and Stunt Flight Modes The elevator trim can be used to help keep the helicopter from drifting forward or backward when in hover with no elevator stick input. For example, if the helicopter drifts forward when in hover, click the Your chosen transmitter should feature a Flight Mode switch. -
Page 18: Throttle Hold
You should always be in the normal flight mode and have the throttle/collective stick set to the lowest possible position BEFORE switching throttle hold off. Before the First Flight Although each Blade 400 3D model is tested at the factory, you should check the following before TH HOLD Switch making your first flight: q Check the security of all screws and control/linkage balls on your model. -
Page 19: Choosing A Flying Area
The belt tension is set properly if the compressed side of the belt While it is possible for the Blade 400 3D to be flown indoors, we suggest that it only be in a very large reaches approximately ½... -
Page 20: Main Rotor Blade Tracking Adjustment
Ball Link ends in by one-half to one full turn at a time. Or, you can decrease the • It is extremely important when hovering and flying the Blade 400 3D to be aware of the power level pitch of the high blade by lengthening the same linkage. -
Page 21: Flybar Paddle Tracking Adjustment
Head Dampening Shims and Tuning Cyclic Response The rotor head (main rotor blade) dampening of your Blade 400 3D model can be adjusted in order to tune the cyclic response and stability of your model. In general, stiffer dampening will result in quicker Flybar Paddle Tracking Adjustment cyclic response with a slight reduction in stability (when compared to softer/less-stiff dampening). -
Page 22: 2008 Official Ama National Model Aircraft Safety Code
2008 official ama national model aircraft safety code GENERAL Routine maintenance is necessary to keep your Blade 400 3D in optimal and safe flying condition. 1. A model aircraft shall be defined as a non-human-carrying device capable of sustained flight in the atmosphere. It shall not exceed Some of the most important things to check routinely include: limitations established in this code and is intended to be used exclusively for recreational or competition activity. -
Page 23: Exploded View Parts Listing
133..Vertical Stabilizer/Fin (1) ........EFLH1472Y Please see your favorite retailer or visit our web site ( ) to find the latest in new www.E-fliteRC.com 067..Canopy Mount Rod (1) ........EFLH1479 134..Screw M2×14mm (2) ........EFLH1473 replacement and optional parts releases for your Blade 400 3D. -
Page 24: Replacement Parts List
) to find the latest in new Please see your favorite retailer or visit our web site ( www.E-fliteRC.com ) to find the latest in new replacement and option parts releases for your Blade 400 3D. replacement and option parts releases for your Blade 400 3D. - Page 25 © 2008 Horizon Hobby, Inc. 4105 Fieldstone Road Champaign, Illinois 61822 (877) 504-0233 www.E-fliteRC.com Futaba is a registered trademark of Futaba Denshi Kogyo Kabushiki Kaisha Corporation of Japan. Spektrum is used with permission of Bachmann Industries Inc., Spektrum radios and accessories are exclusively available from Horizon Hobby, Inc. DSM and DSM2 are trademarks or registered trademarks of Horizon Hobby.