Sign In
Upload
Manuals
Brands
Image Access Manuals
Scanner
Bookeye 4
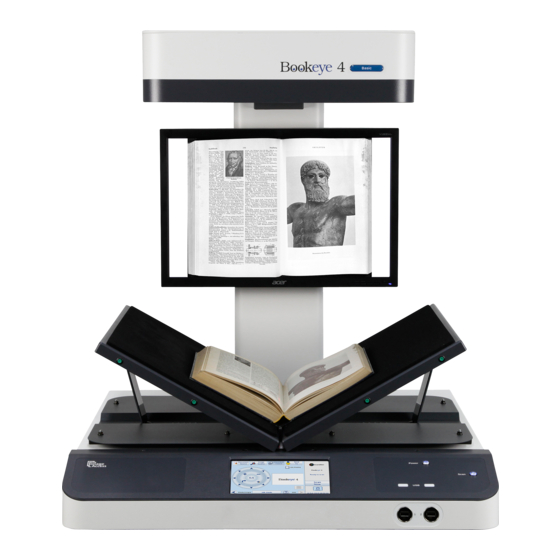
Image Access Bookeye 4 Book Scanner Manuals
Manuals and User Guides for Image Access Bookeye 4 Book Scanner. We have
4
Image Access Bookeye 4 Book Scanner manuals available for free PDF download: Setup Manual, Operation Manual, Installation Manual
Image Access Bookeye 4 Operation Manual (122 pages)
Brand:
Image Access
| Category:
Scanner
| Size: 11 MB
Table of Contents
Table of Content, Part
2
Table of Content, Part
3
Table of Content, Part
4
Introduction
4
Starting the Bookeye
4
Mise en Marche du Bookeye
4
Table of Content, Part
5
About this Manual
5
Version History
6
Table of Contents
7
A Hardware
16
Safety Notes
16
Marking of Safety Notes
16
Laser Safety Note
16
F-A.1 Notes de Sécurité
17
Marquage des Notes de Sécurité
17
Marquage des Notes de Sécurité du Laser
17
Safety Precautions
18
A.2 Safety Precautions
18
F-A.2 Précautions de Sécurité
19
Certification
20
A.3 Certification
20
Device Location
21
Environment
21
Picture 1: Minimum Distance between Bookeye and Walls
21
A.4 Device Location
21
A.4.2 Ambient Light
22
Ambient Light
22
A.5 Content on Delivery
23
Content on Delivery
23
Maintenance
23
Touchscreen
23
Surfaces
23
Book Cradles
23
Repair
23
Device Overview
24
Picture 2: Elements of the Bookeye 4-V1A
24
A.8 Device Overview
24
Connectors on the Rear Side
25
Picture 3: Connectors on the Rear Side
25
F-A.3 Aperçu du Dispositif
26
F-A.3.1 Connecteurs Sur Le Côté Arrière
27
Connecting the Power Source
28
F-A.4 Raccordement À L'alimentation Électrique
29
Switching the Bookeye ® 4 to Standby Mode
30
Picture 4: Keyboard with Power Button
30
Commutation du Bookeye 4 Sur Le Mode de Veille
31
Book Cradles
32
Picture 5: Book Cradles in Flat Mode and Closed
32
Picture 6: Book Cradles in V Mode and Closed
32
Glass Plate Functionality
33
In General
33
Glass Plate Positions
33
A.11.2.1 Transport Lock Position
33
Picture 7: Loosen the Transport Locks
33
Picture 8: Transport Locks Opened
33
A.11.2.2 Fully up Position
34
Picture 9: Transport Locks and Rubber Bumpers
34
A.11.2.3 the 45 Degree Angled Position
35
Picture 10: Glass Plate Opened in 45 Degree Position
35
Operating the Motorized Book Cradle
36
The Cradle Lock Button
36
The Cradle up / Cradle down Buttons
36
Glass Plate Operating Modes
37
Setting the Operation Modes
37
Picture 11: Setting the Book Cradle Mode
37
Picture 12: Manual Operation
37
Picture 13: Automatic Operation
37
Manual Mode
38
Automatic Mode
38
A.13.3.1 Manual Adjustment of the Height of the Book Cradle Plates
38
Picture 14: Pushing One Side Lifts Other Side Simultaneously
38
A.13.2 Manual Mode
38
Working with the Book Cradle Plates
39
Picture 15: Book Cradle Plates Opened
39
Picture 16: Book Prepositioned at Book Cradle
39
A.13.4 Working with the Book Cradle Plates
39
Picture 17: Lowering the Book Cradle
40
Picture 18: Glass Plate Closed
41
A.14 the "Finger Removal" Function
42
Position of Document
42
Picture 19: Book at Book Cradle in Flat Position
42
Picture 20: Book at Book Cradle Opened in "V" Position
42
Finger Positions
43
Picture 21: Correct Finger Position
43
Picture 22: Minimum Vertical Distance
43
A.14.2 Finger Positions
43
A.14.3.1 Distance too Small
44
A.14.3.2 Finger Position too Steep
44
Wrong Finger Positions
44
A.14.3.3 Fingers Hold too Close to the Margin of the Document
45
A.14.4.1 Book Positioned at the Book Cradle
46
A.14.4.2 Single Finger Holds the Book
46
Examples of Finger Removal
46
A.14.4.3 Multiple Fingers Hold the Book
49
A.14.4.4 Small Books with Pattern at Margin
51
Splitting" Function with Two Separate Documents
52
The "Splitting" Function
52
Picture 23: Single Pages on Book Cradle Plates
52
Splitting" Function with a Single Document
53
Picture 24: Single Document on Book Cradle Plate
53
A.15.2 "Splitting" Function with a Single Document
53
Splitting" Function with Single Document at Middle of the Book Cradle Plates
54
Picture 25: Document Position on Book Cradle Plates
54
Picture 26: Splitting Result with Format = Crop and Deskew
54
A.15.3 "Splitting" Function with Single Document at Middle of the Book Cradle Plates
54
Picture 27: Splitting Result with Format = Auto
55
Splitting" Function with a Book
56
Picture 28: Book Cradle Plates Set to "V" Position
56
Picture 29: Large Book at Book Cradle in "V" Position
56
A.15.4 "Splitting" Function with a Book
56
Document Positions Which Can Result in Malfunction
57
Single Pages
57
A.15.5.2 Books
57
Picture 30: Wrong Position of Book Cradle and
57
Picture 31: Book in Bad Position for Splitting
57
A.15.5 Document Positions Which Can Result in Malfunction
57
B Touchscreen Operation
58
Select Application Screen
58
Picture 32: Start Screen after Start-Up
58
Start Screen of the Kiosk User Interface
59
Picture 33: Viewer & Job Control Screen
59
B.2 Start Screen of the Kiosk User Interface
59
Control Fields of the Touchscreen
60
Touchscreen - Document Source
61
Picture 34: Document Source Screen
61
B.3 Touchscreen – Document Source
61
Auto Mode
62
Document Mode
62
Picture 35: List of Document Modes
62
B.3.1 Document Mode
62
Document Position / Minimum Document Size
63
Table of Pictures, Part 2
63
Picture 36: Document Placed Correctly
63
Picture 37: Document Placed Incorrectly
63
B.3.1.1.1 Document Position / Minimum Document Size
63
Book Mode
64
Flat Mode
64
Folder Mode
64
V-Mode
64
Resolution
65
Picture 38: List of Resolutions
65
B.3.2 Resolution
65
Format
66
Picture 39: Selector for Format Settings
66
B.3.3 Format
66
Maximum
67
Picture 40: Parameters for Maximum Format
67
B.3.3.1 Maximum
67
Auto
68
Picture 41: Book Mode Formats
68
B.3.3.2 Auto
68
Finger Removal Mode
69
Crop and Deskew
70
Picture 42: Crop and Deskew Screen
70
Din
71
Picture 43: Format DIN (=ISO) Selected
71
B.3.3.4 Din
71
Ansi
72
Picture 44: List of ANSI Formats
72
B.3.3.5 Ansi
72
Splitting Image
73
Picture 45: Splitting Image
73
Picture 46: Selecting the „Splitting Start Page
73
B.3.4 Splitting Image
73
Scan Mode
74
Picture 47: Available Scan Modes
74
B.3.5 Scan Mode
74
Exposure
75
Picture 48: Exposure Modes
75
Picture 49: Numeric Key Pad to Set Threshold Value
75
B.3.6 Exposure
75
Auto Density [Binary]
76
Picture 50: Auto Density Slider
76
B.3.7 Auto Density [Binary]
76
Touchscreen - Image Quality
77
Picture 51: Image Quality 1
77
Picture 52: Image Quality 2
77
B.4 Touchscreen – Image Quality
77
Color Mode
78
File Format
78
Jpeg
78
Picture 53: List of Color Modes
78
Picture 54: Submenu File Format "Jpeg
78
B.4.1 Color Mode
78
Pdf
79
Pnm
79
Tiff
79
Picture 55: Submenu File Format TIFF
79
B.4.2.2 Tiff
79
Brightness
80
Contrast
80
Gamma
80
Image Sharpness
80
Picture 56: Brightness Slider
80
Picture 57: Contrast Slider
80
Picture 58: Gamma Slider
80
Picture 59: Image Sharpness
80
B.4.3 Brightness
80
Despeckle
81
Image Rotation
81
Invert
81
Mirror
81
Picture 60: Image Rotation
81
Picture 61: Mirror
81
Picture 62: Invert
81
Picture 63: Despeckle
81
B.4.7 Image Rotation
81
Touchscreen - Viewer & Job Control
82
Picture 64: Viewer & Job Control Screen
82
Picture 65: Scanned Image in Preview Area
82
B.5 Touchscreen – Viewer & Job Control
82
Zonal OCR
84
Picture 66: OCR Button Activated
84
Picture 67: OCR Touchscreen
84
B.5.1 Zonal OCR
84
Picture 68: Rectangle Defines the Area for OCR Function
85
Picture 69: Pre-Selection Area Selected
85
Table of Pictures, Part 3
86
Picture 70: Selected Area Magnified
86
Picture 71: OCR Result
86
Job Mode
87
Picture 72: Bottom Line with Status
87
Picture 73: TFT Flat Screen after Selecting "Job Mode
87
B.5.2 Job Mode
87
Picture 74: Disclaimer When Staring the Job Mode
88
Picture 75: Job Mode Start Screen
88
Navigating through the List of Images
89
Picture 76: Controller Circles Blanked out
89
B.5.2.1 Navigating through the List of Images
89
Adding an Image at an any Position to the List
90
Deleting an Image from the List
90
Moving an Image to Another Position
90
Rescan an Image
90
Finalizing the Job Mode
91
Job Mode Time out
91
Picture 77: Destination to Finalize Job Mode
91
Picture 78: Information When Time out Ends
91
B.5.2.6 Finalizing the Job Mode
91
Touchscreen - Send to
92
Picture 79: "Send To" Screen #1
92
Picture 80: "Send To" Screen #2
92
B.6 Touchscreen – Send to
92
Changing a File Name or Other Entries
93
Picture 81: Alphanumeric Keyboard
93
B.6.1 Changing a File Name or Other Entries
93
List of Suitable USB Storage Media
94
USB Options
94
Picture 82: Directory of Connected USB Data Carrier
94
B.6.2 USB Options
94
Copy Options
95
Printer Settings
95
Picture 83: Parameters of Copy Options
95
Picture 84: Printer Settings Window
95
B.6.3 Copy Options
95
FTP Options
96
Picture 85: Parameters of FTP Options
96
B.6.4 FTP Options
96
Network Options
97
Picture 86: Parameters of Network Options
97
B.6.5 Network Options
97
Mail Options
98
Picture 87: Parameters of Mail Options
98
B.6.6 Mail Options
98
Transaction Modes
99
Picture 88: Interactive Mode, Mail Options
99
B.6.6.1 Transaction Modes
99
C the Scanwizard User Interface
100
Picture 89: Scan2Net® Main Menu
100
The Scanwizard User Interface
101
Picture 90: Scanwizard Interface
101
Picture 91: Scanwizard Interface Layout
101
C.1 the Scanwizard User Interface
101
Picture 92: Online Help
102
Picture 93: "Exit" Returns to Scan2Net® Main Menu
102
Information
103
Picture 94: Information
103
C.2 Information
103
D the Setup Level
104
Picture 95: Login Screen
104
Access Level User
105
Picture 96: User Screen
105
D.1 Access Level User
105
Device Info
106
Picture 97: Device Info Screen
106
D.1.1 Device Info
106
Picture 98: Firmware Information
107
Operation Info
108
Picture 99: Operation Info Screen
108
D.1.2 Operation Info
108
User Settings
109
Picture 100: User Settings Start Screen
109
D.1.3 User Settings
109
Language Selector
110
Picture 101: Language Selector Screen
110
D.1.3.1 Language Selector
110
Power Saving
111
Picture 102: Power Saving
111
D.1.3.2 Power Saving
111
Volume
112
Picture 103: Volume Level
112
D.1.3.3 Volume
112
Foot Pedal
113
Picture 104: Foot Pedal Settings
113
D.1.3.4 Foot Pedal
113
Glass Plate
114
Picture 105: Setting for Automatic Mode
114
D.1.3.5 Glass Plate
114
Splitting Start Page
115
Picture 106: Splitting Start Page
115
D.1.3.6 Splitting Start
115
E Technical Data
116
Scanner Specifications
116
Electrical Specifications
117
Dimensions and Weight
118
Ambient Conditions
118
CE Declaration of Conformity
119
FCC Declaration of Conformity
121
Advertisement
Image Access Bookeye 4 Setup Manual (149 pages)
Brand:
Image Access
| Category:
Scanner
| Size: 11 MB
Table of Contents
Table of Content, Part
2
Table of Content, Part
3
Table of Content, Part
4
Introduction
4
Starting the Bookeye
4
About the Manual
5
Version History
6
Table of Contents
7
About the Manual
7
Version History
7
Setup Manual Page
11
Setup Manual Page
13
Setup Manual Page
15
A Safety Notes
16
Safety Notes
16
Marking of Safety Notes
16
Laser Safety Note
16
F-A.1 Notes de Sécurité
17
Marquage des Notes de Sécurité
17
Marquage des Notes de Sécurité du Laser
17
Safety Precautions
18
A.2 Safety Precautions
18
F-A.2 Précautions de Sécurité
19
In General
20
Certification
20
A.3 in General
20
B Hardware
21
Content on Delivery
21
Unpacking the Scanner from the Transport Box
22
Picture 3: Scanner Outside the Transport Box
23
Device Overview
24
B.2 Device Overview
24
Connectors on the Rear Side
25
F-B.1 Aperçu du Dispositif
26
Connecteurs Sur Le Côté Arrière
27
Connecting the Power Source
28
Switching the Bookeye 4 to Standby Mode
29
B.3.1 Starting the Bookeye 4
29
F-B.2 Raccordement À L'alimentation Électrique
30
Mise en Marche du Bookeye
31
Commutation du Bookeye 4 Sur Le Mode de Veille
31
F-B.2.1 Mise en Marche du Bookeye 4
31
C Setup and Adjustments
32
White Balance
33
Focus and Scan Area
34
Auto Focus Scan Start DPI Adjust Gear Correction
34
Laser Check
35
Setup Manual Page
35
Test Suite
36
IP Address
37
User Settings
38
Change GUI
40
Configure GUI Selection
40
Time and Date
41
User Preset
42
D the Poweruser Level
43
Setup Menu
44
Selecting the Login Level
44
Picture 22: Poweruser Log-In Menu
45
Main Menu
46
Navigating through the Menus
47
Device Information
48
Device Info
48
Operation Info
48
Base Settings
49
User Settings
49
Language Selection
49
File Name
50
Power Saving
51
Volume
52
Foot Pedal
53
Glass Plate
54
Display
55
Splitting Start Page
56
Secure File Erasing
57
Document Cache
57
Kiosk App
58
Watermarks
59
Show Warnings
59
Network Configuration
60
IP Configuration Method
60
Ipv4 (Network Interface 0)
61
Ipv4 (Network Interface 1)
62
Domain Name Server
64
SMB Settings
65
Wireless LAN (Basic Settings)
66
Wireless LAN (LAN Interface)
67
Wireless LAN (Security)
68
Wireless LAN (DHCP)
69
Adjust Time & Date
70
Time Format
71
Time Zone
72
Manual Adjustment
72
NTP Server
73
Sound System
74
Set Volume
74
Sound Files
75
Link Events
76
Installed Options
77
Templates
78
Exclusion of Wildcard Characters for Jobmode Scanning
79
Remote Printer
80
Picture 61: Remote Printer Parameters
81
FTP Server
85
Mail Server
87
Picture 65: Mail Server Parameters
88
SMB Configuration
90
Web Service Configuration
92
Picture 69: Web Service Parameters
93
USB Device Configuration
96
Metadata
98
Picture 73: Metadata Parameters
99
PDF Document
100
Picture 75: PDF Document Parameters
101
LDAP Directory Service
102
Picture 77: LDAP Directory Parameters
103
Updates & Uploads
104
Update Scanner Firmware
104
ICC Profiles
106
Scanner Profile
106
Picture 80: ICC Profile Installed
107
Monitor Profiles
108
Picture 83: ICC Profile Information
109
Printer Profiles
110
Touchscreen / Desktop
112
Touchscreen
112
Desktop
113
Java Apps
114
PDF Cover Sheet
115
Watermarks
116
Adjustments & Support
117
Adjustments
117
Auto Focus
118
Focus Line
119
Scan Start
120
DPI Measurement
121
Setup Manual Page
121
Center Measurement
122
Lamp Test
122
Laser Check
123
Picture 106: Laser Check, Optional Measurement
124
White Balance
125
Delete White Balance Data
126
Brightness Correction
126
Lamp Position
127
Gear Correction
128
Log Files
129
Show Log Files
129
Stitching Log Enabled
130
Scan Test Targets
131
Picture 120: Request after Scanning the Test Target
132
Hardware Test Suite
133
Network Analyzer
133
Picture 123: Network Analyzing Parameters
134
Picture 124: Measured Time
135
Administrative Settings
136
Wake up Remote Host
136
Status Notification
137
Change Password
138
Backup Settings
139
Restore Settings
140
Lock Web App
141
Unlock Web App
141
Edit Disclaimer Text
141
Resets & Default Values
142
Set Scanner Defaults
142
Reset Factory Defaults
142
Reset Scanner Defaults
142
Reset Surface
142
Reset Hardware Defaults
142
Set Default Passwords
142
E.1 Scanner Specifications
143
E.2 Electrical Specifications
145
E.3 Dimensions and Weight
147
E.4 Ambient Conditions
148
Image Access Bookeye 4 Operation Manual (53 pages)
V1A Professional series
Brand:
Image Access
| Category:
Scanner
| Size: 3 MB
Table of Contents
Introduction
4
About this Manual
5
Version History
6
Table of Contents
7
About this Manual
7
Version History
7
Software Operation
7
Technical Data
8
A Safety Notes and Device Location
11
Safety Notes
11
Marking of Safety Notes
11
Laser Safety Note
11
Safety Precautions
12
A.2 Safety Precautions
12
Maintenance
13
Touchscreen
13
Surfaces
13
Book Cradles
13
Repair
13
Content on Delivery
13
A.4 Maintenance
13
B Hardware
14
Device Overview
14
Front Side Elements
14
Picture 1: Elements of the Bookeye 4-V1A C35
14
Connectors on the Rear Side
15
Picture 2: Connectors on the Rear Side
15
Connecting the Power Source
16
4-V1A C35
17
Picture 3 Control Panel
17
B.2.1 Starting the Bookeye ® 4-V1A C35
17
Picture 4 USB Connectors and Standby Button
18
Switching to Standby Mode
19
C Hardware Operation
20
Book Cradles
20
Picture 5: Book Cradle in Flat Position; Glass Plate Closed
20
Picture 6: Book Cradles in V Position, Glass Plate Open
21
Upper Touchscreen
22
Picture 7: Viewer & Job Control Screen
22
C.2 Upper Touchscreen
22
Lower Simatic Touchscreen
23
Picture 8: Start Menu Touchscreen
23
Activating the Parameter Menu
24
Picture 9: Content of Parameter Menu
24
Touchscreen Parameter Table
25
D Software Operation
27
Lower Touchscreen Scan Modes
27
White Balance Adjustment
28
Picture 10: White Calibration Step 1
28
Picture 11: White Calibration Step 2
28
Picture 12: Symbol to Activate the Setup Menu
29
Picture 13: Login Window
29
Picture 14: Setup Menu, White Calibration
30
Picture 15: White Balance Without Glass Plate
30
The "Finger Removal" Function
31
Position of Document
31
Picture 16: Book at Book Cradle in Flat Position
31
Picture 17: Book at Book Cradle Opened in "V" Position
31
D.3.1 Position of Document
31
Finger Positions
32
Picture 18: Correct Finger Position
32
Picture 19: Minimum Vertical Distance
32
D.3.2 Finger Positions
32
D.3.3 Wrong Finger Positions
33
D.3.4 Examples of Finger Removal
35
D.3.4.3 Multiple Fingers Hold the Book
38
D.3.4.4 Small Books with Pattern at Margin
40
Picture 20: Login Screen
41
E the Setup Level
41
Picture 21: User Screen
42
E.1 Access Level User
42
Picture 22: Device Info Screen
43
Picture 23: Firmware Information
43
E.1.1 Device Info
43
Picture 24: Operation Info Screen
44
E.1.2 Operation Info
44
Picture 25: User Settings Start Screen
45
E.1.3 User Settings
45
Picture 26: Language Selector Screen
46
E.1.3.1 Language Selector
46
Picture 27: File Name
47
Picture 28: List of Wildcard Characters
47
E.1.3.2 File Name
47
Picture 29: Power Saving
48
E.1.3.3 Power Saving
48
Picture 30: Volume Level
49
E.1.3.4 Volume
49
Picture 31: Foot Pedal Settings
50
Picture 32: Functions for the Foot Pedal
50
E.1.3.5 Foot Pedal
50
Picture 33: OCR Information
51
Picture 34: Splitting Start Page
51
E.1.3.6 Ocr
51
F Technical Data
52
F.2 Electrical Specifications
53
Advertisement
Image Access Bookeye 4 Installation Manual (34 pages)
V-Glass Plate
Brand:
Image Access
| Category:
Scanner
| Size: 4 MB
Table of Contents
Version History
4
Table of Contents
5
General Precautions
8
Safety Precautions
8
Precautions for Service Technicians
8
B Components
9
Balance Weight Carrier with Cover Plate
9
Picture 1: Balance Weight Carrier with Cover Plate and Screws
9
V-Glass Plate Carrier
10
Picture 2: V-Glass Carrier with Screws
10
V-Glass Plate
11
Picture 3: V-Glass Plate with Fixing Screw
11
Assembling the Glass Plate
12
Be4-V2A
12
Picture 4: Scanner at Working Desk
12
Picture 5: Remove Screws Marked with Arrows
13
Picture 6: Removing Caps of Lower Screws
13
Picture 7: Balance Weight Carrier Hold at Back Side of Camera Neck
14
Picture 8: Balance Weight Carrier Positioned over Bottom Screws
14
Picture 9: Screw Inserted
15
Picture 10: Position of Upper Bore Holes of the Carrier
15
Picture 11: Fixing the Carrier with Screws
16
Picture 12: Screws at Upper Side of Carrier
16
Picture 13: Fixing the Screws with Tool
17
Picture 14: Fixing the Upper Part of the Cover Plate (Two Screws)
18
Picture 15: Fixing the Lower Part of the Cover Plate (Two Screws)
18
Picture 16: Front View of the Bookeye with Mounted Balance Weight Carrier
19
Picture 17: Two Screws at the Left Side
20
Picture 18: Two Screws at the Right Side
20
Picture 19: Screws for the V-Glass Plate
21
Picture 20: V-Glass Plate over Screws
21
Picture 21: V-Glass Plate Assembled
22
Picture 22: Moving the V-Glass Plate with both Hands
23
Be4-V2B
24
Picture 23: Assembly Material
24
Picture 24: Screws at Scanner's Back Side
25
Picture 25: Screws to be Removed
25
Picture 26: Screws of Monitor Mount
26
Picture 27: Remove the Marked Screws
26
Picture 28: Removing Camera Neck Front Cover
27
Picture 29: Separate Parts at Predetermined Breaking Zone
27
Picture 30: Inserting T-Nuts in Camera Neck
28
Picture 31: Spacer between Camera Neck and Balance Weight Carrier
28
Picture 32: Position of Balance Weight Carrier
29
Picture 33: Mounting the Cover Plate
29
Picture 34: Remove T-Nuts
30
Picture 35: Remove Hexagon Head Screws
30
Picture 36: Fasten the V-Glass Plate Carrier at the Right Side
31
Picture 37: Fasten the V-Glass Plate Carrier at the Left Side
31
Picture 38: Remove Toggle Screw
32
Picture 39: Inserting V-Glass Plate
32
Picture 40: V-Glass Plate in Final Position
33
Picture 41: Plastic Parts Beside the Camera Neck
33
Picture 42: Bookeye ® 4 with V-Glass Plate
34
Advertisement
Related Products
Image Access Bookeye 4 V1A Professional
Image Access WideTEK 48C
Image Access widetek 44
Image Access Bookeye 4 V3
Image Access Bookeye 4 V2
Image Access WideTEK 48CL
Image Access WideTEK 48CL-600
Image Access bookeye 3
Image Access Bookeye Color
Image Access Bookeye 4 V2 Professional Archive
Image Access Categories
Scanner
Printer
Monitor
Racks & Stands
Scanners
More Image Access Manuals
Login
Sign In
OR
Sign in with Facebook
Sign in with Google
Upload manual
Upload from disk
Upload from URL