Sign In
Upload
Manuals
Brands
Align Technology Manuals
All in One Printer
iTero Element 5D Plus
Align Technology iTero Element 5D Plus Manuals
Manuals and User Guides for Align Technology iTero Element 5D Plus. We have
1
Align Technology iTero Element 5D Plus manual available for free PDF download: User Manual
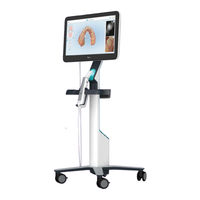
Align Technology iTero Element 5D Plus User Manual (246 pages)
Brand:
Align Technology
| Category:
All in One Printer
| Size: 16 MB
Table of Contents
Table of Contents
17
Introduction to Itero Element 5D and Itero Element 5D Plus Imaging Systems
29
Intended Purpose/Intended Use
30
Indications for Use
30
Contraindications
30
Intended Patient Population
30
Intended Users
30
Use Environment
30
Clinical Benefits
31
Itero Element 5D and Itero Element 5D Plus Hardware
31
Itero Element 5D Wheel-Stand Configuration
32
Figure 1: Front View of the Itero Element 5D Imaging System
32
Itero Element 5D Laptop Configuration
33
Figure 2: Rear View of the Itero Element 5Dimaging System
33
Figure 3: Itero Element 5D Laptop Configuration Imaging System
33
Itero Element 5D Plus Cart Configuration
34
Figure 4: Front View of the Itero Element 5D Plus Cart-Configuration Imaging System
34
Itero Element 5D Plus Mobile Configuration
35
Figure 5: Rear View of the Itero Element 5D Plus Cart-Configuration Imaging System
35
Figure 6: Front View of the Itero Element 5D Plus Mobile-Configuration Imaging System
35
Itero Element 5D Wand
36
Figure 7: Rear View of the Itero Element 5D Plus Mobile-Configuration Imaging System
36
Figure 8: Itero Element 5D Wand
36
Itero Element 5D, Itero Element 5D Plus, and 5D Plus Lite Software
37
Figure 9: Protective Sleeve
37
Figure 10: Disposable Sleeve
37
1.10 Working with Itero Near Infra-Red Imaging (NIRI) Technology
38
Figure 11: Visible Light Spectrum Showing NIRI on the 850Nm Wavelength
38
Figure 12: Reflective Concept - Healthy Enamel Is Translucent While Dentin and Caries Are Reflective
38
Figure 13: Interproximal Carious Lesion
39
1.10.1 Itero NIRI Technology Limitations
40
1.11 about this Manual
40
Assembly Instructions
41
Assembling the Itero Element 5D Wheel-Stand Configuration Scanner
42
Assembling the Itero Element 5D Laptop Configuration Scanner
46
Installing the Itero Element 5D Software - Laptop Configuration
46
Assembling the Itero Element 5D Plus and 5D Plus Lite Scanner - Cart Configuration
48
Figure 14: Removing the Wand from the Cradle
51
Figure 15: Moving the Scanner
52
Figure 16: Do Not Lift the Scanner Using the Main Handle
52
Assembling the Itero Element 5D Plus and 5D Plus Lite Scanner - Mobile Configuration
53
Initial Assembly
54
Moving the Scanner Within the Clinic
56
Using the Trolley for Transportation
56
Optional Protective Cover
58
VESA Mounting
58
Figure 17: Do Not Allow the Power Pack to Dangle in the Air
60
Figure 18: Never Tilt the Screen more than 45 Degrees
60
Getting Started
61
Logging in to the Scanner for the First Time
61
Registering the Scanner - Make It Mine Process
61
Figure 19: Welcome Screen
61
Figure 20: Connect Page Listing the Available Networks
62
Figure 21: Entering the Security Key
63
Figure 22: Scanner Is Connected to the Internet and Online
63
Figure 23: Verifying the Communication with Align
64
Figure 24: Selecting the Time Zone
64
Figure 25: Registering the System to Customize the Setup
65
Figure 26: Itero Subscription Package
65
Figure 27: License Agreement
66
Figure 28: Checking for Updates
66
Working in Demo Mode
67
Figure 29: System Is Registered and Ready
67
Figure 30: Itero Element Logo
68
Figure 31: Demo Mode Option
68
Figure 32: Login Window with a List of Demo Users
69
Figure 33: Demo Login Button
69
Figure 34: Demo Mode Home Screen
70
Figure 35: Past Orders Pane - Options
71
Exiting Demo Mode
72
Figure 36: Exiting Demo Mode
72
Working with the Scanner
73
Logging in to the Scanner
73
Figure 37: Login Window
73
Figure 38: Unexpected Shutdown Notification
74
Figure 39: Password Is Masked
75
Figure 40: Itero Home Screen
76
Resetting Your Password
77
Figure 41: Forgot Password Button
77
Figure 42: Email Field for Forgotten Password
77
Figure 43: Security Answer Field
78
Installing Windows Security Updates
79
Figure 44: Login Window with Notification about Windows Security Updates
79
Logging out of the Scanner
80
Figure 45: Home Screen with Notification about Windows Security Updates
80
Shutting down the Scanner
81
Moving the Scanner
81
Moving the Itero Element 5D Wheel-Stand Configuration Scanner
81
Transporting the Itero Element 5D Laptop Configuration Imaging System
81
Moving the Itero Element 5D Plus Cart-Configuration Scanner
82
Figure 46: Itero Element 5D Laptop Configuration Imaging System in the Supplied Carrying Case
82
Carrying the Itero Element 5D Plus Mobile-Configuration Scanner Within the Clinic
83
Figure 47: Moving the Scanner
83
Transporting the Itero Element 5D Plus Mobile-Configuration Scanner between Clinics
84
Figure 48: Carrying the Scanner between Rooms Within the Clinic
84
Figure 49: Transporting the Scanner between Clinics
84
User Interface
85
Figure 50: Itero Home Screen
85
Figure 51: Percentage of Remaining Battery Charge
86
Figure 52: Help Overlay
86
Scanner Toolbar
88
Figure 53: Scanner Toolbar
88
Figure 54: Percentage of Remaining Battery Charge
89
Figure 55: Help Overlay
89
Touch-Screen Gestures
90
Defining the Scanner Settings
91
Figure 56: Settings Window
91
Defining the Computer Settings
92
Figure 57: Brightness Settings
92
Figure 58: Volume Settings
92
Figure 59: List of Nearby Wi-Fi Networks
93
Figure 60: Connecting to the Clinic Wi-Fi Network
94
Figure 61: Forgetting or Disconnecting from the Network
94
Figure 62: Time Zone Settings
95
Defining the User Settings
96
Figure 63: Scan Settings Window
96
Figure 64: Only Scanning Range Is Highlighted
98
Figure 65: Rx Settings Window
99
Figure 66: Rx Settings Window - NIRI Captures Option Enabled
101
Figure 67: Disable NIRI Confirmation
101
Figure 68: Rx Settings Window - NIRI Captures Option Disabled
102
Figure 69: Signature Settings Window
103
Defining the System Settings
104
Figure 70: Language Settings Window
104
Figure 71: Login Settings Window
105
Figure 72: Diagnostics Window
106
Figure 73: Licensing Information Window
107
Figure 74: System Information Window - Itero Element 5D Plus
108
Figure 75: Export Settings Window - Deleting Exported Files
109
Starting a New Scan
110
Applying a Wand Sleeve
110
Starting the Scan
110
Figure 76: Gently Slide the New Sleeve into Place
110
Figure 77: New Scan Window Showing an Empty Rx and the Progress Toolbar at the Top of the Window
111
Figure 78: New Scan Window - Itero Element 5D Plus Lite
111
Patient Management
112
Adding New Patients
113
Figure 79: New Scan Window - Adding a New Patient
113
Figure 80: New Patient Window
114
Figure 81: Adding the New Patient
115
Figure 82: Message Notifying that a Patient with the same Details Exists
115
Searching for Existing Patients
116
Figure 83: Confirmation Message Regarding an Existing Patient
116
Figure 84: New Scan Window - Searching for an Existing Patient
117
Figure 85: Search Patient Window with Search Field
118
Figure 86: Search Criteria in the Search Field and List of Matching Patients
119
Figure 87: Selecting the Required Patient
119
Editing the Patient Details
120
Figure 88: Selected Patient Displayed in the New Scan Window
120
Figure 89: New Scan Window - Editing a Patient
121
Figure 90: Edit Patient Window and Update Button
121
Clearing the Patient Details from the New Scan Window
122
Figure 91: Message that a Patient with the same Details Already Exists
122
Filling in the Rx
123
Figure 92: Clear Patient Data Button
123
Figure 93: Selecting the Required Case Type
124
Figure 94: New Scan Window - Irecord Case Type
125
Working with Restorative Scan Types
126
Figure 95: New Sleeve Attached Check Box
126
Figure 96: New Scan Window - Restorative Case Type with a Tooth Chart
127
Figure 97: List of Restorative Treatment Options
128
Figure 98: Defining the Restoration Properties
129
Figure 99: Treatment Information Area
130
Disabling NIRI Capture
131
Figure 100: Disabling NIRI Capture for a Specific Case
131
Figure 101: Scan Tool Without the Option to Display NIRI Data in the Viewfinder or to Enlarge the Viewfinder
132
Figure 102: Review Tool Is Not Displayed in View Mode
132
Confirming a New Wand Sleeve between Patients
133
Figure 103: Check Box Confirming a New Sleeve
133
Scanning the Patient
134
Figure 104: Popup Confirmation Message before Scanning
134
Scanning Guidance
135
Figure 105: Recommended Scanning Sequence - Lower Jaw
135
Scanning Best Practices
136
Scan Options
136
Figure 106: Wand Guidance
136
Figure 107: Areas with Missing Anatomy Shown with and Without Additional Scan Feedback - Monochrome
137
Figure 108: Areas with Missing Anatomy Shown with and Without Additional Scan Feedback - Color Mode
137
Figure 109: Model Displayed in Color and Monochrome Mode
138
Toggling the 3D and Viewfinder Display
139
Figure 110: Tap the Opposite Arch or Tap the Arrows to Select It
139
Figure 111: Default View - 3D Scan in the Center of the Window and Viewfinder on the Left
140
Figure 112: Large Viewfinder in the Center of the Screen and 3D Image on the Left
140
Toggling between Color and NIRI Images in the Viewfinder
141
Editing a Scan
141
Figure 113: Viewfinder Displaying a Color Image (Left) or a NIRI Image (Right)
141
Viewing the Scan
142
Figure 114: Editing Tools
142
Missing Scan Segment Notifications
143
Figure 115: Missing Scan Message and Missing Segments Highlighted in Red
143
Using the Scan Timer
144
Sending the Scan
144
Figure 116: Scan Timer Button on the Toolbar and Scan Time
144
Working with the Viewer
145
Figure 117: Sending the Scan
145
Figure 118: Viewer Option in the Past Orders Pane in the Orders Page
145
Figure 119: Viewer Option in Patient's Profile Page
146
Figure 120: Model in a 1-Window View
147
Figure 121: Model in a 2-Window View
148
Figure 122: Model in a 5-Window View
148
Removing the Wand Sleeve
149
Figure 123: Removing a Wand Sleeve
149
Figure 124: Optical Surface of the Wand
150
Figure 125: Gently Slide the New Sleeve into Place
150
Working with Patients
151
Searching for Patients
151
Figure 126: Patients Page
151
Figure 127: Searching for a Patient
152
Figure 128: Patients Matching the Search Criteria Are Displayed
152
Viewing the Patient Details
153
Figure 129: Patient's Profile Page
153
Creating a New Scan for a Specific Patient
154
Figure 130: Patient's Profile Page - New Scan Option
154
Figure 131: New Scan Window with Patient's Details Already Filled in
155
Viewing the Rx
156
Figure 132: Patient's Profile Page - View Rx Option
156
Viewing Previous Scans in the Viewer
157
Figure 133: Rx Details Window
157
Figure 134: Patient's Profile Page - Viewer Option
158
Figure 135: Scan Displayed in the Viewer
158
Working with Orders
159
Figure 136: Orders Page
160
Figure 137: in Progress Pane - Options
161
Figure 138: Past Orders Pane - Options
161
Working with Returned Orders
162
Figure 139: Orders Button Notifying a Returned Order
162
Figure 140: Returned Order in the in Progress Pane
163
Viewing Messages
164
Figure 141: Messages Page
164
Working with Myitero
165
10 Itero Scanner Features and Tools
166
10.1 Comparing Previous Scans Using Itero Timelapse Technology
166
Figure 142: Itero Timelapse - Selecting the Scans to Compare
167
Figure 143: Itero Timelapse Window Showing the Highlighted Changes between the Scans
167
Figure 144: Area of Interest from the First Scan Displayed in the Animation Window
168
Figure 145: Area of Interest from the Second Scan Displayed in the Animation Window
169
10.2 Invisalign Go System
170
10.3 Invisalign Outcome Simulator
170
Figure 146: Itero Timelapse Scale Options
170
10.4 Invisalign Progress Assessment
171
Figure 147: Progress Assessment Window
171
10.5 Editing Tools
172
10.5.1 Deleting a Segment
172
Figure 148: Editing Tools
172
Figure 149: Delete Segment Tool
173
10.5.2 Deleting a Selection
174
Figure 150: Delete Selection Tool
174
Figure 151: Expanded Delete Selection Tool
175
Figure 152: Selected Area of the Anatomy Is Deleted
175
10.5.3 Filling in Missing Anatomy
176
Figure 153: Fill Tool
176
10.5.4 Disabling A.I. Cleanup
177
Figure 154: Areas that Require Scanning Are Highlighted in Red - Fill Tool
177
Figure 155: Disable A.I. Cleanup Tool
178
Figure 156: Scan Displayed with Excess Material Showing
178
10.6 Working with the Eraser Tool
179
Figure 157: Eraser Tool
179
Figure 158: Eraser Tool Options
179
Figure 159: Mark the Area to be Modified
180
Figure 160: Selected Area Removed, and Scan Tool Enabled
180
10.7 Working with the Occlusal Clearance Tool
181
Figure 161: Deleted Area Marked in Red
181
Figure 162: Occlusal Clearance between the Opposing Teeth
182
Figure 163: Occlusal Clearance Range Options
183
Figure 164: Occlusal Clearance Tool and Legend Displayed in the Viewer
184
10.8 Working with the Edge Trimming Tool
185
Figure 165: Edge Trimming Tool
185
Figure 166: Edge Trimming Tool Options
185
Figure 167: Mark the Area to be Trimmed Away
186
Figure 168: Selected Area Is Highlighted, and the Confirmation Icon Is Enabled
186
10.9 Working with the die Separation Tool
187
Figure 169: Selected Area Has Been Removed
187
Figure 170: Green Hint Point Centered on the Prepped Tooth
188
Figure 171: die Separation Is Displayed in High Resolution
188
Figure 172: die Separation Tool Options
189
Figure 173: Scan Is Displayed in Low Resolution
189
Figure 174: before Selecting the die Separation
190
10.10 Working with the Margin Line Tool
191
Automatically Defining the Margin Line
191
Figure 175: Prepped Tooth Is Displayed in High Resolution
191
Figure 176: Model Display Moves to the Occlusal View, and Zooms in on the Prepped Tooth
192
Figure 177: Margin Line Tool Options
192
Manually Defining the Margin Line
193
Figure 178: Margin Line Is Marked on the Prepped Tooth
193
Working with the Review Tool (Itero Element 5D and 5D Plus)
194
Figure 179: Margin Line Tool Options
194
Figure 180: Review Tool with the Snapshot Tool on the Toolbar and the Loupe in the Right Pane
195
Zooming in to and out of the Images in the Image Pane
196
Figure 181: Image Pane on the Right Showing the Area of Interest as both NIRI and Colored Intraoral Images
196
Figure 182: Zoom-In Buttons on the Images in the Image Pane
197
Figure 183: Only the Zoomed-In Image Is Displayed in the Enlarged Image Pane Window
197
Adjusting the Brightness and Contrast of Images in the Image Pane
198
Figure 184: Brightness and Contrast Toolbar Is Collapsed
198
Capturing the Review Tool Images
199
Working with the Review Tool (Itero Element 5D Plus Lite)
199
Figure 185: Brightness and Contrast Toolbars
199
Figure 186: Review Tool with the Snapshot Tool on the Toolbar and the Loupe in the Right Pane
200
Zooming in to and out of the Images in the Image Pane
201
Figure 187: Image Pane on the Right Showing the Area of Interest
201
Figure 188: Zoom-In Button on the Image in the Image Pane
202
Figure 189: Zoomed-In Image Displayed in the Enlarged Image Pane
202
Adjusting the Brightness and Contrast of Images in the Image Pane
203
Figure 190: Brightness and Contrast Toolbar Is Collapsed
203
Capturing the Review Tool Images
204
Figure 191: Brightness and Contrast Toolbar
204
10.13 Working with the Snapshot Tool
205
Figure 192: View Mode - with Snapshot Tool
206
Figure 193: Screen Capture Thumbnail Is Displayed after Taking a Screen Capture
206
Figure 194: Screenshot with an Annotations Toolbar
207
Figure 195: Annotations Toolbar
207
Figure 196: Adding Text to the Screenshot
208
Figure 197: Screenshot with Annotations
208
Figure 198: Notification that the Screenshots and Annotations will be Uploaded to Myitero
209
Figure 199: Confirmation about the Annotations Being Discarded
209
Figure 200: Notification that the Screenshots will be Uploaded to Myitero
210
Figure 201: Option to Download Screenshots from the Orders Page in Myitero
210
11 Care and Maintenance
211
11.1 Handling the Wand and Cable
211
11.2 Cleaning and Disinfecting the Wand
211
11.2.1 Preparation before Cleaning and Disinfection
212
Figure 202: Wand Without a Sleeve
212
11.2.2 Wand Cleaning and Disinfection
213
Figure 203: Remove Gross Contaminants Using Caviwipes1
213
Figure 204: Remove Marks and Stains Using a Soft Bristle Brush
213
11.2.3 Drying - Wand Body
214
11.2.4 Storage and Maintenance
214
Figure 205: Wipe the Optical Surface of the Wand with IPA
214
11.3 Cleaning and Disinfecting the Cradle
215
11.3.1 Preparation before Cleaning and Disinfection
215
11.3.2 Cradle Cleaning and Disinfection
216
Figure 206: Itero Element 5D - Remove Gross Contaminants on the Cradle Using Caviwipes1
216
Figure 207: Itero Element 5D Plus Cart - Remove Gross Contaminants on the Cradle Using Caviwipes1
216
11.3.3 Drying - Cradle
218
11.3.4 Storage and Maintenance
219
11.4 Cleaning and Disinfecting the Scanner Touch Screen and the Wheel-Stand Handle
219
11.5 General Cleaning
219
11.6 Approved Cleaning and Disinfecting Materials
220
A Clinic LAN Network Guidelines
221
Introduction
221
Preparations
221
Router Guidelines
222
Internet Connection Guidelines
222
Firewall
222
Wi-Fi Tips
222
Align Hostname Recommendations
223
BEMC Declarations
224
EMC Declaration - Itero Element 5D
224
EMC Declaration - Itero Element 5D Plus
227
C Itero Element Product Security Whitepaper
230
D System Specifications
233
Itero Element 5D Wheel-Stand Configuration System Specifications
234
Itero Element 5D Laptop Configuration System Specifications
235
Itero Element 5D Plus System Specifications
236
Advertisement
Advertisement
Related Products
Align Technology iTero Element 5D
Align Technology Categories
Dental equipment
All in One Printer
Medical Equipment
More Align Technology Manuals
Login
Sign In
OR
Sign in with Facebook
Sign in with Google
Upload manual
Upload from disk
Upload from URL