Table of Contents
Advertisement
Disposal Instruction (US)
For better protection of our earth, please don't throw this electronic device into
municipal trash bin when discarding. To minimize pollution and ensure utmost
protection of the global environment, please recycle the product. For more
information about the collection and recycling of Waste Electrical and Electronic
Equipment (WEEE), you are invited to visit our homepage at www.aopen.com
under "Green Products"
廃棄上の指示
より良い地球保護のために、電子機器を廃棄処分にする時は、ゴミ箱に捨てな
いで下さい。汚染を最小限に抑え、地球環境の最大限の保護のために、製品を
リサイクルして下さい。廃電気電子機器 (WEEE) の回収とリサイクルについて
の情報は、弊社ホームページwww.aopen.com の"Green Products"(環境に優
しい製品)をご覧下さい。
廢棄及回收處理
為了保護環境,請勿將本產品當作一般廢棄物處理。為減少環境污染,維護地球
資源,本產品報廢時,請回收本產品。
Instruktion til bortskaffelse (Danish)
Af hensyn til vores miljø bedes De ikke bortskaffe denne elektroniske enhed i
en almindelig affaldsspand. For at mindske forurening og sikre beskyttelse af
miljøet bedes De genbruge produktet. For yderligere information vedrørende
indsamling og genbrug af elektronik-affald (Waste Electrical and Electronic
Equipment (WEEE)) er De velkommen til at besøge vores website www.aopen.
com og læse nærmere under "Green Products".
i
Advertisement
Table of Contents

Related Manuals for AOpen I965GMT-LA


Summary of Contents for AOpen I965GMT-LA
- Page 1 To minimize pollution and ensure utmost protection of the global environment, please recycle the product. For more information about the collection and recycling of Waste Electrical and Electronic Equipment (WEEE), you are invited to visit our homepage at www.aopen.com under “Green Products” 廃棄上の指示...
- Page 2 Pour plus d’informations sur la gestion des déchets d’Equipements Electriques et Electroniques (DEEE ou WEEE), vous êtes invité à visiter notre site à www.aopen.com sous “ Green Products”. Entsorgungsanleitung (German) Zum besseren Schutze unseres Planeten, schmeissen Sie elektrische Geräte bitte nicht in öffentliche Mülleimer.
- Page 3 For ĺ beskytte vĺr natur og miljř, vennligst resirkuler dette produk- tet. For mer informasjon om oppsamling og resirkulering i henhold til Waste Electrical and Electronic Equipment (WEEE), se vĺr hjemmeside pĺ www.aopen. com under “Green Products”. Programa de Tratamento de Resíduos de Equipamentos Eléctricos e Electrónicos (Portugese)
-
Page 5: Table Of Contents
Contents Disposal Instructions Welcome Copyright © 2007 AOpen Inc. All Right Reserved Notes and Warning labels used in the manual ....... Safety Information ..........Chapter 1 Introduction ......... 1.1 Board and I/O Layout ........1.2 Rear I/O Ports ......... 1.3 System Block Diagram ........ - Page 6 4.1 Driver Install Utility ........45 4.2 Other useful Features ........46 4.3 Useful Utilities .......... Chapter 5 Troubleshooting ........Troubleshooting Steps ........Chapter 6 Technical Support and Contact ......49 AOpen Technical Support Team Global Locations ....AOpen Technical Support ........
-
Page 7: Welcome
If you lose your printed manual, you may also go to our website at http://www.aopen.com to download an updated fi le in PDF format. Now, we would like to invite you to experience this user-friendly manual and all of the powerful functions this AOpen product offers. -
Page 8: Notes And Warning Labels Used In The Manual
Note: This contains knowledge you should know when assem- bling or using this AOpen product, or some helpful tip. Tip: This Tip tells you some useful information that will make your installation go smoothly. -
Page 9: Chapter 1 Introduction
22. Stand by LED 10. 4-pin DC Power Output Connector 23. VGA2 Connector (Option) 11. USB 2.0 Connector x 2 24. Chrontel 7307C DVI DEC (i965GMt-LA) 12. SATA II Connector x 2 25. Chrontel 7307 DVI + LVDS DEL (Option) -
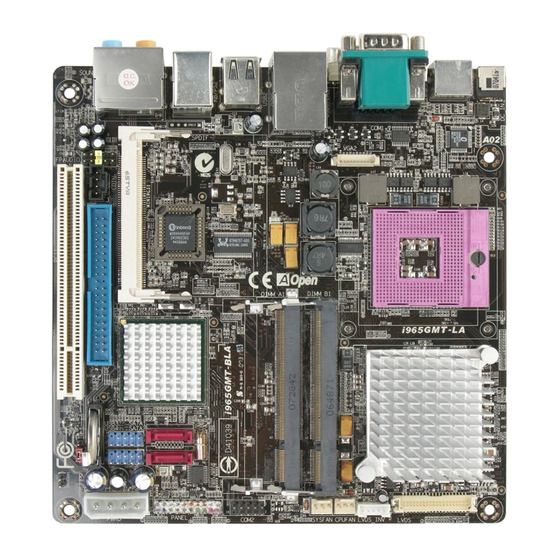
Page 10: Rear I/O Ports
1.2 Rear I/O Ports Figure 1.1 Board I/O Layout Table 1.2: Real I/O Item Item 01. 19V DC Adapter Conector 08. PS/2 Keyboard Connector 02. S-Video Out Connector 09. Rear Surround (S/PDIF_Out) 03. DVI Port 10. Center/Subwoofer 04. COM1 Port 11. - Page 11 Table 1.3: i965GMt-LA Specifi cations Model i965GMt-LA Core 2 Duo / Celeron Processor FSB 533 / 667 / 800 MHz Chipset Intel® GM965 / ICH8M Main Dual Channel Mode Memory Support SO-DIMM DDRII 533 / 667 MHz DDRII SO-DIMM x 2...
-
Page 12: System Block Diagram
LVDS 24 bit Slot x 1 7038B Connector (Option) 300MB/s 533/800 Serial ATA Port x 2 System Chromtel 7307 Connector (i965GMt-LA) Intel RealTek GM965 azalia Chipset Codec DDRII SO DIMM x 2 Dual Channel DDRII 533/667 Intel Up to 4GB... -
Page 13: Chapter 2 Hardware Installation
Chapter 2 Hardware Installation 2.1 Installation Overview Generally, when installing a new motherboard and peripherals into a chassis, people typically follow a certain order of steps for the installation. The list below are the general steps: Start 1. Installing CPU 2. -
Page 14: Installing The Cpu
2.2 Installing the CPU This socket supports uFCPGA package CPU, which is the latest CPU package developed by Intel. Other forms of CPU package are impossible to be fi tted in. 1. Unscrew socket screw counter- clockwise. 2. Locate Pin 1 in the socket and look for a golden arrow on the CPU upper interface. - Page 15 Support CPU Table Processor Number Architecture Clock Speed Front Side Bus L2 Cache Merom Core 2 Duo T7800 65nm 2.60 GHz 800 MHz Core 2 Duo T7700 65nm 2.40 GHz 800 MHz Core 2 Duo T7500 65nm 2.20 GHz 800 MHz Core 2 Duo T7300 65nm 2.00 GHz...
-
Page 16: Installing Cpu Cooler
2.3 Installing CPU Cooler 1. Remove the four screws of the CPU heatsink and take the bracket from heatsink. 2. Tear off the label from bracket for easily pasted on the bottom of main board. 3. Place bracket properly on the back side as picture. 4. -
Page 17: Installing Cpu And System Fans
2.4 Installing CPU and System Fans Plug the CPU fan cable to the CPU FAN connector. If you have a chassis fan, you can also plug it into the SYSFAN connector. +12V +12V Sensor Sensor SYSFAN Connector CPUFAN Connector Note: Some fans do not have a sensor pin, so fan monitoring is not supported. -
Page 18: Installing Memory Module
2.5 Installing Memory Module The motherboard provide SODIMM type memory support. There’re two SODIMM memory slots which motherboard provided. The installation of memory module as below. 1. Put the memory module with correct direction. Notice there’s one stick to make sure direction is correct. 2. -
Page 19: Installing Ide Cable
2.6 Installing IDE Cable The motherboard provides one IDE connector which allow you to connect two ATA 33/66/100 IDE devices like HDD. Pin1 Primary Master (1st) Primary Slave (2nd) ATA 33/66/100 IDE Connector DC power to connect IDE devices IDE cable to connect IDE devices... - Page 20 2.7 Installing SATA Cable The mother board provides two SATA connectors. Connect SATA cable to the on board SATA connector. You can fi nd SATA cable in our package. (this is SATA signal cable) And please also connect 5V power connector with SATA power cable. RSATA_RXP1 RSATA_RXN1 RSATA_TXN1...
-
Page 21: Connecting Front Panel Cable
2.8 Connecting Front Panel Cable Attach the power LED, speaker and reset switch connectors to the corresponding pins. If you enable “Suspend Mode” item in BIOS Setup, the ACPI & Power LED will keep fl ashing while the system is in suspend mode. -
Page 22: Power Consumption
- OUTPUT DC 19V ~ 4.74A Note: Please notice on the power, AOpen mother board provided, is 90W AC-DC adaptor. And the board can offer 145W to connect different peripherals. But it needs to be careful while connecting many peripherals and cause power over 90W. It will causes the system cannot boot-up or cannot work smoothly base on the loading your system has. -
Page 23: Mini Pci And Pci X 1 Installation
2.10 Mini PCI and PCI x 1 Installation The motherboard provides one Mini PCI slot and one 1x PCI slot for users to upgrade his PC functions. Now, the Mini PCI can have digital TV tuner and Video MPEG4 decoder card ...etc. for expansion. The 1x PCI cards have SATA II and Firewire and USB cards …... -
Page 24: Gigabit Lan
2.11 Gigabit LAN One of the strengths is the Intel Gigabit LAN controller on board, this mother board provides 10/100/1000Mbps Ethernet for offi ce and home use. The Ethernet RJ45 connector is located above the USB connectors. The right hand side LED indicates link mode;... -
Page 25: Connecting Usb
2.12 Connecting USB 2.0 This motherboard provides eight USB 2.0 ports to connect USB devices such as mouse, keyboard, modem, printer, etc. There are four ports on the back panel. You can use proper cables to connect Front USB connector to USB modules or chassis front panel. -
Page 26: Channel Audio
2.13 Channel Audio This motherboard comes with an Azalia (Realtek ALC888) codec, which supports the latest 7.1 Channel sound with high quality audio effects, bringing you an excellent audio experience. This motherboard provides 7.1 Channel ports as shown below. The diagram represents the standard location of all speakers for 7.1 Channel sound use. -
Page 27: Connecting Front Audio
2.14 Connecting Front Audio If the chassis is designed with an audio port on the front panel, you’ll be able to connect onboard audio to the front panel through this connector. Please remove the jumper cap from the Front Audio Connector before you connect the cable. -
Page 28: Connect Cd_In
2.15 Connect CD_IN This connector is designed to connect a CD Audio cable from CDROM or DVD drive to onboard sound. CD-IN Connector... -
Page 29: Connecting Com2 Port
COM1 Port DCD# SOUT RTS# Pin 1 CTS# DTR# COM2 Connector Note: You could contact AOpen, if you don’t have suitable cable. -
Page 30: Connecting Case Open "Chassis Intrusion
2.17 Connecting Case Open “Chassis Intrusion” The “CASE OPEN” header provides a chassis intrusion-monitoring function. To make this function work, you have to enable it in the system BIOS, and connect this header to a sensor somewhere on the chassis. So, whenever the sensor is triggered by lights or by the opening of the chassis, the system will beep to inform you. -
Page 31: Bits Lvds Connector (Option)
640 x 480 256/ 16bit/ 32bit Special resolution 16:9 support Note: You could contact AOpen, if you AUO 32” 16:9 Panel: 1366 x 768 don’t have suitable cable. ( Users need to check with your TV panels vender about it ) -
Page 32: Com2 Port (Option)
2.19 VGA2 Connector (Option) COM2 Port (Option) For industrial customer, we also provide slave COM port. RTS# SOUT DCD# Pin 1 CTS# DTR# COM2 Connector port... -
Page 33: Jp14 Clear Cmos Jumper
2.20 JP14 Clear CMOS Jumper You can clear CMOS to restore system default settings. To clear the CMOS, follow the procedure below. 1. Turn off the system and unplug the AC power. 2. Locate JP14 and short pins 2-3 for a few seconds. 3. -
Page 35: Chapter 3 Setting The Bios
AOpen’s R&D engineering team has optimized most BIOS settings of this motherboard. However, some default settings of the BIOS cannot fi ne-tune items that are controlled by chipset. Therefore, this chapter is intended to guide you and help you to confi... -
Page 36: How To Enter The Bios Setup
1. Please avoid of using “Load Optimized Defaults”, unless you are certain your system components (CPU, SDRAM, HDD, etc.) have been proven acceptable for use. 2. AOpen reserves the right to change the content of this publication with out obligation to notify any party of such changes or revisions. -
Page 37: Standard Cmos Features
3.4 Standard CMOS Features The “Standard CMOS Setup” sets the basic system parameters such as the date, time, and the hard disk type. Use the arrow keys to highlight an item and <PgUp> or <PgDn> to select the value for each item. Standard CMOS Features >... - Page 38 Standard CMOS Features > IDE Channel 0 Master > IDE HDD Auto- Detection Press “Enter” to auto-detect parameters of HDD. Standard CMOS Features > IDE Channel 0 Master > IDE Channel 0 Master Defi ne the parameters of IDE devices in Channel 0 (Master or Slave). Available options: None: If there is no device, please select “None”...
-
Page 39: Advanced Bios Features
3.5 Advanced BIOS Features This screen appears when you select the option “Advanced BIOS Features” from the main menu. Advanced BIOS Features > CPU Feature Can select delay time periods to enable thermal monitoring, TM2 Bus Ratio/ VID, Virtualization, Disable bit This parameter allows you to specify the system boot up search sequence. - Page 40 Advanced BIOS Feature > Boot Other Device This parameter allows you to specify other boot devices not listed above. Advanced BIOS Features > Security Option The “System” option limits access to both the System boot and BIOS setup. A prompt asking you to enter your password appears on the screen every time you boot the system.
-
Page 41: Advanced Chipset Features
3.6 Advanced Chipset Features The “Advanced Chipset Features” include settings for the chipset dependent features. These features are related to system performance. Advanced Chipset features > On-Chip Frame Buffer size Available options: 1MB or 8MB Advanced Chipset features > DVMT Mode This object is used to set DVMT mode. -
Page 42: Integrated Peripherals
3.7 Integrated Peripherals This submenu appears if you select the option “Integrated Peripherals” from the main menu. This option allows you to confi gure the I/O features. Integrated Peripherals > OnChip IDE Device Integrated Peripherals > Onboard Device Integrated Peripherals > SuperIO Device > Power On Function Power ON Function: This item is used to select Wake on Keyboard/Mouse mode. - Page 43 Note: 1. Whenever you change this item, it will only take effect after you restart the system and successfully boot Windows or DOS. 2. Wake on Mouse function applies to a PS/2 mouse only. 3. If you set a password but forget it, please clear CMOS. If you want to use Wake on Mouse function in DOS, it is necessary to install the DOS driver of the mouse.
-
Page 44: Power Management Setup
3.8 Power Management Setup The Power Management Setup screen enables you to control the motherboard green features. Power Management > ACPI Suspend Type This function allows you to select suspend types. S1 is Power On Suspend and S3 is Suspend to RAM. Available Options: S1(POS), S3(STR), S1 & S3 Power Management >... -
Page 45: Pc Health Status
3.9 PC health status The Power Management Setup screen enables you to control the motherboard green features. Pc Health Status > System Smart Fan Available options: Enable, Disable Pc Health Status > CPU Smart Fan Available options: Enable, Disable... -
Page 46: Load Optimized Defaults
3.10 Load Optimized Defaults The “Load Optimized Defaults” is used to load the factory defaults for BIOS and Chipset features that are detected by the system. -
Page 47: Set Password
3.11 Set Password A Password prevents unauthorized use of your computer. If you set a pass- word, the system prompts for the correct password before boot or access to Setup. To set a password: 1. At the prompt, type your password. Your password can be up to 8 alphanumeric characters. -
Page 48: Save & Exit Setup
3.12 Save & Exit Setup A Password prevents unauthorized use of your computer. If you set a password, the system prompts for the correct password before boot or access to Setup. 3.13 Exit Without Saving... -
Page 49: Bios Upgrade Under Windows Environment
3.14 BIOS Upgrade under Windows Environment With outstanding R&D ability of AOpen, we now bring you the EzWinFlash BIOS wizard. With an eye on convenience for users, EzWinFlash combines the BIOS binary code and fl ash module together, so the only thing you have to do is just click on the utility and downloaded from web and let it help you complete the fl... - Page 50 STRONGLY RECOMMENDED to close all applications before you start the upgrades. Download the latest version of BIOS package zip fi le from AOpen offi cial web site. (Ex: http://english.aopen.com.tw/) Unzip the downloaded BIOS package (ex: WSGMAXII102.ZIP) with WinZip (http://www.winzip.com) in Windows environment.
-
Page 51: Chapter 4 Installing Drivers
Click and it is done. EzInstall makes installation easy and even foolproof! After putting in the CD, you will be prompted with the AOpen welcome page and our branch information. -
Page 52: Other Useful Features
4.2 Other useful Features Press the Icon to go to the “Install Driver” page. You may press “Back” to return to the main page. Once clicking “GO”, EzInstall will run the installing procedure automatically, and prompt a reboot dialog (Some drivers or utilities may skip the reboot part). Note: Due to the limitation of Intel chipsets driver, Windows 2000 is needed to be updated to service pack 4 for installing the audio... -
Page 53: Useful Utilities
4.3 Useful Utilities Installing Utilities is virtually the same as installing drivers. AOpen provides you with many friendly and powerful utilities to manage your system. You will fi nd a lot of fabulous utilities listed here, and all you have to do is to click on “GO”, then it will install the utilities to your system right away without complicated steps. -
Page 54: Chapter 5 Troubleshooting
Chapter 5 Troubleshooting 5.1 Troubleshooting Steps You are welcome to visit our technical website to learn more about these fea- tures. Start Turn off the power and unplug the AC power cable, then remove all of the add- on cards and cables including VGA, IDE, DFF, COM1, COM2, printer and other external devices. -
Page 55: Chapter 6 Technical Support And Contact
Dear Customer, Thanks for choosing AOpen products. We invite you to register at http://www.aopen.com to become a Gold Member of Club AOpen so as to ensure quality service in the future. In order to maintain the best service to every customer, we recommend you to follow the procedures below and seek help from our branches according to the region you purchased the product. - Page 56 Model Name and BIOS Version Model name and BIOS version can be found on upper left corner of fi rst boot screen (POST screen). For example: i965GMt-LA is model name of mother- board; R1.00 is BIOS version Register Your Motherboard Phoenix - AwardBIOS v6.00PG, An Energy Star Ally...
-
Page 57: Aopen Technical Support
Online Manuals: To download a manual, please log on and then select your preferred language. Under “Type¨ directly, choose “Manuals¨ to go to our manual database. You can also fi nd the manual and EIG in AOpen Bonus Pack. http://www.aopen.com > Chose Territory > Download RCL: We recommend you to choose board/ card/device from the compatibility test reports for assembling your PC.
Need help?
Do you have a question about the I965GMT-LA and is the answer not in the manual?
Questions and answers