
Related Manuals for Microplex SOLID 50 A3 - 3


Summary of Contents for Microplex SOLID 50 A3 - 3
- Page 1 ________________________________________________________________________________ SOLID 50 A3 - 3 Operator’s Manual Edition 2.1 ________________________________________________________________________________...
- Page 2 _______________________________________________________________________________________________ _______________________________________________________________________________________________...
-
Page 3: Table Of Contents
4.2. Turning on the Printer 4.3. Control Panel View 4.4. Function of the Control Panel Elements 4.5. Configuration via the Control Panel 4.6. Menu Structure 4.7. Syntax of Diagrams _______________________________________________________________________________________________ MICROPLEX Operator’s Manual SOLID 50 A3 - 3 Edition 2.1... -
Page 4: Chapter Page
Image Shifting to the Y-Direction 5.27. Lines per Inch Setting (Line Spacing) 5.28. Number of Characters per Inch Setting (Character Spacing) 5.29. Print Density Setting 5.30. Configuration of Network Parameters (IP Address, e.g.) _______________________________________________________________________________________________ MICROPLEX Operator’s Manual SOLID 50 A3 - 3 Edition 2.1... -
Page 5: Table Of Contents
7.4.7. Clearing Jam inside the Duplex Unit 7.4.8. Solving Paper Feed Problems 7.5. Print Repeat after an Error 8. Measures for Transport and Shipping (Repacking) 9. Specifications 10. Index _______________________________________________________________________________________________ MICROPLEX Operator’s Manual SOLID 50 A3 - 3 Edition 2.1... -
Page 6: _______________________________________________________________________________________________
Table of Contents _______________________________________________________________________________________________ _______________________________________________________________________________________________ MICROPLEX Operator’s Manual SOLID 50 A3 - 3 Edition 2.1... -
Page 7: Introduction
_______________________________________________________________________________________________ 1. Introduction 1.1. General Description The print system SOLID 50 A3 - 3 works on an electrophotographical base employing a laser as exposure unit. The resolution of 600 dots per inch is corresponding to about 24 pixels per mm (see section 5.3: Choosing Print Resolution). -
Page 8: _______________________________________________________________________________________________
When transported further, the toner particles, which are affected by heat and pressure, are combined resistantly with the paper inside the fusing unit. The drum is discharged and cleaned. _______________________________________________________________________________________________ MICROPLEX Operator’s Manual SOLID 50 A3 - 3 Edition 2.1... -
Page 9: Conventions
SOLID printer panel is provided with one LED. This symbol shows a flashing LED. This symbol will be used in this manual to show an LED that is not shining. _______________________________________________________________________________________________ MICROPLEX Operator’s Manual SOLID 50 A3 - 3 Edition 2.1... -
Page 10: Ce - Conformity
All handling or procedures that differ from the ones being described in this manual are to be omitted. Disregarding might release dangerous laser radiation. _______________________________________________________________________________________________ MICROPLEX Operator’s Manual SOLID 50 A3 - 3 Edition 2.1... -
Page 11: _______________________________________________________________________________________________
Introduction _______________________________________________________________________________________________ This MICROPLEX product and its consumables are designed and tested according to strict safety standards. By heeding the following instructions, the user is ensured safe operations: - Please make sure your electricity source is properly grounded. - Install the device on solid and level ground. -
Page 12: _______________________________________________________________________________________________
- Please follow all the instructions and hints directly attached to the device and/or described in this manual. - To ensure optimum printer performance, only use MICROPLEX consumables. _______________________________________________________________________________________________ MICROPLEX Operator’s Manual SOLID 50 A3 - 3 Edition 2.1... -
Page 13: Installation
SOLID 50 A3 - 3 printer Drum cartridge Toner cartridge Power cord CD containing: SOLID 50 A3 - 3 Operator‘s Manual Print drivers IDOL Manual Please retain the original packing materials in case the printer has to be transported in the future. -
Page 14: Printer Unpacking
CAUTION! The printer weighs approximately 48 kg (106 lbs) and requires at least two people to lift it safely. Carefully take out the SOLID printer. Fig. 2.2.b Lifting and transporting the printer safely _______________________________________________________________________________________________ MICROPLEX Operator’s Manual SOLID 50 A3 - 3 Edition 2.1... -
Page 15: _______________________________________________________________________________________________
Place the printer in an acceptable atmosphere (see section 2.4: Printer Installation). Remove all the packing materials and the adhesive fasteners (compare the following figure). Fig. 2.2.c Removing the packing materials and adhesive fasteners _______________________________________________________________________________________________ MICROPLEX Operator’s Manual SOLID 50 A3 - 3 Edition 2.1... -
Page 16: _______________________________________________________________________________________________
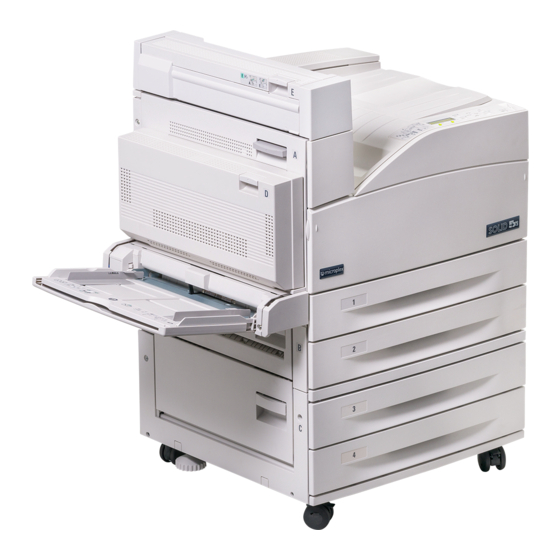
Installation _______________________________________________________________________________________________ Multipurpose feeder Fig. 2.2.d View of a SOLID 50 A3 - 3 printer Please retain the original packing materials in case the printer has to be transported in the future. _______________________________________________________________________________________________ MICROPLEX Operator’s Manual SOLID 50 A3 - 3... -
Page 17: Preparing The Printer
1. Pull up on the handle to open the printer side door (Door A). 2. Gently lower the door to the open position. Fig. 2.3.a Opening the side door (door A) _______________________________________________________________________________________________ MICROPLEX Operator’s Manual SOLID 50 A3 - 3 Edition 2.1... -
Page 18: _______________________________________________________________________________________________
Please store the drum cartridge in its original packing until it is installed. Extreme fluctuations of atmospheric humidity and/or temperature are not allowed. The values listed in section 2.4 need to be met. _______________________________________________________________________________________________ MICROPLEX Operator’s Manual SOLID 50 A3 - 3 Edition 2.1... -
Page 19: _______________________________________________________________________________________________
5. Turn the drum cartridge so that the handle is on top. 6. Remove the tape (on the top of the cartridge; see figure 2.3.d) and then gently pull the protective paper straight up and out of the cartridge. _______________________________________________________________________________________________ MICROPLEX Operator’s Manual SOLID 50 A3 - 3 Edition 2.1... -
Page 20: _______________________________________________________________________________________________
Fig. 2.3.d Removing the protective paper of the new drum cartridge Do not leave the drum cartridge exposed to light for extended periods of time. Fig. 2.3.e Hints about the drum cartridge _______________________________________________________________________________________________ MICROPLEX Operator’s Manual SOLID 50 A3 - 3 Edition 2.1... -
Page 21: _______________________________________________________________________________________________
Fig. 2.3.f Inserting the guides of the new drum cartridge 8. Drop the handle back into place. 9. Push the drum cartridge into the printer until the cartridge clicks into place. _______________________________________________________________________________________________ MICROPLEX Operator’s Manual SOLID 50 A3 - 3 Edition 2.1... -
Page 22: _______________________________________________________________________________________________
Installation _______________________________________________________________________________________________ Fig. 2.3.g Inserting the new drum cartridge 10. Carefully pull the yellow tape completely out of the cartridge. Discard the tape. Fig. 2.3.h Removing the yellow tape _______________________________________________________________________________________________ MICROPLEX Operator’s Manual SOLID 50 A3 - 3 Edition 2.1... -
Page 23: _______________________________________________________________________________________________
Fig. 2.3.j Shaking the toner cartridge 4. Holding the new toner cartridge by the handle and one end, align the cartridge with the slots inside the printer and slide the toner cartridge halfway in. _______________________________________________________________________________________________ MICROPLEX Operator’s Manual SOLID 50 A3 - 3 Edition 2.1... -
Page 24: _______________________________________________________________________________________________
Fig. 2.3.k Inserting the guides of the new toner cartridge 5. Push the toner cartridge into the printer until the cartridge clicks into place. Fig. 2.3.l Inserting the new toner cartridge _______________________________________________________________________________________________ MICROPLEX Operator’s Manual SOLID 50 A3 - 3 Edition 2.1... -
Page 25: _______________________________________________________________________________________________
Fig. 2.3.m Closing the printers side door (door A) 7. Hold both sides of the printer front door (Door F) and close it. Door F Fig. 2.3.n Closing the printers front door (door F) _______________________________________________________________________________________________ MICROPLEX Operator’s Manual SOLID 50 A3 - 3 Edition 2.1... -
Page 26: Printer Installation
- Use the printer only within the allowed fluctuation range of ± 10%. - The power source must be free of noise, and not subjected to surges or noise (e.g. generated by big machines). _______________________________________________________________________________________________ MICROPLEX Operator’s Manual SOLID 50 A3 - 3 Edition 2.1... -
Page 27: _______________________________________________________________________________________________
If the printer is moved with the two cartridges installed, toner may spill out and damage the printer. - Be sure to plug the printer into a properly grounded outlet in the new location. _______________________________________________________________________________________________ MICROPLEX Operator’s Manual SOLID 50 A3 - 3 Edition 2.1... -
Page 28: _______________________________________________________________________________________________
- Do not expose the printer to abrupt temperature changes (heating, window or air conditioning). - The printer should not be exposed to direct sunlight. - Required space: Fig. 2.4.a Required space for the SOLID 50 A3 - 3 (printer with optional cassette 3+4) _______________________________________________________________________________________________ MICROPLEX Operator’s Manual SOLID 50 A3 - 3... -
Page 29: _______________________________________________________________________________________________
Installation _______________________________________________________________________________________________ - Required space (continuation): Fig. 2.4.b Required space for a printer SOLID 50 A3 - 3 with options - in this example: Printer equipped with a high capacity feeder and a finisher /stacker _______________________________________________________________________________________________ MICROPLEX Operator’s Manual SOLID 50 A3 - 3... -
Page 30: Printer Components
Power switch Jam access door (Door A) Duplex unit Front cover (Door F) Multipurpose Cassette 1 feeder Cassette 2 Cassette 3 (option) Cassette 4 (option) Fig. 2.5.a Printer Components _______________________________________________________________________________________________ MICROPLEX Operator’s Manual SOLID 50 A3 - 3 Edition 2.1... -
Page 31: _______________________________________________________________________________________________
Installation _______________________________________________________________________________________________ Control panel Flap Power switch Ethernet interface Centronics interface interface Serial interface Fig. 2.5.b View on the interfaces _______________________________________________________________________________________________ MICROPLEX Operator’s Manual SOLID 50 A3 - 3 Edition 2.1... -
Page 32: Handling Of Consumables
3.1.4) do the following: 3.1.1. Loading Cassettes 1 and 2 Your SOLID 50 A3 - 3 has two standard cassettes (cassettes 1 and 2). They can each hold 500 sheets of plain paper. 1. Pull the cassette open until it stops. -
Page 33: _______________________________________________________________________________________________
Fig. 3.1.1.b Moving the paper guides 3. Press the levers of the front guide (compare the small “picture” in _______________________________________________________________________________________________ MICROPLEX Operator’s Manual SOLID 50 A3 - 3 Edition 2.1... -
Page 34: _______________________________________________________________________________________________
5. Straighten the edges of the stack on a level surface. 6. Now put your stack of print media into the cassette as shown in the following figure. Fig. 3.1.1.d Inserting print media _______________________________________________________________________________________________ MICROPLEX Operator’s Manual SOLID 50 A3 - 3 Edition 2.1... -
Page 35: _______________________________________________________________________________________________
Do not load bent or wrinkled print media. 7. Press the levers of the front guide (see next figure) and slide the guide until it lightly touches the stack of print media. _______________________________________________________________________________________________ MICROPLEX Operator’s Manual SOLID 50 A3 - 3 Edition 2.1... -
Page 36: _______________________________________________________________________________________________
8. Press the levers of the side guide and slide it to the left until it lightly touches the stack of print media. Make sure the guide locks into place. Fig. 3.1.1.g Sliding the side guide to the print media stack _______________________________________________________________________________________________ MICROPLEX Operator’s Manual SOLID 50 A3 - 3 Edition 2.1... -
Page 37: _______________________________________________________________________________________________
Fig. 3.1.1.h Sliding the cassette into the printer _______________________________________________________________________________________________ MICROPLEX Operator’s Manual SOLID 50 A3 - 3 Edition 2.1... -
Page 38: Loading The Multipurpose Feeder
3. Adjust the extension guide to the length of the print media to be used. 4. Flex the sheets back and forth to loosen them, and then fan them. Fig. 3.1.2.b Fanning and aligning the paper pile _______________________________________________________________________________________________ MICROPLEX Operator’s Manual SOLID 50 A3 - 3 Edition 2.1... -
Page 39: _______________________________________________________________________________________________
Do not force the print media. 8. Slide the guides towards the stack (see the following figure) until they lightly touch the stack of print media. _______________________________________________________________________________________________ MICROPLEX Operator’s Manual SOLID 50 A3 - 3 Edition 2.1... -
Page 40: _______________________________________________________________________________________________
Fig. 3.1.2.d Sliding the guides to the print media stack 9. When finished printing from the multipurpose feeder, remove any print media, push the extension guide back in, and push the feeder to the closed position. _______________________________________________________________________________________________ MICROPLEX Operator’s Manual SOLID 50 A3 - 3 Edition 2.1... -
Page 41: Using The Output Bins
Fig. 3.1.3.a Standard output bin of the printer As an option a 3,500 sheets finisher/stacker and a face-up stacker (100 sheets) are available for your SOLID 50 A3 – 2 printer. _______________________________________________________________________________________________ MICROPLEX Operator’s Manual SOLID 50 A3 - 3 Edition 2.1... -
Page 42: Changing The Paper Size Setting
A5 = Long Edge Feed Feed A5R = Short Edge Feed Feed To change the size of the print page (print image) use the panel function Paper Size Selection (see section 5.12). _______________________________________________________________________________________________ MICROPLEX Operator’s Manual SOLID 50 A3 - 3 Edition 2.1... -
Page 43: _______________________________________________________________________________________________
[DIN A5 missing ] Non Standard paper sizes (user defined formats) have to be set using the panel functions Page Length and Paper Width (compare section 4.6 Menu structure). _______________________________________________________________________________________________ MICROPLEX Operator’s Manual SOLID 50 A3 - 3 Edition 2.1... -
Page 44: Toner Cartridge Replacing
The values listed in section 2.4 need to be met. In order to replace the toner cartridge, follow these instructions: Notice the information used with the toner cartridge also. _______________________________________________________________________________________________ MICROPLEX Operator’s Manual SOLID 50 A3 - 3 Edition 2.1... -
Page 45: _______________________________________________________________________________________________
3. Using the handholds located on each side, pull open the printer front door (Door F). Note: You must open the printer side door since the toner cartridge cannot be removed with just the printer front door opened. _______________________________________________________________________________________________ MICROPLEX Operator’s Manual SOLID 50 A3 - 3 Edition 2.1... -
Page 46: _______________________________________________________________________________________________
4. Pull up on the latch to release and slide the toner cartridge out until you see the handle. Handle Toner cartridge Fig. 3.2.c Taking out the toner cartridge _______________________________________________________________________________________________ MICROPLEX Operator’s Manual SOLID 50 A3 - 3 Edition 2.1... -
Page 47: _______________________________________________________________________________________________
If toner spills on the floor, do not clean it up using a vacuum or a wet cloth. Wipe up the spill with a dry cloth. If toner gets on clothing, be sure to wash the clothing in cold water. _______________________________________________________________________________________________ MICROPLEX Operator’s Manual SOLID 50 A3 - 3 Edition 2.1... -
Page 48: _______________________________________________________________________________________________
New toner cartridge Fig. 3.2.f Inserting the guides of the new toner cartridge 11. Push the toner cartridge into the printer until the cartridge clicks into place. _______________________________________________________________________________________________ MICROPLEX Operator’s Manual SOLID 50 A3 - 3 Edition 2.1... -
Page 49: _______________________________________________________________________________________________
13. Hold both sides of the printer front door (Door F) and close it. 14. Place the used toner cartridge in the plastic bag you saved in step 7. Fig. 3.2.h Use the plastic bag for the old toner cartridge _______________________________________________________________________________________________ MICROPLEX Operator’s Manual SOLID 50 A3 - 3 Edition 2.1... -
Page 50: _______________________________________________________________________________________________
15. Please pay attention to the information about the disposal of the old toner cartridge (current information can be found on the new toner cartridge). By returning the used toner cartridge to MICROPLEX, you help support world-wide recycling efforts. Until disposal, keep the old toner cartridge inside a closed cardboard box. -
Page 51: Drum Cartridge Replacing
The values listed in section 2.4 need to be met. In order to replace the drum cartridge, follow these instructions: Notice the information used with the drum cartridge also. _______________________________________________________________________________________________ MICROPLEX Operator’s Manual SOLID 50 A3 - 3 Edition 2.1... -
Page 52: _______________________________________________________________________________________________
4. Using the handholds located on each side, pull open the printer front door (Door F). Note: You must open the printer side door since the drum cartridge cannot be removed with just the printer front door opened. _______________________________________________________________________________________________ MICROPLEX Operator’s Manual SOLID 50 A3 - 3 Edition 2.1... -
Page 53: _______________________________________________________________________________________________
5. Pull up on the latch to release and slide the drum cartridge out until you see the handle. Handle Drum cartridge Fig. 3.3.c Taking out the drum cartridge _______________________________________________________________________________________________ MICROPLEX Operator’s Manual SOLID 50 A3 - 3 Edition 2.1... -
Page 54: _______________________________________________________________________________________________
Do not remove the yellow tape from the drum cartridge at this point. This has to be done in step 14. Fig. 3.3.d Unpacking the new drum cartridge _______________________________________________________________________________________________ MICROPLEX Operator’s Manual SOLID 50 A3 - 3 Edition 2.1... -
Page 55: _______________________________________________________________________________________________
Fig. 3.3.e Removing the protective paper of the new drum cartridge Do not leave the drum cartridge exposed to light for extended periods of time. Fig. 3.3.f Hints about the drum cartridge _______________________________________________________________________________________________ MICROPLEX Operator’s Manual SOLID 50 A3 - 3 Edition 2.1... -
Page 56: _______________________________________________________________________________________________
Fig. 3.3.g Inserting the guides of the new drum cartridge 12. Drop the handle back into place. 13. Push the drum cartridge into the printer until the cartridge clicks into place. _______________________________________________________________________________________________ MICROPLEX Operator’s Manual SOLID 50 A3 - 3 Edition 2.1... -
Page 57: _______________________________________________________________________________________________
Fig. 3.3.h Inserting the new drum cartridge 14. Carefully pull the yellow tape completely out of the cartridge. Discard the tape. Fig. 3.3.i Removing the yellow tape 15. Close the printer side door (Door A). _______________________________________________________________________________________________ MICROPLEX Operator’s Manual SOLID 50 A3 - 3 Edition 2.1... -
Page 58: _______________________________________________________________________________________________
18. Please pay attention to the information about the disposal of the old drum cartridge (current information can be found on the new drum cartridge). By returning the used drum cartridge to MICROPLEX, you help support world-wide recycling efforts. Until disposal, keep the old drum cartridge inside a closed cardboard box. -
Page 59: Operation And Menu Structure
2. Use a proper interface line to connect the printer to the computer or to attach the printer to the network. The printer SOLID 50 A3 - 3 is provided with several interfaces; see figure 2.5.b and chapter 9 Specifications for more information. -
Page 60: _______________________________________________________________________________________________
The printer requires time to warm up after you turn it on. During this period, the message [Please Wait ] appears on the control panel display. After the printer completes its internal tests, the [SOLID 50 A3 - 3 message indicates the printer is ready to receive jobs. -
Page 61: Control Panel View
Operation and Menu Structure _______________________________________________________________________________________________ 4.3. Control Panel View Display (two-lined) ONLINE SOLID 50 A3 - 3 LEDs 9 Keys integrated _______________________________________________________________________________________________ MICROPLEX Operator’s Manual SOLID 50 A3 - 3 Edition 2.1... -
Page 62: Function Of The Control Panel Elements
There are no printable data in the input buffer. ERROR - LED FAULT An error occurred in the printer. The printer is OFF LINE. No error occurring. _______________________________________________________________________________________________ MICROPLEX Operator’s Manual SOLID 50 A3 - 3 Edition 2.1... -
Page 63: _______________________________________________________________________________________________
This structure and the panel functions are described in the following. Using this key a RESET is released in the OFF LINE mode. You can back out e.g. error messages by a RESET. _______________________________________________________________________________________________ MICROPLEX Operator’s Manual SOLID 50 A3 - 3 Edition 2.1... -
Page 64: Configuration Via The Control Panel
You can use the control panel to change the printer configuration and customize your printer to meet your specific needs. In addition printer configuration via Ethernet is possible. The MICROPLEX printer controller offers an integrated website, for more information see Networking Features of MICROPLEX Printers. -
Page 65: Menu Structure
_______________________________________________________________________________________________ 4.6. Menu Structure Access to the menu structure is possible as soon as the printer is turned OFF LINE. The menu structure of the SOLID 50 A3 - 3 is arranged in different levels: ON LINE - Mode ... -
Page 66: _______________________________________________________________________________________________
As an alternative the INFO key can be used as well. ["Function"] _______________________________________________________________________________________________ MICROPLEX Operator’s Manual SOLID 50 A3 - 3 Edition 2.1... -
Page 67: _______________________________________________________________________________________________
If you press the SELECT key although the absolute right digit (digit 1) of the function value is still arrived, the currently displayed function value is stored. _______________________________________________________________________________________________ MICROPLEX Operator’s Manual SOLID 50 A3 - 3 Edition 2.1... -
Page 68: _______________________________________________________________________________________________
If the MENU key is pressed instead, the changes are only stored temporary (not saved as setup). (This key takes the user to the respective previous menu level). _______________________________________________________________________________________________ MICROPLEX Operator’s Manual SOLID 50 A3 - 3 Edition 2.1... -
Page 69: _______________________________________________________________________________________________
Pressing the RETURN key or the MENU key takes the user back to the respective menu level above. Return to the ON LINE - mode: Pressing the START/STOP key switches the user directly to ON LINE from any menu position. _______________________________________________________________________________________________ MICROPLEX Operator’s Manual SOLID 50 A3 - 3 Edition 2.1... -
Page 70: Syntax Of Diagrams
The Panel display column shows the display messages ["Message"] corresponding to the sequences listed on the left. In the column Notes explanations to particular operational steps are given. _______________________________________________________________________________________________ MICROPLEX Operator’s Manual SOLID 50 A3 - 3 Edition 2.1... -
Page 71: Panel Functions
Press the SELECT key. Menu Level 1 is selected. [Status Sheet ] Press the SELECT key again. [Status Sheet ] A status sheet is printed. The printer is turned ON LINE again. _______________________________________________________________________________________________ MICROPLEX Operator’s Manual SOLID 50 A3 - 3 Edition 2.1... -
Page 72: _______________________________________________________________________________________________
/ right Default character code Options Fonts installed (Font banks) Note: Use the panel function Printing the Font List to show the fonts installed (see the following section). _______________________________________________________________________________________________ MICROPLEX Operator’s Manual SOLID 50 A3 - 3 Edition 2.1... -
Page 73: Printing The Font List
Press the NEXT or PREVIOUS key until [Font List ] is displayed. [Font List ] [Font List ] The font list is printed. The printer is turned ON LINE again. _______________________________________________________________________________________________ MICROPLEX Operator’s Manual SOLID 50 A3 - 3 Edition 2.1... -
Page 74: Choosing Print Resolution
600 dpi resolution is selected. [Save as Setup? ] In addition this new value can be saved as setup value (using the SELECT key), before the printer is turned ON LINE again. _______________________________________________________________________________________________ MICROPLEX Operator’s Manual SOLID 50 A3 - 3 Edition 2.1... -
Page 75: _______________________________________________________________________________________________
300 dpi font banks (bitmap writing) are available. If 600 dpi resolution is chosen, the corresponding fonts must be loaded into the printer server (e.g. True Type fonts, scalable download fonts). _______________________________________________________________________________________________ MICROPLEX Operator’s Manual SOLID 50 A3 - 3 Edition 2.1... -
Page 76: Hexdump-Mode Activation
Note: printer off and on again the printer can be taken out of Hexdump-Mode. Time between turning the printer off and on again should be at least 15 seconds. _______________________________________________________________________________________________ MICROPLEX Operator’s Manual SOLID 50 A3 - 3 Edition 2.1... -
Page 77: Normal Print Mode Activation (Incl. Form Feed)
Hexdump-Mode it is possible that data can remain in the input buffer unintentionally (cause: in the Hexdump- Mode no control characters are evaluated and no FORM FEED is effected). _______________________________________________________________________________________________ MICROPLEX Operator’s Manual SOLID 50 A3 - 3 Edition 2.1... -
Page 78: Clearing The Input Buffer (Cancel Job)
[Cancel Job ] is displayed. [Cancel Job ] All data contained in the input buffer [Cancel Job ] will be cleared. The printer is turned ON LINE again. _______________________________________________________________________________________________ MICROPLEX Operator’s Manual SOLID 50 A3 - 3 Edition 2.1... -
Page 79: Printing The Menu Page
[Menu Page] is displayed. [Menu Page ] A menu structure presentation of the [Menu Page ] SOLID 50 A3 - 3 (see section 4.6) is printed. The printer is turned ON LINE again. _______________________________________________________________________________________________ MICROPLEX Operator’s Manual SOLID 50 A3 - 3... -
Page 80: Generating Testsheets (Sliding Pattern)
A series of test prints is generated. [Sliding Pattern ] The printer is turned ON LINE again. The printing out of test prints can be stopped by pressing the START/STOP key. _______________________________________________________________________________________________ MICROPLEX Operator’s Manual SOLID 50 A3 - 3 Edition 2.1... -
Page 81: Feeder (Cassette) Selection
Feeder 2 (Cassette 2) is selected. [Save as Setup? ] In addition this new value can be saved as setup value (using the SELECT key), before the printer is turned ON LINE again. _______________________________________________________________________________________________ MICROPLEX Operator’s Manual SOLID 50 A3 - 3 Edition 2.1... -
Page 82: _______________________________________________________________________________________________
. . . Auto. 2+1 Automatic selection between feeders (the subset of feeders is settable, tray 1+2 = default) Auto.Sel. Mode Automatic selection between all feeders that are installed (Feeder Linking) _______________________________________________________________________________________________ MICROPLEX Operator’s Manual SOLID 50 A3 - 3 Edition 2.1... -
Page 83: Stacker Selection
Paper Tray 2 is selected. [Save as Setup? ] In addition this new value can be saved as setup value (using the SELECT key), before the printer is turned ON LINE again. _______________________________________________________________________________________________ MICROPLEX Operator’s Manual SOLID 50 A3 - 3 Edition 2.1... -
Page 84: _______________________________________________________________________________________________
Panel Functions _______________________________________________________________________________________________ Stacker assignment: Paper Tray 1 Standard output bin (face down tray) Paper Tray 2 Second output bin (optional finisher/stacker) Paper Tray 3 Third output bin (optional finisher/stacker) _______________________________________________________________________________________________ MICROPLEX Operator’s Manual SOLID 50 A3 - 3 Edition 2.1... -
Page 85: Print Mode Selection (Simplex/Duplex)
The duplex mode 1 is selected. [Save as Setup? ] In addition this new value can be saved as setup value (using the SELECT key), before the printer is turned ON LINE again. _______________________________________________________________________________________________ MICROPLEX Operator’s Manual SOLID 50 A3 - 3 Edition 2.1... -
Page 86: _______________________________________________________________________________________________
Duplex print mode short format-side, without rear side displacement for preprinted paper Duplex print mode long format-side, without rear side displacement _______________________________________________________________________________________________ MICROPLEX Operator’s Manual SOLID 50 A3 - 3 Edition 2.1... -
Page 87: Paper Size Selection
The paper size Legal is selected. [Save as Setup? ] In addition this new value can be saved as setup value (using the SELECT key), before the printer is turned ON LINE again. _______________________________________________________________________________________________ MICROPLEX Operator’s Manual SOLID 50 A3 - 3 Edition 2.1... -
Page 88: Enabling Format Check
The format check is enabled. [Save as Setup? ] In addition this new value can be saved as setup value (using the SELECT key), before the printer is turned ON LINE again. _______________________________________________________________________________________________ MICROPLEX Operator’s Manual SOLID 50 A3 - 3 Edition 2.1... -
Page 89: Print Direction Selection
Print direction assignment: Print direction 0 = Portrait (upright format) Print direction 1 = Landscape (horizontal format) Print direction 2 = Portrait upside down Print direction 3 = Landscape upside down _______________________________________________________________________________________________ MICROPLEX Operator’s Manual SOLID 50 A3 - 3 Edition 2.1... -
Page 90: Data - Interface Configuration
(using the SELECT key), before the printer is turned ON LINE again. Note: The printer uses SIA (Simultaneous Interface Administration) to check, which interface is currently used for the transfer of print data. _______________________________________________________________________________________________ MICROPLEX Operator’s Manual SOLID 50 A3 - 3 Edition 2.1... -
Page 91: Emulation Selection
The emulation HP PCL 5 is selected. [Save as Setup? ] In addition this new value can be saved as setup value (using the SELECT key), before the printer is turned ON LINE again. _______________________________________________________________________________________________ MICROPLEX Operator’s Manual SOLID 50 A3 - 3 Edition 2.1... -
Page 92: _______________________________________________________________________________________________
QMS (Magnum) Code V, ZPL II (Zebra Programming Language), Datamax (FGL), Eltron EPL2, Express (More emulations on request) Notice: The brand names mentioned are registered trademarks of the enterprises named above. _______________________________________________________________________________________________ MICROPLEX Operator’s Manual SOLID 50 A3 - 3 Edition 2.1... -
Page 93: Display Language Selection
The display language English is selected. [Save as Setup? ] In addition this new value can be saved as setup value (using the SELECT key), before the printer is turned ON LINE again. _______________________________________________________________________________________________ MICROPLEX Operator’s Manual SOLID 50 A3 - 3 Edition 2.1... -
Page 94: Transparent Code Adjustment
IDOL commands. [Save as Setup? ] In addition this new value can be saved as setup value (using the SELECT key), before the printer is turned ON LINE again. _______________________________________________________________________________________________ MICROPLEX Operator’s Manual SOLID 50 A3 - 3 Edition 2.1... -
Page 95: Selection Of Memory Distribution (Input Buffer)
100 kB is selected as input buffer. [Save as Setup? ] In addition this new value can be saved as setup value (using the SELECT key), before the printer is turned ON LINE again. _______________________________________________________________________________________________ MICROPLEX Operator’s Manual SOLID 50 A3 - 3 Edition 2.1... -
Page 96: Setting To Factory Default
[Save as Setup? ] Only if you press the SELECT key a second time the configuration will be back-outed to factory defaults. The printer is turned ON LINE again. _______________________________________________________________________________________________ MICROPLEX Operator’s Manual SOLID 50 A3 - 3 Edition 2.1... -
Page 97: Font Selection
The font number 5507 Langeoog is selected. [Save as Setup? ] In addition this new value can be saved as setup value (using the SELECT key), before the printer is turned ON LINE again. _______________________________________________________________________________________________ MICROPLEX Operator’s Manual SOLID 50 A3 - 3 Edition 2.1... -
Page 98: _______________________________________________________________________________________________
Panel Functions _______________________________________________________________________________________________ The SOLID 50 A3 - 3 standard equipment contains the following fonts: Font no. Font width Font height Font name 0600 Kurilen 0602 Kurilen Italic 0610 10.1 Kurilen 1710 10.1 Kurilen Italic 4508 Helgoland 4510 Helgoland 4714 14.4... -
Page 99: _______________________________________________________________________________________________
You can use the panel function Printing the Font List (see section 5.2) to generate a list of all fonts installed to the printer. _______________________________________________________________________________________________ MICROPLEX Operator’s Manual SOLID 50 A3 - 3 Edition 2.1... -
Page 100: Text Orientation Selection
ON LINE again. Text orientation assignment: Orientation 0 = Portrait (upright format) Orientation 1 = Landscape (horizontal format) Orientation 2 = Portrait upside down Orientation 3 = Landscape upside down _______________________________________________________________________________________________ MICROPLEX Operator’s Manual SOLID 50 A3 - 3 Edition 2.1... -
Page 101: Symbol Code Selection
The symbol code 901, IBM PC-I is selected. [Save as Setup? ] In addition this new value can be saved as setup value (using the SELECT key), before the printer is turned ON LINE again. _______________________________________________________________________________________________ MICROPLEX Operator’s Manual SOLID 50 A3 - 3 Edition 2.1... -
Page 102: Configuration Of Text Margins
The right margin is changed to 87 dot. [Save as Setup? ] In addition this new value can be saved as setup value (using the SELECT key), before the printer is turned ON LINE again. _______________________________________________________________________________________________ MICROPLEX Operator’s Manual SOLID 50 A3 - 3 Edition 2.1... -
Page 103: Image Shifting To The X-Direction
16/300 inch (about 1.36 mm) to the right. [Save as Setup? ] In addition this new value can be saved as setup value (using the SELECT key), before the printer is turned ON LINE again. _______________________________________________________________________________________________ MICROPLEX Operator’s Manual SOLID 50 A3 - 3 Edition 2.1... -
Page 104: _______________________________________________________________________________________________
X-direction. In this example the value of the Image X-Position was Feed increased (NEXT key). direction (print direction) Previous position of the printout margin (prior to the image shifting) _______________________________________________________________________________________________ MICROPLEX Operator’s Manual SOLID 50 A3 - 3 Edition 2.1... -
Page 105: Image Shifting To The Y-Direction
[Save as Setup? ] In addition this new value can be saved as setup value (using the SELECT key), before the printer is turned ON LINE again. _______________________________________________________________________________________________ MICROPLEX Operator’s Manual SOLID 50 A3 - 3 Edition 2.1... -
Page 106: _______________________________________________________________________________________________
Y-direction. direction In this example the value of the (print Image Y-Position was increased direction) (NEXT key). Previous position of the printout margin (prior to the image shifting) _______________________________________________________________________________________________ MICROPLEX Operator’s Manual SOLID 50 A3 - 3 Edition 2.1... -
Page 107: Lines Per Inch Setting (Line Spacing)
10 lpi. [Save as Setup? ] In addition this new value can be saved as setup value (using the SELECT key), before the printer is turned ON LINE again. _______________________________________________________________________________________________ MICROPLEX Operator’s Manual SOLID 50 A3 - 3 Edition 2.1... -
Page 108: Number Of Characters Per Inch Setting (Character Spacing)
12 cpi. [Save as Setup? ] In addition this new value can be saved as setup value (using the SELECT key), before the printer is turned ON LINE again. _______________________________________________________________________________________________ MICROPLEX Operator’s Manual SOLID 50 A3 - 3 Edition 2.1... -
Page 109: Print Density Setting
The print density is reduced to 60 %. [Save as Setup? ] In addition this new value can be saved as setup value (using the SELECT key), before the printer is turned ON LINE again. _______________________________________________________________________________________________ MICROPLEX Operator’s Manual SOLID 50 A3 - 3 Edition 2.1... -
Page 110: Configuration Of Network Parameters (Ip Address, E.g.)
(the RETURN key [192.168.010.123 ] moves you back, if need be). The new IP address is saved as setup [Saved ! ] value. The printer is turned ON LINE again. _______________________________________________________________________________________________ MICROPLEX Operator’s Manual SOLID 50 A3 - 3 Edition 2.1... -
Page 111: _______________________________________________________________________________________________
(compare section 5.6 Menu Structure). Select the subitem Off from the network menu to switch off the network access. Dynamic Host Configuration Protocol: offers among other things a centralized address management. _______________________________________________________________________________________________ MICROPLEX Operator’s Manual SOLID 50 A3 - 3 Edition 2.1... -
Page 112: _______________________________________________________________________________________________
Capability of a device for sending and receiving data at the same time. In the case of full duplex, collision detection is deactivated. A full duplex capable device is able to buffer data packets. _______________________________________________________________________________________________ MICROPLEX Operator’s Manual SOLID 50 A3 - 3 Edition 2.1... -
Page 113: Operator Maintenance
In order to operate the printer on the highest quality level, it is necessary to carry out simple cleaning operations, and occasionally to replace special components. These operations can be carried out by a MICROPLEX trained operator. A untrained person is not allowed to carry out these operations. -
Page 114: Replacing The Transfer Roller And Fuser
Instruction sheet Pick rollers Fig. 6.2.a Maintenance kit Unpack each box and remove any packaging. Wear the gloves as you replace the fuser to keep your hands clean. _______________________________________________________________________________________________ MICROPLEX Operator’s Manual SOLID 50 A3 - 3 Edition 2.1... -
Page 115: Removing The Old Transfer Roller
3. Gently lower the door to the open position. Caution: Some components inside door A may be hot. 4. Use both hands to press the levers of the transfer roller. _______________________________________________________________________________________________ MICROPLEX Operator’s Manual SOLID 50 A3 - 3 Edition 2.1... - Page 116 Operator Maintenance _______________________________________________________________________________________________ Fig. 6.2.c Grasp the coloured handles 5. Firmly pull the transfer roller out. Fig. 6.2.d Pulling the old transfer roller out _______________________________________________________________________________________________ MICROPLEX Operator’s Manual SOLID 50 A3 - 3 Edition 2.1...
- Page 117 Fig. 6.2.e Unpacking the new transfer roller 7. Align the transfer roller with the opening in the printer door A, and then slide it into place. Fig. 6.2.f Sliding the new transfer roller into place _______________________________________________________________________________________________ MICROPLEX Operator’s Manual SOLID 50 A3 - 3 Edition 2.1...
- Page 118 Operator Maintenance _______________________________________________________________________________________________ 8. Push the transfer roller into the printer door A until it clicks into place. Fig. 6.2.g Inserting the new transfer roller _______________________________________________________________________________________________ MICROPLEX Operator’s Manual SOLID 50 A3 - 3 Edition 2.1...
- Page 119 1. Loosen the two coloured thumbscrews. They do not come completely out. Fig. 6.2.h Loosening the two coloured thumbscrews 2. Grasp the coloured handles through its rings and rotate it out toward you. They do not lock into position. _______________________________________________________________________________________________ MICROPLEX Operator’s Manual SOLID 50 A3 - 3 Edition 2.1...
- Page 120 Fig. 6.2.i Grasp the coloured handles 3. Grasp both handles and firmly pull the fuser out. Fig. 6.2.j Pulling the old fuser out 4. Dispose of the old fuser. _______________________________________________________________________________________________ MICROPLEX Operator’s Manual SOLID 50 A3 - 3 Edition 2.1...
-
Page 121: Installing A New Fuser
Fig. 6.2.k Unpacking the new fuser 6. Align the fuser with the opening in the printer, and then slide it into place. Fig. 6.2.l Sliding the new fuser into the printer _______________________________________________________________________________________________ MICROPLEX Operator’s Manual SOLID 50 A3 - 3 Edition 2.1... - Page 122 7. Carefully tighten the two coloured thumbscrews. Overtightening the screws can strip the threads. Fig. 6.2.m Carefully tighten the coloured thumbscrews 8. Close the printer side door (Door A). _______________________________________________________________________________________________ MICROPLEX Operator’s Manual SOLID 50 A3 - 3 Edition 2.1...
- Page 123 Together with the fuser, further items have to be replaced. (See contents of the maintenance kit and figure 6.2.a, too.) Make sure you follow the instructions given in the instruction sheet shipped with the maintenance kit. _______________________________________________________________________________________________ MICROPLEX Operator’s Manual SOLID 50 A3 - 3 Edition 2.1...
- Page 124 Operator Maintenance _______________________________________________________________________________________________ _______________________________________________________________________________________________ MICROPLEX Operator’s Manual SOLID 50 A3 - 3 Edition 2.1...
-
Page 125: Troubleshooting
Make sure you do not burn your hands when you fix a paper jam. - After closing the printer, make sure all covers are firmly shut. Only a MICROPLEX authorized operator or service engineer should address printer problems for which no remedies are given in the following pages. -
Page 126: Error In The Print Process
- Carefully read the information in section 7.4: Print Media Jam. If the remedies above are not successful please switch off the device and contact a MICROPLEX authorized service engineer. _______________________________________________________________________________________________ MICROPLEX Operator’s Manual SOLID 50 A3 - 3 Edition 2.1... -
Page 127: Reduced Print Quality
See also section 2.4: Printer Installation. Toner residues on the - Clean the printer back side of the printouts If the remedies above are not successful, please contact a MICROPLEX authorized service engineer. _______________________________________________________________________________________________ MICROPLEX Operator’s Manual SOLID 50 A3 - 3... -
Page 128: Error Messages
7.3. Error Messages The following gives examples of warnings and error messages that can be displayed in the control panel of the SOLID 50 A3 - 3 (panel messages, see also section 4.3: Control Panel View). By displaying the message in clear the device points to the reason for the error. -
Page 129: Error In Paper Transport
7.3.3. Service Call Panel message Description Remedies e.g. [Service Call Please give your service [SRxx = yy xx Status number engineer the exact error yy Status value message (hexadecimal) _______________________________________________________________________________________________ MICROPLEX Operator’s Manual SOLID 50 A3 - 3 Edition 2.1... -
Page 130: Print Media Jam
If you store individual packages of paper out of the original carton, make sure they rest on a flat surface so the edges do not buckle or curl. Do not place anything on top of paper packages. _______________________________________________________________________________________________ MICROPLEX Operator’s Manual SOLID 50 A3 - 3 Edition 2.1... -
Page 131: Loading Print Media
(comp. section 3.1.2: Loading the Multipurpose Feeder). Do not fill different kinds of paper into one cassette. The paper paths / paper cassettes must be opened and closed carefully. _______________________________________________________________________________________________ MICROPLEX Operator’s Manual SOLID 50 A3 - 3 Edition 2.1... -
Page 132: Clearing Jams From The Printer
The sheets within all paper paths have to be removed completely. Close all printer covers duly. In fig. 7.4.2.a the paper paths inside a SOLID 50 A3 - 3 printer are shown including some optional equipments. The current paper path depends on the selected paper cassette and the selected output stacker. - Page 133 See the following illustrations for a better understanding of the path the paper travels through the printer and its options. Fig. 7.4.2.a SOLID 50 A3 - 3 schematic paper path of standard cassettes and optional cassettes, duplex unit, and multipurpose feeder...
- Page 134 Troubleshooting _______________________________________________________________________________________________ Fig. 7.4.2.b llustration of areas where you can access jams Fig. 7.4.2.c Printer together with the optional finisher/stacker _______________________________________________________________________________________________ MICROPLEX Operator’s Manual SOLID 50 A3 - 3 Edition 2.1...
-
Page 135: Clearing Jam Inside Cassette 1 And The Toner Cartridge Area
1. Open the multipurpose feeder. Fig. 7.4.3.a Opening the multipurpose feeder 2. Pull up on handle to open the printer side door (Door A). Fig. 7.4.3.b Opening the printer side door (Door A) _______________________________________________________________________________________________ MICROPLEX Operator’s Manual SOLID 50 A3 - 3 Edition 2.1... - Page 136 Reinstall the cassette. 4. If necessary, press the green handle to move the paper to make it easier to remove. Fig. 7.4.3.c Removing jammed paper _______________________________________________________________________________________________ MICROPLEX Operator’s Manual SOLID 50 A3 - 3 Edition 2.1...
- Page 137 7. Confirm that all paper fragments are removed. 8. Close cassette 1. 9. Close the printer side door (Door A). Fig. 7.4.3.e Closing the printer side door (Door A) _______________________________________________________________________________________________ MICROPLEX Operator’s Manual SOLID 50 A3 - 3 Edition 2.1...
-
Page 138: Clearing Jam Inside Cassette
Fig. 7.4.4.b Removing the paper If the paper is not visible or there is not enough showing to grasp easily, it is still in the cassette. Complete step 3 through step 6. _______________________________________________________________________________________________ MICROPLEX Operator’s Manual SOLID 50 A3 - 3 Edition 2.1... - Page 139 Reinstall the cassette. 3. Pull cassette 2 open. 4. Pull the paper to the right, and then straight out. Fig. 7.4.4.c Pulling out the jammed paper _______________________________________________________________________________________________ MICROPLEX Operator’s Manual SOLID 50 A3 - 3 Edition 2.1...
-
Page 140: Clearing Jam Inside Cassette 3 And Cassette
Fig. 7.4.4.d Closing door B 7.4.5. Clearing Jam inside Cassette 3 and Cassette 4 1. Open the side door of cassettes 3 and 4 (Door C). Fig. 7.4.5.a Opening door C _______________________________________________________________________________________________ MICROPLEX Operator’s Manual SOLID 50 A3 - 3 Edition 2.1... - Page 141 4. Pull the paper to the right, and then straight out. 5. Close cassette 3 (or cassette 4). 6. Close the side door for cassettes 3 and 4 (Door C). _______________________________________________________________________________________________ MICROPLEX Operator’s Manual SOLID 50 A3 - 3 Edition 2.1...
-
Page 142: Clearing Jam Inside The Multipurpose Feeder
The printer automatically cycles, forcing the sheet to move forward. Open the printer side door (Door A). Pull the sheet straight out. 4. Close the printer side door (Door A). _______________________________________________________________________________________________ MICROPLEX Operator’s Manual SOLID 50 A3 - 3 Edition 2.1... -
Page 143: Clearing Jam Inside The Duplex Unit
2. Pull the sheet straight out. Fig. 7.4.7.b Removing the paper If the paper is not visible or there is not enough showing to grasp easily, it is already behind door E. _______________________________________________________________________________________________ MICROPLEX Operator’s Manual SOLID 50 A3 - 3 Edition 2.1... - Page 144 3. Pull up on handle to open door E. Fig. 7.4.7.c Opening the door E 4. Pull the sheet straight out. Fig. 7.4.7.d Removing the paper 5. Close door E. Close the duplex unit door (Door D). _______________________________________________________________________________________________ MICROPLEX Operator’s Manual SOLID 50 A3 - 3 Edition 2.1...
-
Page 145: Solving Paper Feed Problems
Media Handling for detailed instructions. Load paper from a fresh Paper has absorbed moisture due to high humidity. package. Store paper in its original wrapper until you load it. _______________________________________________________________________________________________ MICROPLEX Operator’s Manual SOLID 50 A3 - 3 Edition 2.1... - Page 146 If the remedies above are not successful or there is an error message that is not described in the sections above please switch off the device and contact a MICROPLEX authorized service engineer. _______________________________________________________________________________________________ MICROPLEX Operator’s Manual SOLID 50 A3 - 3 Edition 2.1...
-
Page 147: Print Repeat After An Error
EEPROM - configuration) if the user wants to resume the print job at a position he chooses himself. In addition to this see panel function Clearing the Input Buffer (section 5.6). _______________________________________________________________________________________________ MICROPLEX Operator’s Manual SOLID 50 A3 - 3 Edition 2.1... - Page 148 Troubleshooting _______________________________________________________________________________________________ _______________________________________________________________________________________________ MICROPLEX Operator’s Manual SOLID 50 A3 - 3 Edition 2.1...
-
Page 149: Measures For Transport And Shipping (Repacking)
Lock all moveable parts of the printer (use all original transport safety devices, adhesive fasteners and so on). Repack all items in their original packing material and ship them in the original boxes. _______________________________________________________________________________________________ MICROPLEX Operator’s Manual SOLID 50 A3 - 3 Edition 2.1... - Page 150 Measures for Transport and Shipping _______________________________________________________________________________________________ _______________________________________________________________________________________________ MICROPLEX Operator’s Manual SOLID 50 A3 - 3 Edition 2.1...
-
Page 151: Specifications
RS232/RS422 (Jumper) USB 1.1 LAN: Ethernet 10/100 Mbit (TCP-IP) Optional: LAN: Ethernet (SPX-IPX, LAT), Token Ring Host: IBM SCS / IPDS (Twinax/Coax), Siemens (BAM/SS-97) Resumption see next page! _______________________________________________________________________________________________ MICROPLEX Operator’s Manual SOLID 50 A3 - 3 Edition 2.1... - Page 152 15 to 85 % Mains connection: AC 120 V / 60 Hz North America AC 230 V ± 10% / 50 Hz Europe, United Kingdom Power admission: max. 1.5 kVA _______________________________________________________________________________________________ MICROPLEX Operator’s Manual SOLID 50 A3 - 3 Edition 2.1...
- Page 153 There isn’t any generally valid rule to calculate the costs per page. Therefore values given by different manufacturers are very often not comparable. The values given by MICROPLEX are based on the utilization time of the so-called consumables of the printer. There isn’t any generally valid rule for this calculation, either. Therefore MICROPLEX has fixed the definition of consumables as follows: 1.
- Page 154 An exchange of parts is only then necessary even if the MNPSQ is already exceeded. quality Utilization time exchange exchange MNPSQ MNPCAQ pages _______________________________________________________________________________________________ MICROPLEX Operator’s Manual SOLID 50 A3 - 3 Edition 2.1...
-
Page 155: Index
109 Hexdump 76 description, general 7 humidity 28 diagrams 70 dimensions 28 display 61, 62 display language 93 door A 30 door F 30 drum cartridge 51 duplex 85 _______________________________________________________________________________________________ MICROPLEX Operator’s Manual SOLID 50 A3 - 3 Edition 2.1... - Page 156 PREVIOUS key 63, 66, 67 menu page 79 print density 154 menu structure 65 print direction 89 multipurpose feeder 30 print media handling 32 multipurpose feeder, loading 38 print media jam 130 _______________________________________________________________________________________________ MICROPLEX Operator’s Manual SOLID 50 A3 - 3 Edition 2.1...
- Page 157 154 specifications 151 stacker 151 stacker, selection 83 standard output bin 30, 41 START/STOP key 63, 66 STATUS key 63 status sheet 71 symbol 9 symbol code 101 _______________________________________________________________________________________________ MICROPLEX Operator’s Manual SOLID 50 A3 - 3 Edition 2.1...
Need help?
Do you have a question about the SOLID 50 A3 - 3 and is the answer not in the manual?
Questions and answers
What's the common problem or how to fix this one?
Common problems and solutions for the Microplex SOLID 50 A3 - 3 include:
Problem: Paper frequently jams
Causes and Solutions:
- Using incorrect print media: Use only recommended paper and media.
- Wrinkled, creased, or damp paper: Do not load damaged paper; flex, fan, and straighten it before loading.
- Overloading the cassette or feeder: Ensure paper stack does not exceed maximum height limits.
- Incorrect guide position in cassette: Adjust guides to match the paper size.
- Paper moisture due to humidity: Use fresh, properly stored paper.
- Cassette not fully inserted: Push all cassettes firmly into place.
Other Notes:
- Follow specific handling instructions in the manual’s print media section.
- Only authorized personnel should address issues not covered in the manual.
This answer is automatically generated