Jura Impressa C5 Operating Instructions And Warranty
Hide thumbs
Also See for Impressa C5:
- Owner's manual (88 pages) ,
- Manual (84 pages) ,
- Quick reference manual (13 pages)

Related Manuals for Jura Impressa C5


Summary of Contents for Jura Impressa C5
- Page 1 Impressa C5 Fully Automatic Coffee & Espresso Center with Clearyl Blue Water Care System Operating Instructions and Warranty Customer Service 1-800-220-5701...
-
Page 2: Important Safeguards
IMPORTANT SAFEGUARDS wall outlet. To disconnect, turn any control to “off” then remove plug from wall outlet. When using electrical appliances, basic safety precautions 12. Do not use appliance for other than intended use. should always be followed, including the following: 13. -
Page 3: Jura-Capresso / Address Information
Notice: Your Impressa C5 has a 3-prong grounded plug. To JURA-CAPRESSO reduce the risk of electrical shock this plug will fit in an outlet Jura was founded in 1931 in Switzerland. Capresso was only one way. If the plug does not fit in the outlet contact a founded in 1994 in the USA. -
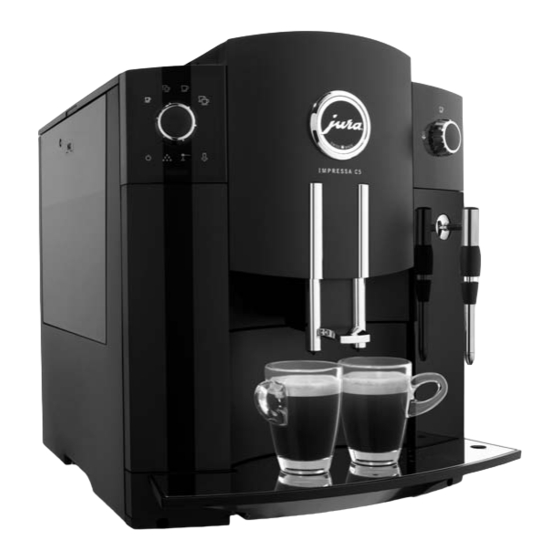
Page 4: Illustrations
1. Height-Adjustable Coffee Spout Fig. 1 2. DIAL (See Fig. 3) Indicators (See Fig. 3a) 2a. Access Door 3. Removable Water Tank 4. Low Water Flotation Device (See Fig. 7.4) 5. Clearyl Blue Water Care Cartridge* 6. Lid for Water Tank 7. - Page 5 Fig. 3 Operating DIAL with illuminated symbols Fig. 3a Indicators behind Access Door 1-cup Espresso FILL WATER light 2-cup Espresso EMPTY TRAY light 1-cup Coffee FILL BEANS light 2-cup Coffee Three DIAL Lights “DIAL” with push button RINSE STEAM CLEARYL button with light PRE-GROUND COFFEE DECALCIFYING button with light MESSAGE light...
-
Page 6: B. Water (Hot Water/Steam
“SELECTOR” Grind a. Cup (for coffee) Fineness Selector b. Water (hot water/steam) c. SELECTOR light Fig. 4 Fig. 5 Fig. 6 Fig. 7 Fig. 8 Fig. 9 Fig. 10 Fig. 11 Fig. 12... - Page 7 Dual Frother PLUS Steam nozzle Steaming Frothing down Sleeve Fig. 13 Fig. 14 Fig. 15 Fig. 16 Fig. 17 Fig. 18 Fig. 19 Fig. 20...
-
Page 8: Table Of Contents
14. Water Care..............17 2. Operating Instructions / Customer Service....9 a. Water Hardness Monitor ........17 3. Welcome to the Impressa C5 ........9 b. Changing the Water Hardness Monitor ....17 a. "Crema Coffee" and Pressure Brewing ....9 15. Clearyl Blue Water Filter Cartridge......18 b. -
Page 9: Product Registration
This fully automatic coffee center is extremely user friendly. Your for maximum flavor and aroma. Your Jura automatic coffee Impressa C5 can prepare one or two cups of crema coffee at a center will always produce espresso and coffee with a thick, time. -
Page 10: Different Coffee Drinks
5. FACTORY SETTINGS • Espresso is not a bean, it's the way the coffee is roasted and The IMPRESSA C5 has four coffee settings. Selecting one of the prepared. Typical US espresso roasts result in darker beans with four coffee symbols (see chapter 9b) will produce approximately an oily surface. -
Page 11: Preparing The Machine For The First Time
1 cup coffee: 5 oz. function properly, please avoid using any kind of coated or 2 cup coffee: 5 oz. per cup, total of 10 oz. flavored beans (all coating and flavors contain sugar or sugar All four settings can be re-programmed to your personal substances). -
Page 12: Adjusting The Grinder
machine. The “ON” symbol (Fig. 3) illuminates, indicating (Fig. 1,2a) the FILL BEANS light blinks (Fig. 3a). that the main power switch is on. • Just push the DIAL again to brew another cup of coffee. Important: After the brewing stops, the machine will discard the •... -
Page 13: Daily Preparation
8. DAILY PREPARATION Example: Change the auto-off from 2 to 4 hours after last use. • Fill the water container every morning with fresh, cold water. The C5 is turned off, but in stand-by mode. Only the ON symbol This will enhance the taste of your coffee. is visible. -
Page 14: Brewing Tips
In the 1-cup selection - the grinder grinds the minimum amount with the Hot Water Feature. Place the cup with the coffee under the frother and turn the SELECTOR to the Water symbol. Hot of coffee (grinding time approx. 5 seconds). Brewing one cup: water will be added to your coffee. -
Page 15: Using Hot Water
or flavored coffee. The machine is ready to make coffee. The machine is ready to make coffee. The cup is placed under • Place a cup under the steam nozzle. the coffee spouts. • Turn the SELECTOR counterclockwise to the Water •... -
Page 16: Preparing Hot Milk / Hot Chocolate
4.Now immerse the frother into the milk (Fig. 14) and turn the Please note: When you stop steaming the display automatically SELECTOR to the Water symbol. Immediately hot steam will highlights the 1-cup Espresso symbol. You can add coffee be released into the milk. immediately after frothing milk. -
Page 17: Water Care
(hand tight) and the frother is completely pushed up against the One or more sections of the indicator strip will turn reddish. steam nozzle (Fig. 15). The more sections turn reddish the harder your water is. If all CAUTION: If the tip of the frother is blocked by hardened milk four sections turn reddish your tap water is very hard (level 4 deposits it is possible that the frother can be pushed off during below). -
Page 18: Clearyl Blue Water Filter Cartridge
15. CLEARYL BLUE WATER FILTER CARTRIDGE Activating: The machine comes with one Clearyl Blue Water Filter Cartridge. You must activate the cartridge for the machine to monitor it The Clearyl Blue cartridge properly. Otherwise the C5 assumes decalcifying mode. • Reduces the water hardness up to 75%. Your machine is turned off, but in stand-by mode. -
Page 19: Automatic Filter Replacement
15b. AUTOMATIC FILTER REPLACEMENT 15d. DO NOT LET THE CLEARYL BLUE FILTER DRY OUT The filter is monitored automatically. After approx. 60 liters of If the filter is not immersed in water, the granular center will dry water (~2,000 oz.) the MESSAGE light and the CLEARYL light out and block any water from passing through. -
Page 20: Fill Water
16a. FILL WATER 16d. STONES AND BEANS When the MESSAGE LIGHT and the FILL WATER light blink, no Every coffee specialty store will tell you that occasionally small more coffee can be made until you fill the water container. The stones can be found in with coffee beans. -
Page 21: Cleaning With Special Tablet
4 to 5 days. 6. Place a large cup (at least 12 oz.) under the coffee spouts. You can buy decalcifying tablets from your local Jura dealer or 7. Push the CLEANING button (Fig. 3a). The C5 disperses with the enclosed mail order form (see chapter 20). - Page 22 CAUTION: If the decalcifying solution comes in contact with the the internal brew chamber into the used coffee container. skin, rinse it off with water. If the solution comes in contact with The machine stops pumping the solution and the EMPTY your eyes, see a doctor.
-
Page 23: Manual Decalcifying
18a. MANUAL DECALCIFYING follow the instructions in chapter 6. Attention: You can run a decalcifying program at anytime even if Please note: Before transporting the machine, make sure that the machine does not prompt you. the water tank is empty, the filter cartridge is removed (discard The machine is ready to brew coffee. -
Page 24: Tips For Better Coffee
21. TIPS FOR BETTER COFFEE Solution: Place a cup underneath the coffee spout. Turn the Height adjustable coffee-spout DIAL to highlight the RINSE symbol. Push the DIAL to rinse the Adjust the height of the coffee-spout to the size of your cups. coffee spouts. -
Page 25: Warranty
In case the machine cannot be repaired, forth above and no person is authorized to assume for JURA- JURA-CAPRESSO will replace your machine with the same CAPRESSO any other liability in connection with the sale of the model with the same or less usage. -
Page 26: Free Repair Service / Extra Repair Coverage
"consequential damages" refer to the cost of repairing or replacing other property which is damaged when this machine does not work properly. Any loss of income is excluded. The remedies provided under this warranty are exclusive and in lieu of allothers.
Need help?
Do you have a question about the Impressa C5 and is the answer not in the manual?
Questions and answers